Social Sites As Backup?

Its probably safe to say the best thing about social platforms is sharing images. Instagram is built exclusively on pictures and has become as ubiquitous as “Kodaking” was back when the Brownie was invented. Photos on social media are fun and inspiring in so many ways. Yet some of us rely on platforms like Facebook and Instagram for backup and access to our pictures; March 13th’s outage is just one more reminder that social platforms should not be used for back up. When you are choosing an online solution for backup, here are a few questions we think you should ask:
  • Are my images being compressed? How much?
  • Are my private images really private?
  • Who can view, edit or delete them? Can I?
  • Can I easily access them any time I want?
  • Am I able to locate the image I need quickly?
  • Who controls my copyright?
  • Will my images be used for unintended purposes like training artificial intelligence facial recognition without my permission? We’re looking at you Flickr and IBM.
  • Can I answer these questions, or will a deep dive in to Terms Of Service be required?
Enjoy your photo feed on social media. We love it too–especially when we’re friends with you and we follow each other. We don’t think social sites have a role in a sound backup strategy. A good backup is a 3-2-1 system: 3 copies of important files and photos on at least 2 different types of storage and 1 copy off site.

Taking Photos in the Snow and Cold

When you gear up for a winter photo expedition, short or long, the first thing to consider is you. If you’re cold, cold, cold, you won’t be able to focus on the process of capturing a good photo. So dress warmly, and take more clothes than you think you’ll need. Know your vehicle is in good shape, pack enough gear and food that you could survive the night, and bring along your cell phone. Always let someone know where you are.

Winter days are often overcast. Taking a good photo can mean a long wait for the perfect light. Wildlife shots always require an investment of patience. You can’t anticipate what that elk, or wolf, is going to do, when. So you wait, hope, and do what you can to stay warm.

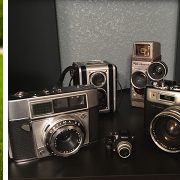
When you have that chance for the shot you want, your equipment needs to be ready to work with you. Have it “tuned up” annually. For analog cameras, have the battery, the shutter, and lenses checked. Be sure your meter is accurate. With digital cameras, bring some extra batteries and be prepared to keep your camera dry.

Professional-grade digital cameras handle inclement weather better than others. If your digital camera doesn’t fit that classification, snow sifting into it can fry the circuitry. To reduce the risk of that damage, seal your camera in a ziplock bag. Whether you are skiing, hiking, or snowshoeing, you can keep batteries warm in your pants pocket. Keep the camera itself in a good-quality external bag to avoid condensation from your body, or an unexpected collision with a tree, from damaging it.

Pack along a tripod and use it to avoid camera movement – this becomes most important if you hope to enlarge any of the pictures you take. Wrap the tripod legs with insulation to keep bare hands from sticking to them. You can buy leg wraps or tape on use pipe insulation from the hardware store.

Sound like a lot of work? The great thing about winter photography is that when you make the effort to be out, you’ll find very few other photographers in your way. You will find glorious expanses of snow unmarked by human activity. And weather creates interesting photo opportunities.

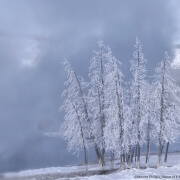
In fact, the snow itself presents interesting opportunities and  challenges. When you really look at snow, you’ll notice its color changes with the light that’s on it. Snow in deep shadows under pine trees is usually blue, at other times of the day, you’ll find snow that’s yellow, pink or red.

When you compose a scene with snow, keep in mind that the eye goes to white or bright areas first. If that’s the foreground of your shot, that’s where a viewer will look. Details will be lost in bright areas, and, a viewer’s eye will be attracted there, possibly missing your intended subject. So be aware of color casts, shadows, and highlights and use them to direct the viewer’s eye to the subject. And if you want to communicate a sense of cold, work with the snow’s blue tones.

Film choices will make working with color simpler so ask questions when you buy your film. For instance, Velvia film gives a warm tone that offsets blues and shadows. If you’re working in digital, exposure latitude is quite limited. (What’s that mean?)

For more on taking photos in the snow, take a look at this book by Livingston’s Tom Murphy, “Silence and Solitude – Yellowstone’s Winter Wilderness.” And don’t forget – if you breathe on your lens and it freezes – it doesn’t matter what kind of effort you put into photo composition, or your gear.

Article by Jenna Caplette, with tips from the staff of F-11 Photo & The Print Refinery™

Video is everywhere.Where's yours?

Video is Everywhere.Where’s Yours?

Video is Everywhere. Where’s Yours?

When a dear friend recently lost her father, she poured her grief into the preparation of the memorial slide show. As the family’s unofficial keeper of memories, she already had access to their photo collections.

Her passion for photography and archiving had equipped her well for the task but she said she was surprised and disappointed to find out that videos of her father were almost impossible to find. She knew he was in old home movies on videotape and likely old movie film as a child. She knew where they were but even if she had the equipment to play them, there was no time to search for the right clips, let alone have them converted into a format she could use in her slideshow.

Knowing that she had precious footage that she wouldn’t be able to share left her feeling an even deeper loss. Unfortunately, this is the part of the story I’m all too familiar with. In our photo stores, many of our video transfer clients come to us to revive memories of a recent family member. It’s not the knowledge that the media is deteriorating or obsolete or cumbersome that brings them in. What calls us to act is the disappointment of not being able to share the immeasurable presence of a loved one during a time of sadness.

This isn’t just a sad story. It’s meant to be a reminder that you might have something very valuable and very inaccessible. You don’t have to rally the family to start the project of converting old movies. One of my favorite customers became a regular by visiting us every few weeks with one videotape or movie reel for transfer. Trickling them in helped her offset the cost and prolong the joy of rediscovery. We’d transfer everything to MP4, just like the videos your phone captures, so she could share them online with her family spread across the globe. If that sounds like another daunting piece of the endeavor that’s holding you back, then stay tuned. In the next post, I’ll explain how this senior citizen mastered video editing and built a digital video library. (hint: it’s youtube and it’s pretty easy).

now is the best time to scan old negatives

Now is the best time to scan old negatives

Now Is The Best Time To Scan Old Negatives

Of the three types of old photo media that many of us have stashed away, negatives are the most often overlooked.  Prints and slides can be viewed relatively easily but because negatives are reversals and they’re so small, it can be hard to determine what’s on them. When you start organizing, they may be first to go in the trash. But you could be discarding good memories of you and your family from decades passed.

Prints are made from negatives so if you have a ton of old pictures, you also have, or had, a ton of old negatives. So why keep the intermediary when we have the finished product? Because where the prints fade and can be damaged, torn or lost during handling, negatives are usually kept in better shape because,

  • If they were originally developed correctly, negatives hold their color better, longer.
  • Photofinishers usually returned negatives to us in clear sleeves which, if they’re made of good quality material, are still protecting them today.
  • With no reason to handle them, negatives are commonly tucked a little deeper into our photo stashes, preserving them further.

Now is a good time to consider scanning any type of old photo media, but especially negatives. Why? Because the equipment that professionals use to scan them at high volume is becoming less mainstream, and more expensive to maintain. There are only two manufacturers still tooling out a handful of high-quality, high-volume film scanners and, as you can guess, they’re expensive to buy and operate. On the contrary, business owners are finding this niche falling further out of demand so it’s harder to justify the cost. Even established labs that already own the equipment have to weigh the costs of maintenance, space, and salaries to keep up legacy film services rather than directing those resources toward newer, more profitable services.

It’s not a doomsday scenario by any means. Store owners work hard to keep costs downs and we hope the recent renaissance in film shooters bolsters the market for processing equipment. But even in resurgence, the market is a fraction of its former self. The cost to scan each frame is likely to go in one direction only; up. If your local photo professional offers negative scanning, take them up on it. I guarantee your results will be positive!

Ideas for Displaying Your Mobile Photos

It’s easier than ever to publish your favorite photos direct from device or social media channel. Instead of choosing a traditional sized photo or paper print –  the real question now is WHAT MATERIAL to print my mobile images on. Wood, metal, fabric, fine art paper, canvas and acrylic are just a few of the options. There are dozens of awesome ways to print and display the mobile photos you love most.

Did you know?

A 1.4MB photo taken on the iPhone 6 can be enlarged into a 16″x20″ print (sometimes larger!) with amazing clarity and sharpness. Most mobile devices have stellar image quality, and because of that, you can do just about anything with the photos you take on your smartphone.

The point is that just about everything can be printed on or turned into an original photographic display. We have all kinds of creative ways to turn your ideas into reality.
Check out some options and let us know if we can help bring your photos to life!
Archive the Art Cave

Archive the Art Cave

Save the school year and your sanity!

Wednesday is the day my grade schoolers come home with a week’s worth of completed assignments. I hate Wednesdays. That’s not true; I love to see their work, talk about what they’ve been up to, and get a glimpse inside their school-brains. But after that I’m left with a stack of guilt. I can weed out the spelling tests and math homework but it’s tough deciding which stories and drawings to keep. The more I save, the less confident I am that I’ll ever really look back on all of them. This conundrum occurs weekly. By the end of the year, I have one large drawer-full and at least one unwieldy stack of each child’s projects. We refer to that section of the office as the Art Cave because they rarely see the light of day after entering. I can’t store these forever but I’m not about to throw them out. So how do I archive the art cave?

I don’t put them in scrapbooks if that’s what you’re thinking. I wouldn’t make it past page two. If you’re on that level, my hat’s off to you. I digitize them and, here’s the important part, store them in an organized, backed-up vault. If that sounds daunting, let me put in other words; I take pics of them with my iPhone. Here’s the process:

  1. Download the Google Photos app. You could rely on iCloud, but it’s not as easy to move and organize them afterward. Google Photos offloads pics from your camera roll into your Google account automatically.
  2. Set up a work table near a window, but not so close that you’re in direct light. Start snapping, making sure your lens is perpendicular to the document. Google’s photo scan app also works well for this but requires four extra clicks per piece to auto straighten and optimize. I ain’t got that kind of time.
  3. Once your batch is “scanned,” select them all and add to a new album. You can be finished here and they’ll always be accessible in Google Photos. I take it one step further. I download the album (select all, press Shft + D and they arrive in a .zip) and save it to my local photo archive, which is a Network Attached Storage device that contains a few redundant hard drives. In the past, I’ve uploaded it right back into my google drive, because I wasn’t sure about the future of Google Photos or confident that I’d be able to find the online albums later. Using my local hard drives instead feel less paranoid.
  4. Strut around the house for a few minutes. You’ve just tackled a major project in hopefully less than 15 minutes. The digitized versions are not only manageable but ready to be printed in a series of photobooks that you’ll proudly display on graduation day.

I still save a few of the actual projects, but after digitizing them, most can go away. Yes, in the garbage. I know it’s difficult. But I need that space to store the children who will be home all day long once school’s out.

Action Photography Tips & Tricks

Article © 2018 by Jenna Caplette, with the expert assistance of Kathy Eyster, a member of the instructional staff at Bozeman’s F-11 Photo & The Print Refinery™.

Here’s the deal with photographing action: if you don’t get it right, you can’t fix it later with Photoshop. Out of focus is out of focus. Use these practical tips to get great action photos even with a point and shoot camera from photo instructor and digital imaging guru Kathy Eyster.

Choose the “sports” mode or a similar setting that uses a fast shutter speed.

Shoot in “continuous” shooting or “burst” mode. You’ll get as many frames as your camera can take for as long as you hold the button down, increasing your odds of getting a great picture. Your flash usually won’t fire in these modes, so this may not stop action in low-light situations.

Photographing the action closest to you will give you the best shots.

Use a technique called “focus lock.” Imagine you’re at a race and you want to photograph your sister crossing the finish line. The finish line isn’t going to move. Set your camera up and frame the shot that you want to get using the finish line as your point of focus. Hold the shutter button halfway down and then shoot just as your sister crosses the line. This allows the camera to pre-focus
on the spot where the action will be giving you a crisp, clear image.

Anticipate the action and start shooting ahead of time.

Try a technique called “panning.” Follow your subject with your camera, keeping the subject in the same spot in the frame. Your subject should be traveling left or right or vice-versa, rather than moving toward you or away from you. When a cross-country skier glides by, focus on the skier and press the shutter in continuous shooting mode. The skier will be sharp and the background blurry, expressing speed.

A large part of action photography is timing, which requires observation and strategy. The more you know about the pattern of activity, the better your images will be. However, it’s difficult to both watch an event and photograph it. If you decide to photograph, prepare to take a lot of pictures. Pack a spare battery and an extra memory card so you don’t run out of power or space on your memory card before the event ends. You’ll take hundreds of pictures and you’ll get a few you like. Toss the bad images, celebrate the good ones. Print. Repeat.

Be sure to visit Eyster’s helpful website for more tips you can use every day: essentialdigitalcamera.com.

Macro Photography

Photography invites you to notice, to look, to see and to focus. When you photograph a flower, you see the fine details and make choices about which aspect of the flower to document. The stamen? The inside of the flower? The edge of a petal? Because your back yard or garden is a place where you have some ability to control and modify the environment, its ideal for practicing macro or extreme close-up photography. Think of it as making portraits of plants, single petals on a sunflower, the curve of bloom, the textures of a zucchini, the work of bees pollinating.

Many point-and-shoot cameras have a “flower” mode that sets the camera up for macro pictures. Designed to get as much in focus as possible, Flower mode helps you hold still for a sharp picture. It also sets an outdoor white balance, so the colors will be accurate for average sunlit conditions.

Macro photography can be done with cameras that have changeable lenses in several different ways. Many zoom lenses include some macro, but can leave you wishing for more. Dedicated macro lenses are for those who live for closeup photography and demand uncompromising quality. If you want to find out about this style of photography before committing to an expense like a new lens, consider adding a close-up filter or extension tube to a lens you already own. Each of these methods provide different benefits, so you may want to try more than one. Filters and tubes are budget friendly enough that you could do both and experiment.

Now, select your image file size. Go big. Choose the largest file size in your camera’s menu and then select the highest quality—generally called “Fine.” This setting provides enough resolution to crop pictures and print enlargements. Memory cards for a digital cameras are larger capacity and cheaper now than ever, so don’t bother to “save space.” You can’t get a crisp print from an undersized file. For resizing and other fine tuning, you can edit your images in a program like Adobe Photoshop. Need help? Stop in and we’ll show you how to make changes to your settings, and check our class schedule for learning opportunities with like minded photographers.

Now that you’re ready to work with your camera, your next task is to consider shooting conditions. With macro photography you’ll quickly discover that the slightest breeze creates movement, blurring your subject. And, good lighting is essential.

The best natural light is often that of bright overcast skies, early morning, or evening. Otherwise, choose a breeze-free time of day and be prepared to modify the light to create the best photographs. Notice where your own shadow falls to prevent accidental shading.

Use bounce or diffused flash to light deep shadows and create sparkling highlights. Or, try light modifiers like reflectors and diffusers to catch and redirect sunlight to fill shadows. This kind of reflected light looks soft and natural. Consider a gold reflector to mimic sunset light and bring out warm colors.

In the harsh midday sun, placing a diffuser or a plain white umbrella above your subject softens and diffuses the light while preserving details in the highlights and shadows. An umbrella also can be useful to block the wind.

Macro photography is best accomplished from the stability of a tripod, whether you have a phone, a point-and-shoot or a camera with changeable lenses. Once you set up your camera, look carefully at the background and foreground of the picture for objects that compete for attention with your chosen subject. Sticks, rocks, grass and leaves that are out of focus and mostly invisible in your viewfinder can become glaringly apparent in a photograph. A single blade of grass or a dead weed can spoil an otherwise perfect picture.

Two essential macro photography skills are patience and intimacy. Patience while you wait for a playful breeze to pass. Patience to find or create the perfect lighting conditions. Patience to checking the details. Intimacy to be willing to see and experience photography in ways you have never done before.

Garage Sale Gold

Garage Sale Gold

It’s that time of year again! I can already smell the must. Yard sales are popping up around the neighborhood. I’m not much of a picker; I have plenty of my own old stuff already. But I can’t pass up a great old camera or photo trinket. I’ve probably made more bad buys than good but since even the non-working ones look good on my shelf, it’s a win-win. Here are some things I’ve picked up along the way that might help you avoid rummage sale remorse.

  1. Know what you’re looking for. Sure, we’d all love to find a priceless Leica and, let’s be honest, sell it for a handsome profit. But looking for a usable charmer or inspiring décor piece is just as much fun. Make sure your budget reflects your purpose. I’ve never been disappointed with a $10 camera, even if it’s a paperweight. But I’ve immediately regretting spending $50 on something that was probably worth it, only to realize that I’m never actually going to carry it around and shoot with it.
  2. Know what works. Stick to cameras that you’re at least somewhat familiar with so that you can test them. Even with no batteries, the film advance should be smooth and the shutter should fire in bulb mode. Better yet, keep some common batteries in your pocket. LR44, PX625 and CR2’s cover a pretty wide swath of old 35mm cameras. If you plan to shoot it, check the foam around the film door. It can deteriorate regardless of camera wear and if it lets light leak in, your shots are shot.
  3. Know the market. Search KEH.com to gauge a top-end selling price. That’s not what you should pay at a yard sale but, if you can confirm it works, it’ll give you an idea what a reputable dealer would charge for it after it’s all cleaned up. They try to buy them for half that value. eBay is a better indicator of private seller values but it can be tough to find accurate examples depending on how rare your find is. Filter for completed and sold items to get some history.
  4. Know your weakness. If you’re a sucker for vintage cameras, then you’re a sucker. I have a soft spot for Yashica Electro 35s even though they’re not great cameras, not yet really vintage, and not particularly unique. But they look like they know what they’re doing and apparently, I like that. You know how they say people look like their dogs? I look like this camera.

And finally, know that you may not find much. In the context of most household sales, camera equipment usually claims coveted prices and even though sellers want to get rid of them, they tend to over-value. Negotiating is key and usually part of the fun. But walking away, especially from a stubborn seller, can be just as satisfying.

How to discover the shutterbug inside a six-year-old

How to discover the shutterbug inside a six-year-old.

How to discover the shutterbug inside a six-year-old. Like most grade school aged children, mine own tablets and can swipe my phone faster than a New York City pickpocket. But they rarely use the devices’ cameras. The most recent photo in either child’s camera roll? A series of 38 selfies with a blurry dog-looking thing from over four months ago. Other parents I’ve surveyed tell me this evidence is typical. We assume they haven’t yet developed an interest in photography. When they do, the device with a camera is ready and waiting.

But if you’ve ever handed an actual camera to a kindergartner, for example, you know there’s more to it. And the older the camera, the better. One with a viewfinder and no screen really gets the gears turning. After they realize what it is (and that there are no games on it), the purpose sinks in. They discover a different tool that invokes a whole different curiosity.

Here’s how I spawned the shutterbug inside a six-year-old boy. I’d keep an old digital camera handy and anytime we left the house, I’d set it in the back seat. He couldn’t not pick it up and within a couple weeks he was taking it out of the house of his own accord. Sure, that was usually when his other device was off limits, but I say any interest counts. Sometimes, he’d take 38 pics of the seatback out of boredom. But often he’d take real pictures. And he got better fast. I’d watch as he would stop, compose, capture, and retake until he found an angle he liked. The results were far more thoughtful than anything he’d shot with an iPad. I didn’t try to explain the menu or functions unless he asked so he discovered most on his own and now frequently uses exposure compensation to improve a shot.

Since then, I’ve let him wrangle my DSLR, complete with a gigantic vertical grip attached. It’s obviously cumbersome but he knows what he’s doing and, more importantly, why he’s doing it. The pictures he takes are important to him and although most are viewed on his device and shared between family, a select few have found fame on his older brother’s blog. I think we’ll venture into printing soon.

I’m not surprised that he’s become a pretty good photographer. I’m surprised that maybe he already was. Sometimes all it takes is the right tool.

Fb/Insta

How to discover the shutterbug inside a six-year-old.

#kidsneedcameras #youngphotog #camerakiddo