Posts

How to Sync Your Text Messages across All Your Apple Devices

Although many of us think of Messages as an iPhone app, Apple’s platform integration lets you read and reply to conversations in Messages on other Apple devices, including the Mac and iPad. All your devices must have the correct settings to make this work reliably. We regularly hear from users who don’t see all their messages on all their devices. If that’s you, check these settings:

  • Same Apple ID: Your devices all know they’re yours when they’re logged in to the same Apple ID. That’s not a problem for most people, but couples who share an Apple ID, for instance, can run into trouble here. To verify this, open Settings > Your Name in iOS and iPadOS, or System Settings > Your Name in macOS. The email address under your picture at the top of each of those screens should match. If it doesn’t, scroll to the bottom, tap or click Sign Out, and sign in again with the correct Apple ID.
  • Two-factor authentication: As with so many Apple services now, your Apple ID must be set up for two-factor authentication, which causes certain logins to be queried a second time on another device. Most people have two-factor authentication set up by now, but if not, turn it on using Apple’s instructions.
  • iCloud Keychain: Your devices must have iCloud Keychain turned on to share your Messages account information. It’s probably already on, but you can enable it if not. Turn it on for an iPhone or iPad in Settings > Your Name > iCloud > Passwords and Keychain > Sync this iPhone. On a Mac, the switch is in System Settings > Your Name > iCloud > Passwords & Keychain > Sync this Mac.
  • Messages in iCloud: This is the key setting—the previous three are just foundational requirements. Enable it for an iPhone or iPad in Settings > Your Name > iCloud > Show All > Messages in iCloud > Use on this iPhone. On the Mac, look in System Settings > Your Name > iCloud > Show More Apps > Messages in iCloud > Use on this Mac.
  • iMessage account: You’ve checked that you’re using the same Apple ID everywhere, but there’s a similar setting that’s also important. On your iPhone or iPad, go to Settings > Messages > Send & Receive and make sure you’re signed into iMessage with the same Apple ID—look at the bottom of the screen. Also, ensure you’re set to send and receive from your phone number and appropriate email addresses. It’s safest to send and receive from all the possibilities and start new messages from your phone number. On the Mac, verify that you have the same settings in Messages > Settings > iCloud.
  • Text Message Forwarding: Turning on Messages in iCloud should keep message history synced across all your devices, including green bubble SMS/MMS text messages. However, it’s worth verifying that SMS/MMS messages are being sent to all your devices. On your iPhone, in Settings > Messages > Text Message Forwarding, select all the devices you want to receive text messages.

Although all the above settings may seem like a lot, most should already be set up correctly. We listed them all because when people have trouble with their messages syncing across all their devices, one or more of these are usually set wrong.

Even with everything configured correctly, there can be hiccups—nothing’s perfect. If messages fail to sync consistently, try these troubleshooting steps:

  • Use the Sync Now button in the Messages in iCloud settings on any device that hasn’t caught up. That likely won’t help instantly, but syncing should eventually catch up.
  • Restart the device—it’s always worth trying. On an iPhone or iPad, choose Settings > General > Shut Down (at the bottom), slide to power off, and then press and hold the side (iPhone) or top (iPad) button to turn the device back on. On a Mac, just choose Restart from the Apple menu.

When Messages in iCloud is working properly, though, you can carry on text message conversations using any of your devices at any time. It’s especially nice to switch to the Mac for easier typing when you’re in an involved conversation.

(Featured image by iStock.com/anyaberkut)


Social Media: One of the best parts of Apple’s tight platform integration is that you can view your text messages on all your devices. Or at least you can if you get everything set correctly.

Apple Announces New MacBook Air Lineup with M3 Chip

In November 2023, Apple unveiled the M3 chip in new versions of the 24-inch iMac and MacBook Pro, causing speculation about when other Mac models would be updated to match. If you’ve been longing for a MacBook Air with an M3 chip, your wait is over. (And we expect Apple to update the Mac mini soon.)

Apple has now announced M3 versions of the 13-inch and 15-inch MacBook Air. For most Mac laptop users who don’t need the additional speed of the M3 Pro or M3 Max chips in the MacBook Pro lineup, these new MacBook Air models combine excellent performance with low prices. The 13-inch MacBook Air starts at $1,099, and the 15-inch model starts at $1,299.

Nothing has changed regarding size, weight, and industrial design, and nearly all the specs remain identical to the previous M2 MacBook Air models. There are three notable differences:

  • The M3 chip: Although the earlier M1 and M2 chips are no slouches, the M3 chip provides even better performance. Benchmarks suggest a 25% to 35% improvement over the M1, and Apple cites real-world examples where the M3 is 35% to 60% faster than the M1. Compared to the M2, the M3 is probably 10% to 20% faster.
  • Support for two external displays: Previously, the MacBook Air could drive only one external display. These new models, however, can drive one external display at up to 6K resolution and another at up to 5K resolution, as long as the lid is closed. (Apple says a software update will enable the same capability for the 14-inch M3 MacBook Pro.)
  • Wi-Fi 6E and Bluetooth 5.3 wireless connectivity: These upgrades aren’t exciting, but they bring the MacBook Air up to par with other recent Apple devices and industry standards. Both provide faster, more robust wireless connectivity, but only when used with other compatible gear.

Should you buy one of these new MacBook Air models? It all depends on what you use now:

  • Intel-based Mac laptop: In terms of performance, the M3 MacBook Air will blow the doors off any Intel-based Mac laptop, and we strongly encourage you to upgrade. The main area where the MacBook Air might disappoint is in the number of ports. It charges via MagSafe 3 and has two Thunderbolt/USB 4 ports, which are sufficient for an external display and a Time Machine backup drive, for instance. If you need more ports, a Thunderbolt hub is probably in your future.
  • M1 or M2 MacBook Air or MacBook Pro: Although the M3 chip is faster than the base-level M1 and M2, our experience is that most people with those Macs aren’t suffering from performance problems. So no, don’t upgrade. If you need more performance, a MacBook Pro with an M3 Pro or M3 Max chip makes more sense.
  • No laptop: For most students getting their first computer or someone who’s adding a laptop to complement a desktop Mac, the M3 MacBook Air models are extremely attractive. We recommend the higher-end MacBook Pro models only for those who anticipate doing processor-intensive audio, video, photo, or development work.

Finally, if you’re pinching pennies, you can still buy the 13-inch M2 MacBook Air starting at $999, and even if you customize it with more memory or storage, you’ll save $100.

You have four decisions to make once you’ve decided to buy a new M3 MacBook Air. We’re happy to consult on your specific situation, but here’s our general advice:

  • Memory: The base amount of memory on the M3 chip is 8 GB (it’s on the chip and can’t be upgraded later), but you can get versions that come with 16 GB or 24 GB. 8 GB is acceptable for casual use, but 16 GB is safer if you want to run a bunch of apps or may have more involved needs in the future. Get 24 GB only if you use memory-intensive apps.
  • Storage: The base level of storage is 256 GB, which isn’t much. We know many people with photo libraries larger than that. You can upgrade to 512 GB, 1 TB, or 2 TB. Note that if you have a lot of old, seldom-needed files, it may be better to order only 512 GB of storage, for instance, and buy an inexpensive external SSD for your archives.
  • Processor: The M3 comes in two versions. Both have 8 CPU cores, but one has only 8 GPU cores, whereas the other has 10 GPU cores. The 8/8 version is available only in the 13-inch MacBook Air and only if you don’t expand memory beyond 8 GB or storage beyond 256 GB. Get the low-end version only if you’re sure you don’t need more memory or storage.
  • Screen size: You must choose a 13.6-inch or 15.3-inch Liquid Retina screen. The 15-inch screen is undeniably larger and displays more content, but the overall Mac is about an inch (2.25–3.5 cm) larger in both dimensions, and it weighs 3.3 pounds (1.51 kg) compared to 2.7 pounds (1.24 kg) for the 13-inch model. This decision is purely personal preference, and we recommend checking out each one in person before buying.

For most Mac laptop users, the M3 MacBook Air models are compelling and well worth a look.

(Featured image by Apple)


Social Media: Apple has announced 13-inch and 15-inch MacBook Air models based on the M3 chip. Along with faster performance, they can drive two external displays when the MacBook Air’s lid is closed. Read our buying advice here:

The Importance of Staying Updated

Does it feel like your Apple devices are always asking you to install operating system updates? You’re not wrong—from September 2022 to January 2024, we saw the following releases in Apple’s previous set of operating systems:

  • macOS 13 Ventura: 20 releases
  • iOS 16: 25 releases
  • iPadOS 16: 20 releases
  • watchOS 9: 15 releases
  • tvOS 16: 12 releases

Apple issued many of those at the same time, but since you might not use all your devices every day, it can seem as though you spend all your time installing updates. As annoying as updating can be, we encourage you to do so soon after you’re notified for three reasons.

Reason One: Fewer Bugs

First, as has always been the case, updates fix bugs. You may not have experienced all the bugs that Apple fixes, but when one blocks something you want to do, the fix comes as a huge relief.

For instance, in a set of releases in January 2024, Apple inadvertently introduced a bug that caused text in many apps, including Mail, Notes, and Safari, to appear to be duplicated and overlap. It was only cosmetic, and switching to another window or resizing the window would make it look right again. But the bug was hugely disconcerting, so Apple fixed it two weeks later in macOS 14.3.1 Sonoma, iOS 17.3.1, iPadOS 17.3.1, and Safari 17.3.1 (which brought the fix to macOS 13 Ventura and macOS 12 Monterey).

Reason Two: Better Security

Second, many of the bugs Apple fixes won’t impact your experience of using your device, but they make it possible for attackers to steal information, install malware, spy on your communications, or even take over your entire device. Nearly all of Apple’s operating system updates contain security fixes to address newly discovered vulnerabilities, and some releases only have security fixes. Apple continues to release security updates for the last two versions of macOS and older versions of iOS and iPadOS as appropriate.

It’s easy to think that you won’t be impacted by security vulnerabilities, but remember that as soon as Apple releases an update outlining what it has fixed, attackers know what vulnerabilities exist in unpatched systems. Apple has to react swiftly to some reported vulnerabilities because blocking them can literally be a matter of life or death when it comes to, for instance, iPhone-using dissidents, activists, or journalists working in opposition to repressive governments that employ spyware against their enemies. (All spyware relies on previously unidentified vulnerabilities.)

However, some security vulnerabilities are more likely to impact regular users. For instance, in macOS 14.2.1, Apple fixed a bug in Screen Sharing. If you were sharing your full screen with someone else and had multiple Spaces, Screen Sharing could show the other person random windows in other Spaces, which could range from embarrassing (adult pictures) to seriously problematic (passwords or financial details).

Reason Three: New Features

Third, on the positive side, many operating system releases introduce welcome new features. When Apple unveils its next set of operating systems at the Worldwide Developer Conference in June, some of the promised features won’t appear with the initial releases. New features that shipped in later releases of macOS 14 Sonoma, iOS 17, iPadOS 17, and watchOS 10 include:

  • watchOS’s double-tap gesture for tapping the default button in many apps
  • AirDrop transfers continuing over the Internet when you move out of AirDrop range
  • Adding NameDrop to share contact info when you bring two devices near each other
  • Additional options to control when the iPhone screen shuts off in StandBy
  • The option to choose a specific album for the Lock Screen’s Photo Shuffle wallpaper
  • HomeKey support for Matter locks
  • Expanded Favorites in the Music app
  • A new automatic Favorite Songs playlist in the Music app
  • The addition of Apple’s Journal app
  • A Translate option for the Action button in the iPhone 15 Pro models
  • 10-day precipitation forecasts in the Weather app
  • Sharing of eligible passes in the Wallet app via NameDrop-like proximity
  • A catch-up arrow in Messages that lets you jump to the first unread message
  • Multiple timers in the Clock app on the Mac
  • Stolen Device Protection for the iPhone
  • Collaborative playlists in Apple Music
  • Support for streaming content to TVs in select hotel rooms using AirPlay

Just Update It

Updates provide both a carrot (user-facing bug fixes and new features) and a stick (security fixes). That’s why we recommend updating soon after Apple pushes out a new release and why devices under management usually receive updates quickly. Even if a security breach is unlikely, the liability of allowing devices to remain unpatched is too high for most organizations. Installing updates is an easy way to reduce worry about things like compromised accounts and ransomware.

There are three types of operating system releases:

  • Minor bug fix and security updates: Install these as soon as convenient, usually within a few days. Examples of these include macOS 14.3 to 14.3.1.
  • Interim feature updates: Because these include bug fixes and security updates alongside the new features, you’ll also want to install these within a few days. An example is iOS 17.2.1 to iOS 17.3.
  • Major version upgrades: Because Apple always releases security updates for the two versions of macOS before the current one, you can wait a month or three before installing a major upgrade, such as from macOS 13 to macOS 14. However, once you’ve verified that your apps and workflow are compatible with the new version, we recommend upgrading because skipping a major version of macOS often results in a more difficult upgrade experience.

In each of these cases, if you’re worried about how an update might impact your workflow, check online forums for discussions of each update and feel free to ask us what we recommend for your particular situation.

(Featured image by iStock.com/Fokusiert)


Social Media: We know it seems like your Apple devices are constantly asking you to install an update. Other than for major upgrades, we recommend updating shortly after updates appear so you can take advantage of bug fixes, security updates, and new features.

Use iOS 17.3’s Stolen Device Protection to Reduce Harm from iPhone Passcode Thefts

Last year, a series of articles by Wall Street Journal reporters Joanna Stern and Nicole Nguyen highlighted a troubling form of crime targeting iPhone users. A thief would discover the victim’s iPhone passcode, swipe the iPhone, and run. With just the passcode, the thief could quickly change the victim’s Apple ID password, lock them out of their iCloud account, and use apps and data on the iPhone to steal money, buy things, and wreak digital havoc.

In essence, Apple allowed the passcode, which could be determined by shoulder surfing, surreptitious filming, or social engineering, to be too powerful, and criminals took advantage of the vulnerability. It’s best to use Face ID or Touch ID, especially in public, but some people continue to rely solely on the passcode.

Apple has now addressed the problem for iPhone users with the new Stolen Device Protection feature in iOS 17.3. It protects critical security and financial actions by requiring biometric authentication—Face ID or Touch ID—when you’re not in a familiar location like home or work. The most critical actions also trigger an hour-long security delay before a second biometric authentication. We recommend everyone who uses Face ID and Touch ID turn on Stolen Device Protection. The feature is not available for the iPad or Mac, but neither is as likely to be used in places like the crowded bars where many iPhones have been snatched.

How Stolen Device Protection Works

The location aspect of Stolen Device Protection is key. When you’re in a “significant location,” a place your iPhone has determined you frequent, you can do everything related to security and financial details just as you have been able to in the past, including using the passcode as an alternative or fallback.

However, when you’re in an unfamiliar location, as you would likely be if you were out in public where someone might steal your iPhone, Stolen Device Protection requires biometric authentication to:

  • Use passwords or passkeys saved in Keychain
  • Use payment methods saved in Safari (autofill)
  • Turn off Lost Mode
  • Erase all content and settings
  • Apply for a new Apple Card
  • View an Apple Card virtual card number
  • Take certain Apple Cash and Savings actions in Wallet (for example, Apple Cash or Savings transfers)
  • Use your iPhone to set up a new device (for example, Quick Start)

Some actions have even more serious consequences, so for them, Stolen Device Protection requires biometric authentication, an hour security delay—shown with a countdown timer—and then a second biometric authentication. The delay reduces the chances of an attacker forcing you to authenticate with the threat of violence. You’ll need to go through the double authentication plus delay when you want to:

  • Change your Apple ID password (Apple notes this may prevent the location of your devices from appearing on iCloud.com for a while)
  • Sign out of your Apple ID
  • Update Apple ID account security settings (such as adding or removing a trusted device, Recovery Key, or Recovery Contact)
  • Add or remove Face ID or Touch ID
  • Change your iPhone passcode
  • Reset All Settings
  • Turn off Find My
  • Turn off Stolen Device Protection

There are a few caveats to keep in mind:

  • The iPhone passcode still works for purchases made with Apple Pay, so a thief could steal your passcode and iPhone and buy things.
  • Although Apple says it’s required, you can turn off Significant Locations to require the extra biometric authentication and security delay everywhere. That would eliminate the worry about a thief using Significant Locations to go to your most recent familiar spot in an attempt to sidestep the extra authentication.
  • If you plan to sell, give away, or trade in your iPhone, make sure to turn off Stolen Device Protection first. Once it’s out of your physical control, no one else will be able to reset it.

Turn On Stolen Device Protection

Before you get started, note that Apple says you must be using two-factor authentication for your Apple ID (everyone should be anyway), have a passcode set up for your iPhone (ditto), turn on Face ID or Touch ID, enable Find My, and turn on Significant Locations (Settings > Privacy & Security > Location Services > System Services > Significant Locations), although this last one doesn’t actually seem to be required.

Then, go to Settings > Face ID/Touch ID & Passcode, enter your passcode, and tap Turn On Protection. (If it’s enabled, tap Turn Off Protection to remove its additional safeguards.)

Once Stolen Device Protection is on and you’re in an unfamiliar location, the actions listed above will require either biometric authentication or two biometric authentications separated by the hour-long security delay.

There is one group of people who should not turn on Stolen Device Protection: those for whom Face ID or Touch ID don’t work. Most people have no trouble with Apple’s biometric technologies, but some people have worn off their fingerprints or have other physical features that confuse Touch ID or, less commonly, Face ID.

If that’s you, stick with our general recommendation for discouraging possible iPhone thefts: Never enter your iPhone passcode in public where it could be observed.

(Featured image by iStock.com/AntonioGuillem)


Social Media: In iOS 17.3, Apple has introduced Stolen Device Protection to discourage iPhone thefts enabled by a revealed passcode. It requires additional biometric authentication, and we recommend that everyone who uses Face ID or Touch ID enable it.

Concerned by the Privacy or Results of Google Search? Try These Other Search Engines

Google is big. Google Search generated $225 billion in revenue in 2022, thanks in part to being the default search engine on all Apple devices. To retain that position—and continue to reap the ad revenue that it generates—Google pays Apple about $18 billion every year. Along with Apple, Google pays billions to phone manufacturers like Samsung, LG, and Motorola; major wireless carriers such as AT&T, T-Mobile, and Verizon; and browser developers like Mozilla and Opera.

So is Google Search’s 90% market share because it’s the best search engine or because Google has enough money to pay distributors for top placement?

Along with concerns about whether Google is the best search engine, some people worry about Google collecting information about them to show targeted ads alongside search results. The more information Google has on users, the argument goes, the better that ads can be targeted, and the more likely it is that users will click the ads, which generates money for Google from advertisers. Others worry that Google’s results may reflect certain types of bias.

If you’re perturbed by the privacy implications of Google knowing everything you search for, or if you’ve found Google’s search results less helpful than you’d like, you can easily switch to another search engine to see if you prefer its results and privacy stance.

How to Switch Search Engines

For many Apple users, the main place to choose a preferred search engine is in Safari’s settings. On the Mac, choose Safari > Settings > Search and choose the desired search engine from the Search Engine pop-up menu. You can choose a different one for Private Browsing windows if you want.

In Chrome-based browsers like Google Chrome, Arc, Brave, Microsoft Edge, and Opera on the Mac, open the settings and look for Search Engine. A pop-up menu lets you choose from some standard options, and additional choices let you add search engines like Brave Search that are too new (or not paying) to appear. Firefox offers similar options when you choose Firefox > Settings > Search.

On the iPhone and iPad, go to Settings > Safari >  Search Engine. Again, if you want a different search engine in Private Browsing tabs, turn off Also Use in Private Browsing and choose another option.

Top Alternative Search Engines

Conceptually, what search engines do is simple—they search a set of Web pages for matching keywords and return a list of them in order of relevance to the user. The hard part is dealing with the number of pages—estimates suggest Google indexes 50 billion pages and Bing 4.5 billion—and scaling the service to respond instantly to tens or hundreds of millions of queries per day. (Google processes 8.5 billion searches per day; Bing handles 400 million.) Beyond Google, here are the main search engines and what sets them apart. (You will also likely see Yandex, sometimes called “the Google of Russia.” Avoid it. For so many reasons.)

  • Bing: The second-most popular (though far, far behind Google) search engine in the world, Microsoft’s Bing sets itself apart with a busy, highly designed search results page that mixes a variety of results. It may work well for you, or you may find it overwhelming and difficult to parse. Microsoft is also putting a lot of effort into chat-based AI-powered results. Bing claims to offer more user privacy than Google, but it’s still tracking users to target ads better. If Bing has better privacy than Google, it may mostly be due to not being part of the larger Google data-collection empire.
  • Yahoo: Though it was the first Web search engine, Yahoo hasn’t run its own index since 2009. Today, Yahoo’s search results are powered by Microsoft Bing, so while the look of the search results page may differ, the results should be identical to Bing’s. Yahoo’s privacy stance is also similar to Bing’s.
  • DuckDuckGo: If privacy is paramount, DuckDuckGo is worth a look because it does not track or store user information at all. Instead, it chooses ads to display only by matching with search keywords. Although it uses Bing for some of its results, DuckDuckGo also incorporates information from numerous other sources, so it won’t seem like an exact clone of Bing.
  • Ecosia: The main reason to use the Berlin-based Ecosia is if you like Bing’s results (but not its layout) and want to support a “social business” that claims to be carbon-negative, offers full financial transparency, and protects users’ privacy. Founded in 2009, Ecosia today relies entirely on Bing’s search results and ads (clicks on which are how Ecosia earns money), and it claims to have planted over 188 million trees in 35 countries since its inception. It’s hard to argue with Ecosia’s environmental results, but as a search engine, it doesn’t feel special.
  • Brave Search: A truly independent search engine, Brave Search relies on its own created-from-scratch index (it leaned on Google and Bing for some results early on, but ceased in August 2023). It also emphasizes user privacy and doesn’t track users, searches, or clicks. Although Brave Search displays keyword-based ads by default, users can pay $3 per month for Brave Search Premium, which provides ad-free results pages. You’ll have to set Brave as the default search engine for most browsers manually; for Safari, all you can do is make a favorite to search.brave.com.
  • Kagi: Speaking of paid search engines, if you really want to avoid ads, Kagi is another independent search engine that rolls its own index and provides access only to subscribers, eschewing ads entirely. You can sign up for a 100-search test account, and if you like it, pay $5 per month for 300 searches or $10 per month for unlimited searches. As with Brave Search, you must manually set Kagi as the default search engine (there’s an extension for Safari).

The “best” search engine is the one that gives you the answers you want without triggering privacy worries or concerns about bias. If you want to see if something other than Google will work better for you, set it as your default search engine and try it for a few weeks.

(Featured image by iStock.com/Prykhodov)


Social Media: Have you become disillusioned by Google due to its search quality or how it tracks your activity to serve targeted ads? You can try other search engines that promise to protect your privacy and provide independent search results.

Feel Free to Upgrade to macOS 14 Sonoma When You’re Ready

Although we’re cautious about recommending that people upgrade to the latest major release of macOS, we think Apple has done a good enough job with macOS 14 Sonoma that anyone who wants to upgrade can do so now. That doesn’t mean you have to upgrade immediately, but there’s no major reason most people need to delay.

Our confidence comes from our positive experience working with those who have upgraded to Sonoma and the fact that Sonoma has received only three updates so far.  None included significant bug fixes:

  • macOS 14.1 fixed two bugs that could reset the System Services settings within Location Services and prevent encrypted external drives from mounting.
  • macOS 14.1.1 came with generic release notes, but the community discovered that it fixed a bug introduced in 14.1 that affected Photoshop and another that could prevent a new M3 24-inch iMac that shipped with macOS 13 Ventura from upgrading to Sonoma.
  • macOS 14.1.2 focused on fixing two WebKit-related security vulnerabilities that were exploited in iOS.

Apple will likely release another update before the end of the year, probably macOS 14.2, with some promised features, a few more bug fixes, and the usual handful of security improvements. After that, the company will continue with an update every month or so to address newly discovered bugs and security vulnerabilities.

That said, you can put off the Sonoma upgrade as long as you’re running macOS 12 Monterey or macOS 13 Ventura and are staying current with Apple’s security updates. Earlier macOS versions no longer receive security fixes, rendering them more vulnerable to attack. Possible reasons to continue delaying include:

  • You’re too busy. The upgrade process will take a few hours, plus some additional time to configure everything properly afterward. When you are ready to upgrade, aim for when a little downtime will be convenient.
  • You rely on incompatible software. The jump from Monterey or Ventura to Sonoma isn’t a big one, so most modern apps should have been updated by now. But if you’re still running macOS 10.14 Mojave or earlier with 32-bit apps, you’ll lose access to them if you upgrade. There’s nothing new here—32-bit apps stopped working in macOS 10.15 Catalina in 2019. Rather than delaying, consider running Mojave and your 32-bit apps in a virtual machine using VMware Fusion or Parallels Desktop.
  • You need consistent versions for workflow reasons. We’re unaware of any examples here, but it’s conceivable that a coworker could be stuck on an older version of macOS and older versions of shared productivity apps. If your upgrade would force you to update those apps and introduce compatibility issues when collaborating with that coworker, you may have to wait until your coworker can upgrade as well.

Sonoma won’t transform your experience of using a Mac, but it has new features you might appreciate. The most noticeable is probably desktop widgets that provide updated information at a glance—you can even add widgets from your iPhone. Sonoma also lets you turn websites in Safari into standalone apps, enjoy aerial screensavers from the Apple TV, create a video overlay of yourself on video calls when sharing your screen, autofill PDF forms, and use the keyboard while dictating.

Before You Upgrade

Once you’ve decided to upgrade to Sonoma, you have three main tasks:

  • Update apps: Make sure all your apps are as up-to-date as possible. If you regularly put off updates, now’s the time to let them complete so you have Sonoma-compatible versions.
  • Clear space: Sonoma may need as much as 25 GB of free space to upgrade, and the Sonoma installer itself is about 12 GB, so we recommend making sure you have at least 37 GB free. Don’t cut this close—you should always have at least 10–20% free space for virtual memory, cache files, and breathing room. Check in Ventura by choosing System Settings > General > Storage; in earlier versions of macOS, choose About This Mac from the Apple menu and click Storage. System Settings provides quick ways to free up space. Another easy one for iCloud Drive users is to Control-click large folders and choose Remove Download to “evict” the local versions of those files temporarily; Box, Dropbox, and Google Drive have similar features.
  • Make a backup: Never, ever install an update to macOS without ensuring you have at least one current backup first. In an ideal world, you’d have an updated Time Machine backup, a duplicate, and an Internet backup. That way, if something goes wrong, you can quickly revert.

Upgrading

After completing those tasks, ensure you won’t need your Mac for a few hours. There’s no telling exactly how long the upgrade will take, so never start an upgrade if you need the Mac soon.

Initiating the upgrade is just a matter of opening System Settings > General > Software Update in Ventura (System Preferences > Software Update in previous versions of macOS), clicking the Upgrade Now button, and following the instructions. If you’d like more handholding, check out Joe Kissell’s ebook Take Control of Sonoma.

After You Upgrade

Part of the reason to set aside plenty of time for your Sonoma upgrade is that there are usually cleanup tasks afterward. We can’t predict precisely what you’ll run into, depending on what version of macOS you’re running now and what apps you use, but here are a few situations we’ve noticed in the past:

  • macOS may need to update its authentication situation by asking for your Apple ID password, your Mac’s password, and if you have another Mac, its password as well. Don’t worry that your Mac has been compromised by malware—it’s fine.
  • Some apps may have to ask for various permissions even though you previously granted them. Again, that’s fine and won’t happen again.
  • If you use your Apple Watch to unlock your Mac and apps (and you should, it’s great!), you may need to re-enable that in System Settings > Touch ID & Password (or Login Password on a non-Touch ID-enabled Mac (previously, it was in System Preferences > Security & Privacy > General).
  • If you use Gmail, Google Calendar, or other Google services, you may need to log in to your Google account again.
  • Websites that usually remember your login state may require that you log in again. If you’re using a password manager like 1Password, that’s easy.
  • You may have to re-enable text message forwarding to your Mac. You do this on your iPhone in Settings > Messages > Text Message Forwarding.

With all that housekeeping done, it’s time to check out all the new features in Sonoma!

(Featured image by Apple)


Social Media: When should you upgrade to macOS 14 Sonoma? There’s no need to install it today, but we think it’s now safe for those who want to take advantage of the new features and integration with Apple’s other operating systems.

Use iOS 17’s Check In Feature to Reduce Worry

We’ve all had a friend or family member say, “Text me when you get home,” because they want the peace of mind from knowing you arrived safely. But what if something goes wrong—or you forget—so they never receive that text? They’ll be worried and won’t know where you are, if you’re OK, and so on.

In iOS 17, Apple has introduced the Check In feature to provide peace of mind—or in the worst case, to help emergency services. It’s conceptually simple. Before you leave to go somewhere, you create a Check In with someone—call them a safety partner—in Messages. You specify where you’re going and whether you’re driving, taking transit, or walking. Then, when you arrive, the Check In automatically ends, alerting your safety partner that you arrived. If you’re delayed en route, Check In takes that into account and extends the expected arrival time appropriately. If you fail to arrive, Check In shares your location and route with your safety partner. Also, if you make an Emergency SOS call or your iPhone or Apple Watch calls emergency services automatically during the Check In, it notifies your safety partner.

Not all situations revolve around following a specific route to a location, so Check In also supports timers. Perhaps a college student is going for an hour-long trail run and wants a friend to check on her if she’s not back as expected. She can use Check In to set a timer for 1 hour, share it with her friend, and when the timer ends, either tap the End button if she’s back or add more time if the run is going fine but taking longer than expected.

Although Check In may seem targeted at friends and family, it could have business uses as well. For instance, a destination Check In might work well for keeping tabs on a colleague traveling to a make-or-break pitch presentation.

Before you start using Check In with someone—in either direction—explain Check In to them and discuss an appropriate response if you or they fail to end Check In successfully. Responses should probably start with a quick text, followed by a phone call. If initial efforts to reach out are met with silence, contacting other people—friends, family members, neighbors, etc.—may be appropriate. At some point, depending on various factors, it will be time to call law enforcement. Of course, if the other person triggers an Emergency SOS during the Check In, call law enforcement immediately. At least in the US, if the person isn’t in your area, don’t call 911. Instead, find the law enforcement website for where the person is and call that organization’s 10-digit number. And here’s hoping it never comes to that!

Create a Check In

To get started with Check In, follow these steps:

  1. In Messages, open a conversation with the person you want to be your safety partner (Check In doesn’t currently work with group conversations).
  2. Tap the ⊕ button to the left of the message field, tap More at the bottom, and tap Check In.
  3. The first time you invoke Check In, Messages walks you through a series of explanatory screens, one of which is important—the privacy level of the data shared with your safety partner if you don’t arrive. Select Full—we can see almost no reason why you wouldn’t want that person to be able to share your exact location and route with emergency services if something has gone wrong. (If necessary, tweak this setting later in Settings > Messages > Data.)
  4. On subsequent uses of Check In, an unsent card appears in the Messages conversation, usually set for an hour in the future. The card isn’t sent automatically so you can customize it before sending it.
  5. Tap the Edit button to adjust the timer or destination.
  6. To change the timer duration, use the time picker and tap Done. Skip to the last step in this list.
  7. To set a destination instead of a timer, tap “When I arrive” at the top of the screen.
  8. Tap the Change button, and in the map, either search for a location or find one manually by pinching and zooming—touch and hold the map to drop a destination pin. At the bottom of the screen, select Small, Medium, or Large to set the size of the area in which you’ll arrive.
  9. Tap Done to close the map and then select Driving, Transit, or Walking so Check In can estimate your arrival time based on your method of transportation.
  10. If you want additional buffer time, tap Add Time and give yourself 15, 30, or 60 minutes beyond when Check In thinks you’ll arrive. This shouldn’t usually be necessary.
  11. Tap Done.
  12. Once you’re back to the Check In card in the Messages conversation, tap the Send button to start the Check In.

Note that safety partners can’t reject Check In cards.

End a Check In

Once you trigger a Check In, it can end in a few ways. First, you can cancel it before the timer completes or you arrive at your destination. Second, it can end successfully when you tap End when the timer finishes or when you arrive at your specified location. Third and finally, there’s the core purpose of the Check In, which is to alert your safety partner if you fail to respond to a timer or arrive where and when you said you would.

  • Cancel: To cancel a Check In, tap the Details button on the Check In card in Messages, tap Cancel Check In, and agree that you don’t want your safety partner notified. Timer and destination Check Ins look slightly different but act the same way. Your safety partner will only see that the Check In card in Messages says it has ended.
  • End successfully: For a timer Check In to end successfully, you must respond when the iPhone prompts you (below left). All your safety partner sees when that happens is a note in the Check In card that the timer ended (below right). You don’t need to interact with your iPhone for a destination Check In to end successfully—just arrive at the specified location. The safety partner’s Check In card updates to say that you arrived.
  • Check In fails to end (initiator): If you don’t arrive at your destination or fail to tap End when prompted, Check In gives you the option of adding time (below left) but after 15 minutes, tells you that it has alerted your safety partner (below center and right).
  • Check In fails to end (safety partner): More interesting is what your safety partner sees if you fail to complete a Check In. They’ll be alerted and can tap Details to see your location, when your devices were last unlocked, and more. They then have to figure out the best way to respond given your setup conversation.

It can take some practice to become fluid with Check In, so it’s worth testing it in everyday situations before using it when it might really matter. Once you use it a few times, you may notice Siri Suggestions offering to start it for you, making it even easier to initiate regularly. We hope you find that it provides some peace of mind and, in the worst-case scenario, helps someone in need of emergency services.

(Featured image by iStock.com/PeopleImages)


Social Media: The new Check In feature of iOS 17 can provide peace of mind by letting you specify a safety partner who will automatically be notified if you fail to arrive at your destination or complete a timer.

Is Your Mac Running Low on Disk Space? Here’s How to Delete Unnecessary Files

Between apps, photos, videos, music, and downloads, it’s easy to fill up your Mac’s drive, particularly one with just 128 or 256 GB of drive space. macOS warns you when you get too low on space, but those warnings may come late—for optimum Mac performance, we recommend you keep at least 10–20% of your drive free for new downloads and virtual memory swap files. There are excellent utilities that help you find and delete unnecessary files, such as the free GrandPerspective, the $9.99 DaisyDisk, and the $14.99 WhatSize, but Apple’s built-in storage management capabilities will likely be all you need.

Apple first introduced its Storage Management tool in the System Information app in macOS 10.12 Sierra, making it accessible from the About This Mac dialog. Starting in macOS 13 Ventura, Apple moved those capabilities to System Settings > General > Storage, providing a quick overview of your drive usage at the top. Hover over each colored bar to see how much space is taken up by a particular type of data. The light gray space at the end of the bar is what’s still available.

Below the graph, macOS may offer some recommendations for reducing storage over time, but they come with tradeoffs. Storing files in iCloud and optimizing Apple TV videos will replace local files with stubs pointing at a version stored in the cloud. That’s OK, but you then have to download the original before you can use it. Deleting files automatically after they’ve been in the Trash for more than 30 days is also fine but could have undesirable results if you ever want to recover older files from the Trash. Enable these if you wish, but the real work happens farther down on the screen, where you find all the categories of files you can explore. Depending on what apps you use, they will vary a bit between Macs, but they correspond to the colored bars you saw in the storage graph. Double-click each one to see what it displays.

For a few app-specific categories, like Mail and Podcasts, you merely learn how much space the app’s data occupies—to save space, you must delete unnecessary data from within the app itself. iCloud Drive and Photos are similar but also let you enable space optimization, which stores only placeholder files or smaller optimized photos on the Mac, leaving the originals in iCloud for later downloading whenever you access them.

More interesting are the Applications, Documents, and iOS Files categories, each of which may reveal gigabytes of unnecessary data. iOS Files, for instance, shows any device backups and software updates stored on your Mac’s drive. It’s worth keeping the latest backup of devices you still use, but delete any older backups and updates that are just wasting space—well over 8 GB in the screenshot below.

The Applications category lists your apps and is sorted by size by default. But try clicking the column header for Kind and scrolling down. You can probably delete most apps tagged as Unsupported, Duplicates, or Older Versions. Similarly, click the Last Accessed column header to see which apps you haven’t launched in years. Many of them can probably go, too.

In Documents, you’ll see four buttons: Large Files, Downloads, Unsupported Apps, and File Browser.

  • Large Files shows huge files regardless of where on your drive they’re located.
  • Downloads shows you the contents of your Downloads folder, much of which you likely don’t need.
  • Unsupported Apps lists any PowerPC or 32-bit apps that won’t run on your Mac. You can delete them.
  • File Browser provides a column view sorted by file size and shows sizes next to each item. It’s great for trawling through your drive to see what’s consuming all that space.

In any of these views, click Delete or Move to Trash to remove the file or Show In Finder to see it in its native habitat, which may help you decide if you should keep or delete the file. To delete multiple files at once, Command-click or Shift-click to select them and then click Delete to remove them all at once.

You may find it worth using GrandPerspective to get a visual overview of how space is used on your drive. After scanning, which can take a long time, it uses tiny colored blocks to represent files, collecting multiple blocks into bigger rectangles to show folder size. Toolbar buttons let you open, preview with Quick Look, reveal location, or delete whatever file block you click. Look in the status bar at the bottom of the window to see the path to the file.

In the screenshot below, the big boxes of color are massive virtual machine disk images, and the selected folder outlined in white at the right contains desktop pictures downloaded by an app that rotates them regularly—gigabytes of old files that can easily be deleted.

If your Mac’s drive has less than 10% free space, consider using Apple’s storage management capabilities—perhaps supplemented with GrandPerspective or another utility—to find and delete files that are wasting space.

Two final notes: Don’t get too wrapped up in the exact numbers in the storage graph matching what the Finder reports, and give the Mac some time to update its free space amounts after deleting files directly or emptying the Trash.

(Featured image based on an original by iStock.com/Bet_Noire)


Social Media: Is your Mac low on drive space? Learn how to use Apple’s built-in storage management capabilities—perhaps supplemented with a third-party utility—to find and delete gigabytes of unnecessary files.

Apple Announces iPhone 15 Lineup, Apple Watch Series 9, and Apple Watch Ultra 2

September is here, and with it, Apple’s latest iPhones and Apple Watches. At its Wonderlust event on September 12, Apple threw back the curtains on the new iPhone 15 lineup, Apple Watch Series 9, and Apple Watch Ultra 2. These devices all provide incremental improvements that make them attractive to people planning to purchase a new iPhone or Apple Watch, though they may not be irresistible upgrades for those still happy with older models. You can pre-order any of them starting September 15, with delivery and in-store availability on September 22.

Alongside the announcement, Apple revealed that iOS 17, iPadOS 17, watchOS 10, tvOS 17, and HomePod Software 17 will become available on September 18, with macOS 14 Sonoma arriving on September 26. Wait a week or two before installing this first batch of updates on essential devices to avoid any last-minute bugs, and hold off on Sonoma for a few months or until you’re confident your necessary Mac apps are compatible. Regardless of when you upgrade, make a backup right before in case an unexpected problem forces you to erase and restore.

Let’s look at each of the new products.

iPhone 15 Lineup

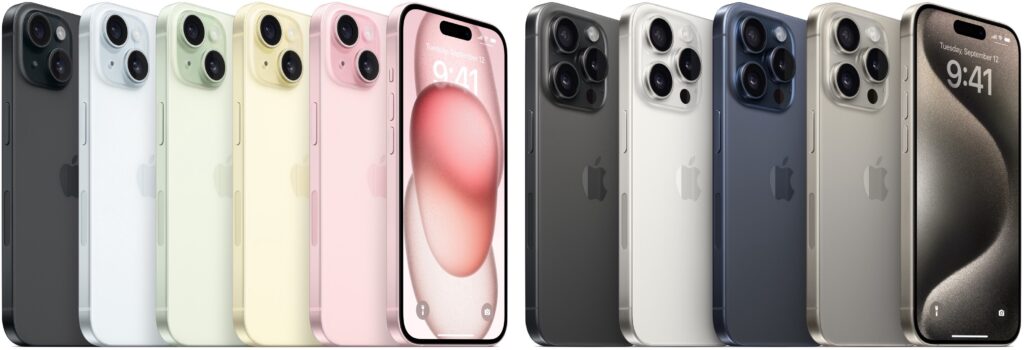
Last year, Apple moved to a four-part iPhone lineup that continues this year, with the 6.1-inch iPhone 15 and the 6.7-inch iPhone 15 Plus. On the high end, we get the iPhone 15 Pro and iPhone 15 Pro Max, again in those 6.1-inch and 6.7-inch sizes. The company updated the industrial design with slightly contoured corners. The iPhone 15 models come in five pastel colors with an aluminum enclosure and color-infused back glass, whereas the iPhone 15 Pro models now boast a titanium enclosure in four colors.

Along with the updated industrial design, all the iPhone 15 models share three notable changes:

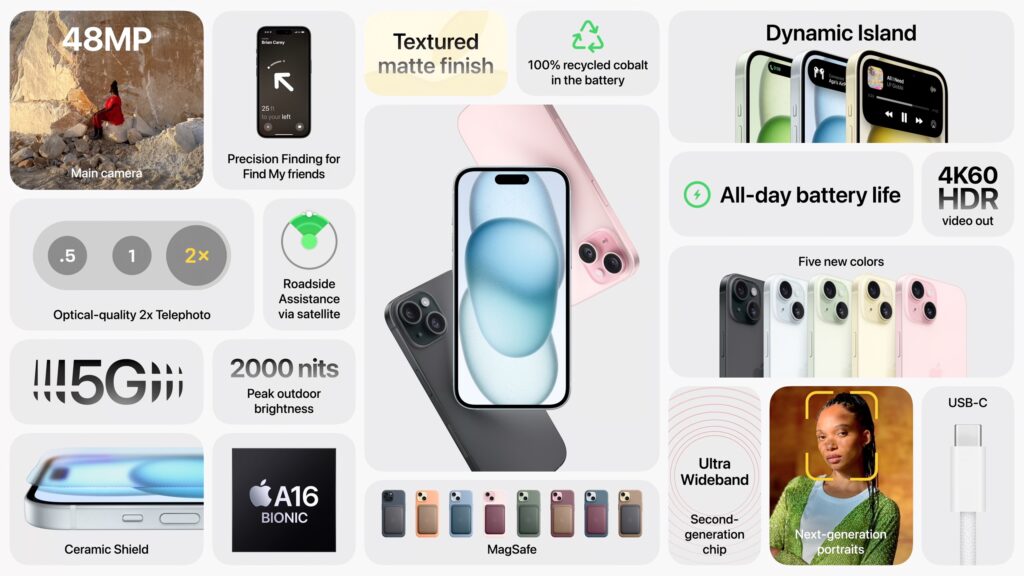
  • USB-C for charging and data transfer: Driven by new European Union regulations, the iPhone 15 models all trade their Lightning port for a USB-C jack. Although it will be annoying to keep both Lightning and USB-C cables around until all Lightning devices have aged out, many Apple users already have USB-C cables and chargers for iPads and MacBooks.
  • Roadside Assistance via satellite: This extension of Emergency SOS via satellite allows anyone experiencing vehicle difficulties in a cellular dead zone to get help using satellite messaging. Apple includes access to satellite services for 2 years, and AAA membership in the US includes the roadside service. Those who aren’t AAA members will be able to purchase service separately.
  • Better Precision Finding: The iPhone 15 and new Apple Watch models all have a second-generation Ultra Wideband chip that lets users employ Precision Finding in the Find My app to locate each other accurately at a much greater range. Apple suggests you can use it to find iPhone 15-equipped friends in a crowd.

Although the iPhone 15 and iPhone 15 Plus aren’t as technologically capable as their Pro siblings, they’re more interesting than the iPhone 14 models they supplant. They receive increased performance thanks to the A16 Bionic chip from the iPhone 14 Pro, and the chip also enables computational photography improvements on top of a new 48-megapixel camera. Also inherited from the iPhone 14 Pro is the Dynamic Island, which displays alerts and Live Activities in the area surrounding the camera and sensor package at the top of the screen, eliminating the need for a notch.

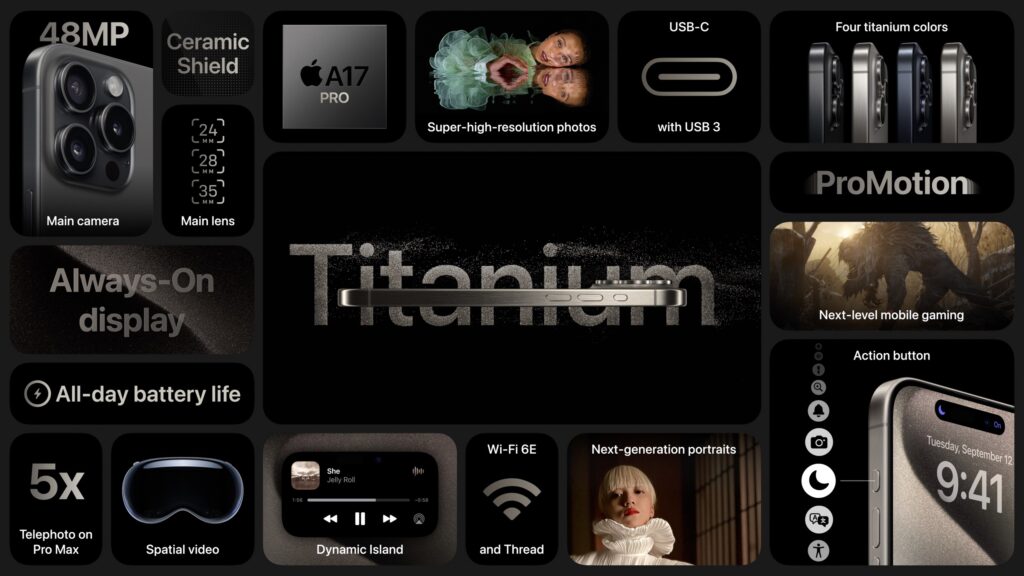
Even though there’s more new on the Pro end, the iPhone 15 Pro and iPhone 15 Pro Max don’t make as significant a jump from their iPhone 14 Pro predecessors. The change everyone will notice is the new Action button that replaces the Ring/Silent switch. You can press and hold it to put an iPhone 15 Pro into silent mode or redefine it to activate Voice Memos, set Focus modes, access the camera or flashlight, enable Accessibility options, or launch a Shortcut. 

The 48-megapixel main camera gains additional computational photography capability thanks to the new A17 Pro chip underpinning the iPhone 15 Pro models, but the most noteworthy enhancement is restricted to the iPhone 15 Pro Max. A tetraprism design enables its Telephoto camera to achieve a 5x optical zoom, an unprecedented capability available only for photographers who don’t mind the 6.7-inch form factor.

Several other improvements are technically impressive but likely of interest and utility only to media professionals. The iPhone 15 Pro’s USB-C port supports USB 3 transfer speeds up to 10 gigabits per second (the iPhone 15 is limited to USB 2.0’s pokey 480 megabits per second), and support for Wi-Fi 6e will enable faster wireless transfers. Both will be welcome to those transferring large image, audio, or video files.

Pricing remains basically the same, with the iPhone 15 and iPhone 15 Plus starting at $799 and $899 for 128 GB of storage, with 256 GB and 512 GB options. The iPhone 15 Pro costs $999 for 128 GB, with 256 GB, 512 GB, and 1 TB storage options. The iPhone 15 Pro Max is $1199 for 256 GB, with 512 GB and 1 TB storage options. If those prices are too steep for your budget, the iPhone SE ($429), iPhone 13 ($599), and iPhone 14 ($699) all remain for sale.

It might be worth upgrading from an iPhone 14 to an iPhone 15 for the 48-megapixel camera and Dynamic Island, but it’s harder to recommend an upgrade from an iPhone 14 Pro unless you find the 5x Telephoto camera indispensable. Otherwise, the older your current iPhone, the more you’ll be impressed by the new models.

Apple Watch Series 9 and Apple Watch Ultra 2

Last year brought the release of the beefy Apple Watch Ultra, so it wasn’t surprising that Apple gave us the Apple Watch Ultra 2 this year alongside the Apple Watch Series 9. They have no industrial design changes, and their improvements are driven by the increased performance and efficiency of Apple’s new S9 SiP (a package containing multiple chips).

Most notable among the changes is a new double tap gesture, which relies on the S9’s faster Neural Engine to detect when your index finger and thumb perform a double tap. watchOS 10 interprets the gesture as activating the primary button in an app, so it can be used to answer or end a phone call, stop a timer, play and pause music, snooze an alarm, take a photo, or open and scroll through the new watchOS 10 Smart Stack from the watch face. It will be available next month. 

Other S9-driven improvements include:

  • Brighter displays: The Apple Watch Series 9 can now display up to 2000 nits, and the Apple Watch Ultra 2 can go up to 3000 nits, making them more readable in bright sunlight.
  • On-device Siri: Siri requests that don’t require information from the Internet can now be processed on the Apple Watch locally, making Siri more helpful for starting workouts or setting timers when there’s no cellular or Wi-Fi connectivity.
  • More capable and accurate Siri: You can now use Siri to access Health data such as sleep hours, Activity ring progress, and more. Plus, you can use Siri to log health data such as weight, period, or medications taken. These capabilities will be available later this year. Apple also claims 25% more accurate dictation.
  • Precision Finding and HomePod integration: The second-generation Ultra Wideband chip in the S9 enables the Precision Finding feature that can direct you to a lost iPhone 15 rather than just playing a sound. Also, when you get close to a HomePod, the Apple Watch provides media controls or offers media suggestions in the Smart Stack.

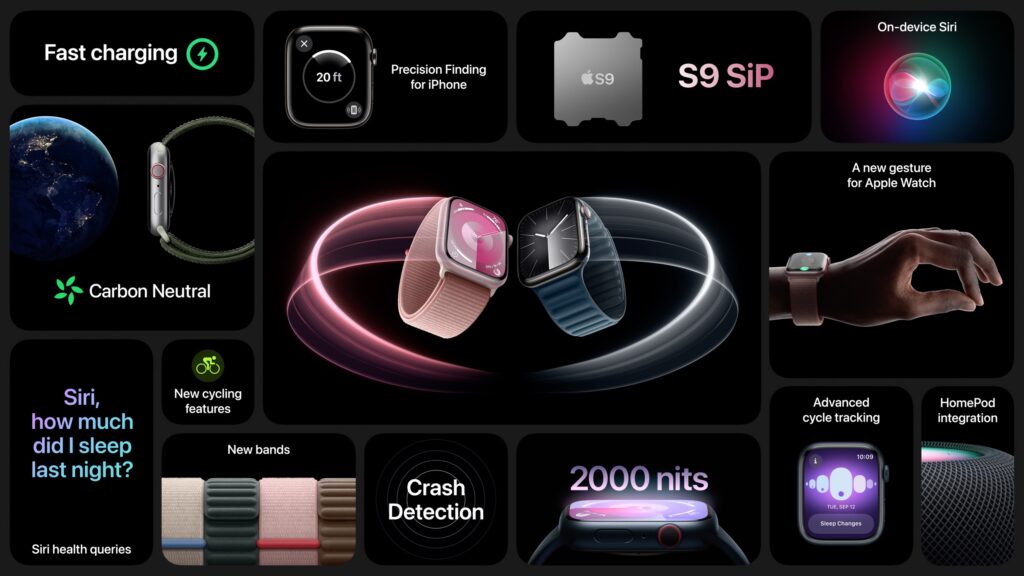
Finally, both the original Apple Watch Ultra and the new model gain a new Modular Ultra watch face that uses the outermost edge of the large display to present real-time data like seconds, altitude, or depth.

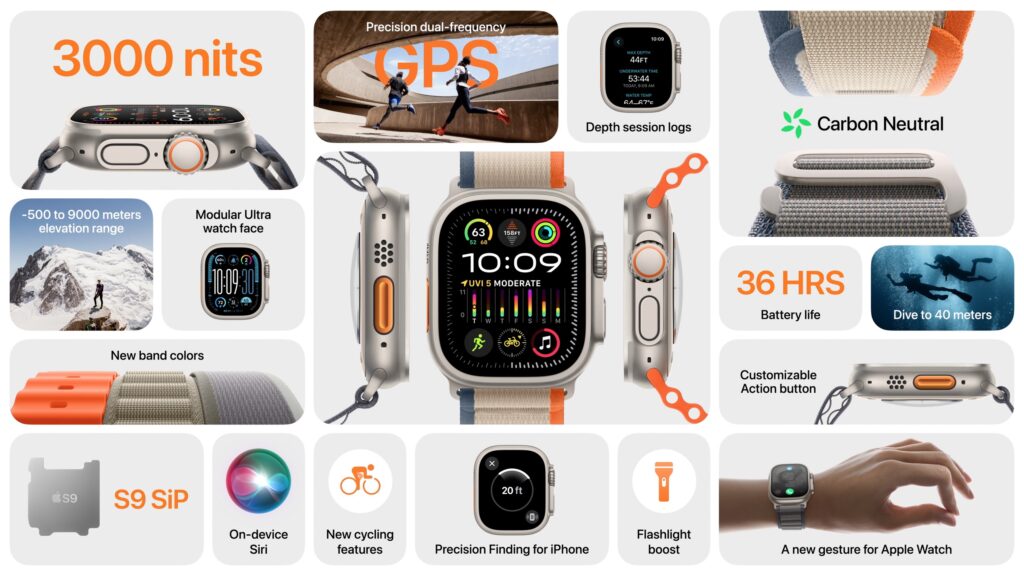
The Apple Watch Series 9 starts at $399 for a 41mm aluminum GPS-only model; 45mm models are $30 more, and cellular connectivity adds $100. It’s available in pink, midnight, starlight, silver, and PRODUCT(RED). In stainless steel, pricing starts at $699 for a 41mm model and includes cellular connectivity; the 45mm models are $50 more. Some textile bands and all stainless steel bands cost an additional $50 to $300. The Apple Watch Ultra 2 remains $799 with an Alpine Loop, Trail Loop, or Ocean Band.

While undoubtedly the most capable watches Apple has ever produced, these new models don’t offer enough new to warrant an upgrade from last year’s models. They’re great for those getting started with the Apple Watch or upgrading from a much older version. Don’t forget that Apple still sells the Apple Watch SE, which lacks the Always-On display and ECG capabilities of the Series 9 but is $150 less expensive. Apple’s comparison page can help you tease out the differences.

(Featured image by Apple)


Social Media: At its Wonderlust event, Apple introduced the iPhone 15 lineup, the Apple Watch Series 9, and the Apple Watch Ultra 2. For the most part, they’re incremental upgrades, making them most compelling to those upgrading from much older devices.

With Storms Increasing, Protect Your Tech Gear from Damaging Power Fluctuations

It has been a tough year for extreme weather events. While the connection between weather and technology may seem tenuous, heat waves, high winds, and lightning strikes can play havoc with all sorts of powered and networked electronic devices.

Anything that causes power fluctuations—spikes, surges, sags, brownouts, and blackouts—can hurt your tech gear. Protecting your most vulnerable devices doesn’t have to be expensive, but don’t be complacent because you plug your Mac into a cheap surge protector you’ve had since college. And note that many power strips offer no surge protection at all.

First off, why are power fluctuations problematic? There are two scenarios:

  • Too little power: Sags and brownouts are drops in voltage; a sag is a short-term dip, whereas brownouts last longer. Blackouts are complete power outages. Although they’re less damaging than surges, sags and brownouts can cause electronic devices to behave erratically or crash, and the fluctuation in voltage—particularly when coming back from an outage—can stress components. Losing power entirely will cause you to lose any unsaved work and possibly end up with document or even drive corruption.
  • Too much power: Spikes and surges are sudden, brief increases in voltage; the difference is that spikes are shorter than surges. Either way, the excessive power can degrade or damage sensitive electronic components, reducing lifespan or causing immediate failures.

The best solution to these scenarios is an uninterruptible power supply (UPS). Put simply, a UPS is a big battery into which you plug your Mac and other peripherals. It then plugs into a wall outlet and monitors the incoming power. If the power surges, falls below a certain threshold, or fails outright, the UPS switches the power source to its internal battery. This happens so quickly that your Mac never even notices.

If your gear is plugged into a UPS when a blackout hits, you get some time to save your work and shut down gracefully, ensuring that you don’t lose data or flirt with drive corruption. A UPS also protects against spikes and surges, filtering out the excess voltage so it can’t harm the devices plugged into it. The downsides to UPSes are that they’re an extra expense, their batteries need replacing every few years, and they take up space under your desk. For a home or small office UPS, consult Wirecutter’s recommendations. For larger installations, contact us.

If power outages are rare in your location, you may prefer to rely on a surge protector instead of a UPS. As the name implies, surge protectors filter out voltage spikes and surges so they won’t damage your gear. Surge protectors are smaller and less expensive than UPSes, and while they don’t have batteries to fail, their protection circuitry degrades over time, so they should be replaced every few years as well. Better surge protectors alert you or stop working entirely when they can no longer provide protection. Again, Wirecutter has good recommendations.

If most of your expensive tech gear is battery-powered, you could forgo even a surge protector. Outages aren’t an issue, and a MacBook or iPhone power adapter will protect against most sags, brownouts, spikes, and surges. The power adapter may incur damage, but it’s inexpensive to replace.

One final thought. No UPS, surge protector, or power adapter can protect against a direct lightning strike. Lightning is too fast and too powerful—it’s millions or even hundreds of millions of volts. Even turning your equipment off isn’t sufficient because lightning that has traveled miles through the air to hit the ground can easily jump across an open switch. If lightning strikes are common in your area, unplug your most expensive devices entirely during severe storms.

To sum up:

  • For a desktop Mac and peripherals, a UPS is a worthwhile investment if you ever suffer from power outages. Also, consider a UPS for essential networking gear—cable modems, routers, switches, and network-attached storage.
  • If power outages are extremely rare, or for equipment that doesn’t need to remain on during an outage, get a good surge protector. If it doesn’t automatically disable itself when it’s no longer effective, write the date on the bottom and replace it in a few years.
  • Although there’s no harm in doing so, it’s not necessary to plug battery-powered device chargers into a surge protector or UPS. A spike or surge may damage them, but they’ll probably sacrifice themselves to protect your gear.
  • When in doubt during severe storms, unplug your most valuable equipment to protect against a direct lightning strike.

(Featured image by iStock.com/HardRockShotz)


Social Media: How can you protect your tech gear from unexpected power fluctuations? A UPS is best in some scenarios, but a not-too-old surge protector is often sufficient.  You can also let your Apple chargers do their job without worrying about what they are plugged into.