Posts

Looking for Apple Manuals? Check the New Documentation Site

Apple publishes a multitude of manuals and tons of technical documentation for its products on its support site, but until recently, it could be challenging to find something specific because the search engine on Apple’s site is poor. For a better path into Apple’s online support materials, check out the company’s new Documentation site, which brings together manuals, specs, and some downloads for nearly all its products. The operating system User Guides are particularly helpful, and they even provide a Version pop-up menu that lets you make sure you’re getting information for the version you’re using.

(Featured image by iStock.com/Ildo Frazao)


Social Media: Do you want to read the actual manuals or specs for Apple products? You can now easily find them on Apple’s new Documentation website.

How to Sync Your Text Messages across All Your Apple Devices

Although many of us think of Messages as an iPhone app, Apple’s platform integration lets you read and reply to conversations in Messages on other Apple devices, including the Mac and iPad. All your devices must have the correct settings to make this work reliably. We regularly hear from users who don’t see all their messages on all their devices. If that’s you, check these settings:

  • Same Apple ID: Your devices all know they’re yours when they’re logged in to the same Apple ID. That’s not a problem for most people, but couples who share an Apple ID, for instance, can run into trouble here. To verify this, open Settings > Your Name in iOS and iPadOS, or System Settings > Your Name in macOS. The email address under your picture at the top of each of those screens should match. If it doesn’t, scroll to the bottom, tap or click Sign Out, and sign in again with the correct Apple ID.
  • Two-factor authentication: As with so many Apple services now, your Apple ID must be set up for two-factor authentication, which causes certain logins to be queried a second time on another device. Most people have two-factor authentication set up by now, but if not, turn it on using Apple’s instructions.
  • iCloud Keychain: Your devices must have iCloud Keychain turned on to share your Messages account information. It’s probably already on, but you can enable it if not. Turn it on for an iPhone or iPad in Settings > Your Name > iCloud > Passwords and Keychain > Sync this iPhone. On a Mac, the switch is in System Settings > Your Name > iCloud > Passwords & Keychain > Sync this Mac.
  • Messages in iCloud: This is the key setting—the previous three are just foundational requirements. Enable it for an iPhone or iPad in Settings > Your Name > iCloud > Show All > Messages in iCloud > Use on this iPhone. On the Mac, look in System Settings > Your Name > iCloud > Show More Apps > Messages in iCloud > Use on this Mac.
  • iMessage account: You’ve checked that you’re using the same Apple ID everywhere, but there’s a similar setting that’s also important. On your iPhone or iPad, go to Settings > Messages > Send & Receive and make sure you’re signed into iMessage with the same Apple ID—look at the bottom of the screen. Also, ensure you’re set to send and receive from your phone number and appropriate email addresses. It’s safest to send and receive from all the possibilities and start new messages from your phone number. On the Mac, verify that you have the same settings in Messages > Settings > iCloud.
  • Text Message Forwarding: Turning on Messages in iCloud should keep message history synced across all your devices, including green bubble SMS/MMS text messages. However, it’s worth verifying that SMS/MMS messages are being sent to all your devices. On your iPhone, in Settings > Messages > Text Message Forwarding, select all the devices you want to receive text messages.

Although all the above settings may seem like a lot, most should already be set up correctly. We listed them all because when people have trouble with their messages syncing across all their devices, one or more of these are usually set wrong.

Even with everything configured correctly, there can be hiccups—nothing’s perfect. If messages fail to sync consistently, try these troubleshooting steps:

  • Use the Sync Now button in the Messages in iCloud settings on any device that hasn’t caught up. That likely won’t help instantly, but syncing should eventually catch up.
  • Restart the device—it’s always worth trying. On an iPhone or iPad, choose Settings > General > Shut Down (at the bottom), slide to power off, and then press and hold the side (iPhone) or top (iPad) button to turn the device back on. On a Mac, just choose Restart from the Apple menu.

When Messages in iCloud is working properly, though, you can carry on text message conversations using any of your devices at any time. It’s especially nice to switch to the Mac for easier typing when you’re in an involved conversation.

(Featured image by iStock.com/anyaberkut)


Social Media: One of the best parts of Apple’s tight platform integration is that you can view your text messages on all your devices. Or at least you can if you get everything set correctly.

How to Avoid Head-Tracked Spatial Audio for FaceTime Audio Calls

If you listen to a FaceTime Audio call using AirPods and hear the other person’s voice moving annoyingly from side to side as you turn your head, the problem is likely head-tracked spatial audio. In general, spatial audio attempts to make sounds seem to come from all around you, and its dynamic head-tracking option adjusts the audio for each ear to simulate how the sound would change as your head moves. Dynamic head tracking may be desirable for music or movies, but with a FaceTime Audio call, having the other person flip back and forth between your ears can be highly disconcerting. To stop this behavior on an iPhone or iPad, open Control Center, touch and hold the volume control, and tap either Off or Fixed instead of Head Tracked. Spatial audio isn’t an option on Mac FaceTime calls.

(Featured image by iStock.com/1550539)


Social Media: If you’ve ever experienced a weird situation where sound on a FaceTime Audio call moves back and forth between your AirPods, it’s because of spatial audio’s dynamic head tracking. Learn how to turn it off.

Annoyed by Inline Predictive Text Suggestions? Here’s How to Turn Them Off

In a slight nod to the hype surrounding generative AI, Apple added inline text prediction capabilities to the iPhone, iPad, and Mac. They can be helpful, particularly on the iPhone and iPad, where it’s often much easier to tap the Space bar than to finish typing a word or sentence. But that’s less true on the Mac, where a fast typist can be slowed down or derailed by the suggestions, and some people dislike having an AI finish their thoughts. The feature is easily turned off. On the iPhone and iPad running at least iOS/iPadOS 17.2, go to Settings > General > Keyboard and switch off Show Predictions Inline. (Leave Predictive Text on to continue to get suggestions above the keyboard.) On the Mac running macOS 14.2 Sonoma or later, open System Settings > Keyboard, click Edit under the Text Input header, turn off “Show inline predictive text,” and click Done.

(Featured image based on an original by iStock.com/Armastas)


Social Media: If you’re not a fan of the new inline text predictions on your iPhone, iPad, or Mac, you can easily turn them off and get back to typing only the words you want to appear.

Forget Your Just-Changed Passcode? iOS 17’s Passcode Reset Has Your Back

The hardest time to remember your iPhone or iPad passcode is right after you’ve changed it. Generally speaking, there’s no reason to change your passcode, but if you inadvertently or intentionally shared it with someone with whom you wouldn’t trust your bank account information, changing it to something new is a good idea. We could also imagine a child who knows your passcode changing it on you as a prank. For whatever reason, if you can’t enter your new passcode, a new iOS 17 feature called Passcode Reset lets you use your old one for 72 hours. Once you’ve tried the wrong passcode five times, tap Forgot Passcode , enter your old passcode , and create a new one . If you’re certain you know the new one, you can expire the old one sooner in Settings > Face ID/Touch ID & Passcode.

(Featured image by iStock.com/NazariyKarkhut)


Social Media: If you change your passcode and can’t remember it (or it was changed for you by a prankster), iOS 17 lets you use your old passcode for 72 hours. It’s a helpful backstop for the results of a memory lapse or mischievous child.

With Storms Increasing, Protect Your Tech Gear from Damaging Power Fluctuations

It has been a tough year for extreme weather events. While the connection between weather and technology may seem tenuous, heat waves, high winds, and lightning strikes can play havoc with all sorts of powered and networked electronic devices.

Anything that causes power fluctuations—spikes, surges, sags, brownouts, and blackouts—can hurt your tech gear. Protecting your most vulnerable devices doesn’t have to be expensive, but don’t be complacent because you plug your Mac into a cheap surge protector you’ve had since college. And note that many power strips offer no surge protection at all.

First off, why are power fluctuations problematic? There are two scenarios:

  • Too little power: Sags and brownouts are drops in voltage; a sag is a short-term dip, whereas brownouts last longer. Blackouts are complete power outages. Although they’re less damaging than surges, sags and brownouts can cause electronic devices to behave erratically or crash, and the fluctuation in voltage—particularly when coming back from an outage—can stress components. Losing power entirely will cause you to lose any unsaved work and possibly end up with document or even drive corruption.
  • Too much power: Spikes and surges are sudden, brief increases in voltage; the difference is that spikes are shorter than surges. Either way, the excessive power can degrade or damage sensitive electronic components, reducing lifespan or causing immediate failures.

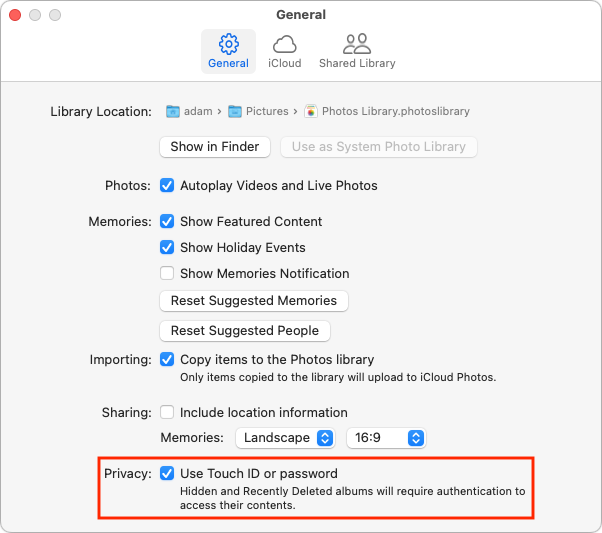
The best solution to these scenarios is an uninterruptible power supply (UPS). Put simply, a UPS is a big battery into which you plug your Mac and other peripherals. It then plugs into a wall outlet and monitors the incoming power. If the power surges, falls below a certain threshold, or fails outright, the UPS switches the power source to its internal battery. This happens so quickly that your Mac never even notices.

If your gear is plugged into a UPS when a blackout hits, you get some time to save your work and shut down gracefully, ensuring that you don’t lose data or flirt with drive corruption. A UPS also protects against spikes and surges, filtering out the excess voltage so it can’t harm the devices plugged into it. The downsides to UPSes are that they’re an extra expense, their batteries need replacing every few years, and they take up space under your desk. For a home or small office UPS, consult Wirecutter’s recommendations. For larger installations, contact us.

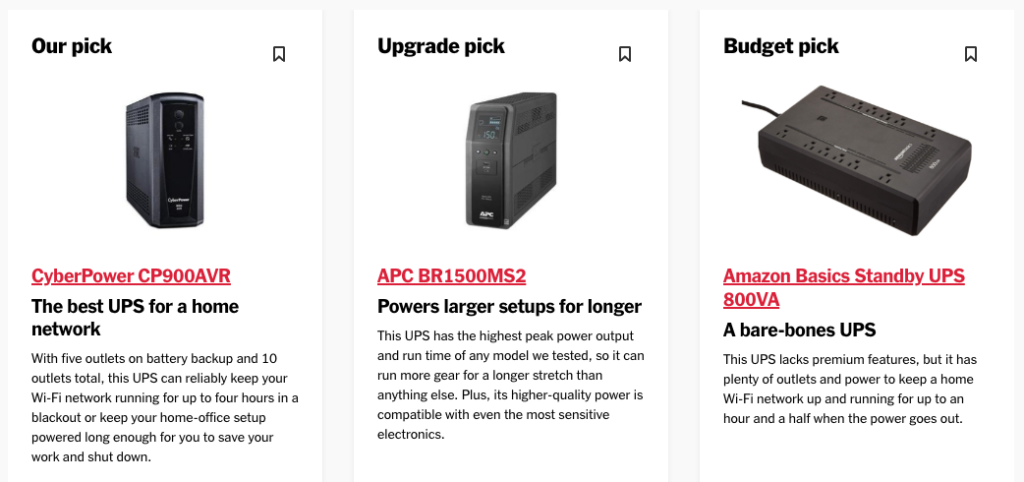
If power outages are rare in your location, you may prefer to rely on a surge protector instead of a UPS. As the name implies, surge protectors filter out voltage spikes and surges so they won’t damage your gear. Surge protectors are smaller and less expensive than UPSes, and while they don’t have batteries to fail, their protection circuitry degrades over time, so they should be replaced every few years as well. Better surge protectors alert you or stop working entirely when they can no longer provide protection. Again, Wirecutter has good recommendations.

If most of your expensive tech gear is battery-powered, you could forgo even a surge protector. Outages aren’t an issue, and a MacBook or iPhone power adapter will protect against most sags, brownouts, spikes, and surges. The power adapter may incur damage, but it’s inexpensive to replace.

One final thought. No UPS, surge protector, or power adapter can protect against a direct lightning strike. Lightning is too fast and too powerful—it’s millions or even hundreds of millions of volts. Even turning your equipment off isn’t sufficient because lightning that has traveled miles through the air to hit the ground can easily jump across an open switch. If lightning strikes are common in your area, unplug your most expensive devices entirely during severe storms.

To sum up:

  • For a desktop Mac and peripherals, a UPS is a worthwhile investment if you ever suffer from power outages. Also, consider a UPS for essential networking gear—cable modems, routers, switches, and network-attached storage.
  • If power outages are extremely rare, or for equipment that doesn’t need to remain on during an outage, get a good surge protector. If it doesn’t automatically disable itself when it’s no longer effective, write the date on the bottom and replace it in a few years.
  • Although there’s no harm in doing so, it’s not necessary to plug battery-powered device chargers into a surge protector or UPS. A spike or surge may damage them, but they’ll probably sacrifice themselves to protect your gear.
  • When in doubt during severe storms, unplug your most valuable equipment to protect against a direct lightning strike.

(Featured image by iStock.com/HardRockShotz)


Social Media: How can you protect your tech gear from unexpected power fluctuations? A UPS is best in some scenarios, but a not-too-old surge protector is often sufficient.  You can also let your Apple chargers do their job without worrying about what they are plugged into.

Keep Your Apple Devices Cool in the Summer Heat

June 2023 was the hottest month on record for the planet, at least until July 2023. Among the many ill effects of such heat are what it does to iPhones, iPads, Macs, Apple Watches, and other digital devices. Excessive heat shortens the overall lifespan of lithium-ion batteries and increases the likelihood of both transient errors and hardware failures—iPhones warn you when they’re getting too hot because of these issues. Apple recommends using nearly all its devices in conditions no hotter than 95ºF/35ºC and storing them in locations that don’t exceed 113ºF/45ºC. (The exception is the adventurous Apple Watch Ultra, which can be worn in temperatures up to 130ºF/55ºC.) The most common place to avoid is a car parked in the sunshine on a hot day, which can easily exceed 130ºF within an hour and rise from there. So don’t leave your iPhone in the car during an afternoon at the beach!

(Featured image by iStock.com/Jorge Garcia Argazkiak)


Social Media: As many parts of the world struggle with record heat waves, remember that excessive heat—operating temperatures over 95ºF/35ºC—is harmful to portable electronic devices like the iPhone, iPad, and Apple Watch. Keep your digital friends cool!

How to Protect Your Child’s Hearing from Too-Loud Headphone Audio

Loud sounds are harmful to everyone, and many parents worry that their children are at risk for hearing loss due to too-loud headphone audio from iPhones and iPads. To lower the likelihood of this happening, Apple provides a Reduce Loud Sounds option in Settings > Sounds & Haptics > Headphone Safety for both iOS and iPadOS. Select it and set a limit, with 80–85 decibels generally considered safe. To keep kids from increasing the limit, go to Settings > Screen Time and set a Screen Time passcode. Then navigate into Content & Privacy Restrictions, enable the switch at the top, and then scroll down and set Reduce Loud Sounds to Don’t Allow. After that, the headphone output from all apps will be capped at the decibel level you specified.

(Featured image by iStock.com/Ivan Zhdanov)


Social Media: Too-loud headphone volume causes hearing loss, but Apple makes it easy to reduce loud sounds played through headphones and prevent kids from bypassing the volume limits.

Look Up Apple Device Details in Mactracker

It’s difficult for even those who work with Apple devices daily to remember all the details. What processors were available with the 2020 iMac? What resolutions did the Apple Thunderbolt Display support? What are the differences between the fifth and sixth generations of the iPad mini? To find the answers to these and many other questions quickly, turn to Ian Page’s free Mactracker app, an indispensable repository of information about Apple products. Versions are available for the Mac and the iPhone and iPad.

(Featured image based on an original by iStock.com/Shahid Jamil)


Social Media: If you ever need to look up technical details about an Apple product, look no further than the Mactracker app, which provides specifications for every Mac, iPhone, iPad, and iPod ever made. It’s an indispensable free download.

Use the Hidden Album in Photos to Hide Private Images

We’ve recently heard from people who have been embarrassed when they gave their iPhone to someone to swipe through some innocuous photos of a vacation, only to have the person swipe too far and end up at some NSFW (not safe for work) images. Ouch.

Embarrassment might be low on the list of problems such photos could cause. It’s not hard to imagine a male supervisor innocently sharing photos with a female employee but ending up embroiled in a sexual harassment situation if she were to stumble across the kinds of NSFW photos that regularly land politicians in hot water.

It’s safest to avoid taking NSFW photos to start, especially if the iPhone is a work-managed device. If that’s unrealistic, we recommend deleting any NSFW images from the iPhone as soon as feasible. A third option may be the best solution in the modern world—the Hidden album Apple provides in the Photos app on the iPhone, iPad, and Mac. On the iPhone and iPad, you’ll find it with other albums in the Utilities collection. On the Mac, it appears in the sidebar under Photos. (If you don’t see it, you may have hidden it—we explain how to unhide it below.)

There are four essential things to know about the Hidden album:

  • You don’t add photos to the Hidden album by dragging or using an Add to Album option. Instead, you choose Hide from a contextual menu. On the iPhone and iPad, touch and hold a photo (or a set of selected photos) and tap Hide in the menu that appears. Or tap the ••• button and choose Hide. On the Mac, select one or more photos, Control-click them, and choose Hide X Photos. To remove a photo from the Hidden album, use the same approach with the Unhide command.
  • Unlike regular albums, whose photos also appear in All Photos, photos in the Hidden album won’t appear anywhere else, including in searches. That’s the point of the feature.
  • You can hide or show the Hidden album on each of your devices independently. On the iPhone and iPad, control whether it shows up in the Utilities album collection with Settings > Photos > Show Hidden Album. In the Photos app on the Mac, control whether it appears in the sidebar using View > Show/Hide Hidden Photo Album. Obviously, if you’ve hidden the Hidden album, you must show it to look inside.
  • If you use the Hidden album, we strongly recommend protecting it (and the Recently Deleted album) with Face ID or Touch ID so only those with biometric access to your device can view it. On the iPhone and iPad, enable Settings > Photos > Use Face/Touch ID (see above). On the Mac, go to Photos > Settings > General and select “Use Touch ID or password.” Again, these settings are per-device, so what you set on the iPhone won’t automatically carry over to other devices. But really, turn it on everywhere.

Overall, the Hidden album is a welcome feature, and if you have any photos that could embarrass you if someone were to stumble across them, put them in the Hidden album and turn on the biometric protection.

(Featured image based on an original by iStock.com/AlexZabusik)


Social Media: Although it’s safest to keep all NSFW images off your iPhone entirely, if you have photos that could be embarrassing or legally troublesome if the wrong person were to stumble across them, protect them using the Hidden album in Photos.