Posts

Is Your Mac Running Low on Disk Space? Here’s How to Delete Unnecessary Files

Between apps, photos, videos, music, and downloads, it’s easy to fill up your Mac’s drive, particularly one with just 128 or 256 GB of drive space. macOS warns you when you get too low on space, but those warnings may come late—for optimum Mac performance, we recommend you keep at least 10–20% of your drive free for new downloads and virtual memory swap files. There are excellent utilities that help you find and delete unnecessary files, such as the free GrandPerspective, the $9.99 DaisyDisk, and the $14.99 WhatSize, but Apple’s built-in storage management capabilities will likely be all you need.

Apple first introduced its Storage Management tool in the System Information app in macOS 10.12 Sierra, making it accessible from the About This Mac dialog. Starting in macOS 13 Ventura, Apple moved those capabilities to System Settings > General > Storage, providing a quick overview of your drive usage at the top. Hover over each colored bar to see how much space is taken up by a particular type of data. The light gray space at the end of the bar is what’s still available.
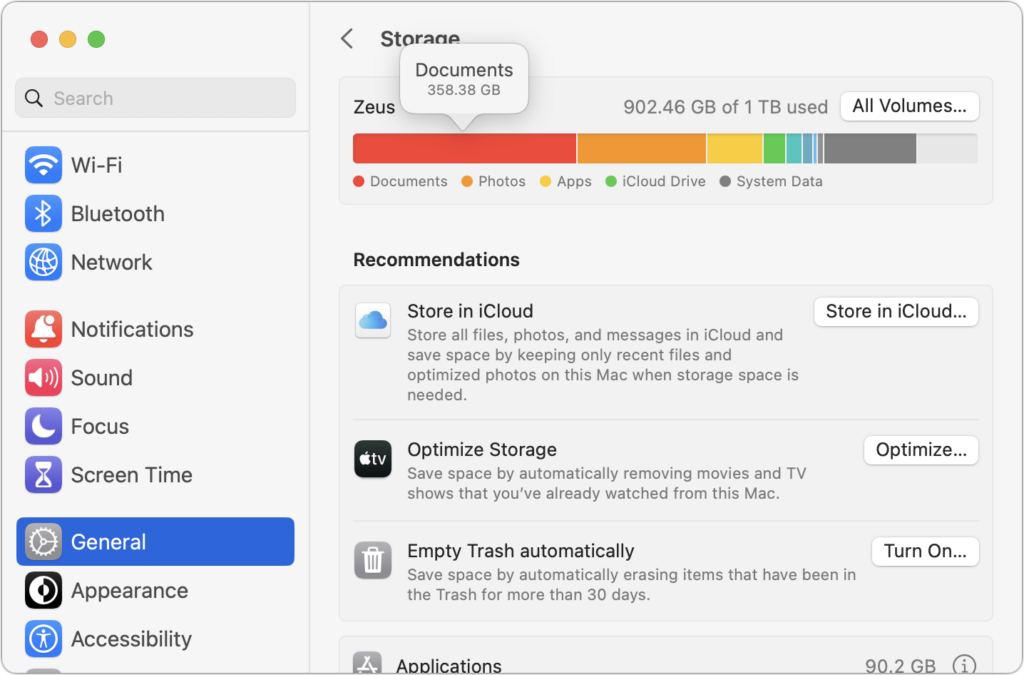
Below the graph, macOS may offer some recommendations for reducing storage over time, but they come with tradeoffs. Storing files in iCloud and optimizing Apple TV videos will replace local files with stubs pointing at a version stored in the cloud. That’s OK, but you then have to download the original before you can use it. Deleting files automatically after they’ve been in the Trash for more than 30 days is also fine but could have undesirable results if you ever want to recover older files from the Trash. Enable these if you wish, but the real work happens farther down on the screen, where you find all the categories of files you can explore. Depending on what apps you use, they will vary a bit between Macs, but they correspond to the colored bars you saw in the storage graph. Double-click each one to see what it displays.
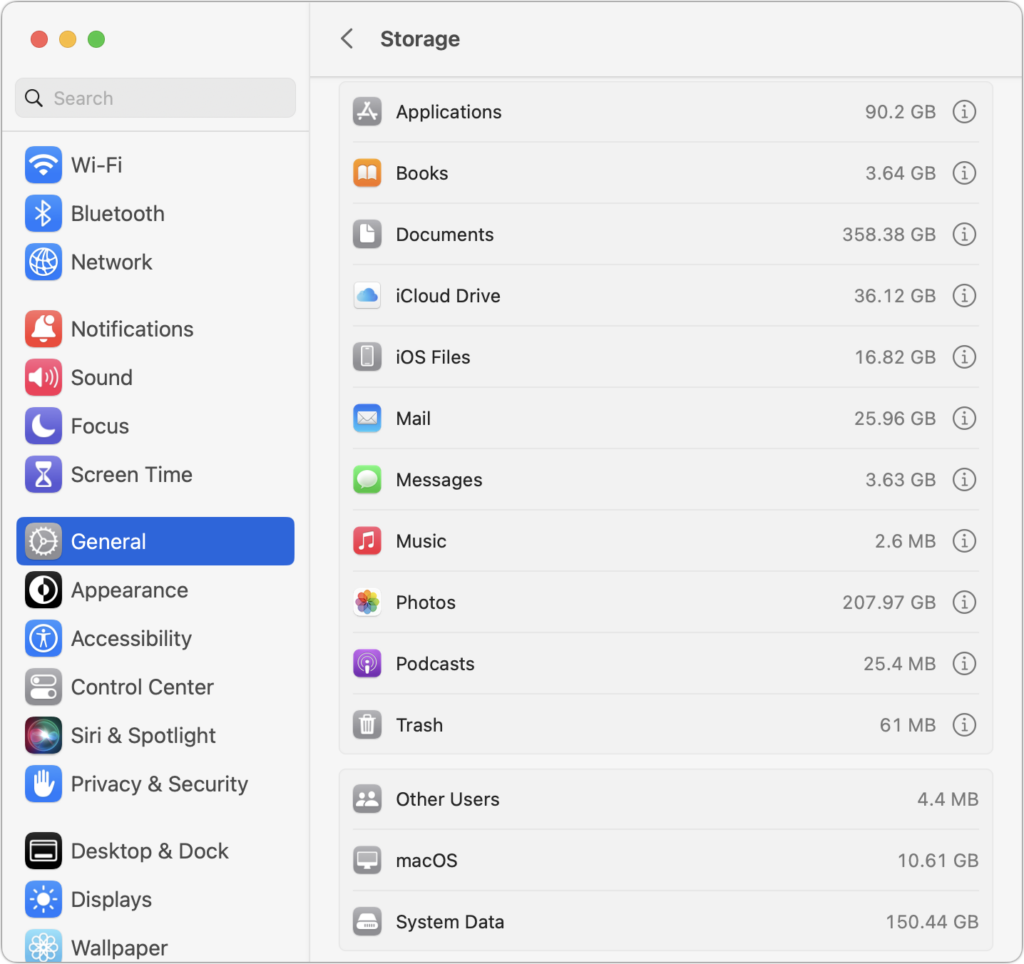
For a few app-specific categories, like Mail and Podcasts, you merely learn how much space the app’s data occupies—to save space, you must delete unnecessary data from within the app itself. iCloud Drive and Photos are similar but also let you enable space optimization, which stores only placeholder files or smaller optimized photos on the Mac, leaving the originals in iCloud for later downloading whenever you access them.

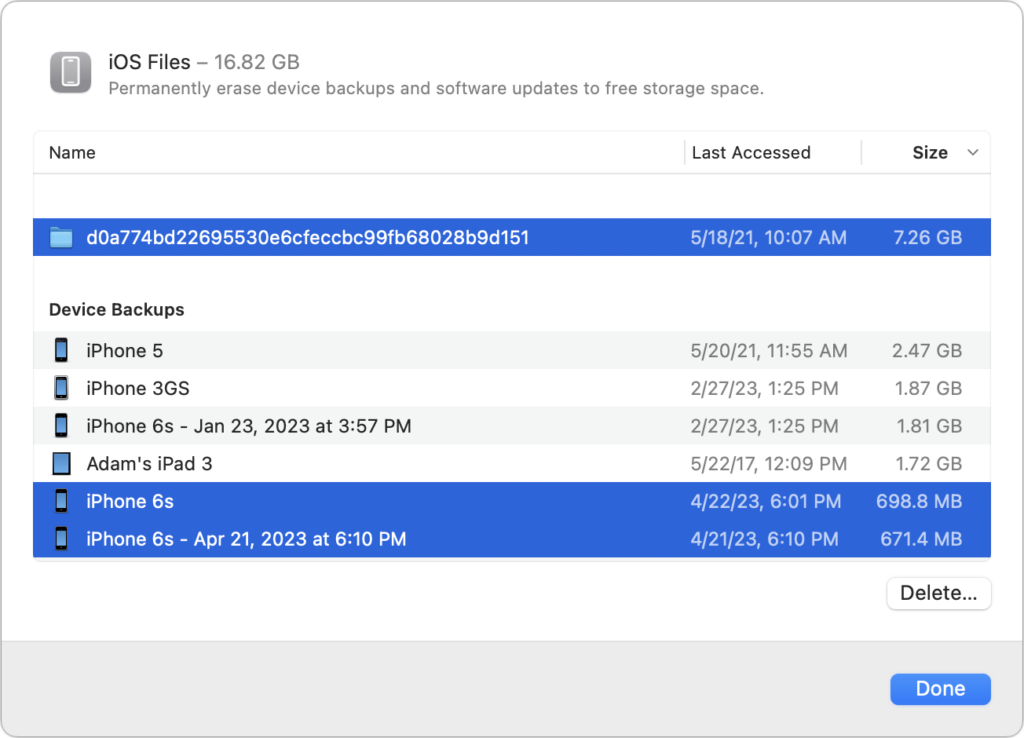
More interesting are the Applications, Documents, and iOS Files categories, each of which may reveal gigabytes of unnecessary data. iOS Files, for instance, shows any device backups and software updates stored on your Mac’s drive. It’s worth keeping the latest backup of devices you still use, but delete any older backups and updates that are just wasting space—well over 8 GB in the screenshot below.
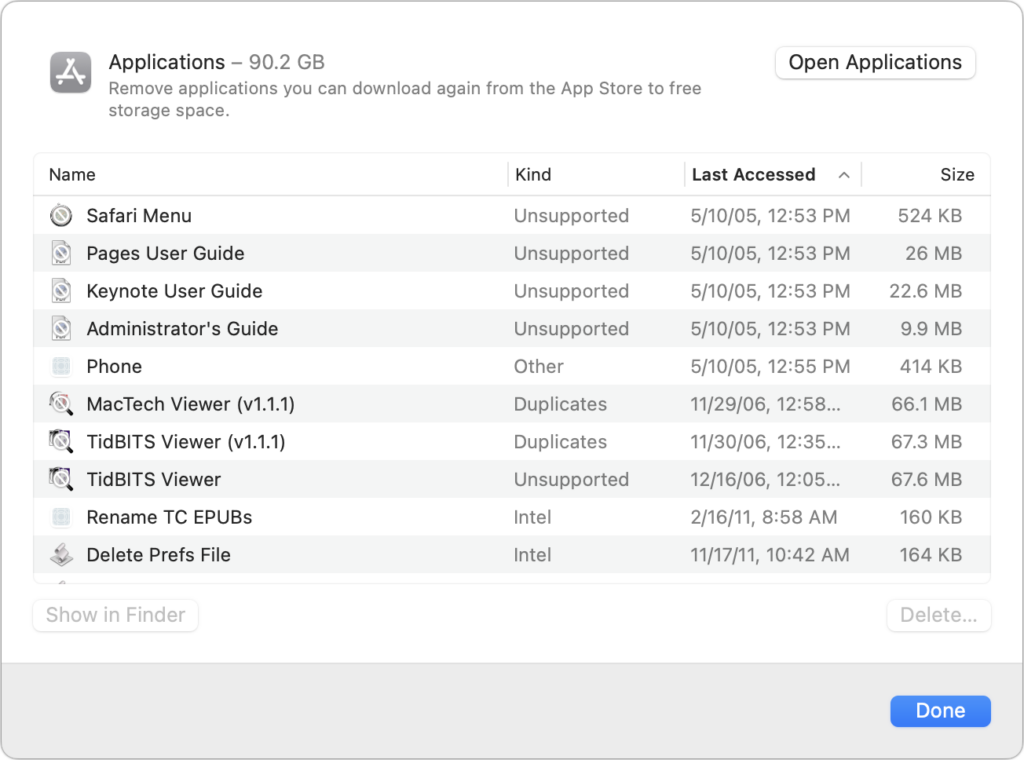
The Applications category lists your apps and is sorted by size by default. But try clicking the column header for Kind and scrolling down. You can probably delete most apps tagged as Unsupported, Duplicates, or Older Versions. Similarly, click the Last Accessed column header to see which apps you haven’t launched in years. Many of them can probably go, too.
In Documents, you’ll see four buttons: Large Files, Downloads, Unsupported Apps, and File Browser.

  • Large Files shows huge files regardless of where on your drive they’re located.
  • Downloads shows you the contents of your Downloads folder, much of which you likely don’t need.
  • Unsupported Apps lists any PowerPC or 32-bit apps that won’t run on your Mac. You can delete them.
  • File Browser provides a column view sorted by file size and shows sizes next to each item. It’s great for trawling through your drive to see what’s consuming all that space.
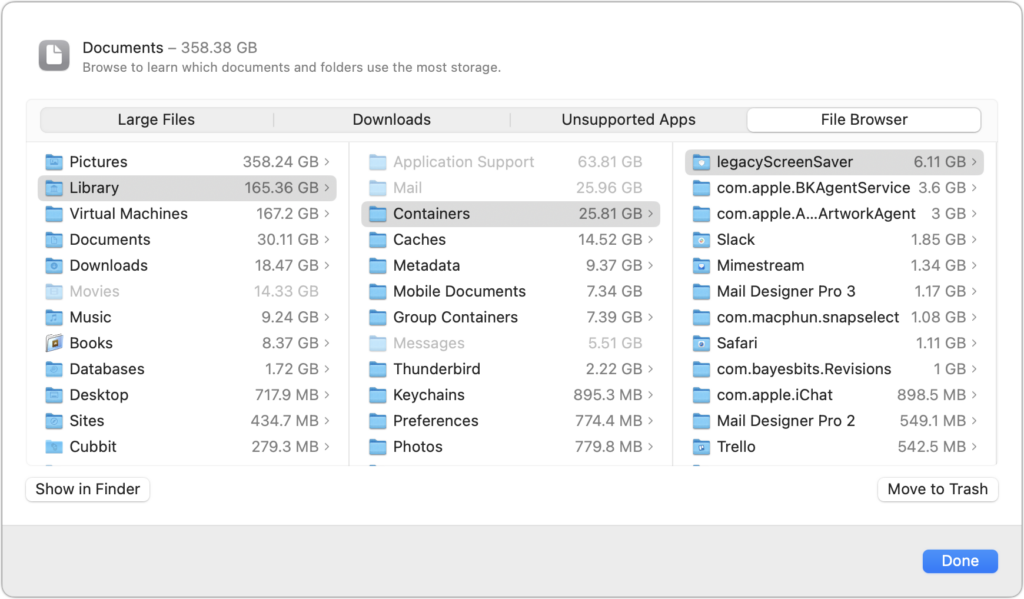
In any of these views, click Delete or Move to Trash to remove the file or Show In Finder to see it in its native habitat, which may help you decide if you should keep or delete the file. To delete multiple files at once, Command-click or Shift-click to select them and then click Delete to remove them all at once.

You may find it worth using GrandPerspective to get a visual overview of how space is used on your drive. After scanning, which can take a long time, it uses tiny colored blocks to represent files, collecting multiple blocks into bigger rectangles to show folder size. Toolbar buttons let you open, preview with Quick Look, reveal location, or delete whatever file block you click. Look in the status bar at the bottom of the window to see the path to the file.

In the screenshot below, the big boxes of color are massive virtual machine disk images, and the selected folder outlined in white at the right contains desktop pictures downloaded by an app that rotates them regularly—gigabytes of old files that can easily be deleted.

If your Mac’s drive has less than 10% free space, consider using Apple’s storage management capabilities—perhaps supplemented with GrandPerspective or another utility—to find and delete files that are wasting space.

Two final notes: Don’t get too wrapped up in the exact numbers in the storage graph matching what the Finder reports, and give the Mac some time to update its free space amounts after deleting files directly or emptying the Trash.

(Featured image based on an original by iStock.com/Bet_Noire)


Social Media: Is your Mac low on drive space? Learn how to use Apple’s built-in storage management capabilities—perhaps supplemented with a third-party utility—to find and delete gigabytes of unnecessary files.

Keep Your Apple Devices Cool in the Summer Heat

June 2023 was the hottest month on record for the planet, at least until July 2023. Among the many ill effects of such heat are what it does to iPhones, iPads, Macs, Apple Watches, and other digital devices. Excessive heat shortens the overall lifespan of lithium-ion batteries and increases the likelihood of both transient errors and hardware failures—iPhones warn you when they’re getting too hot because of these issues. Apple recommends using nearly all its devices in conditions no hotter than 95ºF/35ºC and storing them in locations that don’t exceed 113ºF/45ºC. (The exception is the adventurous Apple Watch Ultra, which can be worn in temperatures up to 130ºF/55ºC.) The most common place to avoid is a car parked in the sunshine on a hot day, which can easily exceed 130ºF within an hour and rise from there. So don’t leave your iPhone in the car during an afternoon at the beach!

(Featured image by iStock.com/Jorge Garcia Argazkiak)


Social Media: As many parts of the world struggle with record heat waves, remember that excessive heat—operating temperatures over 95ºF/35ºC—is harmful to portable electronic devices like the iPhone, iPad, and Apple Watch. Keep your digital friends cool!

Two Tricks for Fixing a Mac That’s Restarting Unexpectedly

Although extremely uncommon, it’s not unheard of for a Mac, particularly an older model, to restart unexpectedly. If it happens once, chalk it up to cosmic rays and move on. But if it happens multiple times, try these two things right off. First, use compressed air to remove dust from cooling vents or the inside of the Mac, if you can open it up. Dust can cause heat buildup, which can in turn cause restarts. Second, try plugging the Mac into a different electric circuit or, ideally, into an uninterruptible power supply (UPS). Dirty power can provoke all sorts of undesirable behavior—including unexpected restarts—and shorten the lifespan of the Mac’s electronic components. Remember, clean air and clean power make for a happy Mac.

(Featured image by Adam Engst)

Make Sure to Test Your Backup System with Occasional Restores

Did you know that the word for the irrational fear of Friday the 13th is paraskevidekatriaphobia? Neither did we, but what that supposedly unlucky day is good for—whenever it rolls around—is reminding us to test our backup systems. If something does go wrong, backups can save your bacon, but only if they’re actually working. So on Friday the 13th this month, take a few minutes to make sure you can restore files from Time Machine, see if you can boot from your bootable duplicate, and generally verify that your data really is being backed up successfully. And if you’ve already missed the 13th, today is a fine day to make up for it with a quick test.

(Featured image by Adam Engst)

Don’t Succumb to iOS 13 Update Fatigue!

Does it seem like that red badge on the Settings app indicating that there’s a new iOS 13 or iPadOS 13 update pops up at least once per week? You’re not imagining things—Apple has been frantically squashing bugs in its mobile operating systems since their release in mid-September.

If you haven’t yet upgraded from iOS 12, there’s no harm in waiting until the new year to see if things have settled down. (Well, no harm as long as you don’t receive a pair of Apple’s snazzy new AirPods Pro as a holiday gift, since they work only with devices running at least iOS 13.2, iPadOS 13.2, watchOS 6.1, tvOS 13.2, and macOS Catalina 10.15.1.)

That said, given Apple’s generally reliable record with major iOS updates, many people have upgraded to iOS 13. You shouldn’t feel bad if you have done so, either. Despite Apple’s flurry of bug fix updates, the overall user experience with iOS 13 has been generally acceptable.

Even if you haven’t noticed problems with iOS 13, it is important that you keep installing all these smaller updates, because they fix problems that could be serious. More important yet, if you do have trouble with your iPhone or iPad, and you’re not running the latest version of iOS or iPadOS, updating is the first fix to try.

To hammer home why you should stay up-to-date with iOS releases, here’s a brief timeline of Apple’s fixes so far:

  • iOS 13.0 (September 19): This was the initial release of iOS 13 for the iPhone, with oodles of new features… and lots of bugs. Apple promised iOS 13.1 and the first release of iPadOS 13.1 for September 29th, with additional features and bug fixes.
  • iOS 13.1 (September 24): After iOS 13.0 received scathing reviews in early iPhone 11 reviews, Apple moved the release date of iOS 13.1 up by five days. It added more features and addressed numerous bugs with Mail, Messages, Reminders, Notes, Apple ID sign-in, the Lock screen, and more.
  • iOS 13.1.1 (September 27): This quick Friday release the same week as iOS 13.1 fixed bugs that could prevent an iPhone from restoring from backup, cause batteries to drain too quickly, reduce Siri recognition accuracy, bog down Reminders syncing, and allow third-party keyboard apps to access the Internet without your permission.
  • iOS 13.1.2 (September 30): The next Monday brought iOS 13.1.2, which ensured that the progress bar for iCloud backups would disappear after a successful backup, addressed bugs that caused the Camera app and flashlight to fail, and improved the reliability of Bluetooth connections in some vehicles.
  • iOS 13.1.3 (October 15): After a two-week breather, this update addressed bugs that could prevent incoming calls from ringing, block meeting invites from opening in Mail, cause incorrect data in Health after daylight saving time changes, prevent apps and voice memos recordings from downloading after restoring from iCloud Backup, stop an Apple Watch from pairing successfully, and cause Bluetooth connection problems with vehicles (again) and hearing aids.
  • iOS 13.2 (October 28): With this update, Apple delivered additional promised features, including support for the HomePod, Siri privacy options, HomeKit Secure Video, new emoji, Deep Fusion in the iPhone 11 Camera app, and AirPods Pro support. It also fixed a bug with password autofill in third-party apps, resolved an issue that prevented swipe to go home from working on the iPhone X and later, eliminated a problem that caused saved notes to disappear temporarily, and ensured that manual iCloud backups completed successfully.
  • iOS 13.2.1 (October 30): As it turned out, iOS 13.2 could brick HomePods during installation or after a reset. This HomePod-exclusive update fixed that bug.
  • iOS 13.2.2 (November 7): This update stomped a big bug that could cause apps to quit unexpectedly in the background, potentially causing data loss and draining the battery more quickly. It also addressed two bugs that could cause an iPhone to lose cellular service.
  • iOS 13.2.3 (November 18): This release resolved one bug that could cause searches in Mail, Files, and Notes to fail and another that prevented photos, links, and other attachments from displaying in the Messages detail view. It also addressed problems that could prevent apps from downloading content in the background and prevent Mail from fetching new messages and including and quoting original content when replying.

With luck, you never ran into any of these bugs—they weren’t universal. But the problems were real, and they inconvenienced plenty of people. Just like with vaccinations, staying current with your iOS updates is the best way to keep the bugs at bay.

(Featured image modified slightly from an original by energepic.com from Pexels)


Social Media: Apple has been squashing bugs in iOS 13 and iPadOS 13 left and right, with numerous updates since their September release. If you’ve upgraded already, we recommend that you keep installing maintenance fixes as they come out.

Some May Like It Hot… But Your Technology Prefers to Stay Cool

When summer brings sunny days and rising temperatures, you may have ditched your business suit for shorts or skirts to stay comfortable, but your technological gear can’t do the same. And keeping your tech cool is about more than comfort—as temperatures rise, performance can suffer, charging may get slower or stop, various components might be disabled, and devices can become unreliable.

How Hot Is Too Hot?

You might be surprised by the recommended operating temperatures for Apple gear—whether you’re talking about an iPhone X or a MacBook Pro, the company recommends staying under 95° F (35° C).

Such temperatures happen regularly throughout the summer. Even in cooler climes, the temperature in a parked car in the sunshine can easily hit 130º F (54º C) in an hour and rise higher as time passes. And no, cracking the windows a couple of inches won’t make a significant difference. We hope you’re already thinking about that with regard to children and pets, but as you can see, tech gear should also be protected. Apple says its products shouldn’t even be stored—turned off—at temperatures over 113º F (45º C).

It’s not just cars you have to think about. Temperatures in homes and offices without air conditioning can also rise higher than electronics would prefer, and that’s especially true for computers that stay on most of the time and aren’t located in well-ventilated areas.

What’s the Danger?

First off, remember that all electronic devices produce their own heat on top of the ambient heat in the environment, so the temperature inside a device can be much, much hotter than outside. The CPU in an iMac can hit 212º F (100º C) under heavy loads.

Temperatures higher than what components are designed for can have the following effects:

  • Chips of all types can behave unpredictably as increased thermal noise (electrons vibrating more) causes a higher bit error rate. Because electrical resistance increases with heat, timing errors can also occur.
  • Lithium-ion batteries discharge well in high temperatures, but the increased rate of chemical reactions within the battery will result in a shorter overall lifespan.
  • As devices heat and cool, the uneven thermal expansion of different materials can cause microscopic cracks that can lead to a variety of failures over time.

Some heat-related problems are temporary, so when the device or component cools down, it will resume working correctly. But others, particularly drops in battery life—are irreversible and particularly worth avoiding.

When a Mac gets too hot, it will spin up its fans in an attempt to keep its internal components cool. If your Mac’s fans are ever running at full tilt, first quit apps you aren’t using, particularly those that might be CPU-intensive and thus creating a lot of heat. If that doesn’t make a difference, restart it to make sure the problem isn’t some rogue process. If the fans come back on at full speed quickly, shut it down and let it cool off for a bit. In the worst case, an overheated Mac will start acting unpredictably or crash.

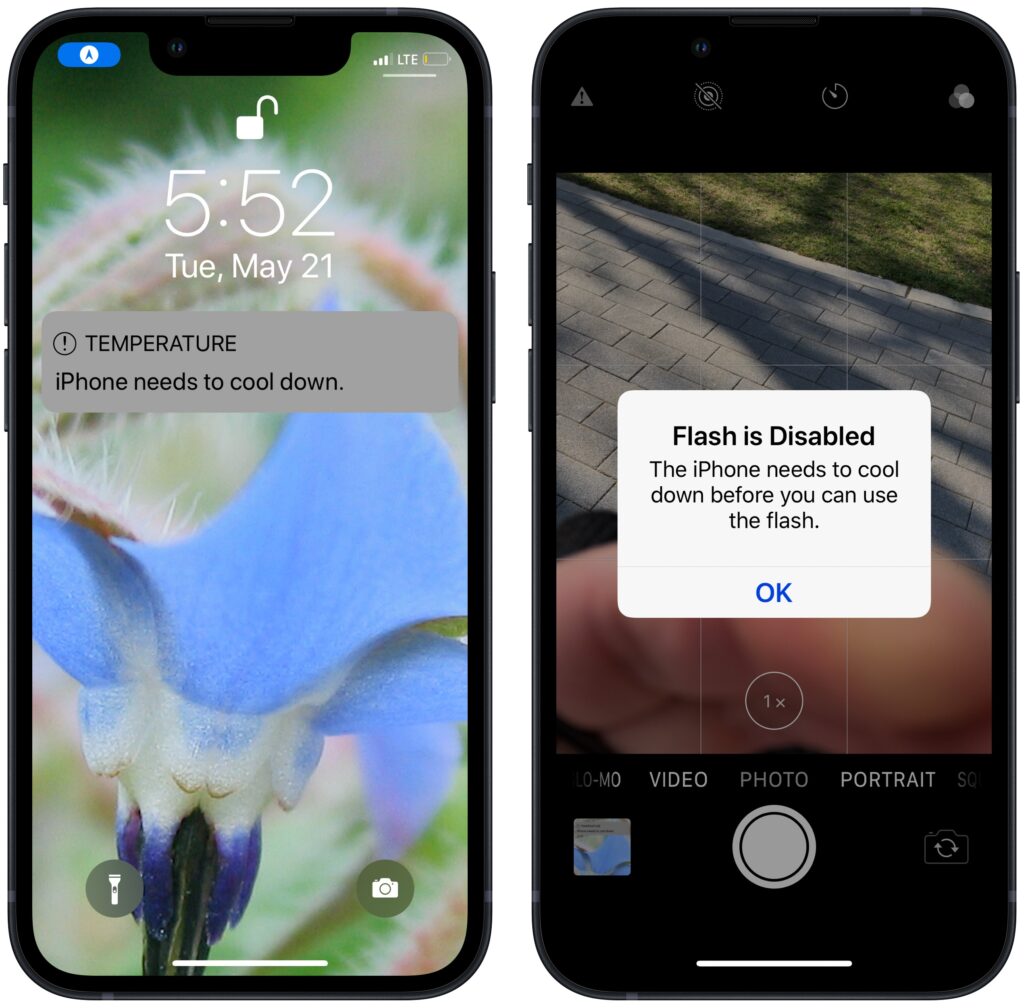
iOS devices don’t have fans, so they employ other coping mechanisms. If your iPhone or iPad gets too hot, the device will alert you.

Apple says you might notice some of the following behaviors:

  • Charging, including wireless charging, slows or stops.
  • The display dims or goes black.
  • Cellular radios enter a low-power state. The signal might weaken during this time.
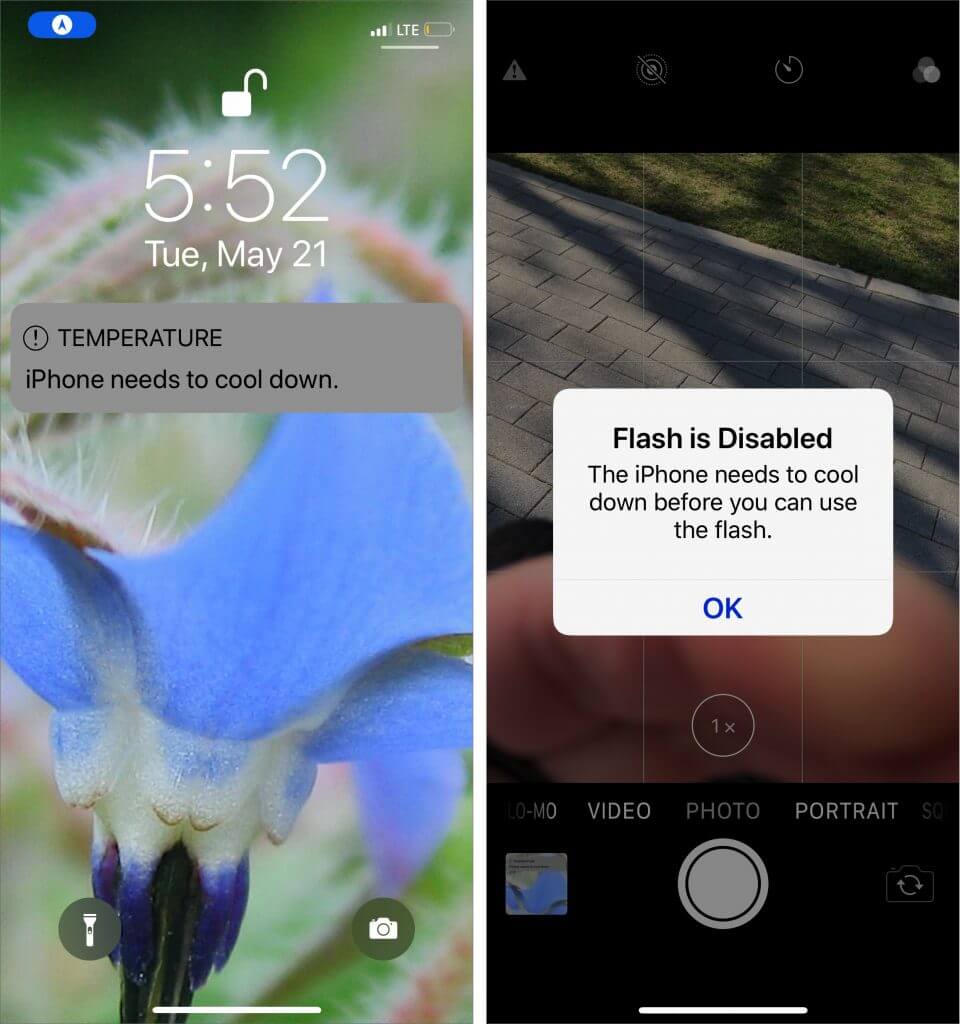
  • The camera flash is temporarily disabled.
  • Performance slows with graphics-intensive apps or features.

If you’re using Maps on an overheating iPhone for GPS navigation in the car, it may show a “Temperature: iPhone needs to cool down.” screen instead of the map. You’ll still get audible turn-by-turn directions, and the screen will wake up to guide you through turns,

How to Keep Your Tech Cool

For the most part, keeping Apple devices cool just requires common sense, since you’d do the same things for yourself.

  • As Apple’s specifications recommend, avoid using devices when the temperature is over 95º F (35º C). If you can’t avoid it entirely, keep usage to a minimum.
  • Don’t leave devices in cars parked in the sun for long periods of time. If it happens accidentally, let the device cool before using it.
  • Provide good ventilation so air can cool the device. Don’t block ventilation ports in the back of desktop Macs, and don’t use Mac laptops in bed, propped on a pillow, or under the covers. It can be worth vacuuming dust out of ventilation ports every so often.
  • Never put anything on the keyboard of an open Mac laptop.
  • Avoid stacking things on top of a Mac mini.
  • Monitor the temperature of server closets. If they get too hot, keep the door open, add a fan, or run the air conditioning.

Luckily, the temperatures that cause problems for Apple hardware aren’t terribly comfortable for people either, so if you’re way too hot, that’s a good sign your gear is as well.

(Featured image by Alfonso Escalante from Pexels)


Social Media: How hot is too hot for your Apple devices? You may be surprised by the answer.

A Quick Way to Check Battery Levels on Your iPhone, Apple Watch, and AirPods

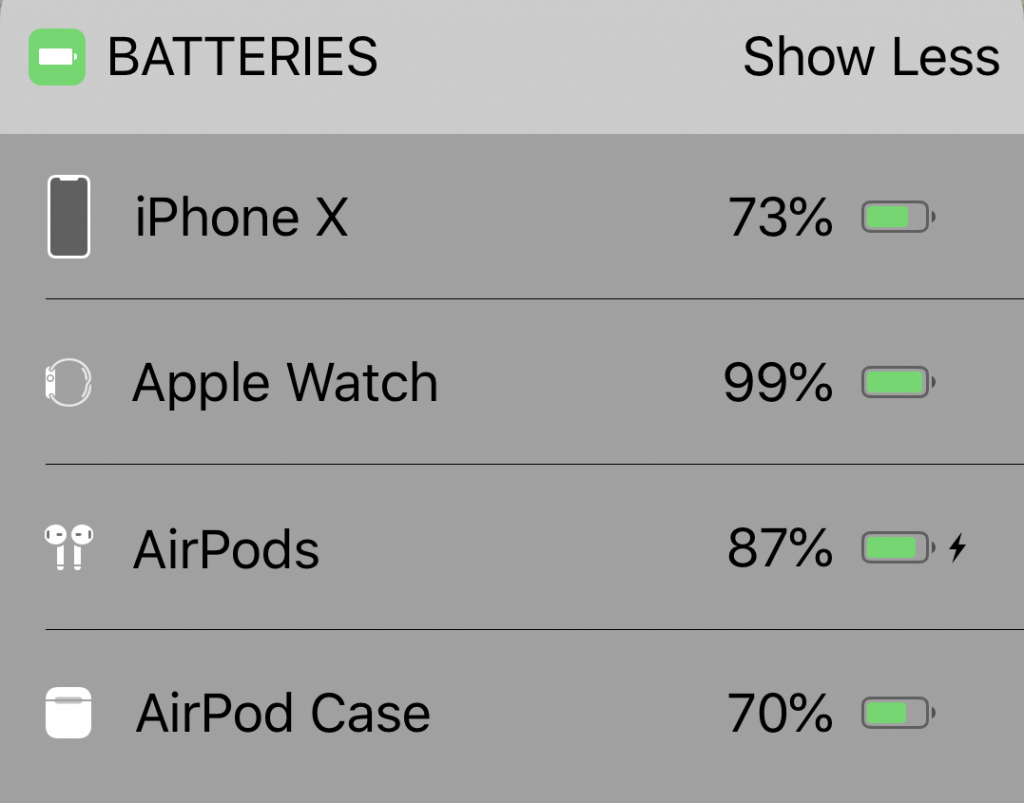
Apple’s Batteries widget is a little known but highly useful tool for quickly assessing which of your small Apple devices is lowest on power—something you may wish to do when traveling with only one charging cable. To access it, switch to Today view on the iPhone, accessible by swiping right on the Home screen or Lock screen. If the Batteries widget isn’t already there, scroll to the bottom, tap Edit, and tap the green + button to the left of Batteries in the list. Of course, if you just want to check the battery status on one device, that’s possible too. It’s easy to figure out how much power remains in your iPhone’s battery because of the indicator at the top right of the screen (swipe down on it to invoke Control Center and see the percentage on the iPhone X and later). On the Apple Watch, swipe up on the screen to see its battery percentage in Control Center. For AirPods, open the case and wait for the pop-up to appear on your iPhone’s screen.

(Featured image by Adam Engst)

Need to Merge Photos Libraries? Here Are Your Options

Photos makes it easy to create and switch between libraries. That’s good when photos need to be kept completely separate. For instance, a real estate agent might want to keep personal photos separate from house photos taken for work. But too much separation is annoying—you have to keep switching between libraries, and it’s easy to import new photos into the wrong one.

If you struggle with multiple Photos libraries, never fear—you can merge them. Unfortunately, the process is slow, can require a lot of disk space, and may result in the loss of some metadata. You have three options: merging through iCloud Photos, using the PowerPhotos utility, and merging by exporting and importing. Each has pros and cons.

Merge through iCloud Photos

Apple’s iCloud Photos service offers the best solution for merging libraries. The trick is that whenever you designate a library as your System Photo Library, Photos automatically uploads all images that aren’t already present, adding them to the photos already in iCloud Photos. It also retains all the metadata surrounding your photos—titles, keywords, albums, facial recognition, projects, and more.

On the downside, using iCloud Photos almost certainly won’t be free unless you have so few photos that the combined library will fit within the free 5 GB of iCloud space Apple gives everyone. Almost everyone will have to pay for additional storage space ($0.99 per month for 50 GB, $2.99 for 200 GB, or $9.99 for 2 TB) for at least the month in which you’re doing the merge. iCloud Photos is a good service, so it’s likely worth paying for anyway.

More problematic is that the iCloud Photos way of merging will be very slow. If you haven’t already started using it, it could take a week or more to upload many thousands of photos. Plus, it will probably download the entire cloud-based collection of photos to each library whose photos you want to merge, so you may need a lot of local disk space too.

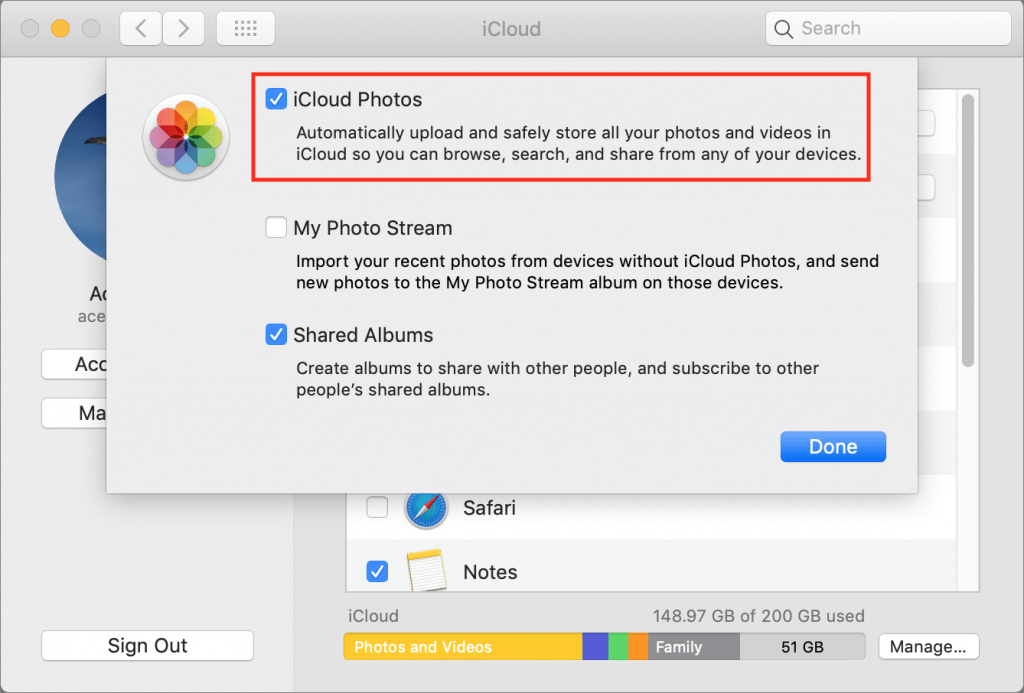
If you haven’t previously used iCloud Photos, go to System Preferences > iCloud and click the Options button next to Photo. In the dialog, select iCloud Photos.

Now, starting with the smallest Photos library and working up in size, follow these steps for each library you want to merge:

  1. Double-click the Photos library to open it.
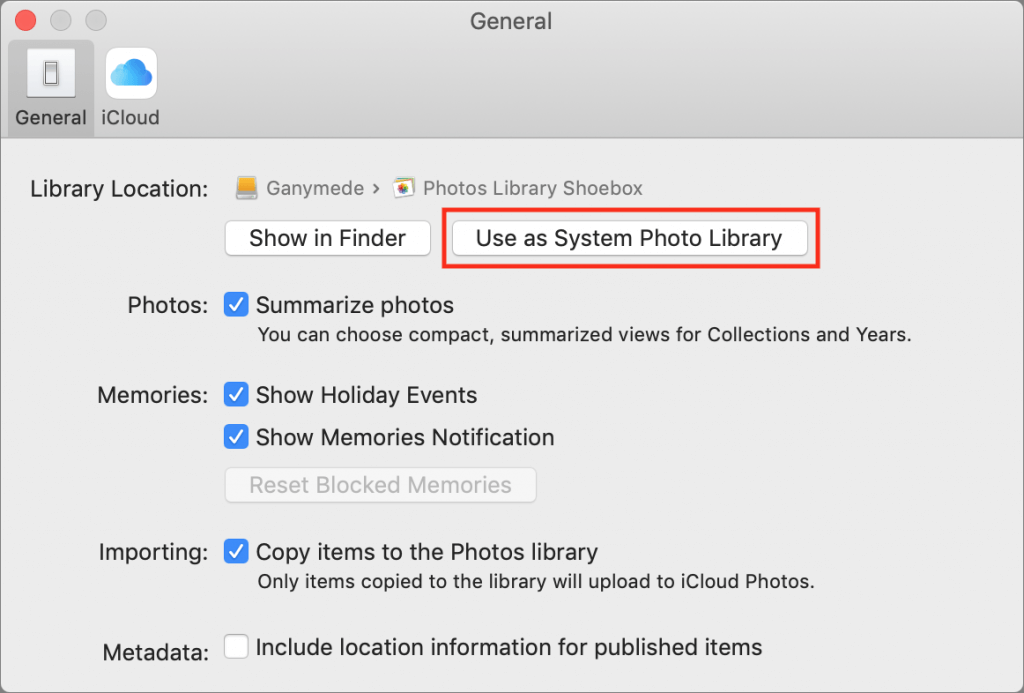
  2. In Photos > Preferences > General, click Use as System Photo Library. (If it’s dimmed out, that library is already set as the System Photo Library.)
  3. Wait for photos to upload. Scroll to the bottom of the Photos view to see the progress. A Pause link will appear there during uploading—click it if you need to keep Photos from overwhelming your Internet connection. Once the photos have all uploaded, go back to Step 1 with your next Photos library.

When you’re done, the last Photos library becomes the one you’ll keep, and you can delete the others. Needless to say, make sure you have good backups first!

Merge with PowerPhotos

The $30 PowerPhotos from Fat Cat Software provides a variety of extra capabilities when working with Photos. It helps you to create and manage multiple libraries, copy photos between libraries, find duplicates, and—most important for this topic—merge libraries.

Because PowerPhotos is working entirely on your Mac’s drive, it’s fast and it doesn’t require huge amounts of extra disk space. Unfortunately, unlike the iCloud Photos approach, which brings in both originals and any edits to those photos, PowerPhotos can import only your original photos or the versions that you’ve edited, not both. Plus, it can’t merge facial recognition data, smart albums, or print projects.

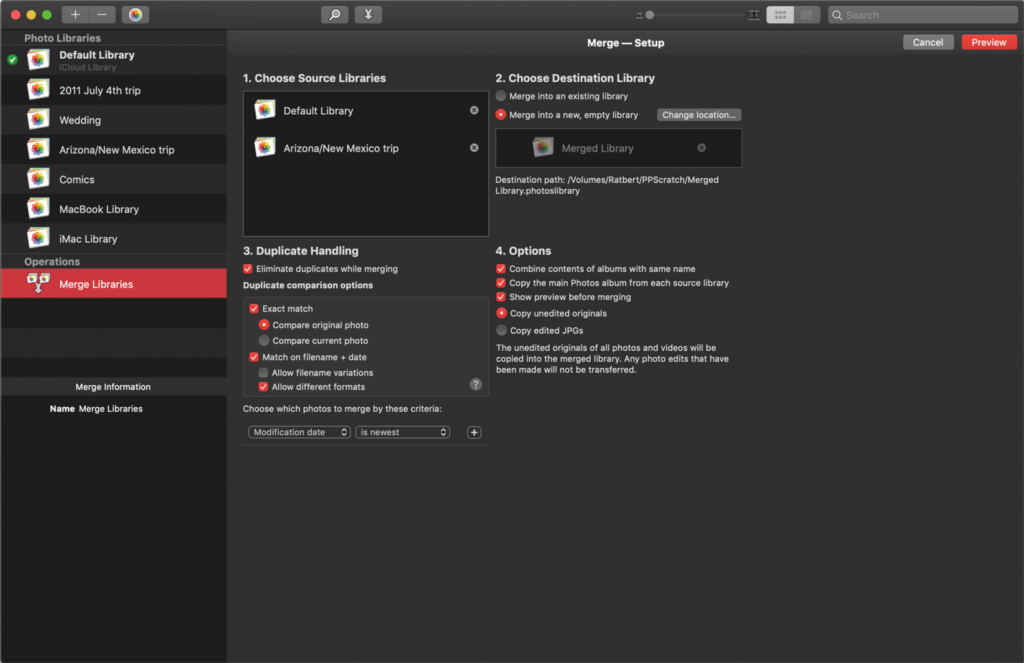
PowerPhotos provides an actual interface for merging too—choose Library > Merge Libraries to start.

In the window that appears, you have four tasks:

  1. Choose source libraries. You aren’t limited to merging just two libraries; you can pick multiple sources.
  2. Choose the destination library. This is the library you want to receive all the photos. If you want, you can create a new one.
  3. Configure duplicate handling. PowerPhotos can import just one of several copies of duplicate photos, or you can bring in all the duplicates if that’s important.
  4. Choose options. PowerPhotos can merge album contents, create an album from each source library, and create a backup before merging. Most important, though, is the choice of whether to merge your original photos or the edited versions.

Merge by Exporting and Importing

This final option is conceptually simple. You export all the photos from one library and then import them into another. It’s even what Apple recommends. The main thing it has going for it is that it’s free, and it will be faster than the iCloud Photos approach. It could also be useful if you want to copy a subset of photos between libraries, rather than merging all photos.

However, as with PowerPhotos, you have to choose between original and edited photos, and you’ll need a lot of extra disk space. Even worse, you’ll lose even more metadata, including albums, faces, and print projects. And if you export as JPEG, your photos may also suffer a slight quality drop as they’re recompressed.

For those who want to use this approach, Apple provides detailed instructions. In essence, you’ll click Photos in the sidebar to see everything, and then choose Edit > Select All. Then you’ll choose File > Export and either Export X Photos (to get the edited versions of images) or Export Unmodified Original for X Photos (to get the original images). Once everything has exported, you’ll switch libraries in Photos and then drag the folder of exported images back into Photos to import it.

Our nod goes to the iCloud Photos technique, but PowerPhotos is a fine utility for those who aren’t perturbed by its limitations. Of course, don’t start any merging without making backups first, and if you need help, don’t hesitate to call us.


Social Media: If you want to merge Photos libraries to avoid having to switch back and forth, there are several approaches you can take, but each comes with pros and cons. See them all at:

Recover Drive Space by Deleting Old and Unnecessary iOS Device Backups

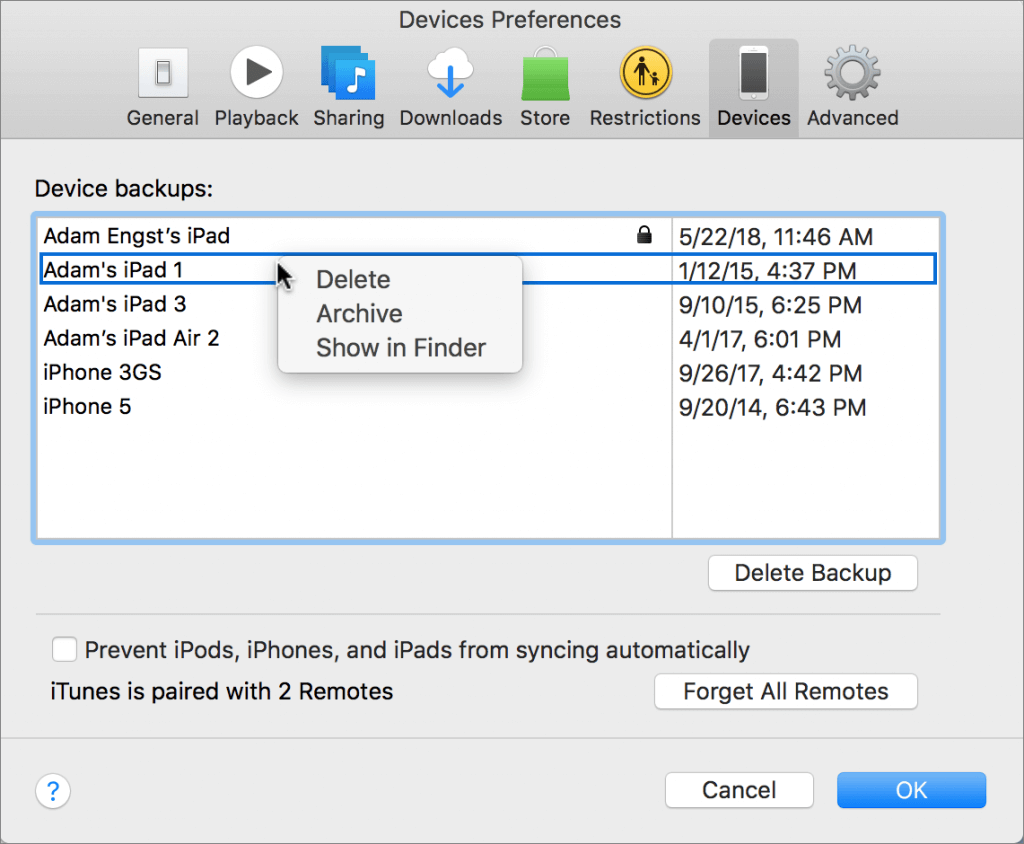
If you’ve been good about backing up your iOS devices to iTunes on your Mac or to iCloud, give yourself a gold star! Both backup destinations are fine, but there’s one potential downside to iTunes backups: they can consume a lot of space on your Mac’s drive. In iTunes, go to iTunes > Preferences > Devices, where you’ll see all the iOS device backups that iTunes has stored. If there are multiple older backups or any for devices you no longer own, you can get rid of them. Control-click the offending backup, and choose Delete. Or, if you want to check how large a backup is first, instead choose Show In Finder, and then in the Finder, choose File > Get Info. When you’re ready, move the selected backup folder to the Trash.

To Update macOS 10.14 Mojave, Use This New System Preferences Pane

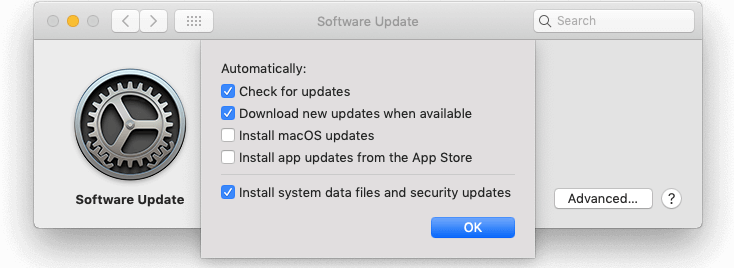
For years, you’ve used the App Store app to install operating system and app updates on your Mac. That’s still true for apps, but with macOS 10.14 Mojave, Apple moved operating system updates to the new Software Update preference pane, which replaces the old App Store preference pane. Open System Preferences > Software Update to check your version of macOS and access available updates—there will be an Update Now button to click. You should also visit this pane to tell your Mac how to best handle system and app updates: Don’t select “Automatically keep my Mac up to date” because updates might come at an inconvenient time for you. Instead, click Advanced and then select “Check for updates” and “Install system data files and security updates”—they’re important. Unless you’re low on drive space, selecting “Download new updates when available” is fine, since that will make updating faster. However, keep “Install macOS updates” and “Install app updates from the App Store” off so you can choose when to update.