We’ve become accustomed to our iPhones and iPads switching into Low Power Mode to preserve battery life, and you can enable it manually if you want to reduce power usage for a day. New in macOS 12 Monterey for the MacBook Air and MacBook Pro is a similar feature, though you must enable it manually. Open System Preferences > Battery, click Battery in the sidebar, and select Low Power Mode. It reduces the screen brightness automatically and may decrease CPU performance. Make sure to turn it off once you don’t need it anymore.
(Featured image by iStock.com/Pascal Kiszon)
https://f11photo.com/wp-content/uploads/sites/13/2022/03/Low-Power-Mode-photo.jpg8001280F-11 Photohttps://f11photo.com/wp-content/uploads/sites/13/2023/06/PR-F11Photo-logo.jpgF-11 Photo2022-03-01 10:07:002022-03-31 21:22:24Extend Your Battery Life in macOS 12 Monterey with Low Power Mode
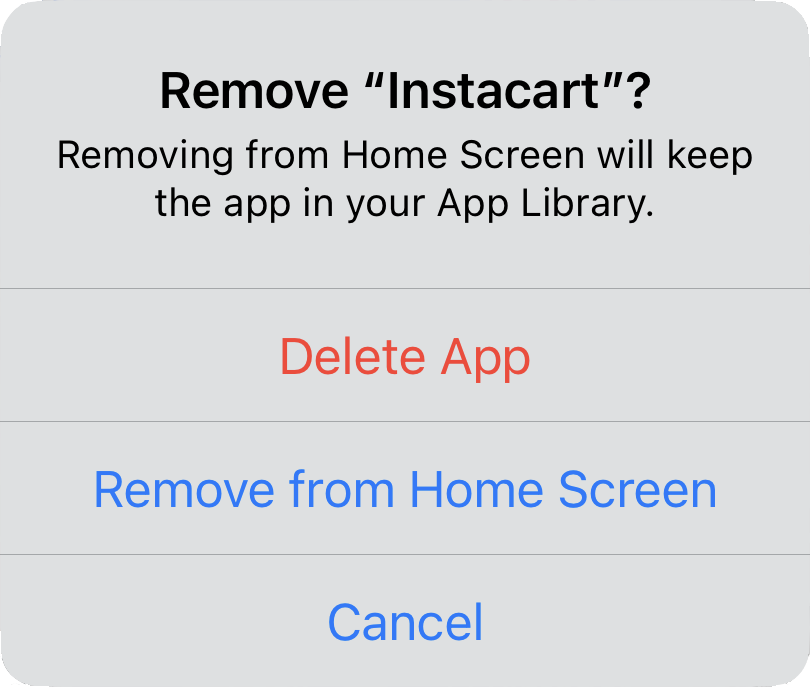
In iOS 15 and iPadOS 15, Apple added a feature that would have been even more welcome before the advent of the App Library: the capability to manage apps from Search. But it’s still handy as a way to delete or position an app you can’t find on a Home screen page. Swipe down from the middle of the Home screen to enter Search, after which you can work with any app you see in Siri Suggestions or find with a search ➊. Touch and hold an app to display its contextual menu ➋, including a Delete App option. Or touch and hold it and start dragging to move it to a Home screen page ➌. Bonus: you can even drag an app out multiple times to put it on multiple Home screen pages or in multiple folders!
(Featured image by iStock.com/B4LLS)
https://f11photo.com/wp-content/uploads/sites/13/2022/03/Manage-apps-from-Search-photo.jpg8001280F-11 Photohttps://f11photo.com/wp-content/uploads/sites/13/2023/06/PR-F11Photo-logo.jpgF-11 Photo2022-03-01 10:06:002022-03-31 21:22:25Delete or Position iOS Apps from Search
For years now, Apple has made transparency a part of the macOS interface, which has the effect of blending the menu bar into the background and making menus and some windows take on the background hue, as you can see on the left side of the illustration below. For many people, transparency blurs the interface, making it harder to differentiate interface elements from the wallpaper. It also causes problems for screenshots meant for publication because the images end up with unrepresentative color levels. To prevent that from happening, open System Preferences > Accessibility > Display and select Reduce Transparency. It can be a significant difference, as you can see on the right side of the illustration below.
(Featured image by Adam Engst)
https://f11photo.com/wp-content/uploads/sites/13/2022/03/Reduce-Transparency-photo.jpg8001280F-11 Photohttps://f11photo.com/wp-content/uploads/sites/13/2023/06/PR-F11Photo-logo.jpgF-11 Photo2022-03-01 10:05:002022-03-31 21:22:27Use Reduce Transparency for a Consistently Colored macOS Interface
Over the past few months, there has been a spate of media reports about how people may have been tracked without their knowledge using AirTags, Apple’s elegant location trackers. Like many mainstream media forays into the tech world, the reports are often short on detail and sometimes unclear on the reality of how the AirTags work. Nor is it clear that there have been many successful cases of AirTag abuse, but the mere fact that people are trying to use AirTags to stalk others is concerning.
Apple put significant effort into preventing such abuses, revolving around three features:
Safety alerts: If you have an iPhone or iPad running iOS 14.5 or later and an unknown AirTag is traveling with you, your device will alert you to that fact. Although safety alerts aren’t available for those using Android smartphones, Android users can download Apple’s Tracker Detect app to scan manually.
Safety sounds: After an AirTag has been separated from its owner for several days, it will make a sound the next time it moves.
NFC identification: If you find an AirTag, you can hold it up to an iPhone or other NFC-capable smartphone to load a website that reveals the AirTag’s serial number and the last four digits of the owner’s phone number. The police can use this information to learn the owner’s identity from Apple.
Sadly, those precautions haven’t been sufficient either to dissuade all would-be stalkers or to educate potential stalking victims (and let’s be real—dissuading stalkers is also a matter of educating people that it’s unethical, likely dangerous, and often illegal to abuse an AirTag in this way). Apple has responded in two ways, one general, the other specific to AirTags.
Personal Safety User Guide
Apple documents its products and services quite well, but the company tends to generate many focused pages without much high-level organization. It’s all too easy to flail around within Apple’s support documentation looking for help if you don’t know what search terms are likely to work. In an effort to mitigate that problem for issues surrounding personal safety, Apple has created the Personal Safety User Guide website, also available as a downloadable 56-page PDF.
The Personal Safety User Guide brings together numerous Apple support articles in two main sections:
Review and take action: The first section helps you review how your devices and apps are set up, with a focus on settings that could expose you to harm. It helps you manage sharing settings, look at location sharing, control your Home accessories, and more. You’ll also learn how to block unknown sign-in attempts, document suspicious activity, delete suspicious content, and avoid fraudulent requests to share information, among much else. The main criticism here is that the section on AirTag safety doesn’t explain or link to all the features Apple provides.
Safety and privacy tools: The second section is a bit more generic, providing support documentation that encourages you to take advantage of the features Apple has provided to protect your safety and privacy. Among other topics, it discusses passcodes, setting up Face ID and Touch ID, using two-factor authentication, seeing which apps are accessing your data, blocking unwanted calls and messages, and using Emergency SOS.
The Personal Safety Guide ends with three checklists, each of which walks you through a series of steps. These are extremely useful because almost no one would necessarily know or remember all the places to check. The checklists help you:
See who has access to your device or accounts
Stop sharing with someone
Control how someone else can see your location
The Personal Safety User Guide website is best when you want an answer to a specific question, but it doesn’t lend itself to reading front to back. For that, we recommend downloading the PDF, which you can read at whatever depth you desire. But do at least scan the entire thing to get a sense of what it contains should you need that information later.
Apple AirTag Announcement
Shortly after releasing the Personal Safety Guide, Apple also posted a short but detailed statement on its website. In it, the company makes it clear that it is actively working with law enforcement on all cases involving AirTag abuse. Apple also says that it has updated its unwanted tracking documentation to explain AirTag safety features more clearly to users and to include resources for those who feel their safety is at risk.
Apple also outlined important advancements that will be coming to the AirTag and Find My network systems via software updates later this year:
New privacy warnings during AirTag setup: To ensure that everyone understands the utility of AirTags and the implications of abuse, people setting up an AirTag for the first time will see a message that clearly states that AirTags are meant to track their own belongings, that tracking people without their consent is a crime in many places, that AirTags are designed to alert victims to their presence, and that law enforcement can request identifying information about the owner of an AirTag.
Better alerts for AirPods: Instead of an “Unknown Accessory Detected” alert when your iPhone detects Find My network-compatible AirPods traveling with you, the alert will specify that AirPods are involved, not an AirTag. (There are third-party Find My network accessories that will still generate this alert, such as the Chipolo ONE Spot.)
Refined unwanted tracking logic: Apple will be updating its unwanted tracking alert system to notify users sooner that an unknown AirTag or Find My network accessory is traveling with them.
Precision Finding for unknown AirTags: Those with an iPhone 11, iPhone 12, or iPhone 13 will be able to take advantage of Find My’s Precision Finding feature to home in on the location of an unknown AirTag. Previously, this capability was limited to your own AirTags.
Display alerts with unknown AirTag sound: When an unknown AirTag emits a sound to alert anyone nearby to its presence, and it’s detected moving with your iPhone or iPad, an alert will also appear to help you play the sound again or use Precision Finding, if available. This should help when an unknown AirTag is in a place that blocks sound or if its speaker has been disabled.
More obvious AirTag alert sound: Apple will be adjusting the tone sequences to make an unknown AirTag’s alert sound easier to hear and find.
Overall, these changes are welcome, and it’s a testament to the care Apple took when designing the AirTag and Find My network systems that it can make such enhancements through software updates—no hardware changes are necessary. It’s also good to see Apple taking the problem—however small it might actually be—seriously and working to reduce it even further.
(Featured image by Apple)
Social Media: Media reports suggest that miscreants are trying to use Apple’s AirTag location trackers to stalk people. Apple has responded with personal safety advice and promised AirTag safety enhancements.
https://f11photo.com/wp-content/uploads/sites/13/2022/03/AirTag-privacy-photo.jpg8001280F-11 Photohttps://f11photo.com/wp-content/uploads/sites/13/2023/06/PR-F11Photo-logo.jpgF-11 Photo2022-03-01 10:04:002022-03-09 00:06:04Apple Works to Improve Safety in the Wake of AirTag Stalking Reports
Back in iOS 14, Apple added the App Library, which collects all the apps on your iPhone. With everything available in the App Library, iOS 14 was also able to provide the option of hiding Home screen pages, a boon for those of us with too many disorganized pages. In iOS 15, Apple has taken the next step. You can still hide Home screen pages, but if you never want to see them again, you can delete them (apps remain in the App Library). Or, if they’re not in the order you want, you can rearrange them. Touch and hold any empty spot on the Home screen to enter jiggle mode. Tap the dots above the Dock that indicate which Home screen page you’re on. In the Edit Pages screen, you can now tap the – button next to a hidden page to delete it ➊. If you want to delete a visible page, first hide it by tapping its checkmark underneath ➋. Or, to rearrange Home screen pages, drag a thumbnail to a new location ➌. Tap Done or press the Home button when you’re finished.
(Featured image by Adam Engst)
https://f11photo.com/wp-content/uploads/sites/13/2022/02/Home-Screen-pages-photo.jpg8001280F-11 Photohttps://f11photo.com/wp-content/uploads/sites/13/2023/06/PR-F11Photo-logo.jpgF-11 Photo2022-02-01 13:08:002022-02-28 22:38:33iOS 15 Allows Rearranging and Deletion of Home Screen Pages
There’s little more frustrating than running out of space, which always seems to happen at just the wrong time. Luckily, Apple makes it easy to check any time, before it becomes a problem. On the Mac, choose About This Mac from the Apple menu and click Storage. On an iPhone or iPad, navigate to Settings > General > iPhone/iPad Storage. For iCloud, you can look in either System Preferences > Apple ID on the Mac or in Settings > Your Name > iCloud > Manage Storage on an iPhone or iPad. Once you know how much space is consumed by what, you can more easily clear unnecessary data.
(Featured image by iStock.com/alphaspirit)
https://f11photo.com/wp-content/uploads/sites/13/2022/02/man-stressed-by-too-much-stuff-photo.jpg8001280F-11 Photohttps://f11photo.com/wp-content/uploads/sites/13/2023/06/PR-F11Photo-logo.jpgF-11 Photo2022-02-01 13:07:002022-02-28 22:38:50Where to Check macOS, iOS/iPadOS, and iCloud Storage Status
Most of the time, when you unlock your iPhone or iPad, you want to launch an app. In iOS 15 and iPadOS 15, you no longer have to unlock the device, find the app on a Home screen page, and tap it. Instead, you can open an app directly from the Lock screen, assuming Settings > Face/Touch ID & Passcode > Today View and Search is turned on. Just swipe down from the middle of the Lock screen ➊ to access the Search screen, which lists apps from Siri Suggestions ➋. You can tap one of those to open it, or you can use the Search field to find an app by name and tap the search result ➌.
(Featured image by iStock.com/ipopba)
https://f11photo.com/wp-content/uploads/sites/13/2022/02/Search-from-Lock-Screen-photo.jpg8001280F-11 Photohttps://f11photo.com/wp-content/uploads/sites/13/2023/06/PR-F11Photo-logo.jpgF-11 Photo2022-02-01 13:06:002022-02-28 22:39:07In iOS 15, You Can Now Open an App from the Lock Screen
It’s unfortunate that the most recent iteration of the Magic Mouse has its Lightning charging port on the bottom, making it impossible to use while charging, unlike the Magic Keyboard and Magic Trackpad, which work fine when plugged in. To check if your Magic Mouse needs charging before it starts to nag (and starts acting a little funky), look in one of these spots. If your menu bar is displaying the Bluetooth icon, click it, and the charge level should show up. Or click the Control Center icon on the menu bar and click Bluetooth. You can also look in System Preferences, in either the Bluetooth preference pane or the Mouse preference pane. In our experience, the Bluetooth menu is the easiest, but Control Center and the Mouse preference pane are the most reliable—sometimes the charge level doesn’t appear in the menu.
(Featured image by iStock.com/Alex Sholom)
https://f11photo.com/wp-content/uploads/sites/13/2022/02/tired-mouse-photo.jpg8001280F-11 Photohttps://f11photo.com/wp-content/uploads/sites/13/2023/06/PR-F11Photo-logo.jpgF-11 Photo2022-02-01 13:05:002022-02-28 22:39:24Does Your Magic Mouse Need More Juice? Here’s How to Check
As pandemic-related restrictions ebb and flow, many people continue to work from home at least some of the time. A key requirement for successful remote work is a fast, solid Internet connection. Unfortunately, it’s all too common for Internet connections to degrade over time as cables endure a variety of insults ranging from water seeping into connectors to squirrels gnawing through insulation. You might be surprised at how variable such problems can be—we once saw an Internet connection that dropped out infrequently; it turned out that squirrels had damaged just one pair of wires in the cable, and the Internet provider’s system hopped between pairs depending on other neighborhood traffic.
How do you know if something in your Internet connection needs fixing? If the entire connection goes offline periodically, even if it comes back on its own, that’s a hint. Videoconferencing apps and streaming video services can also provide useful warnings—if the picture often pixelates or pauses, or if the audio falls out of sync with the video, that’s another indication that something may be wrong. Finally, if you use a VPN, Internet connectivity issues can cause all sorts of weird problems.
When you notice such problems, you can perform a simple test that may shed some light on the situation. First, make sure to stop any audio or video streaming or large downloads. Then go to speedtest.net and click the Go button. Speedtest will run some tests to come up with three numbers:
Download: Your download performance, generally measured in megabits per second (Mbps), is the most important and determines how quickly your computer can receive data from the Internet for downloads and streaming video.
Upload: Conversely, your upload performance, also measured in megabits per second, determines how fast you can send data to the Internet. It’s almost always much lower than download performance, but sufficient upload bandwidth is essential for your audio and video to be clear and smooth in a videoconference.
Latency: This number, which Speedtest calls “ping,” measures the amount of time in milliseconds to send a single packet to the destination server and receive it back again. The lower the latency, the more responsive communications will be, which is all-important for online gaming. Very long latencies can also cause problems for VPNs.
(You can also use other similar services, such as Netflix’s fast.com or Google’s built-in tester. Apple even built a networkQuality tool into macOS 12 Monterey—run it at the command line in Terminal—though it has an unusual Apple Network Responsiveness test that replaces the latency test.)
What should these numbers be? When you signed up for a plan with your Internet service provider (ISP), you should have been quoted download and upload numbers, such as 200 Mbps down and 10 Mbps up. If you don’t know what those numbers should be, ask your ISP. It’s not uncommon for download and upload speeds to vary somewhat from what you were promised, but they should generally be close.
Latency is trickier, and ISPs won’t promise anything specific. The lower the latency number, the better. Speedtest suggests that times under 59 milliseconds are good for gaming, times between 60 and 129 milliseconds are acceptable, a range of 130–199 milliseconds is problematic, and 200-plus milliseconds won’t be usable. There’s no way to know what latency numbers might cause other problems, but we’d pay attention to anything over 100 milliseconds.
Let’s assume your numbers aren’t what they should be—or at least what you’d like them to be. Don’t complain to your ISP right away. Instead, try these steps:
Run the test a few more times, preferably at different times of the day. (If you create an account with Speedtest, it will track your tests so you can see how they change.) You may discover that performance is slow only during peak usage hours.
Run more tests using different Speedtest servers or even different testing services. You’re testing the performance between you and a particular server, and it’s possible that server is having problems that others won’t share.
If you have other devices, run tests from those as well. Don’t assume you’ll get identical results because different devices may have varying capabilities. If you notice differences between devices that use Wi-Fi and those connected via Ethernet, that might point to your Wi-Fi router as a bottleneck. That’s not common with modern Wi-Fi routers, but if you’re still relying on an old AirPort Express, it could be slowing you down.
Restart your devices, and if that doesn’t make a difference, restart or power cycle your router and modem as well.
If your performance problems persist through all those troubleshooting tests, the problem is likely in the physical connection, and only your ISP can address that. When you call, be sure to share the testing numbers and any commonalities—times of day, for instance—that you observed. With luck, they’ll be able to confirm your issues and dispatch a technician to evaluate the physical connection for problems.
(Featured image by iStock.com/gorodenkoff)
Social Media: Slow or unreliable Internet connection? It could be your ISP—read on to find out how to test your connection and evaluate the results.
https://f11photo.com/wp-content/uploads/sites/13/2022/02/Internet-connection-cables-photo.jpg8001280F-11 Photohttps://f11photo.com/wp-content/uploads/sites/13/2023/06/PR-F11Photo-logo.jpgF-11 Photo2022-02-01 13:04:002022-02-28 22:39:41If Your Internet Connection Is Slow, Research These Three Numbers
Some people find it hard to find the mouse pointer at times, particularly on a large screen or when working in Dark Mode or in apps with dark interfaces. You’ve long been able to increase the size of the pointer generally and also zoom it temporarily by shaking it, but in macOS 12 Monterey, Apple now lets you change the color of the pointer. That could be a boon to those who have trouble seeing it otherwise. Go to System Preferences > Accessibility > Display > Pointer, click the Pointer Fill Color box, and choose a different color in the color picker. You can also choose a different Pointer Outline Color if that’s helpful. After customizing it, if you decide you prefer the old black-and-white version, click the Reset button.
(Featured image by iStock.com/tahir_duran)
https://f11photo.com/wp-content/uploads/sites/13/2022/01/pointer-color-photo.jpg8001280F-11 Photohttps://f11photo.com/wp-content/uploads/sites/13/2023/06/PR-F11Photo-logo.jpgF-11 Photo2022-01-03 13:08:002022-01-31 17:28:39Change Your Pointer Color in macOS 12 Monterey