Calendar Tip for iPhone Photographers

The Clip It Calendar is the perfect choice to keep your iPhone and Instagram images front and center all year.  When using pictures from your iPhone in a multi-image product like this, hit the “+” sign and make a new album on your phone with a name you’ll remember like “2019 Calendar.” Next, select the photos you want to use from any album then use “add to” at the bottom of the screen to make them appear in your new “2019 Calendar” album. Now you’re ready to order Clip It Calendars here or use the F-11 Photo Print & Share App.  All of the photos you want to use are now be in one convenient location–choose a template and drop the photos in the month you want to see them in next year.  You’ll be done in no time!  Oh ya when you’ve finished your project, you can delete the “2019 Calendar” album from your iPhone–your photos will still be in the original albums.

Video is Everywhere. Transfer, Edit, Share.

With a little fear and sadness, the last post was a reminder that we all have valuable old movies growing obsolete and inaccessible in our memory archives. Here’s how to have them transferred and, more importantly, what to do then.

1.    Transfer

This is often the most daunting part because it raises a lot of questions. Where do I take it? Is it safe? What do I get back? How do I play it? Answers: Stay local and start with a small batch of one or two tapes or reels. If we don’t do it, we have a partner who does and we won’t risk (and don’t recommend) possible damage or loss in shipping.

Have it transferred to MP4. It’s a high quality, universal format of digital video. DVD or Bluray might sound simpler, but those formats are nearing obsolescence too so you’ll have to ‘rip’ them to digital video later for further editing and sharing. Having your movies transferred directly to MP4 leapfrogs that step.

2.      Edit

A good transfer service like ours will remove dead space and divide long tapes into shorter clips for you. But since there’s a good chance you won’t have been able to preview the footage first, you may still want to edit the video you get back.

First, copy the full versions to the same hard drive and cloud storage you trust for your photo backups. We’ll use Youtube because it’s great for editing and sharing. That shouldn’t be your only copy though.

If you have a Gmail account, use it to log into Youtube and click upload. Your first channel, like an album, is created by default. Drag your .mp4 into the window and while it uploads and processes, add your title, description, and tags (names, places, events). I begin my titles with the year the movies were filmed, so they’re listed in order later.

Once published, click the edit button to access all sorts of tools. To trim and clip out unwanted pieces, look for the “Enhancements” tab and then the “Trim” button. A timeline appears at the bottom where you subtract the beginning, end or pieces in the middle. When you’re done, save it as the original or as a new version. Done!

3.      Share

Your Youtube channel is public by default so that anyone you share a link with can view it, and it’s searchable on google. You can set your channel or individual videos to private, or even unlisted so that they can only be seen by you and those you allow. This is great for family because, if you give them permission, family members can help edit, title, tag and comment. One person can transfer and upload and you or someone far away can return later to refine them incrementally.

This is just the basics but if you’ve made it this far, you’re ready to tackle your first transfer. Call our experts today to get started!

Printing for young memories

Printing for Young Memories

When you think back to your surroundings growing up; your bedroom, living room, what do you remember? The furniture? The patterns on the walls and floor? I remember photos. Some of them probably still hang in a hallway in my parents’ house. They are my family. Me, grandparents, cousins. I wouldn’t have forgotten about those people had the photos not been there. Well, maybe a couple of them. But the photos helped cement in my mind just how important family was to us. What do your walls say about you now?

My kids are growing up in the screen age. Their photos are on Instagram, Google Drive, hard drives. The ubiquity of glowing pixels and endless streams of content everywhere makes it hard to assign a value to select images. And less likely that you’ll find any adorning the walls in our homes.

For Mother’s Day, I compiled all the photos of my kids with their grandmother in the last year and made a calendar for her. I stopped at 200. With that kind of abundance, is each one still as valuable as the single snapshots that hung in my childhood bedroom? Maybe. I print them anyway.

I hang little galleries in their bedroom and one in the hallway.  Some are recent, others are a decade old or more. I rearrange them when they’re knocked off the wall in epic boy battles. They don’t notice them. But they know they’re there. The people in them are more important than those floating by in Facebook feeds. And they’ll remember them later.

As a population, we take more pictures than ever before in history. It’s easier and less expensive to print them than it’s ever been. But we make fewer. I think that makes each one more valuable.


now is the best time to scan old negatives

Now is the best time to scan old negatives

Now Is The Best Time To Scan Old Negatives

Of the three types of old photo media that many of us have stashed away, negatives are the most often overlooked.  Prints and slides can be viewed relatively easily but because negatives are reversals and they’re so small, it can be hard to determine what’s on them. When you start organizing, they may be first to go in the trash. But you could be discarding good memories of you and your family from decades passed.

Prints are made from negatives so if you have a ton of old pictures, you also have, or had, a ton of old negatives. So why keep the intermediary when we have the finished product? Because where the prints fade and can be damaged, torn or lost during handling, negatives are usually kept in better shape because,

  • If they were originally developed correctly, negatives hold their color better, longer.
  • Photofinishers usually returned negatives to us in clear sleeves which, if they’re made of good quality material, are still protecting them today.
  • With no reason to handle them, negatives are commonly tucked a little deeper into our photo stashes, preserving them further.

Now is a good time to consider scanning any type of old photo media, but especially negatives. Why? Because the equipment that professionals use to scan them at high volume is becoming less mainstream, and more expensive to maintain. There are only two manufacturers still tooling out a handful of high-quality, high-volume film scanners and, as you can guess, they’re expensive to buy and operate. On the contrary, business owners are finding this niche falling further out of demand so it’s harder to justify the cost. Even established labs that already own the equipment have to weigh the costs of maintenance, space, and salaries to keep up legacy film services rather than directing those resources toward newer, more profitable services.

It’s not a doomsday scenario by any means. Store owners work hard to keep costs downs and we hope the recent renaissance in film shooters bolsters the market for processing equipment. But even in resurgence, the market is a fraction of its former self. The cost to scan each frame is likely to go in one direction only; up. If your local photo professional offers negative scanning, take them up on it. I guarantee your results will be positive!

Ideas for Displaying Your Mobile Photos

It’s easier than ever to publish your favorite photos direct from device or social media channel. Instead of choosing a traditional sized photo or paper print –  the real question now is WHAT MATERIAL to print my mobile images on. Wood, metal, fabric, fine art paper, canvas and acrylic are just a few of the options. There are dozens of awesome ways to print and display the mobile photos you love most.

Did you know?

A 1.4MB photo taken on the iPhone 6 can be enlarged into a 16″x20″ print (sometimes larger!) with amazing clarity and sharpness. Most mobile devices have stellar image quality, and because of that, you can do just about anything with the photos you take on your smartphone.

The point is that just about everything can be printed on or turned into an original photographic display. We have all kinds of creative ways to turn your ideas into reality.
Check out some options and let us know if we can help bring your photos to life!
Print from any device

Print from any device

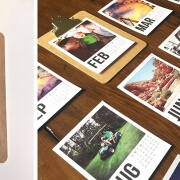
Where exactly is this cloud?

Sharing photos has never been easier. Finding them? That’s a whole other thing. If you feel a little lost in the cloud, you’re not alone. Ask anyone where their photos are and most will answer with some variation of, “Right here, on my phone.” Now ask where, actually, physically do they reside? Blank stare. Even the techiest of us have to pause to remember exactly which platform we captured or shared this particular photo on. Or we’ll just go with the standard answer we give our wives when they ask… weekly. “Honey, we use iCloud.” or “…Google Photos.” or …”Facebook saves them forever.” Eye roll.

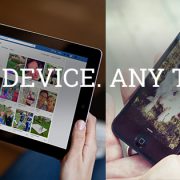
So where, really, do all these pixels exist? The truth is it doesn’t matter where they’re stored. We can fetch them from any device, any platform, any time. Maybe they’re on instagram, or in your Google Drive, or in link to a Dropbox folder. No problem. We are the locksmiths of photo vaults. (Don’t worry, we aren’t breaking in!)

There are three ways to order just about everything we make. That includes prints, posters, wall art, books, cards, the works.

1.    Online from a computer.

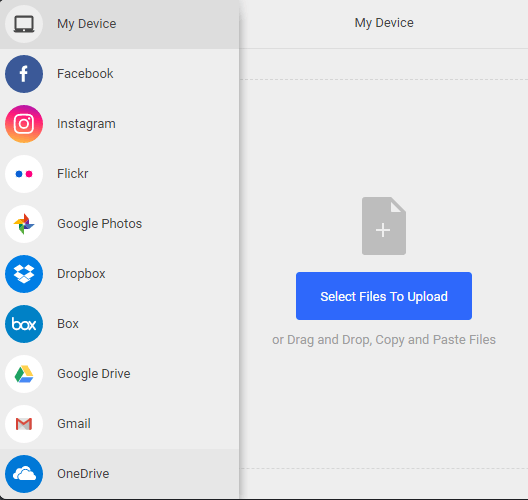
It’s old school but that’s where most of us store the good stuff; high resolution photos from dSLRs and family portrait sessions. If they’re on a hard drive or cloud drive connected to your computer, this applies. Start at our website and choose the type of product you’d like to order. You’ll be prompted to “Add Image(s)” in a window that looks something like this.

print from any device

Choose your source and the rest is easy! We’ll even verify image quality once uploaded.

2.    Online from any phone or tablet.

If our app is compatible with your device, give it a try! Otherwise continue in your device’s browser and you’ll see a box similar to the one above. Once uploaded, you can crop and edit during the order process.

3.    In-store from any device.

This is your best option because our experts can help every step of the way. Getting pictures from your phone into one of our kiosks is as easy as plugging it in. Just like your camera card or USB drive, the kiosk will find all the pictures on your device and then you can choose the ones you want.

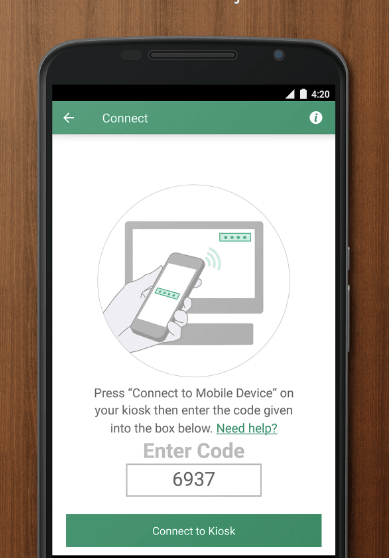
If you need only a few images, you can choose them first on your phone and send them wirelessly to the kiosk, like AirDrop®!

What if they’re not on your phone at all? No problem. Our kiosks connect to every web service above. Once your order is complete, the secure connection is closed.

Print from any device
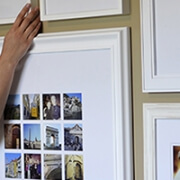
I’m everywhere. All the time.

Your photos will probably never all be in one place. Don’t let that stop you. Here’s an example. I wanted to make a photo book for my wife’s birthday. I had some family portraits that the photographer shared with us in Dropbox. I knew that about 20 of her favorite memories from the year are posted on her Facebook page, and the rest were on my phone.

I walked up to the kiosk with only my phone in my pocket, selected the book design I wanted and clicked “Add Photos.” A list of local and online sources appeared. I clicked the Dropbox icon, entered my username and password, found the folder from my Photographer and chose her favorites. Once they were uploaded, I clicked  “Add Images” again. This time I chose the Facebook icon and entered my username and password. But wait, the photos were posted in my wife’s account, not mine. No problem! Facebook shows you images posted by you and your friends, organized by person. I navigated to my wife’s shared photos and selected about 25 of them. The kiosk put them in the same bucket as our family portraits and I went back to “Add Photos” one more time. This time, I selected wireless device as my source. The kiosk directed me to a webpage on my phone where I selected the images I wanted transferred. This can also be done with an app.

Once uploaded, I had images from all three sources in one bucket. The whole upload process took about ten minutes. I spent a bit longer customizing my book before placing the order.