View Notes in Their Own Windows, and Float Them Over Everything Else

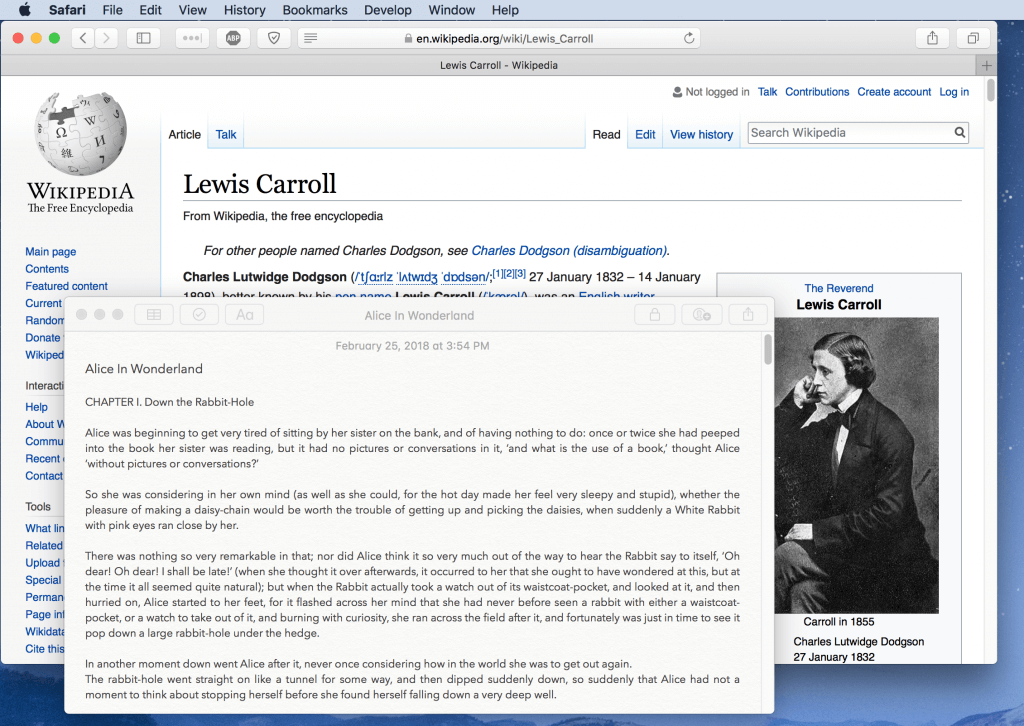
Here’s one for those who use Apple’s Notes app for storing bits of information. By default, Notes in macOS gives you a single window, with each note listed in a sidebar. But what if you want to see two notes at once? Or keep one always available no matter what else you’re doing? Select the desired notes in the sidebar by Command-clicking them, and then choose Window > Float Selected Notes to open them in their own windows. Or, just double-click them in the sidebar! Then, to make sure one or more of those windows is never obscured by another app, make it active and then choose Window > Float on Top. It’s still a normal window that you can move and resize and close, but no other app will appear over it. See how Safari is the frontmost app below, but the Notes window is on top?

Need to Do Some Simple Math? Get Siri to Do It!

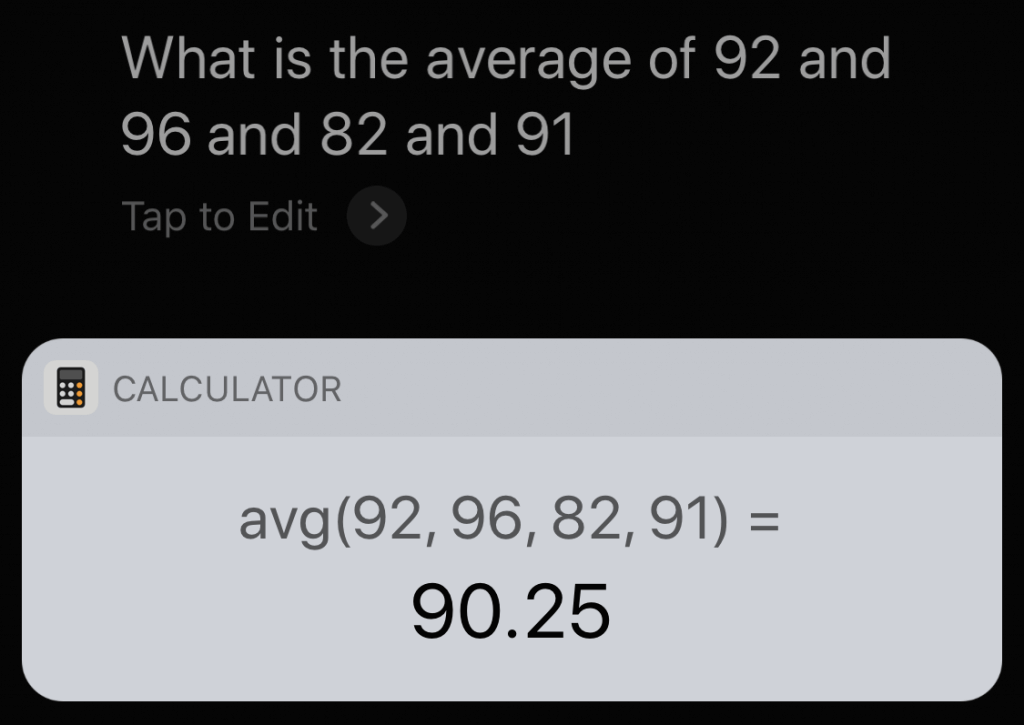
If you’re reading this, chances are good that you’re not in elementary school, but it’s still easy to end up with a bunch of numbers you need to calculate. Perhaps you’re trying to total receipts for an expense report, average your kid’s report card grades, or split a restaurant bill. Either way, instead of launching the Calculator app on your iPhone (it’s oddly missing from the iPad), get Siri to do the math for you. For each the above examples, try the following, making sure to speak the decimal point as “point” or “dot.” “What is 113.25 plus 67.29 plus 89.16?” “What is the average of 92 and 96 and 82 and 91?” “What is 235.79 divided by 6?” Siri always shows you the calculation, so you can verify that it heard you correctly, just in case you’re doing this in a loud restaurant.

Did You Know You Can Put Shadows on Text You Type on the Mac?

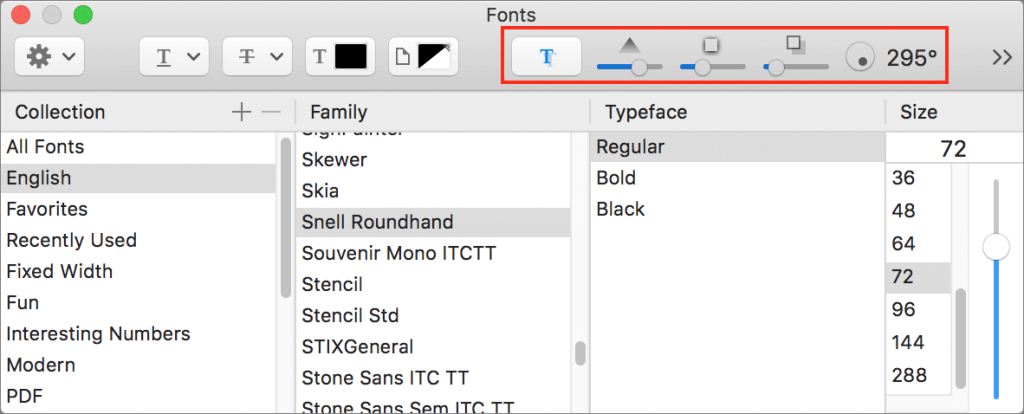
Snazzy shadowed text probably isn’t appropriate for your company’s annual report, but if you’re whipping up a flyer for a birthday party, you might want to jazz up the text. You can do that in most Mac apps that support macOS’s system-level Fonts palette. Select your text, and then bring up the Fonts palette. Generally speaking, such as in Pages and TextEdit, you do that by choosing Format > Font > Show Fonts, though the exact location may vary by app. Then click the shadowed T button toward the right of the toolbar, which activates the next four controls: Shadow Opacity, Shadow Blur, Shadow Offset, and Shadow Angle. Play with each slider and the rotating angle control until you have an effect you like.

Swipe Back and Forth between Web Pages for Easier Navigation

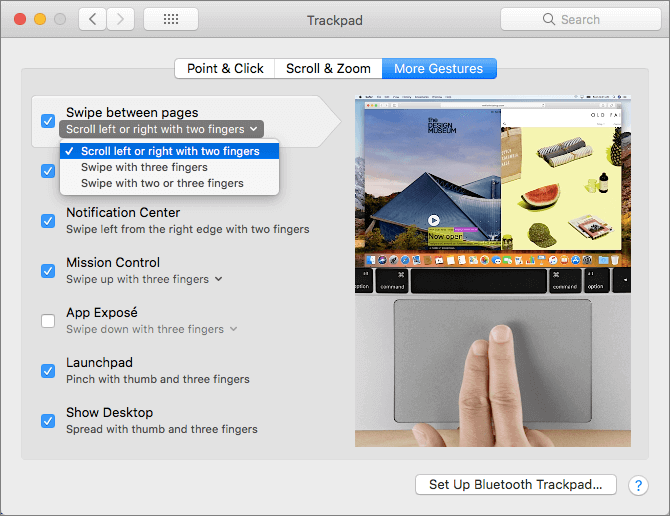
For navigation, every Web browser offers back and forward buttons, generally represented by arrows in the upper left of the toolbar. You can also navigate by choosing menu commands and typing keyboard shortcuts—did you know that Command-Left arrow and Command-Right arrow work too? But if you’re using a Mac with a trackpad, you can move back and forth between Web pages—in Safari, Chrome, and Firefox—with a two-fingered swipe left (for back) or right (for forward). If you prefer, you can switch to a three-fingered swipe in System Preferences > Trackpad > More Gestures. Or, if it’s difficult for you to keep exactly two or precisely three fingers on the trackpad, you can choose to swipe with two or three fingers.

Trading Faces: Picking a Better Face for People Photos Recognizes

Apple’s Photos app is remarkably good at identifying people in your snapshots and collecting all the pictures that contain a particular person into a group in its People view. At its top level, the People view shows a thumbnail photo for each person, picking one automatically from all the available photos. Needless to say, it doesn’t always pick the photo you want, so if you dislike what’s there, you can change it easily on the Mac. In Photos, click People in the sidebar and double-click the thumbnail of the person you want to change. If necessary, click Show More to see all their photos, then Control-click the desired photo and choose Make Key Photo from the contextual menu.

Create and Name Reminders Lists to Use Them Via Siri

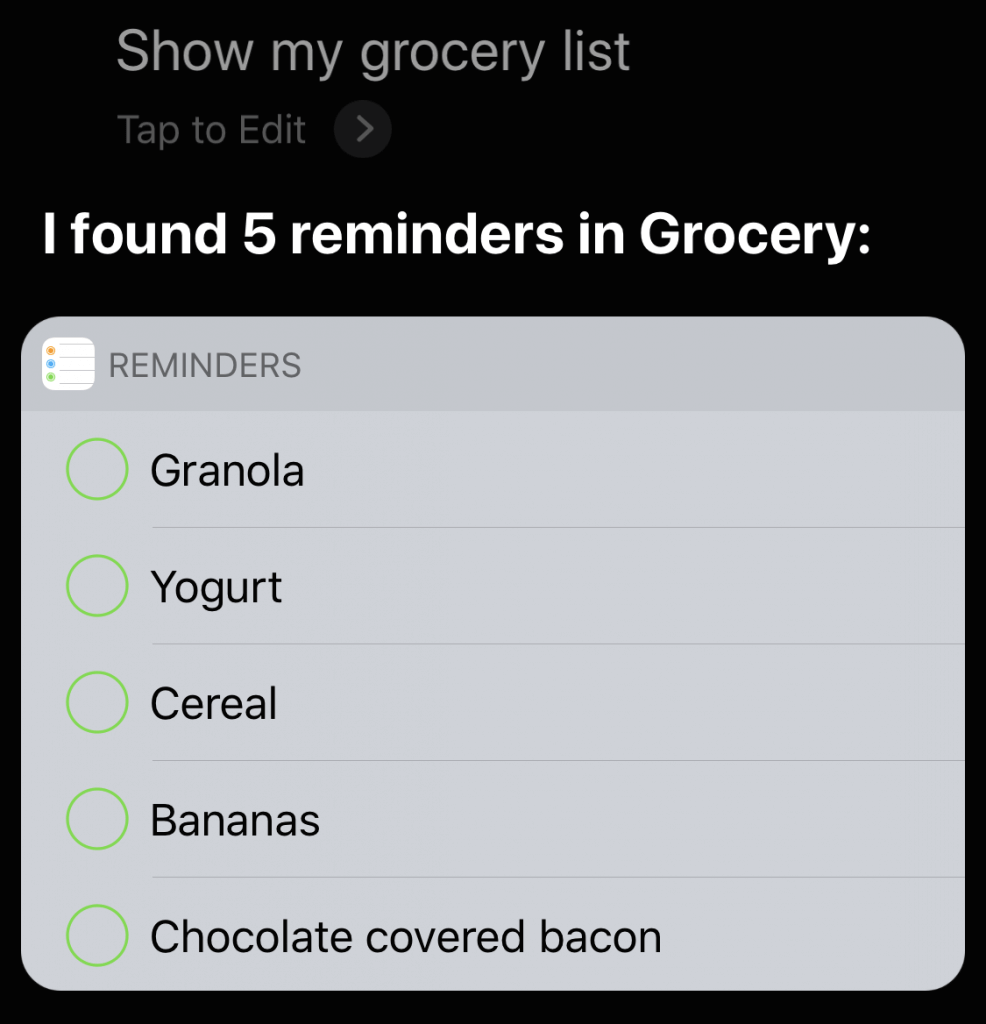
Do you create reminders with Siri on the iPhone? Those reminders are automatically added to your default list, which you set in Settings > Reminders > Default List. That’s great generally—“Hey Siri, remind me to update watchOS tonight at 11 PM”—but less good when you want to maintain different shopping lists. For instance, create a list called “Grocery,” and then you can tell Siri, “Put chocolate-covered bacon on my Grocery list.” Want to get fancy? Make a list called “Hardware,” and then tell Siri, “Add birdseed to my Hardware list, and remind me when I arrive at Home Depot.” You may have to pick the correct Home Depot location from a list, but then you’ll receive an alert reminding you to buy birdseed when you pull into the parking lot. To look at any list via Siri, just say something like “Show my Grocery list.”

Find the Battery Percentage Indicator on the iPhone X

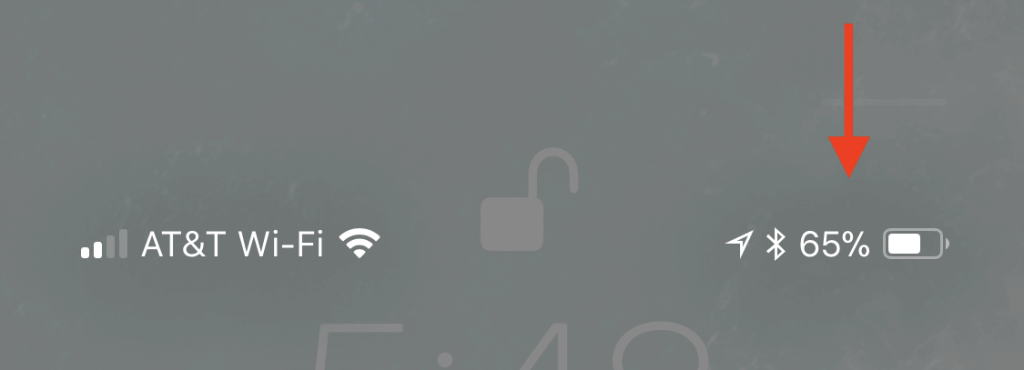
Wondering what happened to the numeric battery percentage indicator on the iPhone X? The notch takes up enough space at the top of the screen that there was room only for the battery icon, which can be hard to interpret. If you want to see precisely what percentage of your battery is left, swipe down slightly from the top-right corner of the screen. That gives you the full set of indicators, including battery percentage. You don’t have to keep swiping down enough to show Control Center, but if you do, all the indicators will be there too.

Install Minor Operating System Updates to Maintain Herd Immunity

It seems like Apple releases updates to iOS, macOS, watchOS, and tvOS nearly every week these days. It has been only a few months since iOS 11 and macOS 10.13 High Sierra launched, and we’ve already seen ten updates to iOS and seven updates to macOS. Some of these have been to fix bugs, which is great, but quite a few have been prompted by the need for Apple to address security vulnerabilities.

Have you installed all these updates, or have you been procrastinating, tapping that Later link on the iPhone and rejecting your Mac’s notifications? We’re not criticizing—all too often those prompts come at inconvenient times, although iOS has gotten better about installing during the night, as long as you plug in your iPhone or iPad.

We know, security is dull. Or rather, security is dull as long as it’s present. Things get exciting—and not in a good way—when serious vulnerabilities come to light. That’s what happened in November 2017, when it was reported that anyone could gain admin access to any Mac running High Sierra by typing root for the username and leaving the password field blank. That one was so bad that Apple pushed Security Update 2017-001 to every affected Mac and rolled the fix into macOS 10.13.2.

Part of the problem with security vulnerabilities is that they can be astonishingly complex. You may have heard about the Meltdown and Spectre hardware vulnerabilities discovered in January 2018. They affect nearly all modern computers, regardless of operating system, because they take advantage of a design flaw in the microprocessors. Unfortunately, the bad guys—organized crime, government intelligence agencies, and the like—have the resources to understand and exploit these flaws.

But here’s the thing. Security is an arms race, with attackers trying to take advantage of vulnerabilities and operating system companies like Apple, Microsoft, and Google proactively working to block them with updates. If enough people install those updates quickly enough, the attackers will move on to the next vulnerability.

The moral of the story? Always install those minor updates. It’s not so much because you will definitely be targeted if you fail to stay up to date, but because if the Apple community as a whole ceases to be vigilant about upgrading, the dark forces on the Internet will start to see macOS and iOS as low-hanging fruit. As long as most people update relatively quickly, it’s not worthwhile for attackers to put a lot of resources into messing with Macs, iPhones, and iPads.

That said, before you install those updates, make sure to update your backups. It’s unusual for anything significant to go wrong during this sort of system upgrade, but having a fresh backup ensures that if anything does go amiss, you can easily get back to where you were before.


HEIF or JPG

What the HEIF Happened to JPG?

Apple’s latest bombshell is a whole new image format and you may already be using it. HEIF stands for High Efficiency Image File and it replaces the JPG format in iOS 11.

Where did this come from?

Apple adopted it as a better way to save ever more complex images from iPhones, beginning with iOS 11. But they didn’t invent it. The Moving Picture Experts Group (MPEG) did in 2015 and since it’s a universal standard, there will be lots of support for it. Photoshop® is already compatible.

Newer Apple devices already use HEIF and quietly convert to jpg when sharing with a platform that might not support it, like when attaching to an email. As for your old jpgs, they’ll stay that way. You’ll never need to convert them or use them differently than you do now.

Four Big Advantages

  1. High-Efficiency means lightweight. Images encoded in HEIF are about half the size of a jpg of comparable quality. That means faster processing and movement across networks which is important for mobile where increased battery life and decreased bandwidth use are paramount.
  2. It’s a container. One High Efficiency Image File can contain multiple images like Live Photos. Sure, a GIF can do that but not with the same quality. HEIFs support 16-bit color depth (256 times more than an 8-bit gif or jpg).
  3. It speaks 3D. Dual cameras on the latest iPhones capture depth data that enable enhanced capabilities like Portrait Mode. HEIF records depth layers and other metadata to preserve these features and increased editing capabilities for later.
  4. Simple rotation and cropping. Rotating jpeg 90 degrees requires that the entire image be resampled. It costs processing time and degrades image quality. But HEIF’s support orientation and cropping as outside instructions that don’t change the original pixel map. You can crop today and revert to the full image a year from now (in theory).

So, does this change everything?

Not at all. Existing formats like jpg, tif, gif, png and others aren’t going away. Each has strengths that will continue to suit their uses in a variety of capture and publishing platforms. When it comes to printing and sharing, we have no beef with HEIF either. Ordering high quality photo products from our website or in our store is just as easy as it is with a jpeg. If you do need to change a HEIF file to JPG, websites like aconvert.com can do it for free.

So, HEIF is here. But there’s nothing to fear. Mamma won’t take your jpg away.

If you have questions about saving, storing and printing your images, call us! Our experts are here to help.