Posts

Upgrade Past macOS 10.15 Catalina to Keep Getting Microsoft Office Updates

We aren’t quite ready to recommend that everyone upgrade to macOS 13 Ventura, but if you use Microsoft Office with macOS 10.15 Catalina, you should start planning for an upgrade. Microsoft has announced that current versions of its productivity suite—Office for Mac 2019, Office for Mac 2021, and Microsoft 365—will receive updates only if your Mac is running macOS 11 Big Sur, macOS 12 Monterey, or macOS 13 Ventura. If you keep using Catalina, your Office apps will continue to work, but they won’t receive enhancements, bug fixes, or security updates past October’s 16.66 updates. Contact us if you have questions about appropriate upgrade paths.

(Featured image based on an original by iStock.com/jewhyte)

Sort Your Lists Differently in Reminders in iOS 14 and Big Sur

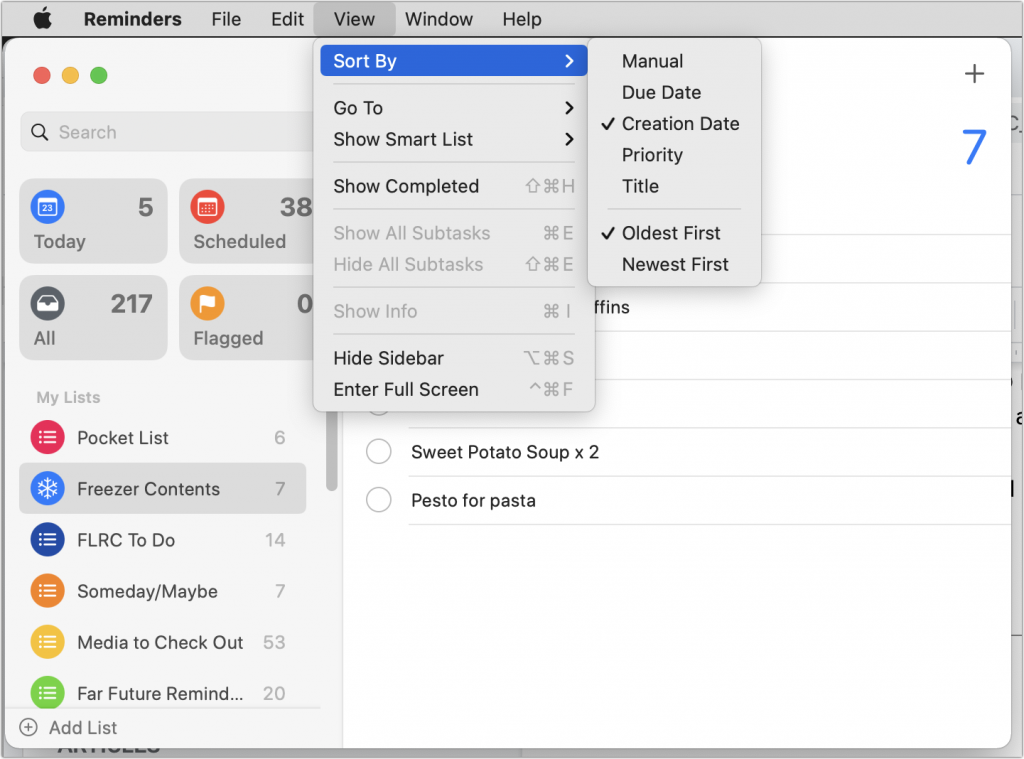
For many years, Apple’s Reminders app let you sort your lists, but in just one way that applied to all lists equally. That was a problem if you had a to-do list that you wanted to sort by Due Date and a list of foods in your freezer that you wanted to sort by Creation Date (to see which were older) or Title (for a simple alphabetical sort). Happily, in iOS 14 and macOS 11 Big Sur, Apple finally addressed this limitation, letting you sort each list independently. Your choices even sync across all your devices! So if you had given up on sorting, or given up on Reminders entirely because of this limitation, on the Mac, check out the View > Sort By menu, and in iOS and iPadOS, tap the ••• button and then Sort By.

(Featured image by iStock.com/fizkes)

Pin Your Chats in Messages for Faster Access

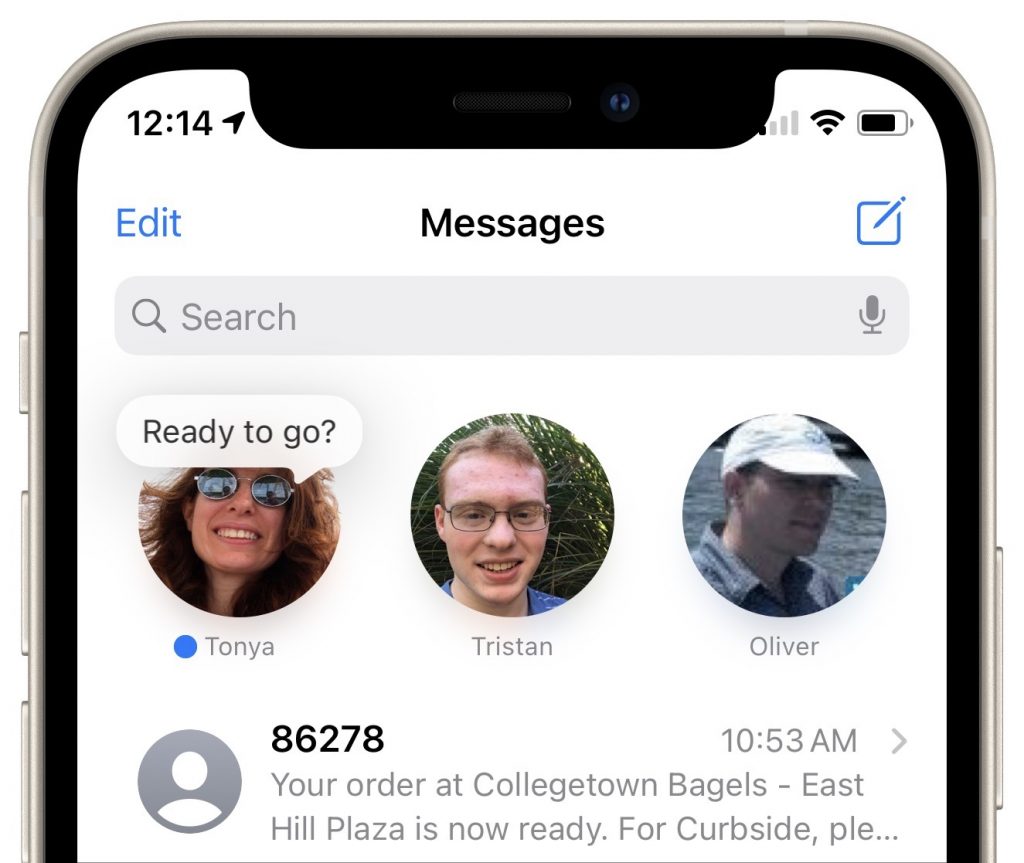
A new feature of Messages in both iOS 14 and macOS 11 Big Sur is the option to pin up to nine conversations at the top of the conversation list for easy access. No longer do you have to worry about them scrolling out of sight. On an iPhone or iPad, touch and hold a conversation and tap Pin in the menu that appears; on a Mac, Control-click the conversation and choose Pin. (Remove them by repeating the action and choosing Unpin.) Each of your devices can have different conversations pinned. If you are used to scanning the left side of Messages for blue new-message indicators, also be sure to look for those blue dots amongst your pinned icons at the top of the screen. Also, note that on the Mac, it can be a little too easy to see a notification banner about a new message, switch to Messages, and type in the currently selected (but wrong) conversation.

(Featured image by Polina Zimmerman from Pexels)

Not a Fan of Big Sur’s Translucent Menu Bar? Here’s How to Disable It

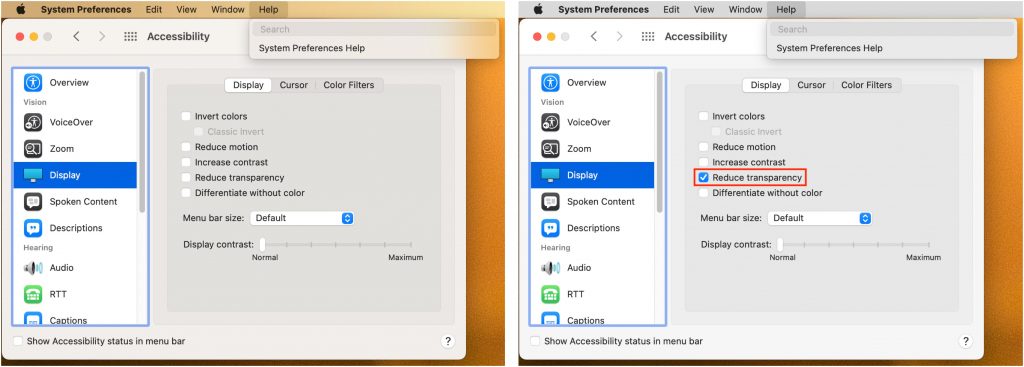
In macOS 11 Big Sur, Apple went back to a design direction from the earliest days of Mac OS X: a translucent menu bar. Since its color changes depending on the desktop picture, many people aren’t enamored of it (left, below). Luckily, reverting to the traditional opaque menu bar is simple. Open System Preferences > Accessibility > Display and select Reduce Transparency. That will turn the menu bar gray again and make other windows and menus opaque, too (right, below). Simple gray might not be as whizzy as fancy transparency, but it’s more predictable and easier to see.

(Featured image by aung nyi on Unsplash)

Apple Hid the Proxy Icon in Big Sur’s Finder. Here’s How to Reveal It

This is a twofer tip. You may not have known that every document window in macOS has long had a proxy icon in the title bar, next to the filename. The proxy icon is not just cosmetic. You can drag it to Mail to attach the document to a message, to a Web browser to upload it, or to any other location you can drag a document’s icon in the Finder (top screenshot, below, showing Preview in Catalina). You can also drag proxy icons from Finder windows to Open and Save dialogs to navigate to the location of the proxy icon and even pre-fill the filename when saving. Alas, in macOS 11 Big Sur, in at least the Finder and Preview, Apple chose to hide the proxy icon and the drop-down menu that lets you rename, tag, or move files using controls on the title bar (middle screenshot, below). Plus, the new title bar design tends to truncate file names. Happily, mousing over the filename expands the name and reveals both the proxy icon and the drop-down menu (bottom screenshot, below). Apple’s desire to reduce onscreen clutter makes usage more cumbersome than before, but all the functionality is still present.

(Featured image by Harrison Haines from Pexels)

It’s Time to Consider Upgrading to macOS 11 Big Sur

We’re cautious when it comes to recommending upgrades to new versions of macOS. Apple makes the upgrade process easy—though it can be time-consuming—but upgrading can create workflow interruptions, render favorite apps inoperable, and have other consequences. At the same time, it’s important to stay in sight of the cutting edge for security reasons and to take advantage of advances from Apple and other developers. Upgrading is not an if question; it’s a when question.

We’re not saying that everyone needs to upgrade to macOS 11 Big Sur now, but if you want to, it should be safe now that Apple has released several bug-fix updates. However, there are still a few caveats, and preparation is essential.

Reasons Not to Upgrade

Some people should continue to delay upgrades to Big Sur due to software incompatibilities. Most software under steady development will have been updated for Big Sur by now, but some workflows rely on older versions of apps where an upgrade isn’t practical or possible (ancient versions of Adobe Creative Suite, for instance), or on obsolete apps that will never be updated. You may be able to learn more at RoaringApps, but those who haven’t yet upgraded past 10.14 Mojave may have to upgrade or replace 32-bit apps that ceased working starting with 10.15 Catalina.

The other app category that continues to have trouble with Big Sur are backup apps that make bootable duplicates. Catalina moved macOS to its own read-only volume, and Big Sur goes a step further by applying cryptographic signatures that make it even harder for an attacker to compromise the operating system. Unfortunately, that also makes creating a bootable duplicate difficult. Carbon Copy Cloner and ChronoSync have developed workarounds; SuperDuper remains incompatible at this point, although an older version can create data-only backups. If you rely on one of these apps for critical backups, make sure you know what you’re getting into before upgrading or reassess your backup strategy.

Before You Upgrade

Once you’ve decided to upgrade to Big Sur, you have three main tasks:

  • Update apps: Make sure all your apps are as up-to-date as possible. If you regularly put off updates, now’s the time to let them complete so you have Big Sur-compatible versions.
  • Clear space: Big Sur needs a minimum of 35.5 GB to upgrade, and as of macOS 11.2.1, the installer won’t proceed unless there’s enough space. Don’t cut this close—you should always have at least 10–20% free space for virtual memory, cache files, and breathing room.
  • Make a backup: Never, ever install a major upgrade to macOS without ensuring that you have at least one current backup first. In an ideal world, you’d have an updated Time Machine backup, a bootable duplicate, and an Internet backup. That way, if something goes wrong as thousands of files are moved around on your drive, you can easily restore.

After those tasks are complete, make sure you don’t need your Mac for a few hours. There’s no telling exactly how long the upgrade will take, especially if it has to convert your drive to APFS, so never start an upgrade if you need the Mac soon.

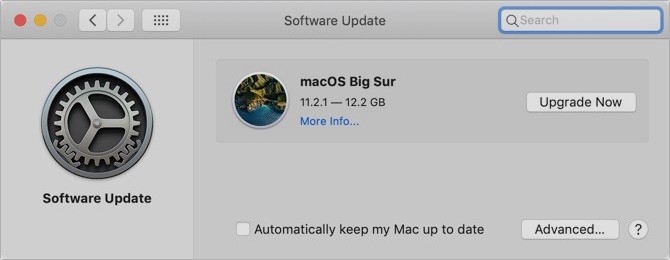
Initiating the upgrade is just a matter of opening System Preferences > Software Update, clicking the Upgrade Now button, and following the instructions.

After You Upgrade

Part of the reason to set aside plenty of time for your Big Sur upgrade is that there are always clean-up tasks afterward. We can’t predict precisely what you’ll run into, but here are a few situations we’ve noticed:

  • macOS will probably need to update its authentication situation by asking for your Apple ID password, your Mac’s password, and if you have another Mac, its password too. Don’t worry that this is a security breach—it’s fine.
  • Some apps may have to ask for permission to access your contacts and calendar even though you previously granted permission. Again, that’s fine.
  • If you use your Apple Watch to unlock your Mac and apps (and you should, it’s great!), you’ll need to re-enable that in System Preferences > Security & Privacy > General.
  • If you use Gmail or Google Calendar or other Google services, you may need to log in to your Google account again.
  • Websites that usually remember your login state will likely require that you log in again. If you’re using a password manager like 1Password, that’s easy.
  • You may have to re-enable text-message forwarding to your Mac on your iPhone in Settings > Messages > Text Message Forwarding.
  • Those who use Backblaze for Internet backups will find their backups have been “safety frozen.” Follow these instructions for thawing your account.

Finally, Time Machine in Big Sur now supports and prefers APFS-formatted drives, and all of Apple’s development is going in that direction now. You can keep using your existing Time Machine backup in Big Sur, but after you’re confident that everything is working well—and you have another backup—it’s worth removing your Time Machine backup drive in System Preferences > Time Machine > Select Disk, reformatting the drive as APFS in Disk Utility, and restarting the backup in the Time Machine preference pane.

With all that housekeeping done, it’s time to check out all the new features in Big Sur!

(Featured image based on originals by Apple)


Social Media: Should you upgrade to macOS 11 Big Sur? There’s no need to do so yet, but it should be safe for most people, so if you’re excited about the new look and the new features, this is a good time to upgrade. Read on for our pre- and post-upgrade tasks.
Keep Your Mac Quiet at Night and During Presentations with Do Not Disturb

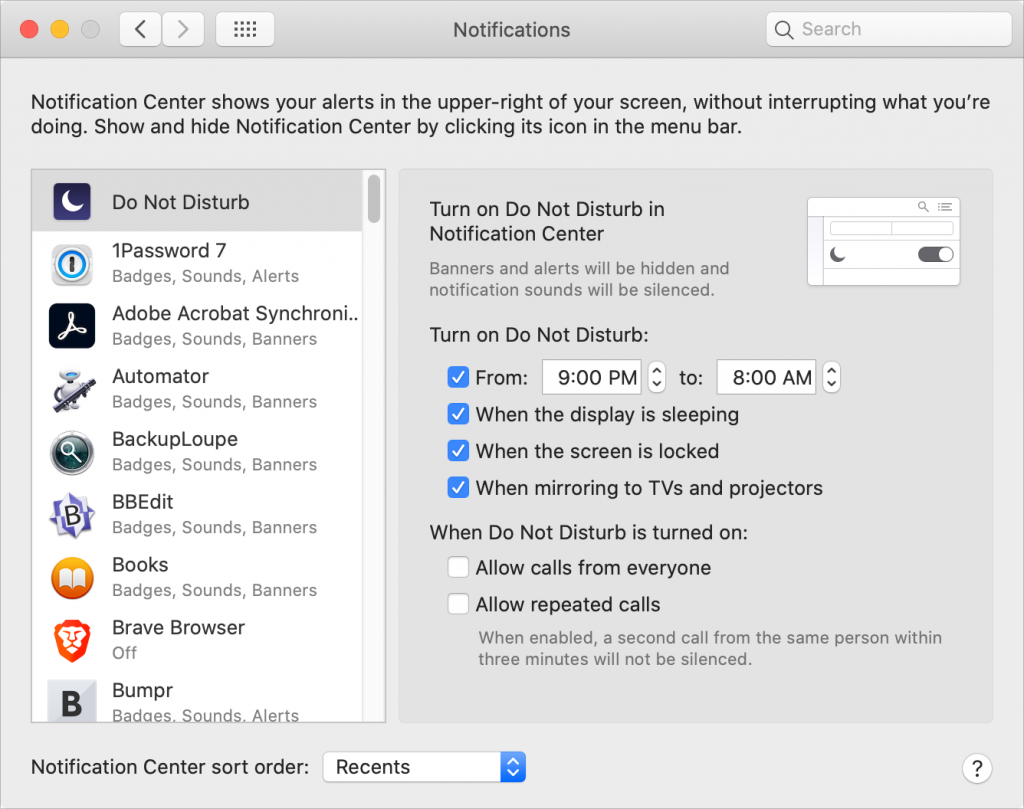
We’re all accustomed to the Do Not Disturb feature on our iPhones since they’re with us for most of the day and often spend the night next to the bed. But Apple long ago added Do Not Disturb to the Mac as well, and it’s useful for muting your Mac at night to eliminate unnecessary noises and for preventing unwanted notifications during presentations. In System Preferences > Notifications > Do Not Disturb, you can tell macOS to turn the feature on during specific times, when the display is sleeping or locked, and when mirroring to another screen. Or, you can turn on Do Not Disturb manually—you might want to do this when giving a presentation with Zoom or another videoconferencing app. In macOS 10.15 Catalina and earlier, do this in Notification Center by clicking it at the far right of the menu bar, scrolling up, and enabling the Do Not Disturb switch. In macOS 11 Big Sur, you find Do Not Disturb in Control Center.

(Featured image by Andrea Piacquadio from Pexels)