How Often Should Macs Be Replaced?
It’s a question as old as the personal computer. When should you replace your current Mac with a new model that’s faster and more capable? If money were no object, the answer would be easy—whenever you feel like it. For the rest of us, and particularly for organizations with multiple Macs and limited budgets, the question is harder to answer. But answer it we must because most of us can’t do our jobs without a Mac.
Let’s first look at some of the things that might encourage you to upgrade:
- Performance and resale value: Many companies and large organizations swap out their Macs every 3 to 5 years. That’s considered the sweet spot where performance starts to decline, but resale value remains relatively high. Plus, Macs of that age start to have more problems that may require repair, resulting in lost productivity due to downtime.
- Hardware limitations: At some point, you might feel your Mac is too slow—you’re seeing the spinning beachball frequently, or tasks are taking too long to complete. Another common concern crops up when you frequently have to shuffle files around to deal with low disk space on the startup drive. Or perhaps the battery life of a Mac laptop isn’t always sufficient for your needs—losing hours of productivity while on an airplane without seat power can be problematic.
- macOS support: Although there’s no requirement that you run the latest version of macOS, being unable to upgrade is a hint that your Mac is getting older. Apple provides security updates for the two versions of macOS before the current one, so if your Mac can’t stay within that update circle, it will become more vulnerable to security exploits.
- Physical damage: Macs are fairly durable, which often keeps them running even when the screen is cracked, a key sticks sometimes, or the case has been dented. The more damage your Mac has, the more likely it is that something else will go wrong, potentially at an inconvenient time.
- General flakiness: It’s hard to quantify this, but an older Mac might start to feel slow, crash more often, or act weirdly. Sometimes those problems can be resolved by reinstalling macOS and apps from scratch, but that’s a lot of work and far from guaranteed.
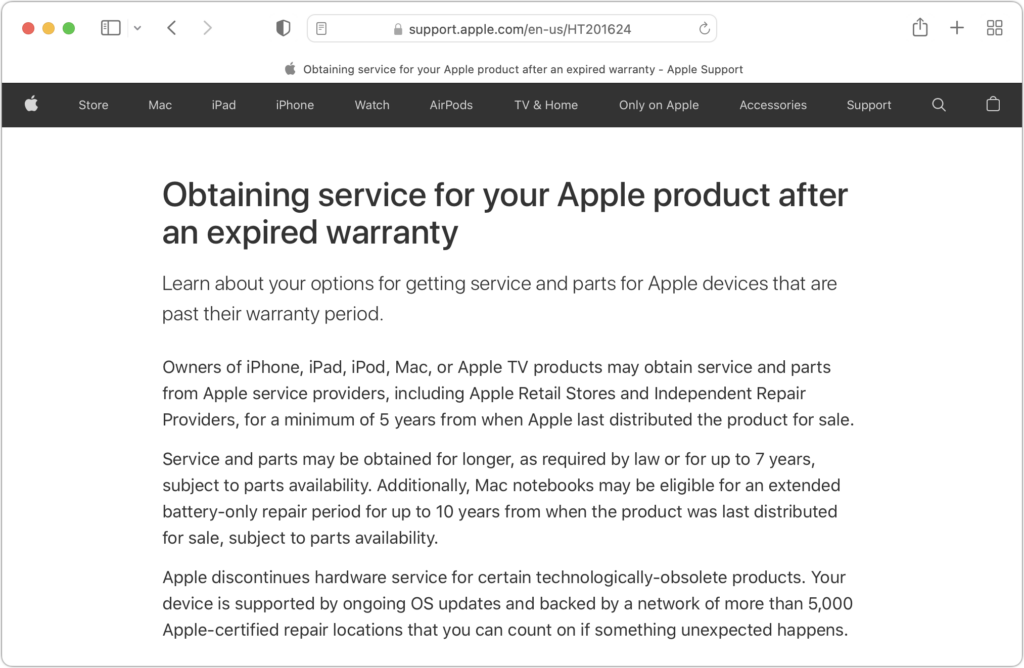
- Repair support: Apple guarantees that it will provide parts and service for all products within 5 years of when Apple last distributed them for sale. After that, Apple considers the products “vintage” for the next 2 years and will repair them subject to parts availability. Apple considers products pulled from the market more than 7 years before to be “obsolete” and won’t repair them apart from Mac laptops that are eligible for an additional battery-only repair period.
- Shiny new Mac: Sometimes, it’s easy to delay a new Mac purchase because none of the Macs seem quite right. At other times, however, the exact Mac you want will be released just when you need it, making for an easy decision.
With those variables in mind, let us offer recommendations for different audiences:
- Large-fleet organizations: It’s probably not worth the time to consider the needs of every employee in the context of what Mac they have. Instead, create a policy for replacing Macs on a 3- to-5-year schedule you can build into your annual budget. When it’s time to replace a particular Mac, swap it out for a comparable new model and send the old one to a resale organization.
- Small-fleet organizations: For companies and nonprofits with a smaller number of Macs and a smaller budget, stick with the same 3- to 5-year schedule, but instead of automatically replacing each Mac as its number comes up, use it as an opportunity to evaluate the user’s needs and then either replace the Mac or set the next evaluation date. You may end up replacing Macs slightly less often, perhaps every 4 to 6 years. It’s also more likely that old Macs will be handed down rather than resold.
- Creatives and freelancers: If you live and die by the work you can accomplish on your Mac, pay regular attention to whether your Mac is meeting your needs. You’ll probably start to notice issues in 3 to 5 years, and as soon as you do, start watching Apple’s releases to see what new Mac might be the best replacement. Also, consider saving a small amount per month with the idea that you’ll have enough to buy your new Mac about the time the old one noticeably starts to cut into your productivity.
- Home users: As long as the Mac meets your needs and can run a version of macOS that’s receiving security updates, there’s no harm in continuing to use it for 8 years or more. However, if it starts to need hardware repairs and repeated consultant visits, that’s an indication that you should spend the money on a new Mac instead. Once it can no longer run a supported version of macOS, it’s time for a replacement.
- Fixed budgets: We get it—sometimes there’s no money for a new Mac. Assuming you can accomplish what you need to do and avoid sketchy parts of the Internet, go ahead and run your current Mac into the ground. It could last 10 years or more. And when it comes time to replace it, there’s no shame in looking to the used market—all those Macs that others are replacing often come up for sale at bargain prices.
We hope this has given you some structure for thinking about replacing Macs, whether you’re worried about the Mac on your desk or all those in the entire design department. And, of course, feel free to contact us for help putting together a replacement schedule.
(Featured image by iStock.com/Prykhodov)
Social Media: When should you replace the Mac on your desk—or your organization’s Macs? There is no single answer, but we run down some variables that play into the decision and make recommendations for different use cases.


 New privacy warnings during AirTag setup: To ensure that everyone understands the utility of AirTags and the implications of abuse, people setting up an AirTag for the first time will see a message that clearly states that AirTags are meant to track their own belongings, that tracking people without their consent is a crime in many places, that AirTags are designed to alert victims to their presence, and that law enforcement can request identifying information about the owner of an AirTag.