Posts

Apple Starts Releasing Rapid Security Responses for the iPhone, iPad, and Mac

By now, you’ve probably seen a new form of update for iOS, iPadOS, and macOS: the Rapid Security Response. Early in May, Apple released the first instances of these updates, which the company had promised for iOS 16, iPadOS 16, and macOS 13 Ventura when those operating systems were first announced. Let’s answer some of the questions we’ve been hearing.
What are Rapid Security Responses?

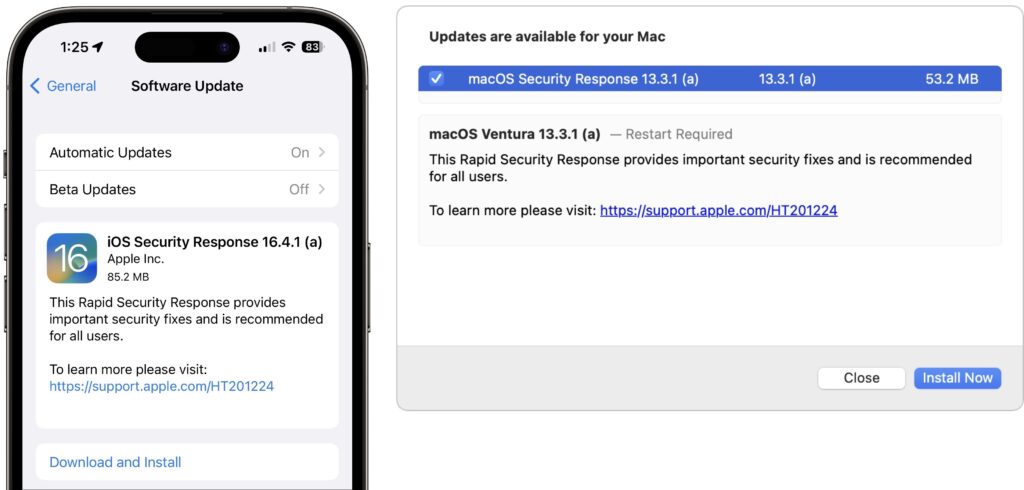
Rapid Security Responses are security updates that Apple wants to distribute as quickly and broadly as possible. Users often delay installing standard operating system updates because they’re huge downloads, interrupt work for a long time while installing, and occasionally cause new problems.

To address these concerns, Rapid Security Responses are much smaller, install far more quickly (sometimes without a restart), and can easily be removed if they cause problems.

What security vulnerabilities do Rapid Security Responses address?

Apple released no security notes for its first set of Rapid Security Responses, and we don’t anticipate that changing for future releases. The point of a Rapid Security Response is to block a serious vulnerability that’s likely being exploited in the wild, and Apple doesn’t describe such fixes until it has patched vulnerable operating systems, including older versions, tvOS, and watchOS, none of which can take advantage of Rapid Security Responses. If this last set of updates is any indication, Apple will identify the Rapid Security Response fixes in security notes for the next full operating system update, which will also include the same fixes.

How do I install a Rapid Security Response?

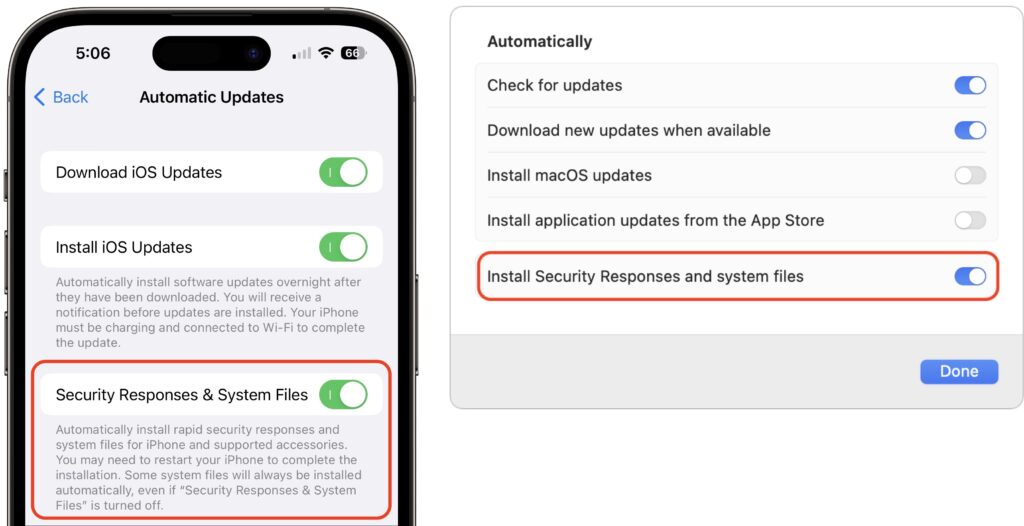
Rapid Security Responses use the same software update mechanism as Apple’s other operating system updates. You can and generally should let Rapid Security Responses install automatically. That’s the default, but check to make sure.

  • iOS/iPadOS: Go to Settings > General > Software Update > Automatic Updates, and look at “Security Responses & System Files.”
  • macOS: Go to System Settings > General > Software Update, and click the ⓘ next to Automatic Updates. Then look at “Install Security Responses and system files.”
On recent iPhones and Macs, the installation time was quick, with the device being ready to use again within 2–4 minutes, including a restart. Older devices took longer, and future Rapid Security Responses may take more or less time.

How can I revert if a Rapid Security Response causes a problem?

Apple makes this easy in both iOS/iPadOS and macOS, with the amount of time being roughly similar to how long the Rapid Security Response took to install:

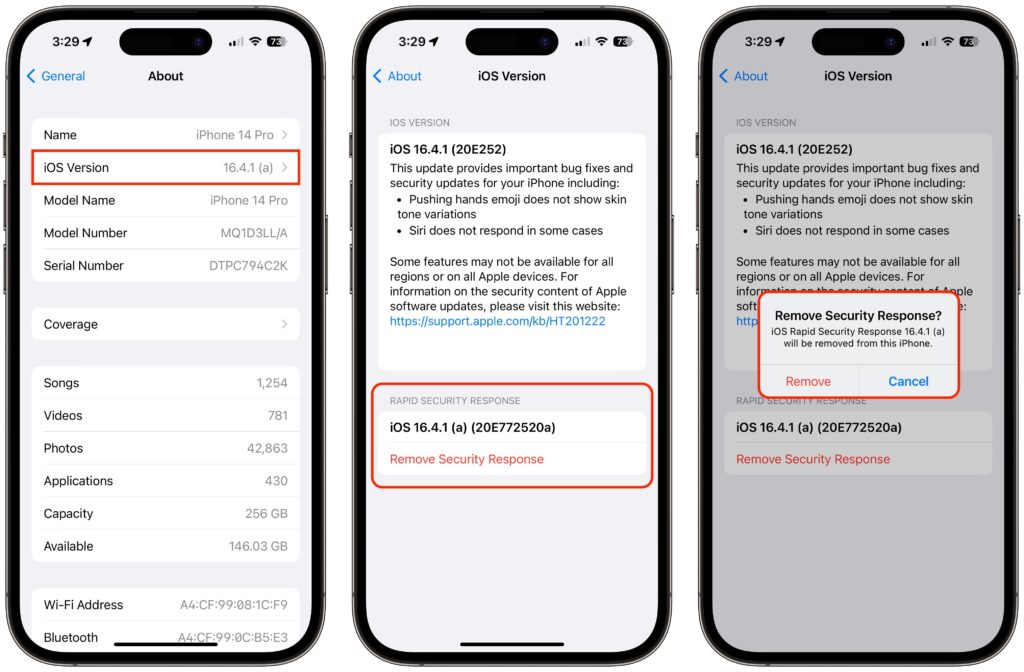
  • iOS/iPadOS: Go to Settings > General > About > iOS/iPadOS Version, tap Remove Security Response, and confirm the action.
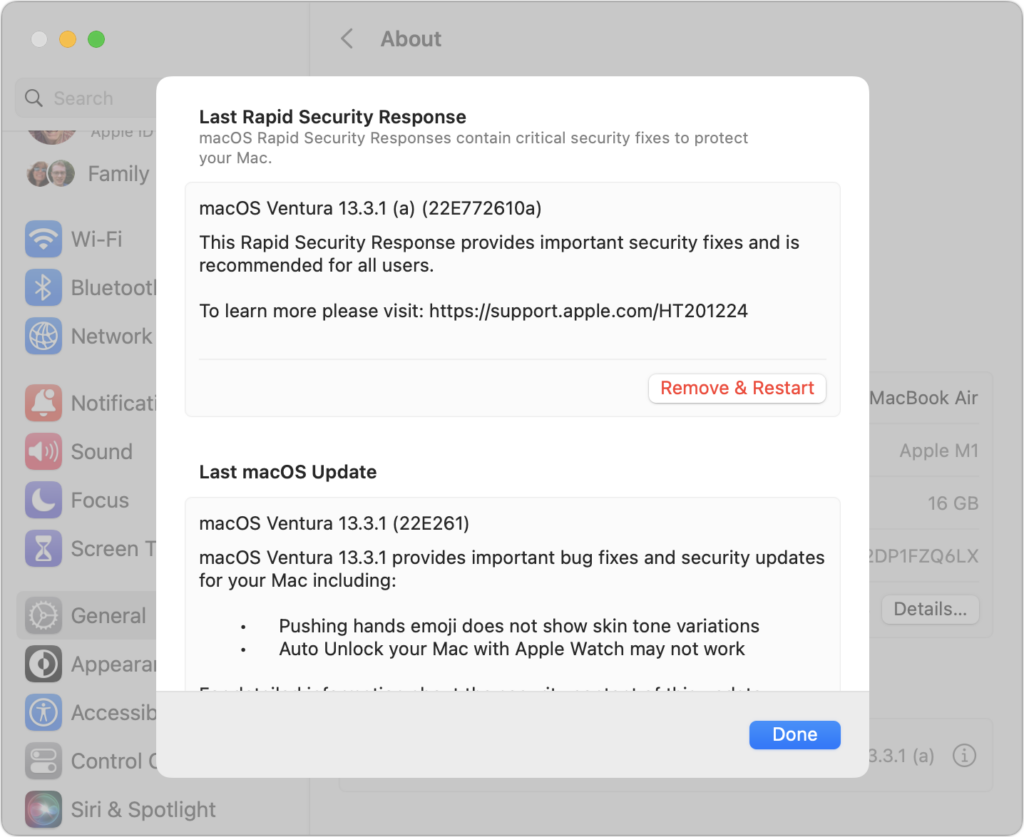
  • macOS: Go to System Settings > General > About, click the ⓘ next to the macOS version, click Remove & Restart, and confirm the action.

How can I tell if I’m running a Rapid Security Response?

With this first Rapid Security Response, iOS and iPadOS both posted a notification informing the user of the update; macOS did not.
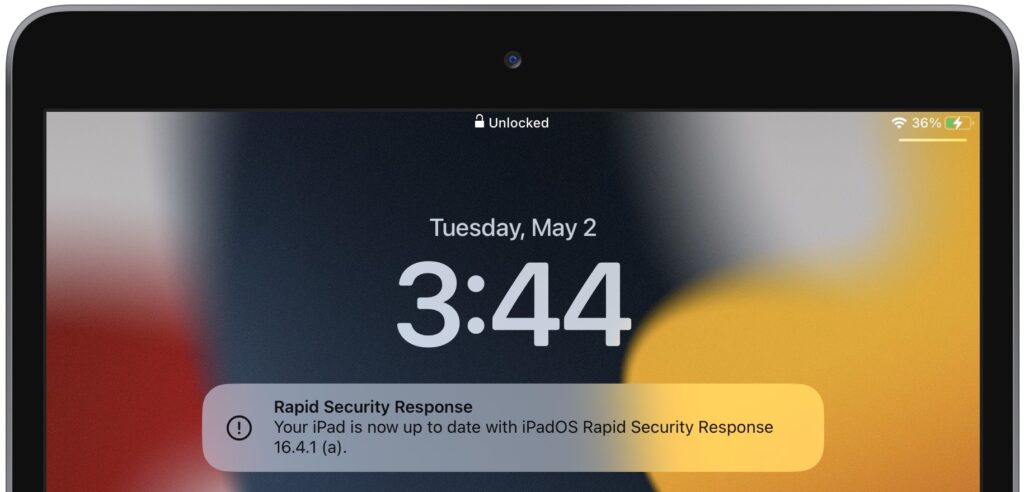
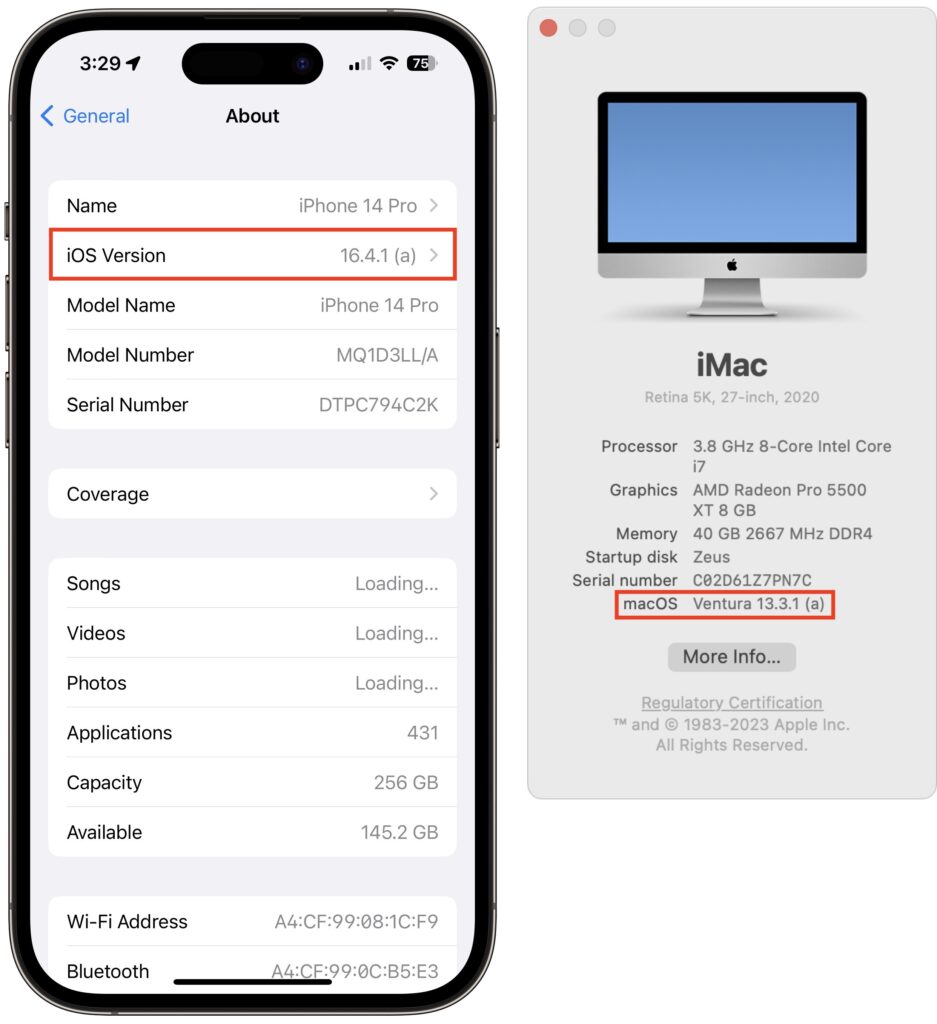
More generally, devices updated with a Rapid Security Response will have a letter after their version number, such as 16.4.1 (a), and the letter will disappear with the next full update, such as iOS 16.5. To determine what version your devices are running:

  • iOS/iPadOS: Go to Settings > General > About, and look at the iOS/iPadOS Version line.
  • macOS: Choose About This Mac from the Apple menu, and look at the macOS line.
Given what we know now, we recommend that everyone install Rapid Security Responses as soon as they’re available. If you notice a problem afterward, you can remove it. The only caveat is that if your employer manages your device, they may prefer to delay the Rapid Security Response installation until they’re comfortable with the changes.

(Featured image by iStock.com/champpixs)


Social Media: In an effort to protect users from security vulnerabilities that are being actively exploited, Apple has introduced Rapid Security Responses, which are security updates that are quick to download, quick to install, and easily removed if necessary.

Prevent Quick Screenshots from Cluttering Your Photos Library on the iPhone and iPad

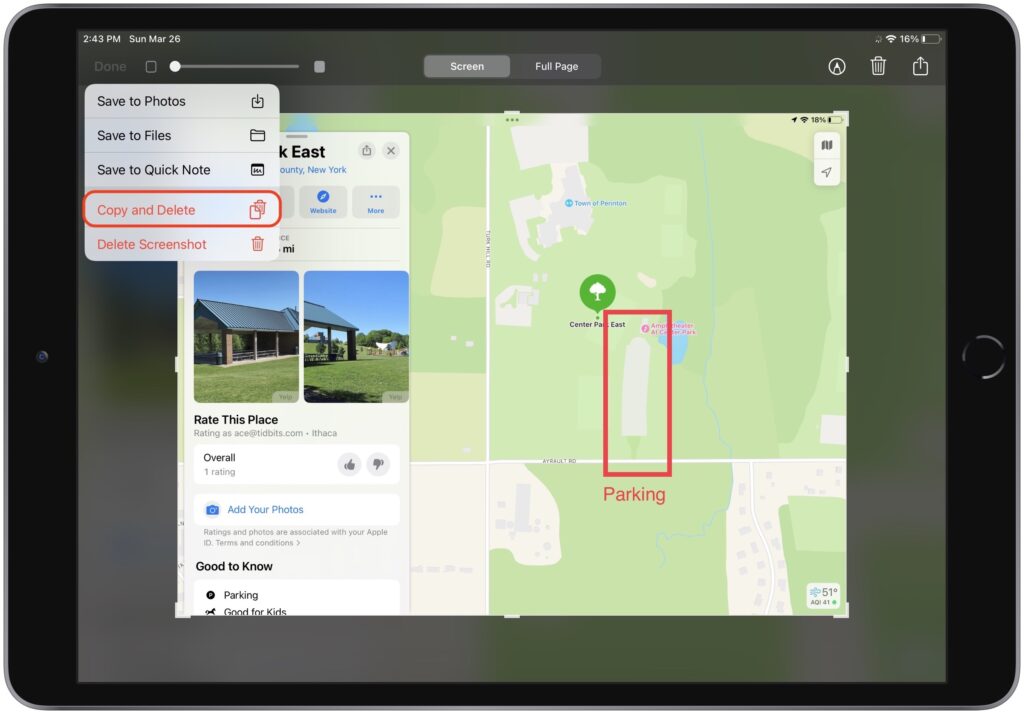
By default, when you take a screenshot (instructions for iPhone and iPad), it saves to Photos. But what if you don’t want something like a quick image of a map for a friend to clutter your Photos library? In iOS 16 and iPadOS 16, Apple has added new options. When you tap the screenshot thumbnail that appears briefly after pressing the capture buttons, you can crop and mark up your image. Or not. The key is that when you’re ready, tap Done to get an option to Copy and Delete, which is great when all you want to do is paste the screenshot into a Messages conversation or Mail message. You can also save to Photos, Files, or Notes, or just trash the screenshot if you’ve changed your mind.

(Featured image by iStock.com/simona flamigni)


Social Media: Do you take temporary screenshots on your iPhone or iPad so you can message what your screen looks like to a friend? If you don’t want these images saved in Photos, read on for a tip about how to move them to the clipboard for pasting instead.

iOS 16.4 Adds Voice Isolation Feature to Improve Cellular Calls

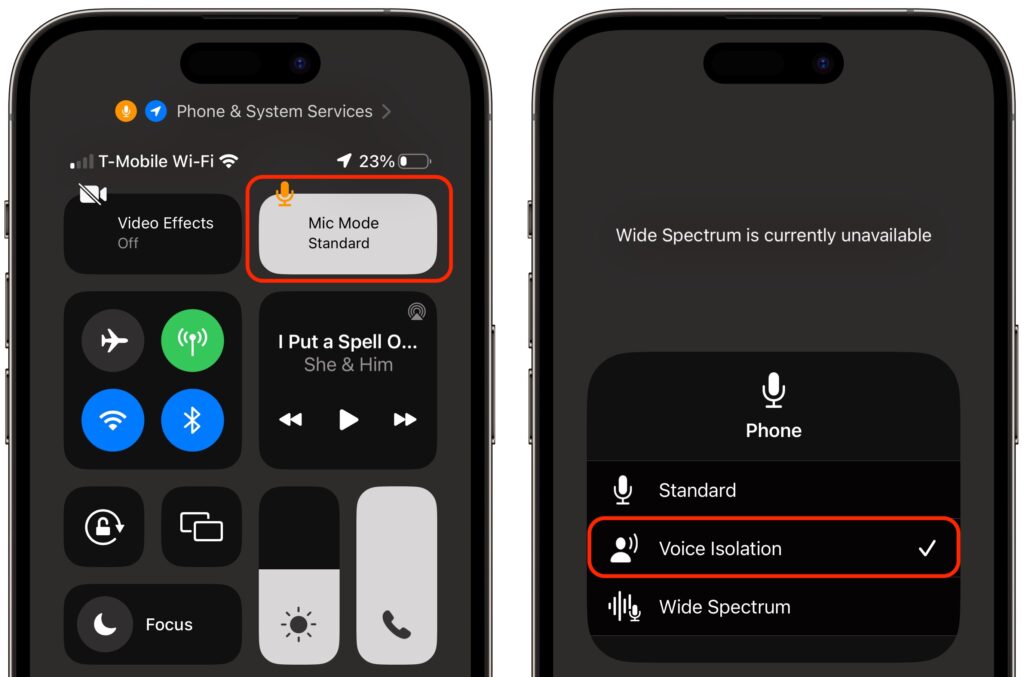
In iOS 15, Apple added the Voice Isolation feature to FaceTime calls to filter out noise around you while you’re talking, which is a boon if you’re making a call in a loud space or outside environment. With the recently released iOS 16.4, Apple has now brought that feature to cellular calls as well, but it’s not an option in Settings > Phone, as you might expect. Instead, during a call, open Control Center by swiping down from the top right of the screen (Face ID iPhones) or up from the bottom (Touch ID iPhones). Then tap the Mic Mode button and Voice Isolation. You won’t hear any difference, but the person on the other end should be able to hear you better. iOS remembers your setting, so switch back to Standard when you’re done—Voice Isolation may not sound as good as Standard in quiet spaces.

(Featured image by iStock.com/Jub Job)


Social Media: If you make phone calls in loud environments, you can now be heard more easily with iOS 16.4’s new Voice Isolation feature for cellular calls. The tricky part is enabling it in Control Center while talking.

How to Share a Contact Card without Sharing Everything in iOS 16

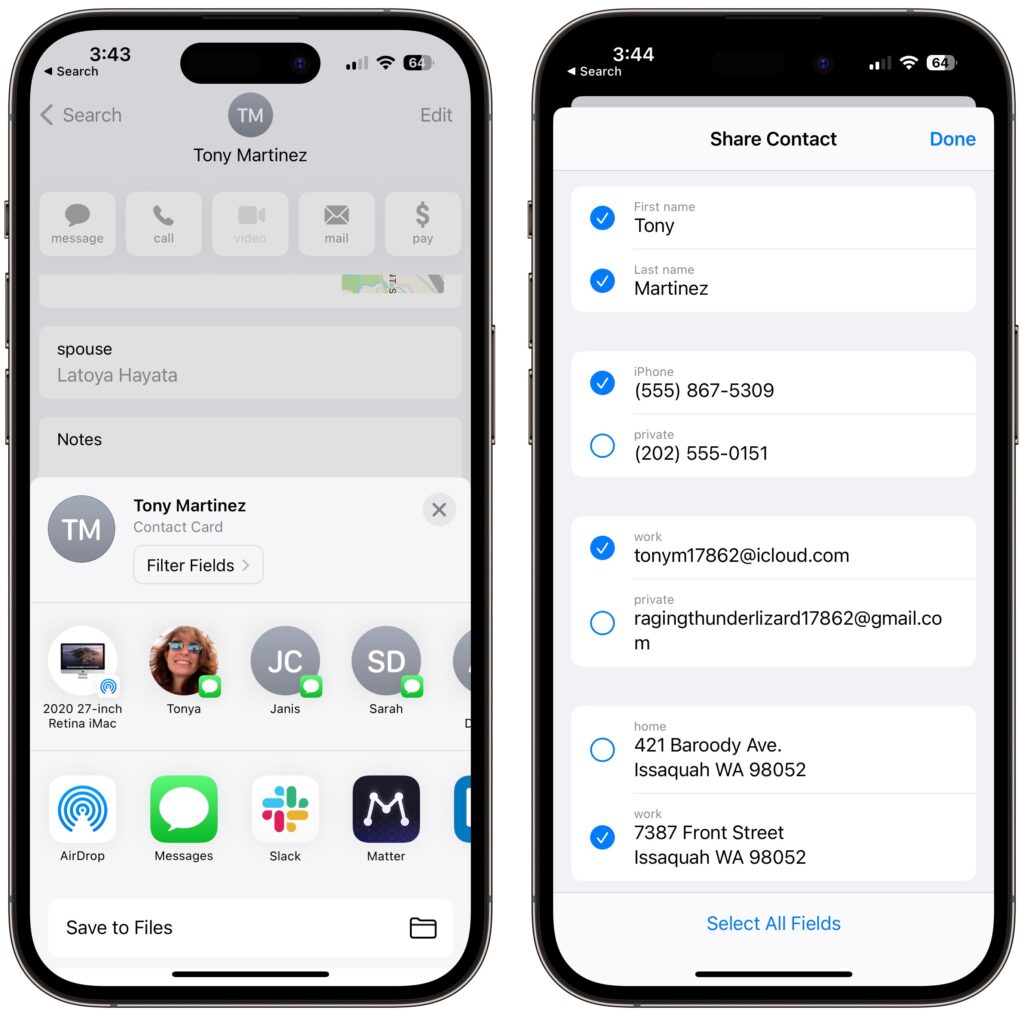
Apple makes it easy to share contact cards on the iPhone or iPad—just scroll down in a contact and tap Share Contact. But what if you don’t want to share every piece of data on that card? To avoid oversharing in iOS 16 or iPadOS 16, tap Filter Fields at the top of the Share sheet and deselect the private items. If the card has a lot of data and you want to share only a few items, tap Deselect All Fields at the bottom of the sheet and select only what you want to share. Unfortunately, your selections aren’t remembered if you share the same card again later, so be sure to reset your selections each time you share.

(Featured image by iStock.com/diane39)

You Can Use Face ID in iOS 16 on Newer iPhones When You’re Lying on Your Side

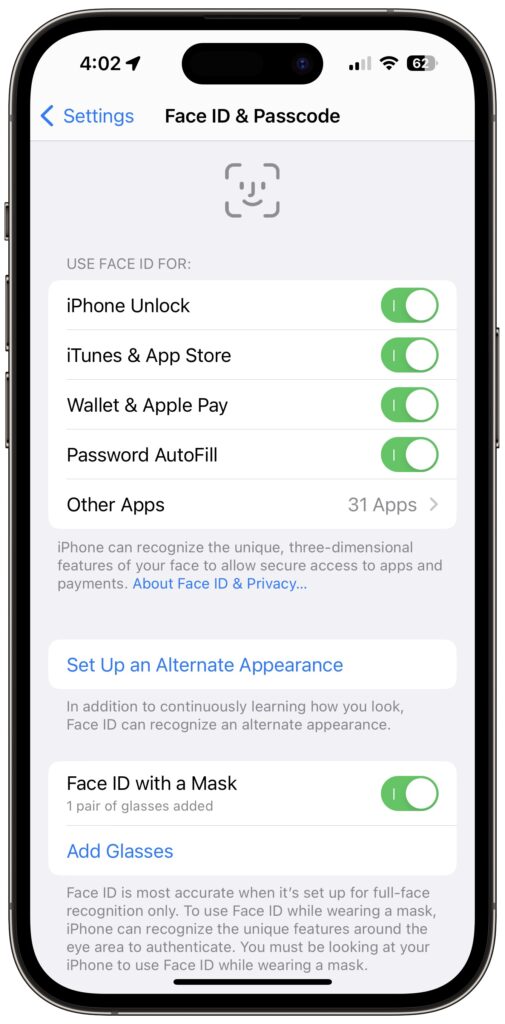
If you’ve ever tried to use Face ID to unlock an iPhone while lying on your side in bed, you may have noticed that it didn’t work. That’s because Face ID used to require that the iPhone be upright, in portrait mode. In iOS 16, however, Apple has improved Face ID so it will unlock your iPhone even when you’re lying on your side and the iPhone is in landscape orientation. Alas, this capability requires an iPhone 13 or iPhone 14, but if you have one of those phones, give it a try in bed tonight—you don’t need to adjust any settings.

(Featured image by iStock.com/Kateryna Onyshchuk)

It’s Time to Try Dictation in iOS 16 and iPadOS 16

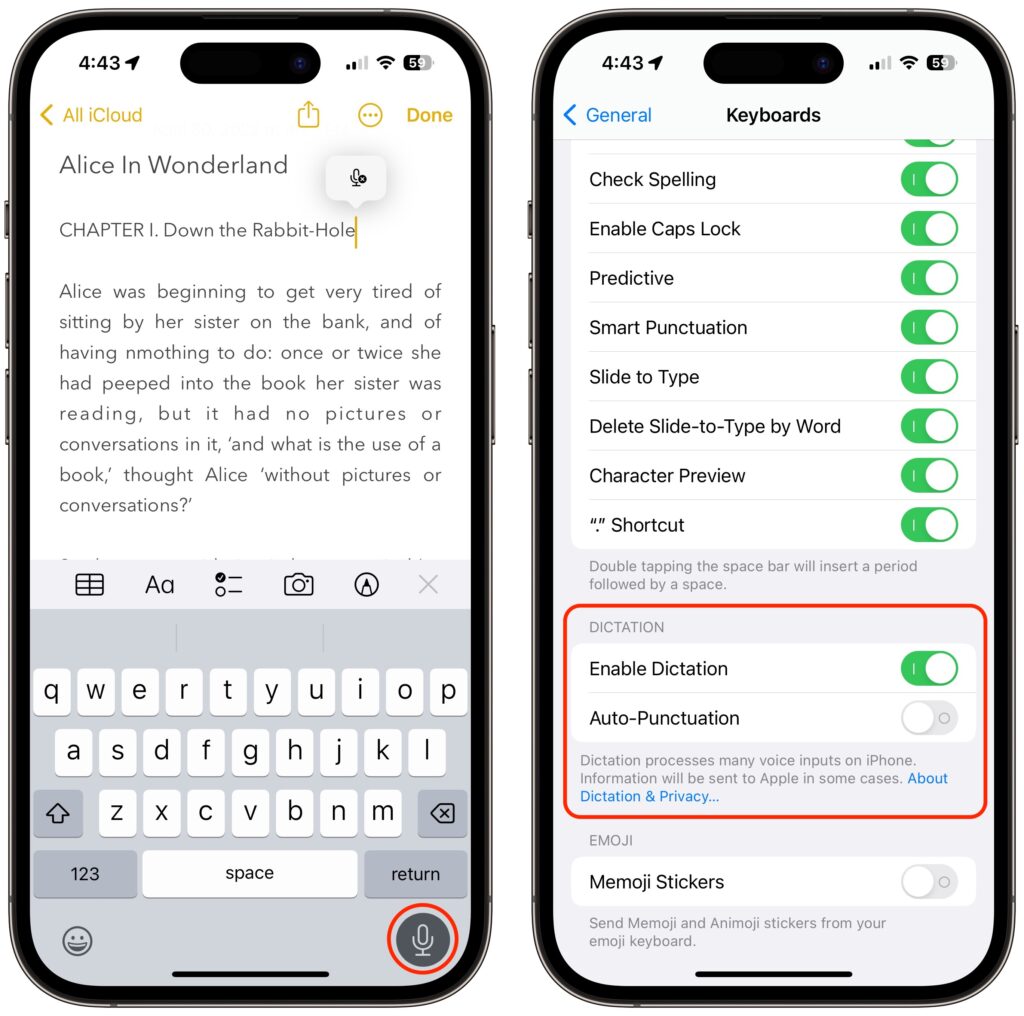
Apple has long provided a microphone button in the keyboard to invoke dictation on the iPhone and iPad. But, it wasn’t always easy to hit, and you had to switch back to the keyboard to fix the inevitable mistakes. (Apple’s dictation is a huge timesaver but far from perfect, particularly with homonyms and proper nouns.) With iOS 16 and iPadOS 16, Apple made the microphone button larger and repositioned it to make it easier to tap. More importantly, the keyboard remains available while dictation is active, enabling you to work with text manually during dictation. You can fix mistakes, reposition the insertion point, select and delete text, and so on. For instance, if dictation inserts the wrong word, double-tap the word to select it and speak the replacement. Or, if you want to add something, tap in the text to move the insertion point and start speaking again. Dictation can even add punctuation for you, but it’s a little haphazard at that, so you might want to disable that option in Settings > General > Keyboard.

(Featured image by iStock.com/fizkes)

Here’s How to Stop Getting Paste Permission Requests

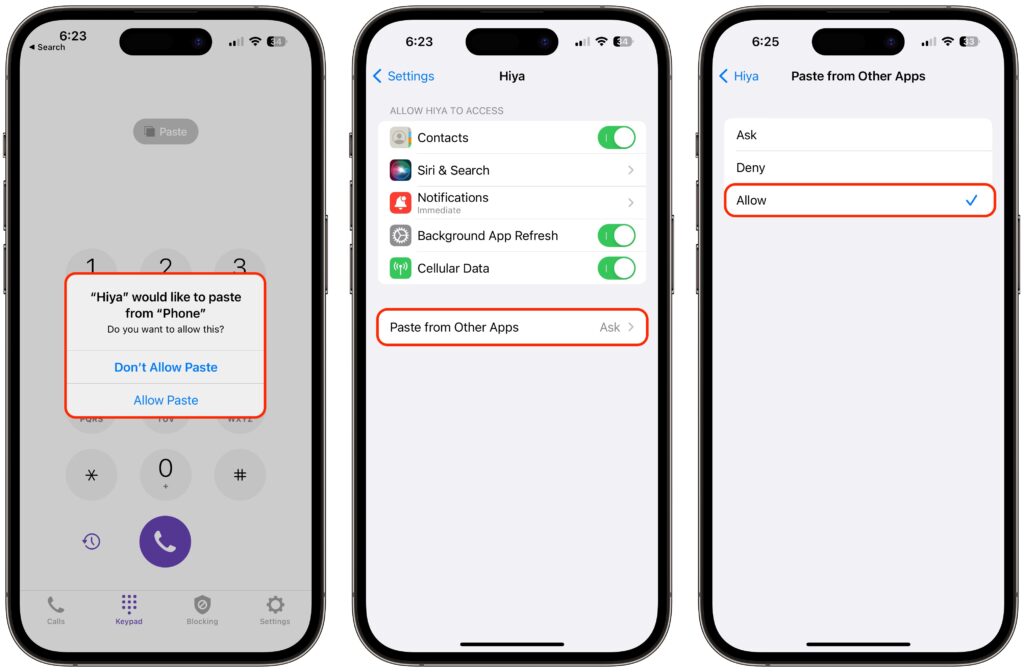
In iOS 16, Apple tightened security by displaying a confirmation alert when you copy data from one app and paste it into another. More security isn’t bad, but these alerts can become annoying if you copy and paste frequently. In iOS 16.1, Apple added a setting to control the behavior for each app. If you get these alerts too often when pasting in an app, go to Settings > AppName > Paste from Other Apps and switch it from Ask to Allow. Many apps don’t include the setting; hopefully, any apps where you paste often will have this setting or include it soon.

(Featured image based on an original by iStock.com/AaronAmat)

Delete Contacts More Easily in iOS 16 and iPadOS 16

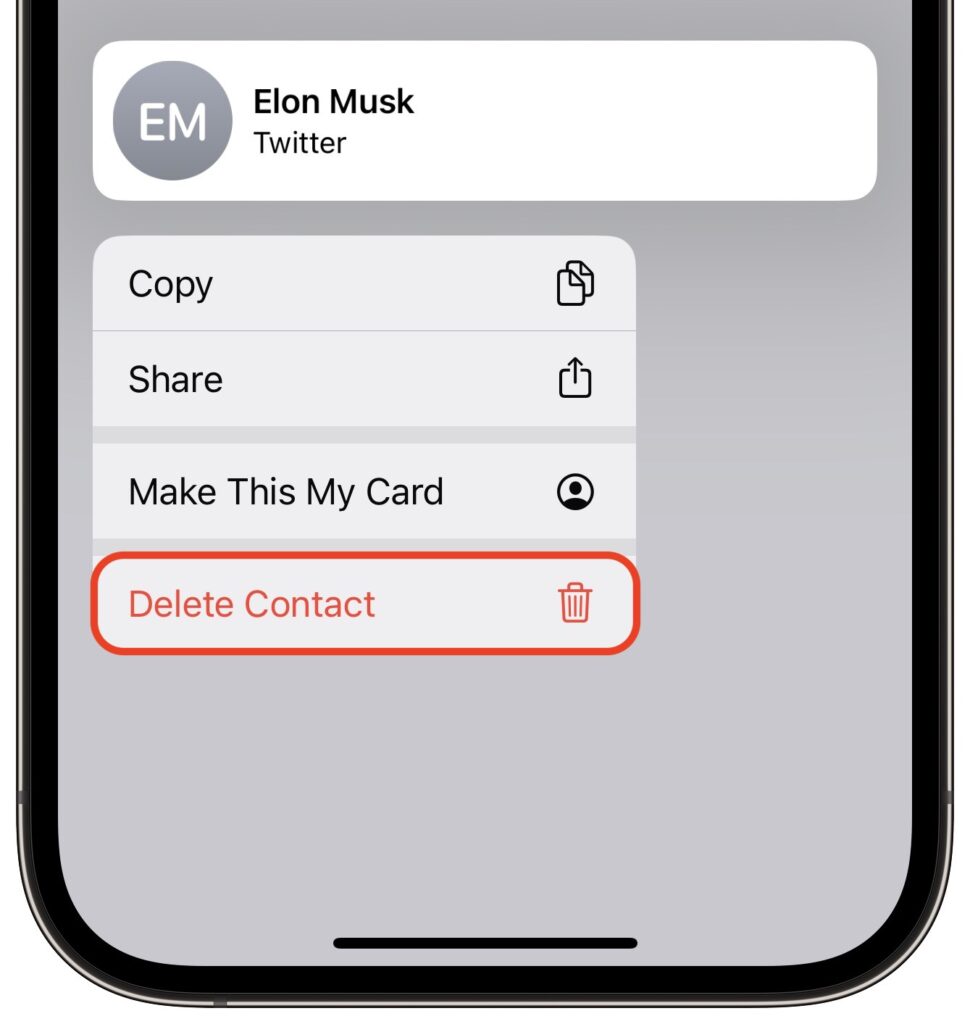
Deleting contacts on the iPhone and iPad used to be a pain, especially if you wanted to trash multiple contacts. You had to open the contact, tap Edit, scroll to the bottom, and tap Delete Contact. Although you still can’t swipe left on a contact in a list, as you do when deleting in Mail and Messages, iOS 16 and iPadOS 16 provide a simpler method. Touch and hold a contact in the Phone or Contacts lists, and then tap Delete Contact at the bottom.

(Featured image based on an original by iStock.com/anyaberkut)

You Can Now Use Siri to Reboot Your iPhone or iPad

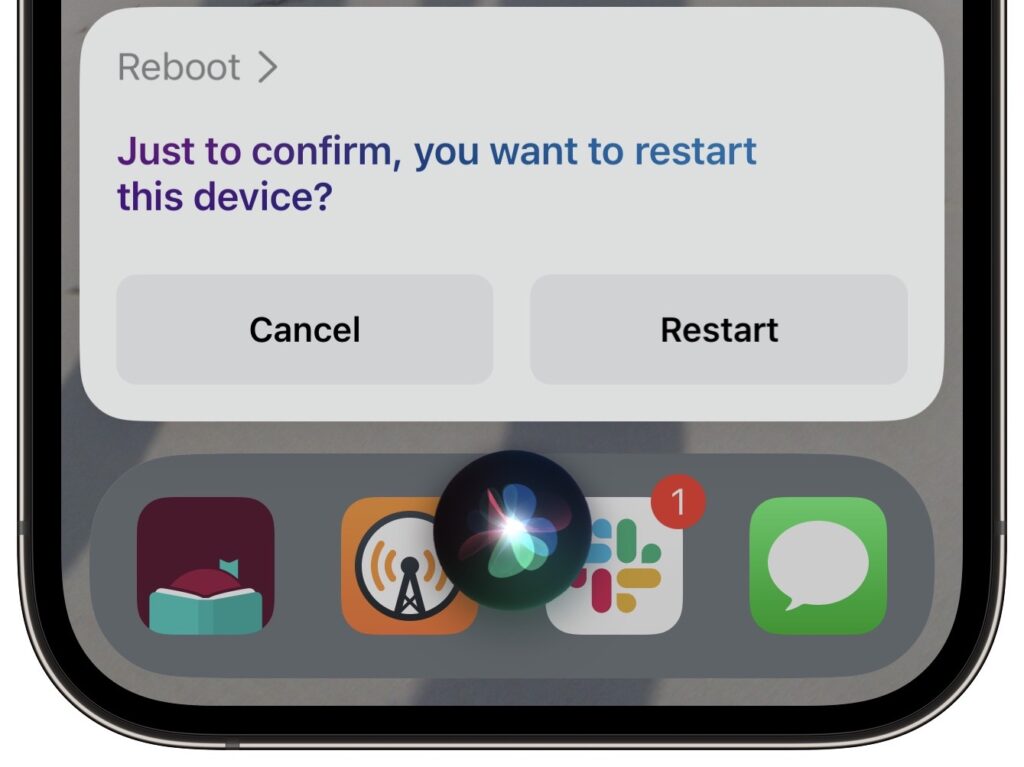
Although iOS and iPadOS are extremely stable, there are times when rebooting your iPhone or iPad can eliminate odd or problematic behavior, and there’s no harm in trying it. In the past, you’ve had to remember which buttons to press or select Settings > General > Shut Down and then press a button to turn the device back on. In iOS 16 and iPadOS 16, however, Siri has learned a new trick: how to reboot iPhones and iPads. Invoke Siri by holding the side button or Home button, and then say, “Reboot” or “Restart this device.” (Using “Hey Siri” can result in unexpected results, and saying “Restart” on its own tends to cause Music to start playing the last song.) Tap Restart, and your device reboots. If only this worked for the Apple Watch and HomePod too!

(Featured image by iStock.com/Wachiwit)

Practice with the Emergency SOS via Satellite Demo, Just in Case

In mid-November, Apple launched its new Emergency SOS via satellite feature for the iPhone 14 lineup. If you have an iPhone 14 and find yourself in an emergency situation in the US or Canada without cellular or Wi-Fi service, you can still contact emergency services. Apple says the service will expand to France, Germany, Ireland, and the UK in December 2022. The service is free for 2 years, and Apple hasn’t said what it will cost after that.

The challenge we users face with Emergency SOS via satellite is that it works only when you have no cellular or Wi-Fi service, and nearly all the time when you’re in such a situation, there’s no emergency. So if something bad does happen when you’re far from civilization, you may not be in the best state of mind to use Emergency SOS for the first time.

Apple has thought of that and provides two ways to get some experience talking to a satellite. One is the Emergency SOS via satellite demo, which you can try anytime. Or, for a real-world test of the system when you have no cellular or Wi-Fi coverage, you can try sharing your location via satellite using the Find My app. Once you’re outside with a clear view of the sky, here’s what to do.

Emergency SOS via Satellite Demo

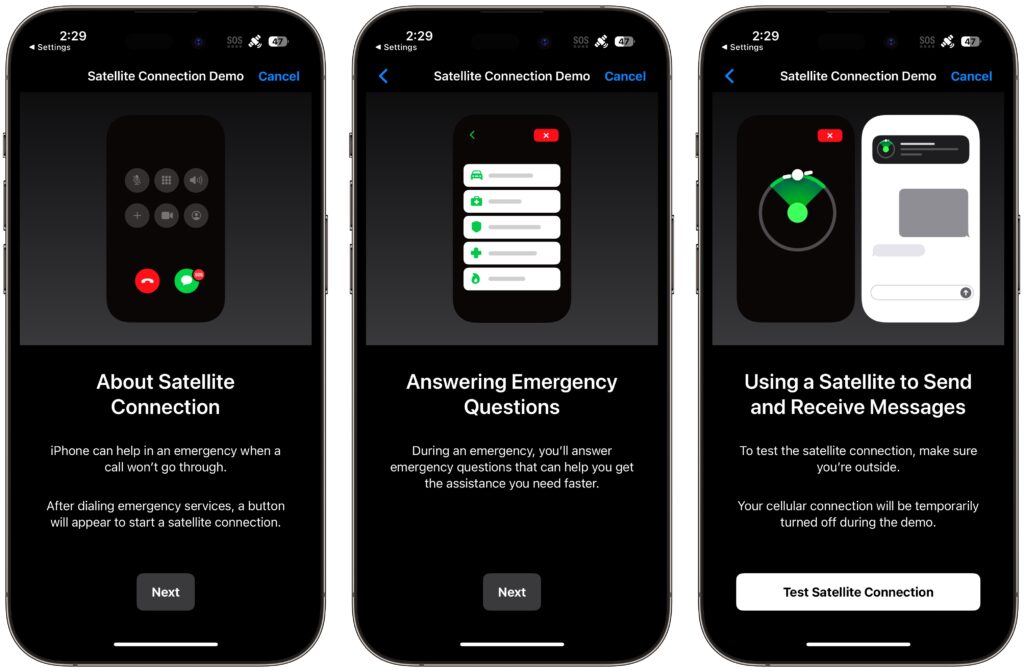
To get started with the Emergency SOS via satellite demo, go to Settings > Emergency SOS, scroll down, and tap Try Demo. First, the iPhone walks you through several screens that turn off cellular, explain how the system works, and tell you that in a real emergency, you’ll answer a series of standard questions to help the dispatcher send the help you need.

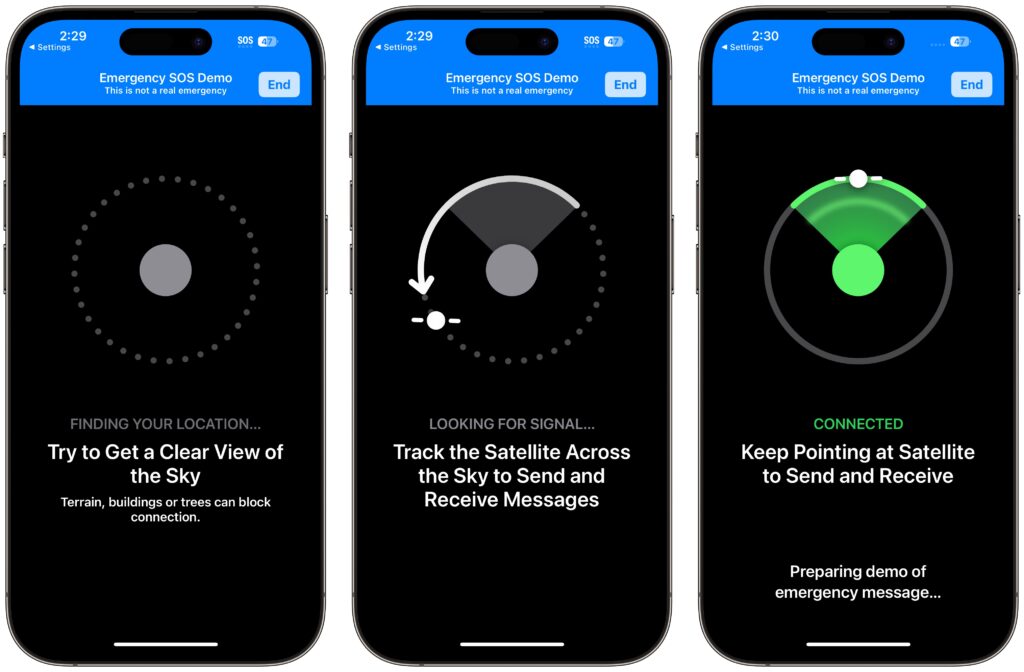
Next, the demo teaches you how to find and connect to a satellite. Along with asking you to turn left or right—follow the arrows on the locator until it turns green—the demo may tell you that you have to wait for a few minutes until another satellite comes into range.

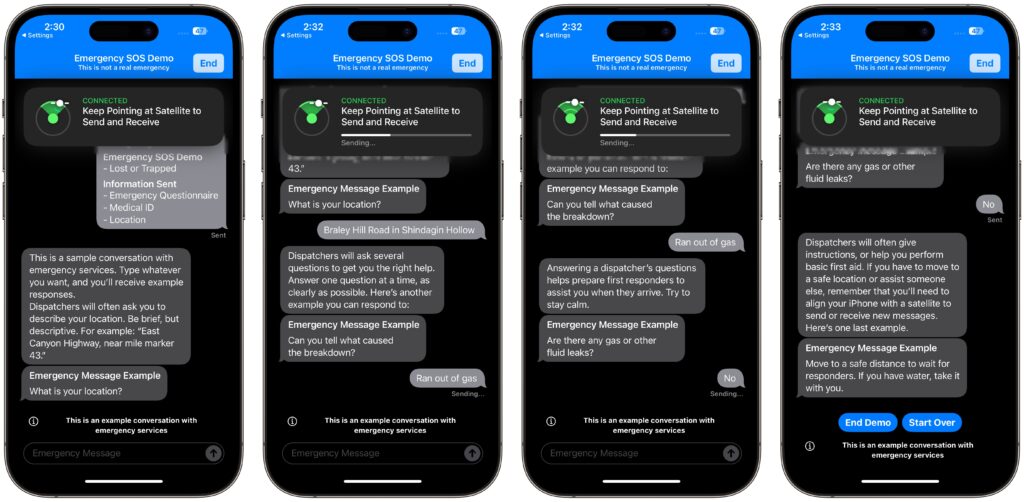
You won’t run through the same questionnaire you would in a real emergency, though. Instead, you get canned texts that mimic the conversation you might have with a real dispatcher. You can reply however you want, but it won’t change the responses. When you finish, tap End Demo.

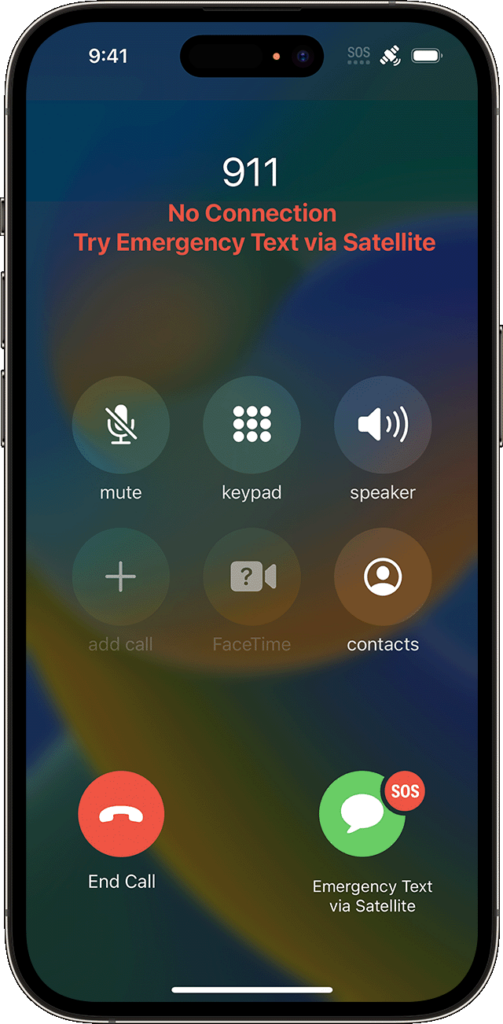
Remember, in a real emergency, you’d dial 911 or invoke Emergency SOS by holding the side button and either volume button until the Emergency SOS slider appears. The call won’t work, but you’ll be able to start the Emergency SOS via satellite process for real.

Share Your Location with Find My via Satellite

As welcome as Emergency SOS via satellite will be if you ever need it, Find My via satellite may have more real-world utility right now. It enables you to share your location manually via the Find My app, regardless of the situation. Once you complete the process, anyone with whom you share your location generally will be able to see the updated-via-satellite location.

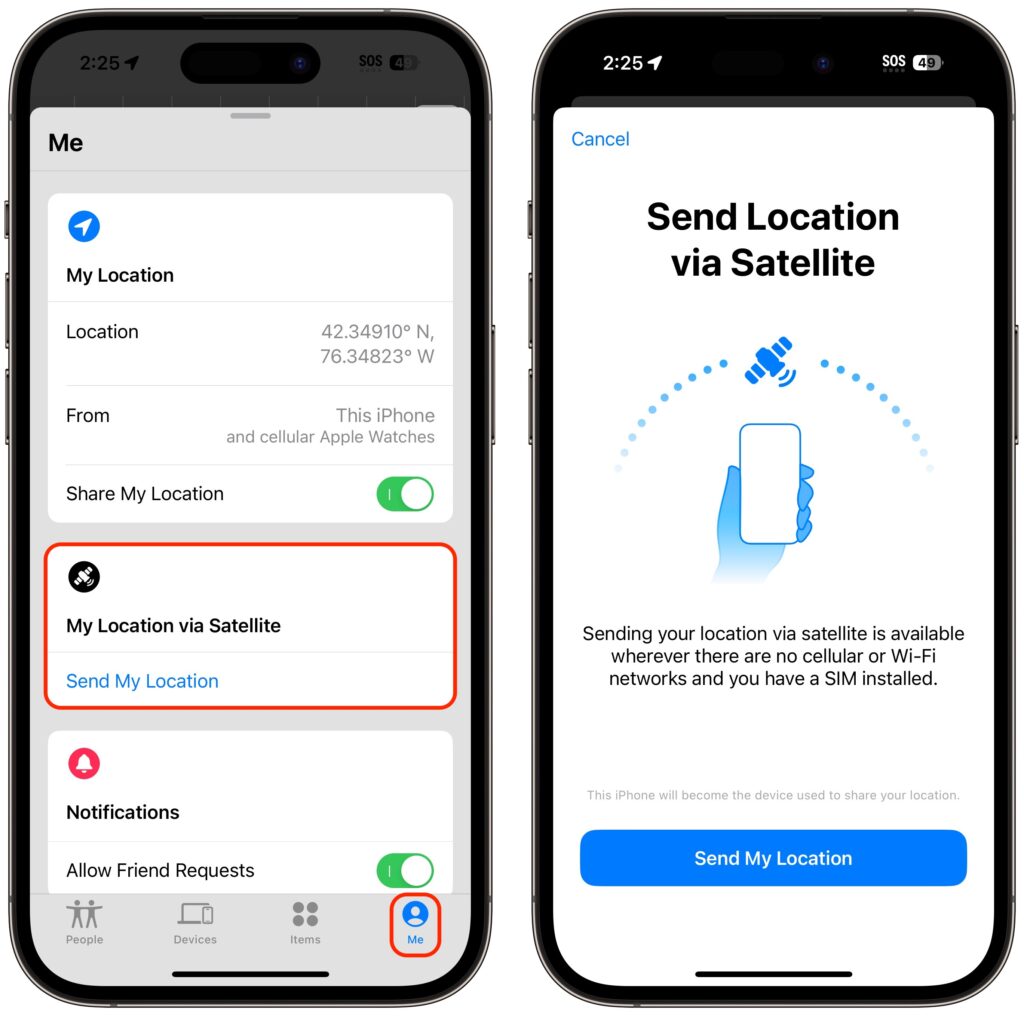
To get started in your cellular-free location, open the Find My app, tap Me in the toolbar, and tap Send My Location.

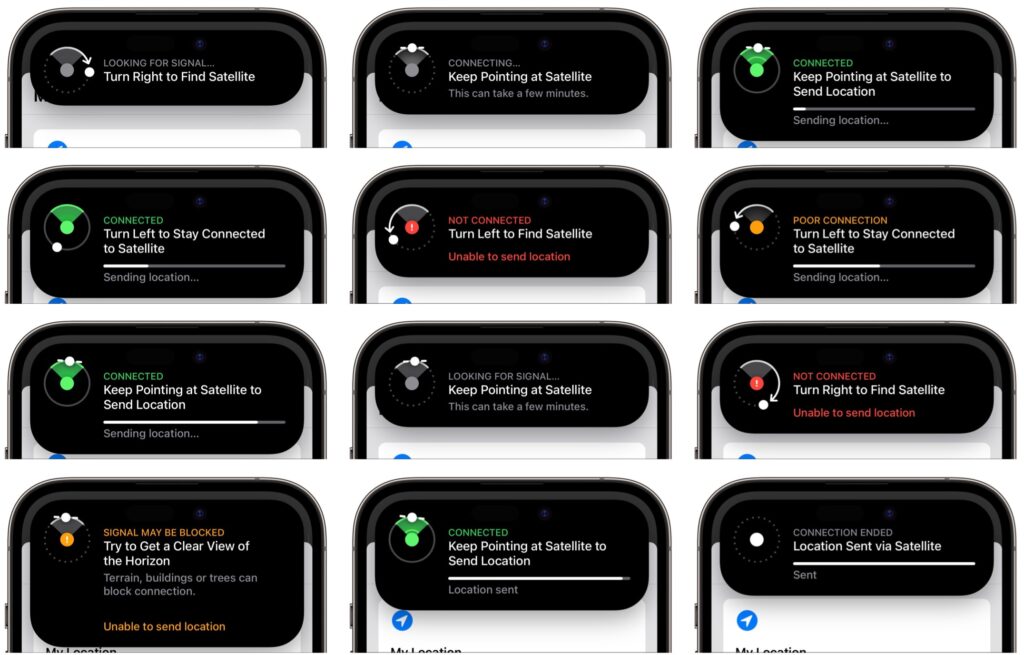
Find My will then start directing you to turn left and right, holding your iPhone up to the sky and pointing it at the satellite. A circular direction-finder shows which way to go and when you’re pointing in the right direction. If it fails (as it did in the lower-left message below), you’ll be directed to get a clear view of the horizon. If you’re in a deep valley, climbing higher may solve the problem, as it did in our test. The process isn’t quick, but the constant feedback and progress bar ensures that you feel like it’s doing something the entire time.

It’s important to realize that no one will be notified of your location, and you have no other way to communicate with people via satellite. So you’ll want to make plans with a friend or family member before you go into a situation where you could need help without having cellular service. Have a conversation beforehand so they know to look for you in Find My if you don’t get in touch by a predetermined time.

It would be nice if you could notify family or friends of your location for situations where you’d like help but don’t need emergency services. In the future, Apple could use the Send My Current Location option in Messages, but that doesn’t work via satellite now. Regardless, Emergency SOS and Find My via satellite are tremendously impressive, and we expect Apple to enhance the iPhone’s satellite communication capabilities in future iPhones and versions of iOS.

(Featured image by iStock.com/AntonioFrancois)


Social Media: For iPhone 14 owners, the future is here today with Emergency SOS and Find My via satellite, which let you contact emergency services and share your location by talking to a communications satellite. Learn how to try it here: