Posts

iOS 15 Brings Back the Text Magnifier, but Trackpad Mode Is Easier

Prior to iOS 13, when you were editing text on an iPhone or iPad, Apple provided a magnifying glass that showed the position of the insertion point. It worked, but was clumsier than just moving the insertion point directly, which is what Apple enabled in iOS 13 and iOS 14. The only problem? Your finger usually obscures the text you want to edit. In iOS 15, Apple brought back the text magnification bubble to show you where the insertion point is in the text under your finger. If you’ve missed that feature, touch and hold on some text and drag the insertion point. Even easier is trackpad mode on the iPhone, which lets you touch and hold the Space bar to turn the entire keyboard area into a virtual trackpad that lets you move the insertion point above.

(Featured image by iStock.com/Ralf Geithe)

Universal Control Arrives in macOS 12.3 and iPadOS 15.4

With the recent release of macOS 12.3 Monterey and iPadOS 15.4, Apple shipped Universal Control, the last major technology promised in its 2021 operating system upgrades. Universal Control enables you to use the keyboard and mouse or trackpad attached to one Mac to control up to three other Macs or iPads—you can even copy and paste or drag items between devices. It’s a great way to make more of your Apple devices while staying on task—no longer do you need to stop using your Mac to accomplish something on your iPad, and if you have both an iMac and a MacBook Air, it becomes trivially easy to use them simultaneously.

Universal Control can simplify grabbing a file from your MacBook Air while using your iMac, or it might make it easy to check something in an iPad-only app without switching from your familiar Mac keyboard and trackpad. For those who would benefit from more screen space, Universal Control simplifies keeping a Web browser window open on one Mac while you’re writing about it on another.

First, make sure all the Macs and iPads you want to use with Universal Control meet its system requirements. macOS 12.3 and iPadOS 15.4 are essential, and most (but not all) Macs and iPads that can run those versions are compatible. All the devices must be signed in to the same iCloud account, that account’s Apple ID must have two-factor authentication enabled, and no device can be sharing its Internet or cellular connection. Bluetooth and Wi-Fi must be turned on, and Handoff must be ​​enabled in System Preferences > General on the Mac and in Settings > General > AirPlay & Handoff on the iPad. That may sound like a lot, but most of those are defaults.

Apple says everything must be within 30 feet (10 meters), but in nearly all cases, you’ll want the devices to sit next to one another so you can easily see what you are doing on all the screens.

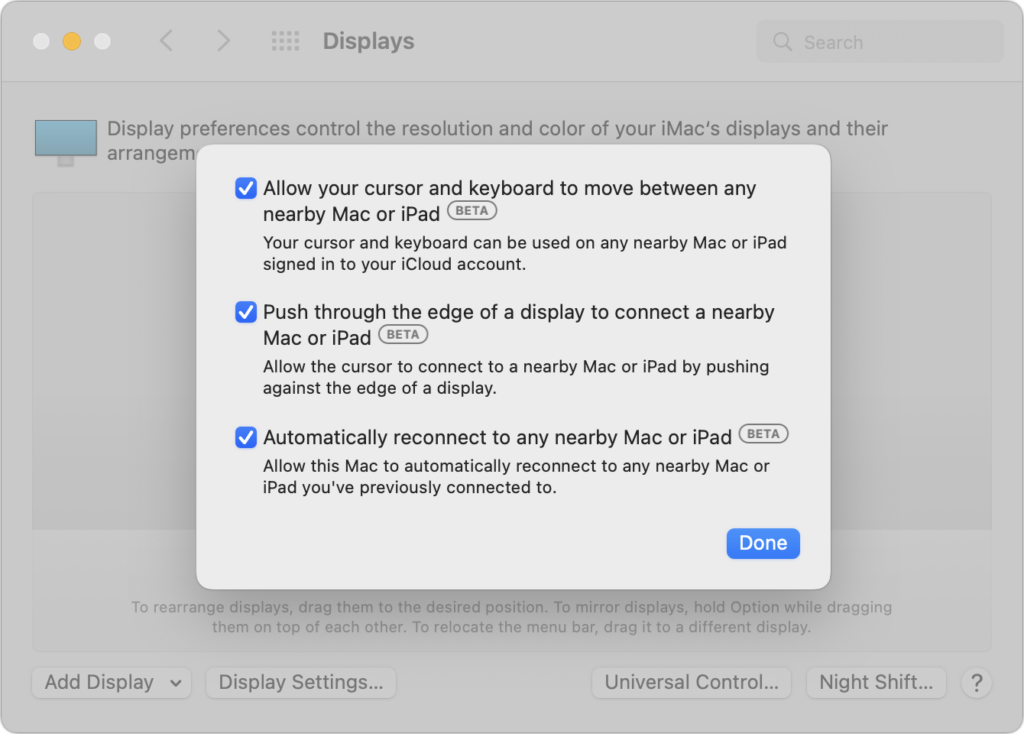
The only trick with setting up Universal Control is that it must be initiated from a Mac. Open System Preferences > Displays, click the Universal Control button, and in the dialog that appears, enable all three switches. Only the first one is necessary; the other two make connecting in the future easier.

After you click Done, you’ll return to the Displays preference pane, where any available Macs and iPads should appear, much like they were external monitors. If they don’t show up, click the Add Display pop-up menu and select the device you want to control under “Link Keyboard and Mouse.” You can also select them in Control Center, after clicking Displays. As long as you’ve selected “Automatically reconnect to any nearby Mac or iPad,” you shouldn’t have to repeat this step.

(The “Mirror or Extend to” section of the Add Display pop-up menu is where you select devices to use as external displays for your Mac. Macs running Monterey appear here courtesy of AirPlay, as do Apple TVs; iPads appear thanks to Apple’s Sidecar technology.)

Drag the device screen icons to match where they sit on your desk. The screenshot above indicates that you’d move the pointer from the double-screen iMac to the right to control the MacBook Air and down from the middle of the iMac screens to control the iPad.

When your pointer moves to another device’s screen, everything you do from then on will affect apps on that Mac or iPad, with one caveat. After the pointer moves to another device, you usually need to click once to create “focus,” which means specifying which window should receive subsequent clicks and keystrokes. If you forget to do this (it will become second nature quickly) and start typing, keystrokes will go to the previous device.

To help you move data between your devices, Universal Control offers two additional features beyond clicking and typing:

  • Copy and paste: As you might expect, you can copy data on one device with Command-C, move the pointer to another device, and paste it into an app on the second device with Command-V.
  • Drag and drop: Alternatively, you can drag files and other types of data from one device to another. This works well between Macs, and you can also move data between Macs and iPads in many situations, such as dragging an Apple Pencil sketch from an iPad and dropping it in a graphics app on the Mac. If a drag doesn’t work, try copy and paste or fall back on sharing the data via AirDrop or iCloud Drive.

Keep in mind that once you’ve turned it on, Universal Control has no concept of primary and secondary devices. In practice, you’ll probably use one keyboard and pointing device to control everything, but that’s not necessary. You can use a trackpad and keyboard connected to any device to control any other device, switching whenever you’d like.

Since Apple labels Universal Control as a beta, you may experience occasional dropouts or rough edges. If it loses track of a device, try putting the device to sleep and waking it again, and if that doesn’t work, open the Displays preference pane and select the device from Add Displays again.

Controlling one Mac from another is extremely fluid because the pointer and keyboard act exactly as expected. However, if you haven’t previously used a trackpad and hardware keyboard with an iPad, you may find its approach somewhat surprising. It’s a hybrid between a traditional pointer and a touchscreen, so the pointer is attracted to Home screen icons and many other controls, transforming it into a selection highlight. Either way, Universal Control just works. Give it a try!

(Featured image by Apple)


Social Media: With macOS 12.3 Monterey and iPadOS 15.4, you can now use your Mac’s keyboard and pointing device to control up to three other Macs or iPads with Apple’s new Universal Control. Learn more at:

Delete or Position iOS Apps from Search

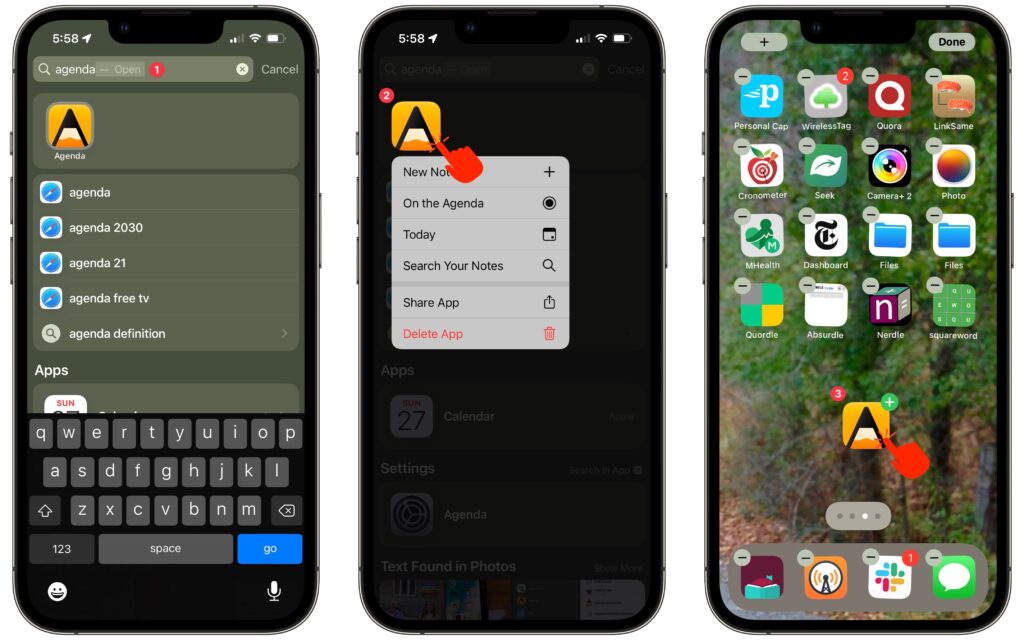
In iOS 15 and iPadOS 15, Apple added a feature that would have been even more welcome before the advent of the App Library: the capability to manage apps from Search. But it’s still handy as a way to delete or position an app you can’t find on a Home screen page. Swipe down from the middle of the Home screen to enter Search, after which you can work with any app you see in Siri Suggestions or find with a search ➊. Touch and hold an app to display its contextual menu ➋, including a Delete App option. Or touch and hold it and start dragging to move it to a Home screen page ➌. Bonus: you can even drag an app out multiple times to put it on multiple Home screen pages or in multiple folders!

(Featured image by iStock.com/B4LLS)

iOS 15 Allows Rearranging and Deletion of Home Screen Pages

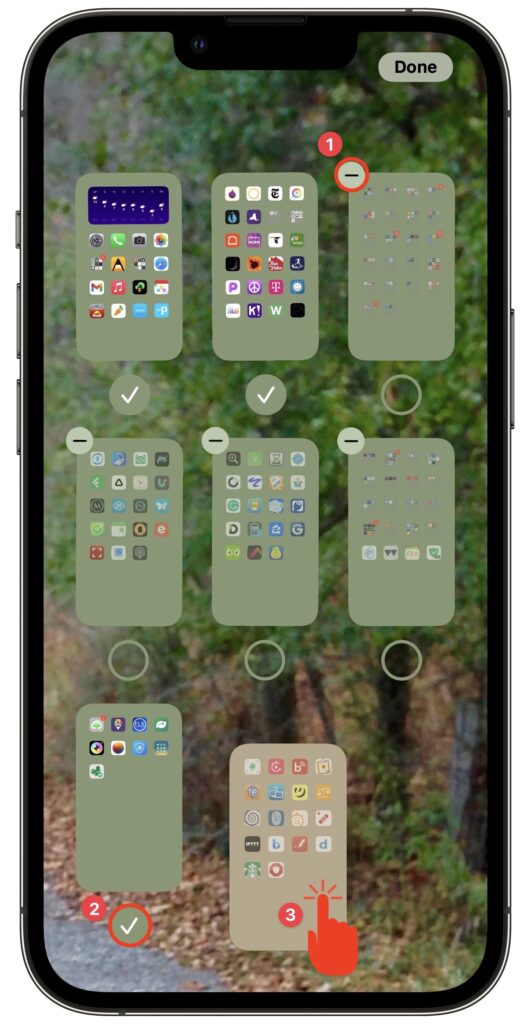
Back in iOS 14, Apple added the App Library, which collects all the apps on your iPhone. With everything available in the App Library, iOS 14 was also able to provide the option of hiding Home screen pages, a boon for those of us with too many disorganized pages. In iOS 15, Apple has taken the next step. You can still hide Home screen pages, but if you never want to see them again, you can delete them (apps remain in the App Library). Or, if they’re not in the order you want, you can rearrange them. Touch and hold any empty spot on the Home screen to enter jiggle mode. Tap the dots above the Dock that indicate which Home screen page you’re on. In the Edit Pages screen, you can now tap the – button next to a hidden page to delete it ➊. If you want to delete a visible page, first hide it by tapping its checkmark underneath ➋. Or, to rearrange Home screen pages, drag a thumbnail to a new location ➌. Tap Done or press the Home button when you’re finished.

(Featured image by Adam Engst)

In iOS 15, You Can Now Open an App from the Lock Screen

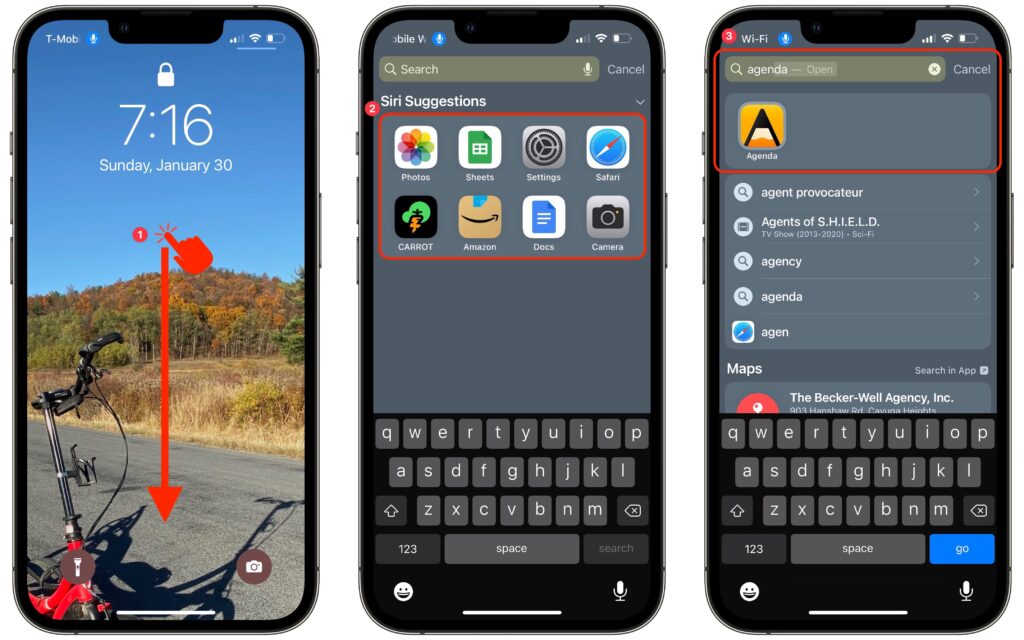
Most of the time, when you unlock your iPhone or iPad, you want to launch an app. In iOS 15 and iPadOS 15, you no longer have to unlock the device, find the app on a Home screen page, and tap it. Instead, you can open an app directly from the Lock screen, assuming Settings > Face/Touch ID & Passcode > Today View and Search is turned on. Just swipe down from the middle of the Lock screen ➊ to access the Search screen, which lists apps from Siri Suggestions ➋. You can tap one of those to open it, or you can use the Search field to find an app by name and tap the search result ➌.

(Featured image by iStock.com/ipopba)

Set Custom Text Sizes on a Per-App Basis in iOS 15

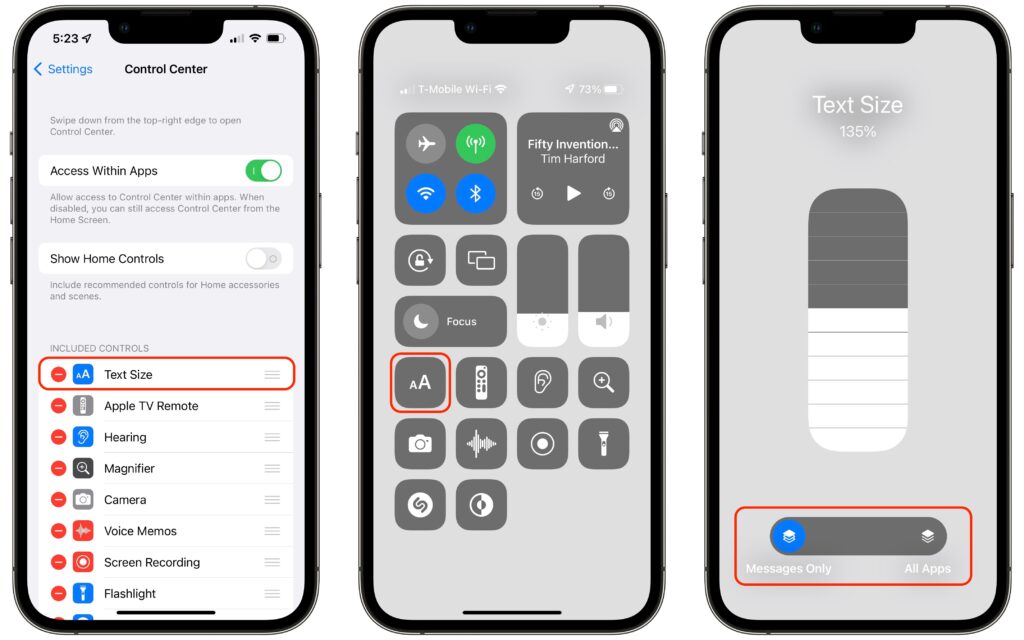
In previous versions of iOS, you could change the systemwide text size to make all apps—at least those that support Dynamic Type—display text at larger or smaller sizes. (Most people who use this feature want the text larger so it’s easier to read with aging eyes.) In iOS 15 and iPadOS 15, however, Apple lets you adjust the text size on a per-app basis, so you can increase it only for those apps where it really makes a difference for you. First, make sure Text Size is showing in Control Center by going to Settings > Control Center, and if it’s not in Included Controls, tap the green + button for it under More Controls. Then, while in an app where you want bigger text, invoke Control Center, tap the Text Size button, move the vertical slider to the desired setting, and then tap the App Only button so the setting affects only that app, not all apps.

(Featured image by iStock.com/SandraMatic)

Plan for the Future by Establishing a Legacy Contact

Have you heard the expression “hit by a bus”? It’s a somewhat macabre attempt to inject a little levity into planning for the unthinkable event of dying without warning. No one expects to be hit by a bus, but people do die unexpectedly in all sorts of ways. That’s terrible, of course, but it’s also incredibly hard on that person’s family, who suddenly must deal with an overwhelming number of details. Many of those details revolve around the deceased’s digital life—devices, accounts, passwords, subscriptions, and more.

We strongly encourage everyone, regardless of age or infirmity, to think about what your family would want and need to do with your digital presence in the event of your death. The ultimate guide to this topic is Joe Kissell’s book Take Control of Your Digital Legacy, although the current version is a little out of date and is slated for updating in 2022.

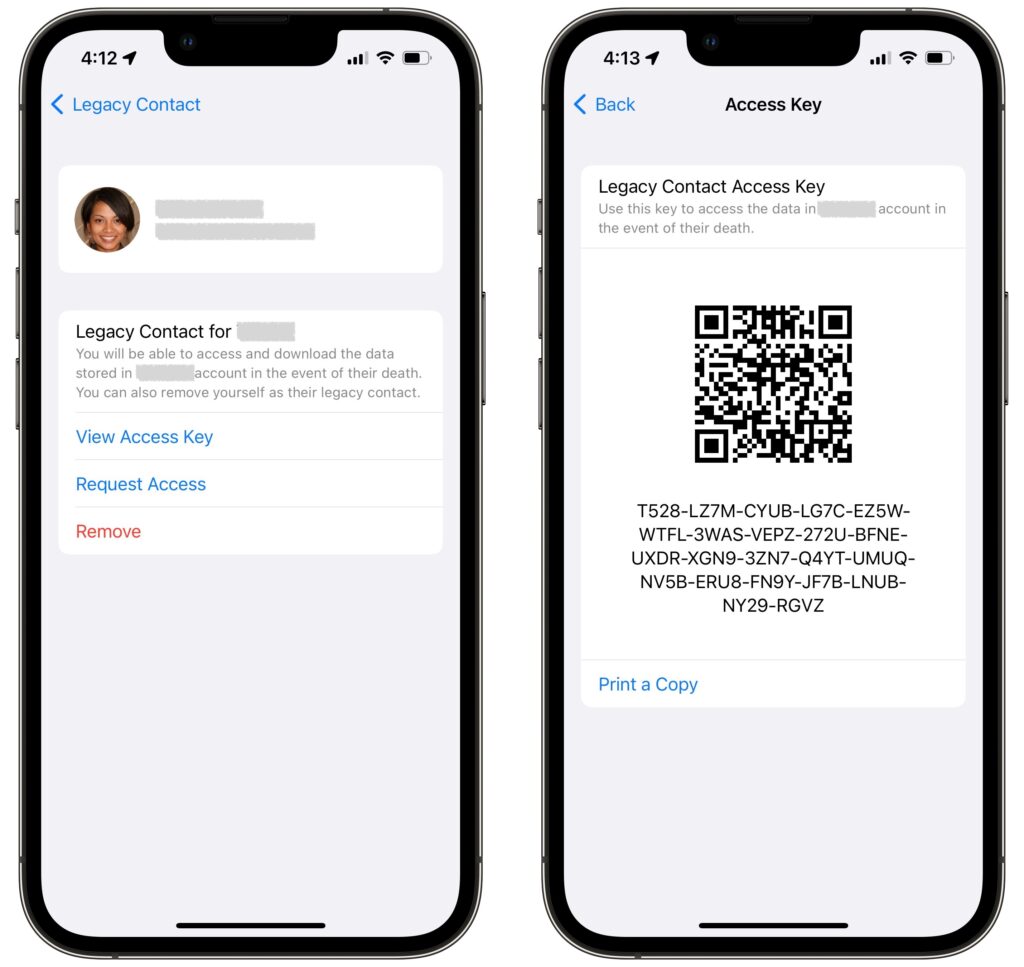
The next edition of that book will undoubtedly discuss Apple’s new Legacy Contact feature, introduced in iOS 15.2, iPadOS 15.2, and macOS 12.1 Monterey. It enables you to specify one or more people as a Legacy Contact. Should you die unexpectedly, those people can use an access key along with your death certificate to access much of your Apple content and remove Activation Lock from your devices. (If you have time to prepare for your passing, it’s easier to share all your passwords and passcodes explicitly.) The person or people you set as Legacy Contacts don’t have to be running Apple’s latest operating systems or even be Apple users, though it’s easier if they are. (Like so many other things in life.)

Don’t put off specifying someone as a Legacy Contact, whether it’s a family member or close friend. The entire point of the “hit by a bus” scenario is that it’s both unexpected and could happen at any time. (It’s possible to get access without being a Legacy Contact, but it requires a court order and will undoubtedly be significantly more work.)

Apple provides good directions for the Legacy Contact feature, and while we’ll summarize the steps below, read Apple’s documentation to get the word from the horse’s mouth. Apple’s support pages include:

What Data Can a Legacy Contact Access?

Apple has the full list at the link above, but in short, a Legacy Contact can access anything stored in iCloud, including photos, email, contacts, calendars, messages, files, and more, as well as the contents of iCloud Backup. Not included are licensed media (music, movies, and books), in-app purchases (upgrades, subscriptions, and game currency), payment information (Apple ID payment info or Apple Pay cards), and anything stored in the account holder’s keychain (usernames and passwords, credit card details, and more). A Legacy Contact cannot access the deceased’s devices—Apple is incapable of sharing passcodes. However, Apple can remove Activation Lock so those devices can be erased and reused.

How Do You Add a Legacy Contact?

Adding someone as a Legacy Contact is easy. You must be running iOS 15.2, iPadOS 15.2, or macOS 12.1 Monterey to initiate the process, and two-factor authentication must be turned on for your Apple ID (this is a very good idea anyway).

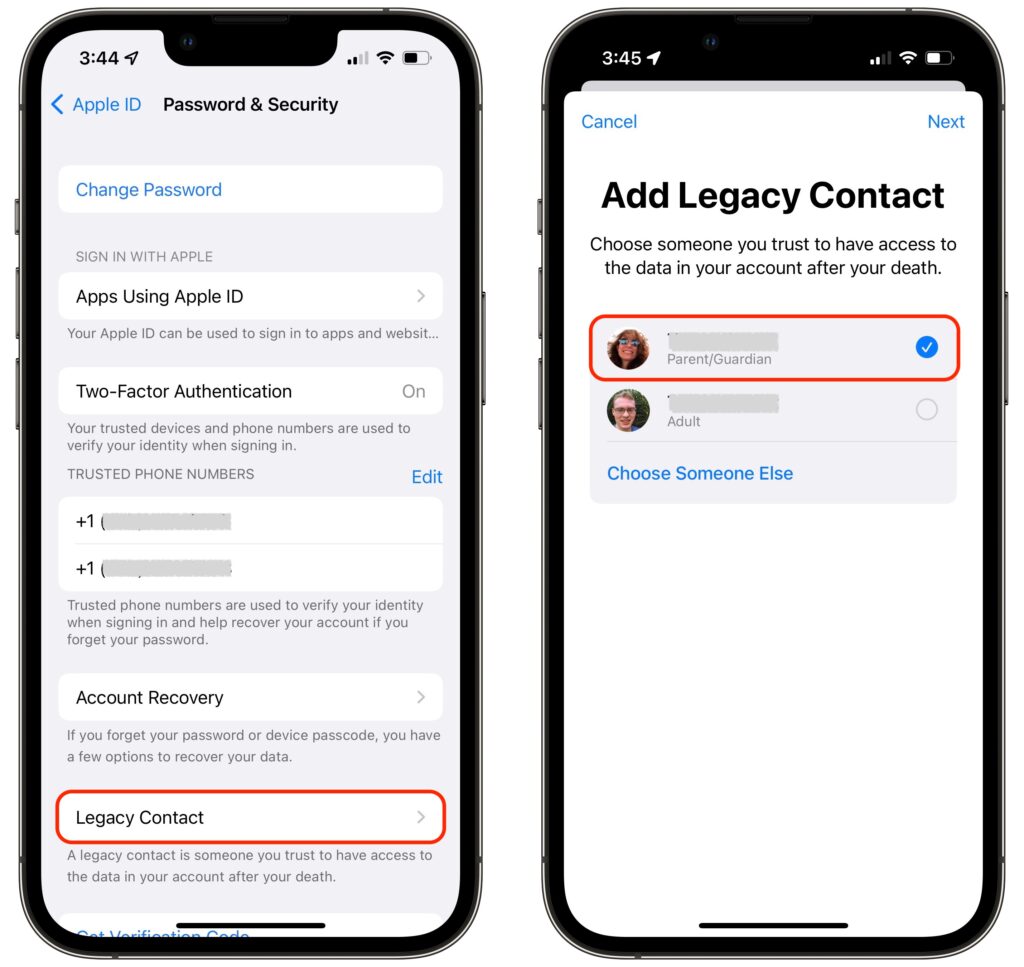
On an iPhone or iPad, go to Settings > Your Name > Password & Security > Legacy Contact > Add Legacy Contact. On a Mac, use System Preferences > Apple ID > Password & Security > Legacy Contact > Manage. You can choose a group member if you’re in a Family Sharing group or pick someone from your contacts list.

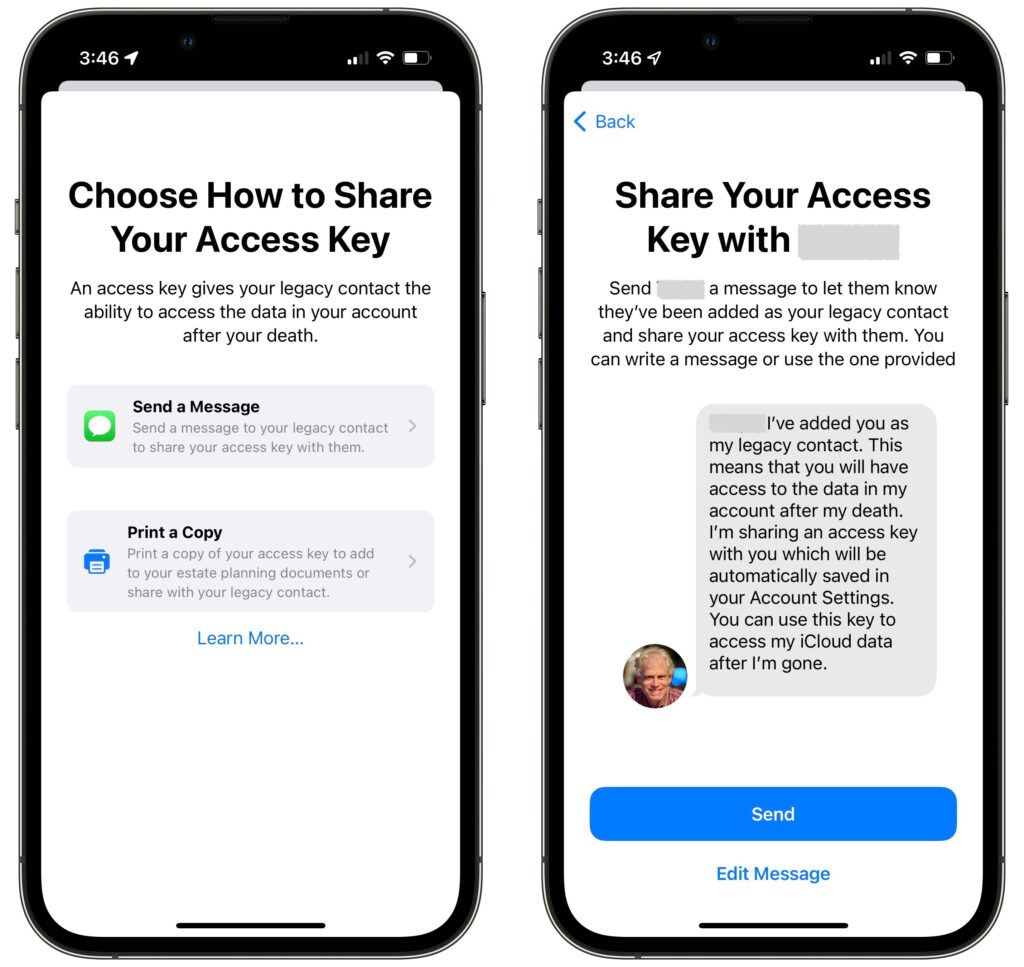
As part of the process of picking someone, Apple allows you to share the access key via Messages if they’re running iOS 15.2, iPadOS 15.2, or macOS 12.1 Monterey. If they accept, a copy of the access key will automatically be stored in their Apple ID settings. If they’re not running a necessary operating system or don’t use an Apple device, you can instead print out an access key QR code and give that to them. You might also want to print a copy to store with your will and other important documents.

It may often be appropriate to act as a Legacy Contact for the people you’re asking to be your Legacy Contacts, particularly with spouses or adult children.

How Does a Legacy Contact Request Account Access?

Let’s assume the worst and pretend ​​that someone who has added you as a Legacy Contact has passed away. To request access to their Apple ID, you need the access key that the person shared with you and a copy of their death certificate. You can find the access key on an iPhone or iPad in Settings > Your Name > Password & Security > Legacy Contact > Contact’s Name, and on the Mac in System Preferences > Apple ID > Password & Security, where you click Manage next to Legacy Contact settings and then Details next to the person’s name. It’s also possible that the person shared the access key as a document stored with their estate planning documents.

The screens that provide the access key also have a Request Access link. Tap or click that and follow the instructions to upload the death certificate. If you don’t have an appropriate Apple device, you can also do this on the Web at Apple’s Digital Legacy – Request Access page.

Apple evaluates all access requests to make sure they’re legitimate, and once approved, sends you an email with more details and instructions. That email will also include a special Legacy Contact Apple ID that replaces the deceased’s previous Apple ID. You can use that Apple ID to log in to iCloud.com or download data at privacy.apple.com, sign in to an Apple device, or restore an iCloud backup to another Apple device. Having an access request approved also removes Activation Lock from the deceased’s Apple devices so you can restore them to factory settings and set them up again, either fresh or with the Legacy Contact’s Apple ID’s data.

The main limitation is that the Legacy Contact Apple ID is good only for 3 years, after which the legacy account is permanently deleted. So be sure to download everything important fairly quickly—don’t just keep using the Legacy Contact Apple ID or assume that you’ll be able to go back to it at any time.

We sincerely hope that you never have to act as Legacy Contact for a loved one, but we can say from experience that this new feature can only help make an already stressful time more manageable.

(Featured image by iStock.com/Olga Serba)


Social Media: Apple’s new Legacy Contact feature makes it simpler for you to give a family member access to your iCloud data after your death. Read on to learn how to make someone a Legacy Contact or what to do if you are a Legacy Contact.

FaceTime Gains Cool New Features in Apple’s Latest Operating Systems

It’s no exaggeration to say that videoconferencing went mainstream during the pandemic. However, Apple’s FaceTime didn’t stack up well against Zoom and others due to its emulation of the telephone call experience, questionable interface decisions, and lack of cross-platform compatibility. However, with iOS 15, iPadOS 15, and macOS 12 Monterey, Apple has nearly brought FaceTime into feature parity with Zoom and others and it has even added a few features that break new ground.

FaceTime Links

One of the smallest new features in FaceTime may be the most important. No longer do you have to call others via FaceTime, an awkward approach left over from the days of landlines. That’s still possible, but it’s easier and more considerate to make and share a FaceTime link instead, which lets others join your call when they’re ready. FaceTime links make it effortless to rejoin a call if you have to drop off or if something goes wrong, and they simplify switching from one device to another. You can share FaceTime links like any other Web link, through Messages, email, discussion systems like Slack, or posting on a Web page.

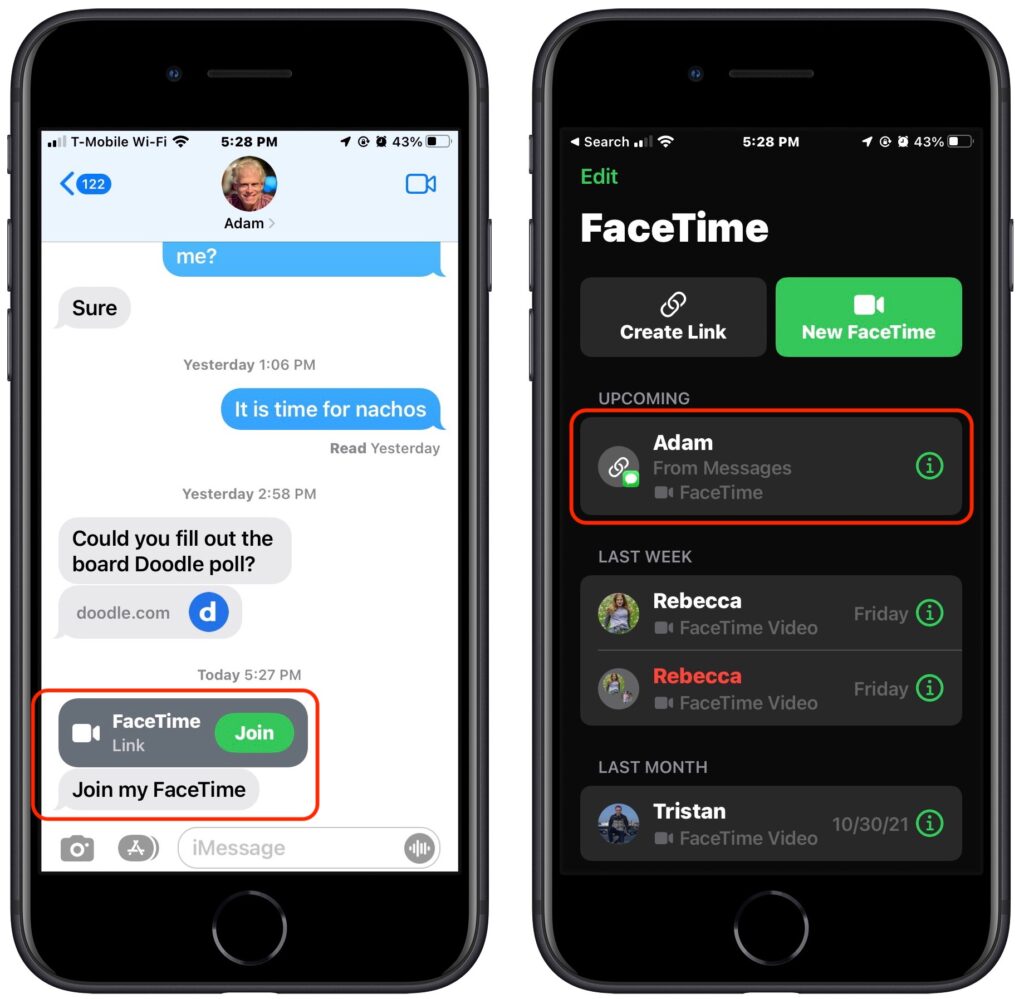
To create a FaceTime link, launch the FaceTime app and use the Create Link button in the upper left. If you’re creating it in iOS 15 or iPadOS 15, you can add a name before copying or sharing the link in the share sheet. In Monterey, clicking the button presents a sharing menu with similar appropriate options.

To join a call, all a recipient of the link has to do is tap or click the link. If they’re running one of Apple’s latest operating systems, the call will also appear in the FaceTime app, under Upcoming.

Either way, people joining the call get a preview window in which they can adjust their video and mic settings. After they hit the Join button, the organizer is notified that they’re waiting and can add them to the call. (That may seem like an unnecessary extra step, but it ensures random trolls can’t join FaceTime calls whose links have been shared publicly.)

If you’re scheduling a call, you can create a FaceTime link within an event in Calendar. That’s handy to make sure you have the link available at the right time, to make it available on all your devices, and to let others access it via a shared calendar. Use the Location or Video Call field, and select FaceTime when it’s offered. The event then gets a Join button that makes it easy to access the call. (If you’re sharing the calendar with someone who isn’t using one of Apple’s latest operating systems, they’ll just see a link they can click.)

Despite being associated with an event, such FaceTime links aren’t time-specific. You can start the call any time you want, and anyone else can attempt to join it at any time, but they’ll be able to get in only if you as the organizer let them in. So it won’t do them any good to join before or after the scheduled time.

FaceTime Web App

FaceTime links are also essential for allowing FaceTime calls to include those who aren’t running Apple’s latest operating systems. If you’re still on macOS 11 Big Sur or iOS 14, opening a FaceTime link switches to Safari and opens the FaceTime Web app. That also works for those using Android, Windows, or Linux, as long as they have a compatible Web browser, which means Google Chrome or another Chrome-based browser like Brave or Microsoft Edge. Firefox won’t work.

For the most part, the FaceTime Web app works just like the native FaceTime app, with the ability to change basic camera and microphone settings and support for grid view. There are two notable limitations:

  • FaceTime Web app users can only join calls, not initiate them.
  • Advanced options like the mic modes and video effects aren’t available.

Mic Modes and Video Effects

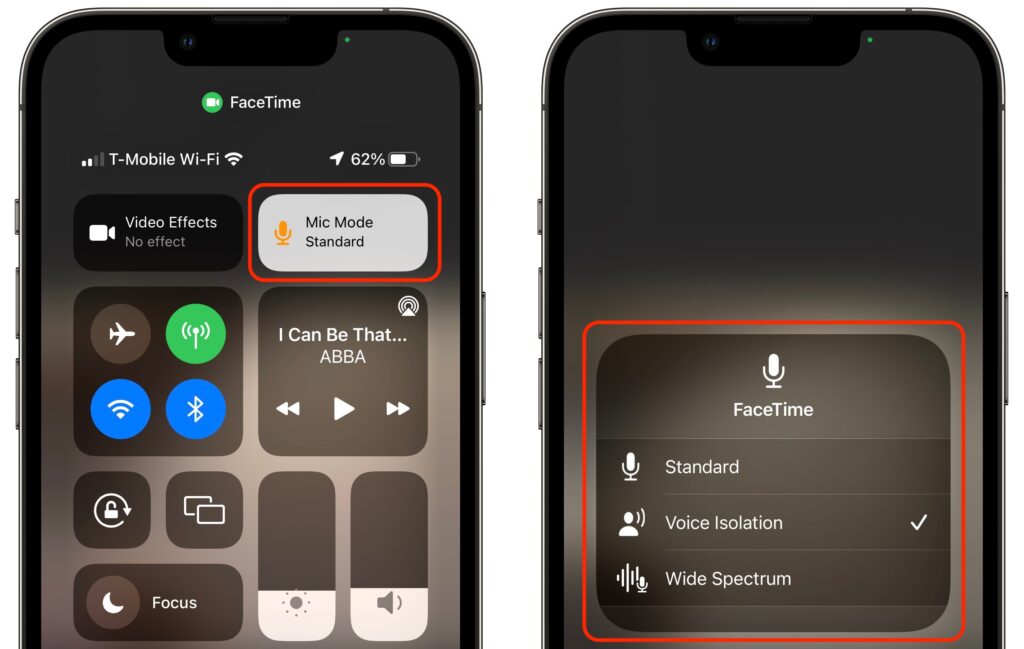
In an effort to catch up with the likes of Zoom, Apple added several audio and video features to FaceTime. There are now three mic modes that you can enable in Control Center during a call:

  • Standard: FaceTime does nothing special to the audio.
  • Voice Isolation: FaceTime focuses on your voice, working to eliminate non-vocal sounds and other background noise.
  • Wide Spectrum: FaceTime expands its attention to all the sounds in the room, which is essential for things like music lessons.

Although the equivalent Control Center button is labeled Video Effects, there’s only one at the moment: Portrait mode. It works exactly as it does in the Camera app for photos, keeping you in focus and blurring the background. Perhaps Apple will add other video effects in the future, much like Zoom’s virtual backgrounds and immersive sets. You can also toggle Portrait mode by tapping the Video Effects button in your FaceTime tile.

The Voice Isolation and Wide Spectrum mic modes, and the Portrait mode video effect, are available only on iPhones and iPads that have an A12 Bionic chip or later, or an M1 chip. Similarly, they work only on M1-based Macs, not older Intel-based Macs.

Grid View

When Apple first introduced FaceTime group calls, participants’ tiles would swim around on the screen, moving and expanding to indicate who was speaking. It was dizzying. Happily, Apple finally listened to annoyed users and has now introduced a simple grid view like every other videoconferencing app on the planet.

Once there are four or more participants in a call on an iPhone or iPad, a Grid button appears when you tap the screen to reveal the FaceTime controls. Tap it to switch into or out of grid view. In Monterey, there’s an always-visible Grid button in the upper-right corner.

Screen Sharing for iPhones and iPads

As helpful as FaceTime links are, our favorite new feature of FaceTime is screen sharing for those using an iPhone or iPad. (Macs can’t currently participate in FaceTime screen sharing but have their own screen sharing capabilities, accessed through the Conversations menu in Messages.) With a couple of taps, you can share your screen with someone else, or they can share their screen with you, all while maintaining the video call. For many remote workers, this feature is essential, whether you are collaborating on a project or showing your work to your boss. Another obvious use is remote tech support. If someone is having trouble accomplishing something on their iPhone or iPad, you can see what’s going wrong live on a FaceTime call. And kids, no doubt, will find many fun things to do together.

To share your screen during a FaceTime call, tap anywhere on the screen to reveal the FaceTime controls, tap the screen sharing button on the right, and tap the Share My Screen confirmation prompt. After a 3-second countdown, others on the call can see your screen, even as you switch away from the FaceTime app and use your iPhone or iPad however you want.

While you’re sharing your screen, a purple status icon reminds you that others can see what you’re doing. To stop sharing your screen, tap someone’s video tile to switch back to the FaceTime app and tap the screen sharing button again.

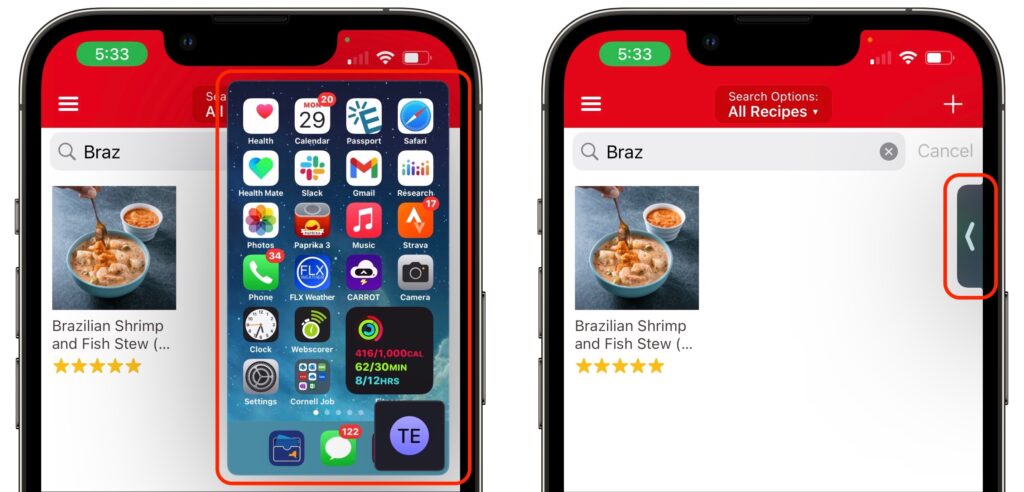
When someone shares their screen with you, a Picture-in-Picture (PiP) window of their screen appears. Tap it to expand it to the entire screen, moving the FaceTime call video to its own PiP window. Tap that FaceTime PiP window to return to the call. If you switch to another app, as shown below, the shared screen returns to being a PiP window. If any PiP window is in your way, you can drag it to another corner or swipe it off the screen to the left or right to hide it entirely. A tab appears to indicate the hidden PiP window; tap it to bring the window back.

SharePlay

People will either love SharePlay or ignore it entirely. It enables everyone on a FaceTime call to watch the same video or listen to the same audio while continuing the conversation. The big caveat is that everyone must have legal access to the content, which generally means a subscription to whatever service is being used, whether that’s Apple Music, Apple TV+, Disney+, HBO MAX, or Paramount+. Currently, SharePlay works only in iOS 15 and iPadOS 15 and on the Apple TV running tvOS 15. It’s slated to appear in a future version of Monterey, perhaps 12.1.

Initiating a SharePlay session is easy: simply navigate to Apple’s TV or Music app, or another app that supports SharePlay, and start playing something. You may be asked if you want to play it for everyone or just for yourself, or you may be told the content will play automatically. Assuming everyone on the call has the necessary subscription, the audio or video starts playing instantly.

What’s a little freaky about SharePlay is that, with one minor exception, everyone is an equal participant. If you start playing something, someone else can pause it or rewind it, say, and the video will pause or rewind for everyone. The exception is that only the person who started playing a video can stop it (tap the screen to reveal the controls), although anyone can start playing something else to replace it.

If you have an Apple TV, you can initiate video playback from the Apple TV or move something that’s already playing to the Apple TV. While you’re on a FaceTime call on your iPhone or iPad, press and hold the TV button on the Apple TV’s remote to open Control Center, and then select the SharePlay button that appears there to get started.

With all these new features, it’s time to rethink how you use FaceTime, and that’s especially true if you haven’t been using FaceTime because it lacked the features in some other videoconferencing app.

(Featured image by iStock.com/jacoblund)


Social Media: FaceTime has joined the big leagues in iOS 15, iPadOS 15, and macOS 12 Monterey. Read on to learn about FaceTime links, its cross-platform Web app, special mic modes and video effects, grid view, screen sharing, and SharePlay.

Use Visual Look Up in Photos in iOS 15 to Identify Plants, Pets, and More

Have you ever wanted to identify a plant, flower, or pet breed, or find out what that famous painting is called? Us too. In iOS 15 and iPadOS 15, Apple added a new AI-driven feature called Visual Look Up that provides more information about photos of plants, flowers, pets, books, artworks, and landmarks. When you’re viewing a photo, swipe up or tap the sparkle-badged info button ➊ to see metadata about the image (camera model, image details, location, and more) and then tap Look Up to learn more ➋. Depending on the item recognized, it will suggest Wikipedia articles, similar images from the Web, websites, bookstores, map locations, and more. Tap a suggestion to switch to Safari or another app for details. (If the info button doesn’t have the sparkle badge, Visual Look Up hasn’t identified anything in the photo.)

(Featured image by iStock.com/Hakase_)

Apple Provides Temporary iCloud Backup Space for New Device Transfers

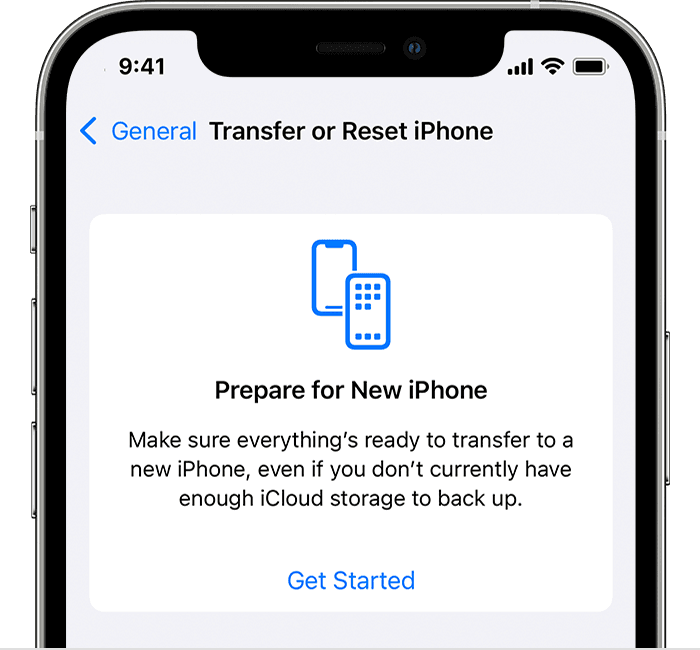
When you move from an old iPhone or iPad to a new one, the easiest approach is often the Quick Start device-to-device transfer. But if that doesn’t work, or if you have to give up one device before receiving the other, iCloud Backup is a fine alternative. Fine, that is, if you have enough iCloud storage space, which many people with the free 5 GB plan do not. For devices running iOS 15 or iPadOS 15, Apple just introduced the option to create a temporary iCloud backup that’s larger than the available space. Tap Settings > General > Transfer or Reset Device > Get Started to create the backup. You have 21 days (plus another 21 if necessary) to restore that backup, and it sticks around for another 7 days after you restore.

(Featured image by iStock.com/honley)