Posts

Use Guided Access to Let Kids and Others Use Your iPhone Temporarily

Let’s get one thing straight. You know that you should never, ever share your iPhone or iPad passcode with anyone you don’t trust implicitly, like a spouse or adult child, right? That’s because, with your iOS passcode, someone could change your Apple ID password, and if you use iCloud for email, completely steal or otherwise abuse your online identity. (Scared? Good. If you’ve given anyone your passcode, go change it right now. We’ll wait.)

So if sharing your passcode is such a terrible idea, how do you let someone else use your iPhone or iPad temporarily? Perhaps you want to let your kid play a game in the car while you focus on tricky winter driving. Or maybe you time running races with an iPhone app and want someone to do the timing without giving them full access to your iPhone. Whatever the reason you want to give someone limited access to a single app in iOS 13, the solution is Guided Access.

Enabling and Configuring Guided Access

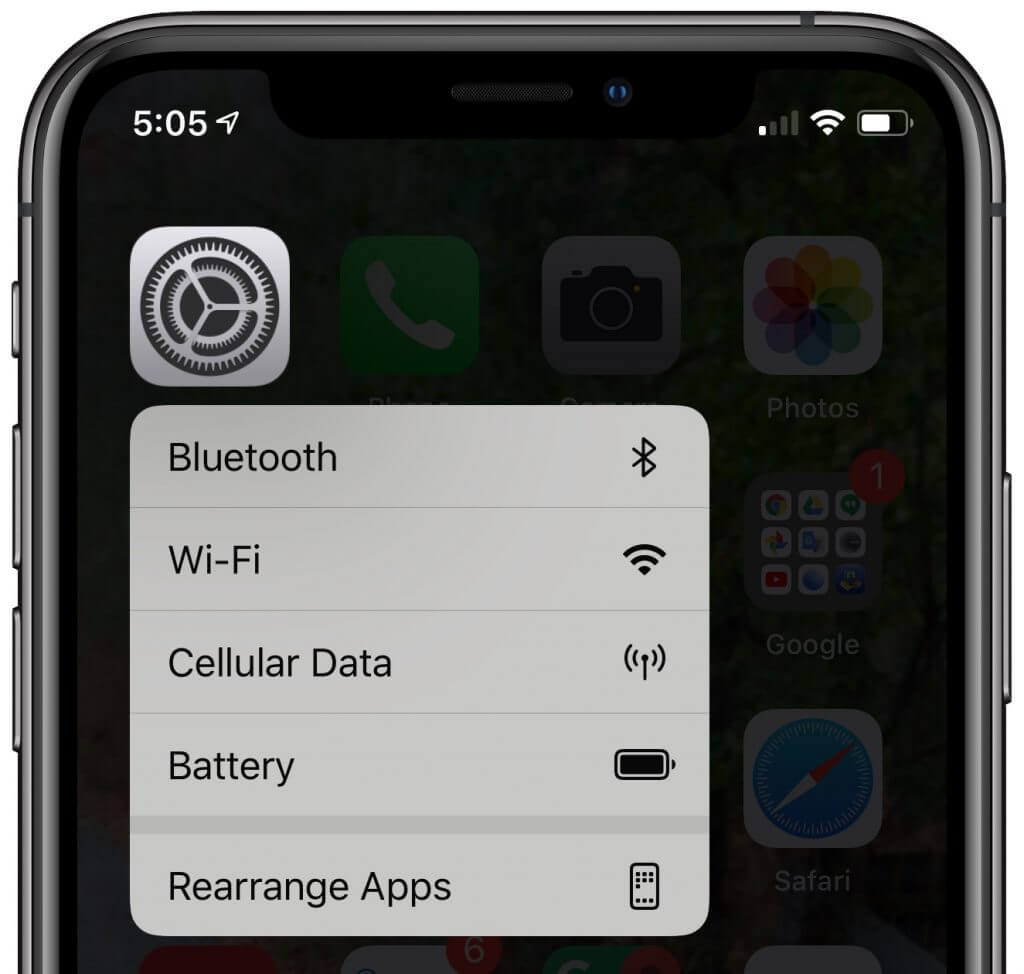
To turn Guided Access on, navigate to Settings > Accessibility > Guided Access (it’s near the bottom), and flick the switch. While you’re here, check out the remaining settings:

  • Passcode Settings: Create a passcode for getting out of Guided Access here (it can be different than your normal one), and choose whether you can use Touch ID or Face ID to exit as well.
  • Time Limits: You don’t set time limits here, but you can set audio and spoken warnings before the time runs out.
  • Accessibility Shortcut: Enable this if you also use triple-click for another Accessibility Shortcut like Magnifier.
  • Display Auto-Lock: Choose how long the device can be inactive before the screen turns off. If the Guided Access user wakes up the device, they’ll still be in Guided Access.

With those settings configured, switch to the desired app and triple-click the side or Home button, and if necessary, tap Guided Access in the Accessibility Shortcut list. You can do five things:

  • Set session-specific options: Tap Options in the lower-right corner to access various switches. If they’re disabled:
    • Side Button or Sleep/Wake Button: The user can’t put the device to sleep.
    • Volume Buttons: The user can’t change the volume.
    • Motion: The screen doesn’t change from the orientation (portrait or landscape) it was in when you started Guided Access.
    • Touch: The user can’t do anything with the screen at all—probably most appropriate for letting a young child watch a video.
    • Dictionary Lookup: Prevents word lookups in some apps.
  • Set time limits: At the bottom of the Options list, tap Time Limit and set an amount of time after which the device can’t be used until you enter the Guided Access passcode.
  • Disable specific areas on the screen: Draw circles around parts of the screen you want to make off-limits to the user. After making a circle, you can move it by dragging it, resize it by dragging any of its handles, or remove it by tapping its X button.
  • Start/Resume Guided Access: In the upper-right corner, tap Start. If you haven’t yet set a passcode, you’ll be prompted to do that.
  • Exit the setup screen: In the upper-left corner, tap End.

Using Guided Access

Once you tap Start, iOS tells you it’s entering Guided Access and lets you use the current app with the restrictions you’ve applied. If you decide that the restrictions aren’t right, triple-click the side or Home button to return to the setup screen. When you’re done, tap Resume in the upper-right corner.

To leave Guided Access, triple-click the side or Home button, enter the passcode, and in the setup screen, tap End in the upper-left corner.

That’s it! Once you understand the various limitations of Guided Access, you’ll be able to turn it on and off quickly whenever you need to let someone use your iPhone or iPad for a while.

(Featured image by mohamed Abdelgaffar from Pexels)


Social Media: Never, ever share your iPhone or iPad passcode with anyone who you don’t trust implicitly. Instead, you can give people limited access to a single app with Guided Access. Learn more here:

Need to Charge Your iPhone or iPad More Quickly? Get a Higher Wattage Power Adapter

By default, most iPhones and iPads ship with Apple’s tiny 5-watt power adapters. They work, but not quickly. However, the iPhone 8 and later, all models of the iPad Pro, and the most recent iPad Air and iPad mini models support fast charging when connected to higher wattage power adapters. You may have an older one of these around, or you can buy a new one. Apple has bundled with iOS devices or sold 10-watt, 12-watt ($19), and 18-watt ($29, USB-C) power adapters, and the company has also produced 29-watt, 30-watt ($49), 61-watt ($69), and 87-watt ($79) USB-C power adapters for Mac laptops. Plug your compatible iPhone or iPad into one of these chargers with an appropriate cable (for a USB-C charger, you’ll need a USB-C to Lightning Cable, $19), and it will charge significantly more quickly. Look for a wattage rating on the adapter itself, or multiply the output volts and amps together to get watts.

(Featured image by Matthew Henry on Unsplash)

iOS 13 Replaces 3D Touch with Tap-and-Hold

Do you use 3D Touch on your iPhone? From 2015 through 2018, every iPhone from the iPhone 6s through the iPhone XS supported 3D Touch, other than the iPhone SE and iPhone XR. With 3D Touch, you could (sometimes) press a control, and then press a little harder to make additional options appear. But because the 3D Touch hardware was expensive, it never made its way to the iPad or iPod touch. Apple replaced 3D Touch in the entire iPhone 11 line this year with the iPhone XR’s simpler Haptic Touch hardware that provides haptic feedback—the sensation of touching something—when you tap-and-hold (or long-press, if you prefer) on an object. With iOS 13, 3D Touch is gone, and almost everything it could do, you now accomplish with a tap-and-hold. So give it a try—long-press icons on the Home screen, panels in Control Center, messages in Mail, links in Safari, and a lot more.


(Featured image by Adi Goldstein on Unsplash)

iOS 13 Makes Editing Text Easier

Let’s be honest—text editing in iOS has never been anywhere near as good as it is on the Mac. We may be more accustomed to our mice and keyboards, but the Multi-Touch interface has always been clumsy when it comes to text. Apple keeps trying to improve iOS’s text editing features, and iOS 13 (and iPadOS 13) brings some welcome changes in how we go about positioning the text insertion point, selecting text, and performing the familiar options in the Mac’s Edit menu: Cut, Copy, Paste, and Undo/Redo. Has it caught up with the Mac yet? You’ll have to decide that for yourself, once you’ve learned the new techniques.

Note that these changes apply only to spots in iOS where you’re entering and editing text, not selecting and copying static, read-only text such as a Web page in Safari. And even when you are working on a Web page where you can enter and edit text, the site may override iOS’s text handling.

Insertion Point Positioning

Positioning the insertion point on the Mac is easy—you move the cursor to the right spot and click. In previous versions of iOS, you could tap to put the insertion point at the start or end of a word, or press and hold briefly to bring up a magnifying glass that let you put the insertion point anywhere, including within a word. It was slow and awkward, and made better mostly by trackpad mode, which you could invoke by long-pressing the Space bar.

iOS 13 improves positioning by letting you press and hold the insertion point to pick it up and then drag it to where you want it. This approach is much easier and more sensible than the previous method.

Selecting Text

On the Mac, you can select text with multiple clicks, by clicking and dragging, or by using the keyboard. In iOS, however, text selection has always been tough—you could double-tap to select a word, but anything else required subsequent moving of start and end markers. (On an iPad with a keyboard, you could hold Shift and use the arrow keys too.)

Happily, iOS 13 improves text selection. To start, you can still double-tap to select a word, but you can also triple-tap to select a sentence (shown below) and even tap four times in quick succession to select an entire paragraph. Unfortunately, these selection shortcuts may not work in all apps, but you can always fall back on the previous approach.

For selections of an arbitrary length, just press, pause ever so briefly to start selecting, and then drag to extend the selection. In other words, it’s as close to the Mac approach as is possible with the Multi-Touch interface. If the selection isn’t quite right, you can adjust the start and end markers.

Cut, Copy, Paste, and Undo Gestures

Everyone knows Command-X for Cut, Command-C for Copy, Command-V for Paste, and Command-Z for Undo on the Mac. In previous versions of iOS, those commands were available only from a popover that appeared when text was selected, or (for Paste) when you pressed and held in a text area. The only command with a gesture, so to speak, was Undo. At the risk of dropping it, you could shake your iOS device to undo your last action. Not good.

iOS 13 introduces a variety of three-finger gestures to make these commands quick and easy to invoke. Note that you can use the entire screen for these gestures—it’s OK to make them with one finger over the keyboard.

  • Copy: To copy selected text, pinch in with three fingers, or, more likely, your thumb, index finger, and middle finger.
  • Cut: To cut (copy and then delete) selected text, perform the copy gesture twice in quick succession.
  • Paste: To paste the text you’ve copied at the insertion point, reverse the action—pinching out (spreading) with three fingers.
  • Undo: To undo a mistake, immediately swipe left or tap twice with three fingers. You can keep swiping or double-tapping to undo more actions.
  • Redo: To redo the action that you just undid, swipe right with three fingers.

Whenever you use one of these gestures, a little feedback badge appears at the top of the screen to reinforce what you just did.

If you can’t remember which direction to pinch or swipe, press and hold with three fingers anywhere for a second to see a shortcut bar at the top of the screen with icons for Undo, Cut, Copy, Paste, and Redo.

Finally, instead of using Cut and Paste to move a swath of selected text, try dragging it to the new position.

Slide to Type

Various third-party keyboards have provided “slide-to-type” over the years, letting you type a word by sliding your finger from letter to letter on the keyboard without lifting it up in between. But switching to a third-party keyboard meant that you often gave up useful other features, like Siri dictation, so most people stuck with Apple’s default keyboard.

On the iPhone, iOS 13 now lets you slide to type on its default keyboard, and it works surprisingly well. In iPadOS 13, slide-to-type works only on the new floating keyboard you can get by pinching with two fingers on the default keyboard (pinch out with two fingers to restore the default keyboard). When you get to the end of a word, lift your finger to insert it, and then start sliding again for the next word. If you make a mistake, the suggestions above the keyboard often provide the word you want. You can switch between tapping (best for unusual words) and sliding on a word-by-word basis.

Make a mistake with sliding? By default, tap Delete after inserting a slide-to-type word to delete the whole word, not just the final letter. If you don’t like that behavior, turn off Delete Slide-to-Type by Word in Settings > General > Keyboard.

(Featured image by Lorenzo Cafaro from Pixabay)


Social Media: Today’s article will make text editing in iOS 13 faster and more fun. Read about important new and improved techniques for selecting, copying, and moving text, plus a new slide-to-type option.

Migrate Your Data from an Old iPhone to a New One with iOS 12.4’s New Feature

Most people are probably waiting until September to buy a new iPhone, but Apple is laying the groundwork for making the migration from an old phone to a new one even easier this time around. In iOS 12.4, Apple introduced a new way to migrate your data directly from one iPhone to another. This is an extension of the iOS 11 Quick Start feature that helps you set up a new iPhone with settings from your current device. All you have to do is turn on the new iPhone and place it next to a current iPhone running iOS 12.4 or later. When you see the prompt asking if you want to set up a new iPhone, tap Continue and scan the animation on the new iPhone using the current iPhone’s camera. Then you have to enter your current passcode on the new iPhone and set up Touch ID or Face ID, and tap Transfer from iPhone. Well, that and you’ll need to wait a while for all the data to transfer. If you don’t see this Transfer Your Data screen for some reason, you’ll still be able to restore all your data from an iCloud or iTunes backup.

(Featured image by Adam Engst)

What Can You Store in Apple’s Wallet App? Credit Cards, Boarding Passes, Tickets, and More!

Have you wondered what you can do with the Wallet app on your iPhone? Although it started out life called Passbook, Apple soon realized that the only sensible name was Wallet. That’s because it stores digital versions of roughly the same sort of things you might put in a physical wallet: credit and debit cards, store cards, membership cards, and even cash (well, Apple Pay Cash, anyway).

Nearly all airlines can put your boarding passes in Wallet, too, and if you buy something like a concert ticket online, you may be able to add it to Wallet by tapping the “Add to Apple Wallet” button in the confirmation page or email. Having a boarding pass or ticket, which Apple calls a pass, in Wallet makes it easy to scan for a gate attendant.

Here’s how to use cards and passes in Wallet.

Display Your Cards and Passes

The main Wallet screen shows your cards and passes in a scrollable list, with credit/debit cards at the top. (If you’ve set up Apple Pay Cash, it’s treated as a debit card.)

To view more details about a card or pass, tap it.

In the case of a credit/debit card, you see the face of the card and a list of its recent Apple Pay transactions.

For boarding passes for multi-flight trips, you see a single pass in the main list, but after you tap it, you can swipe horizontally to display the pass for each leg of the trip.

Membership cards, such as the ChargePoint card, may work like credit/debit cards in that you need to hold them near a reader to sign in.

In each case, to access settings related to the card or pass, tap the black ••• button at the upper right.

Adding and Using Credit and Debit Cards

Adding a credit/debit card so it can work with Apple Pay starts with tapping the black + button at the upper right of the Wallet screen. From there, follow the prompts—you can scan your card with the camera instead of keying in the data.

If you add more than one card, you’ll want to specify which should be the default for Apple Pay. Go to Settings > Wallet & Apple Pay. Scroll down to Transaction Defaults, and tap Default Card. Tap the desired card. In Wallet, the default card appears with its full face showing, below your other credit/debit cards.

To pay for a purchase with a stored credit/debit card at a payment terminal, put your iPhone right next to the terminal. The iPhone may automatically prompt you to authenticate Apple Pay, but if not, double-click the Home button or, with the iPhone X, XR, XS, or XS Max, double-click the side button. Wallet displays your default card. To authenticate, rest your finger on the Home button or, with the iPhone X models, authenticate with Face ID. To use a non-default card, tap the card pile at the bottom of the screen and then tap the desired card.

Adding and Using Airplane Boarding Passes and Event Tickets

For flights, when you check in and get boarding passes using the airline’s iPhone app, you’ll be given the opportunity to tap an Add to Apple Wallet button. Do that and the boarding pass appears in Wallet, which will also display a notification for it on the Lock screen in the hours before your flight. When you need to show the boarding pass to security or the gate attendant, tap that notification to display the boarding pass with its QR code.

For events, the ticket-seller may display the Add to Apple Wallet button on the confirmation page of the checkout process or attach the tickets to your email receipt. In the latter case, open the message in Mail and tap the attachment to open it, and then tap Add to put it into Wallet. Later, when you arrive at the venue, open Wallet and display the ticket—again with a QR code—to gain entry.

Deleting Cards and Passes

Although you may want to keep some digital tickets for nostalgic reasons, it’s best to clean out old items:

  • To delete a credit/debit card, tap the card to view it and then tap the black ••• button. Scroll down and tap Remove This Card.
  • To remove a pass, go to the bottom of the main Wallet screen and tap Edit Passes. Tap the red delete button for that item, tap the next Delete or Delete All button, and then tap Done at the upper right.

Using Wallet makes it easier to keep your physical wallet slimmer. It can take a few minutes to add your cards and passes initially, but it’s worth the effort.

(Featured image by Two Paddles Axe and Leatherwork on Unsplash)


Social Media: Want to reduce the thickness of your wallet? Try offloading some cards to the Wallet app on your iPhone! Here are the basics:

The Secret Trick That Lets You Paste Phone Numbers into the Phone App

Most iOS apps and many Web sites make phone numbers “hot” so you can tap them to call. But it’s not uncommon to run across a number that’s formatted oddly or broken across a line of text such that it can’t be recognized. Just because iOS can’t recognize it doesn’t mean you have to memorize the number temporarily or flip back and forth to the Phone app to type it in it. Here’s a workaround. Double-tap the start of the phone number to select it, and then drag the rightmost blue handle to extend the selection to the entire number. Tap Copy in the popover that appears to copy it. Then switch to the Phone app, tap Keypad at the bottom, and then tap in the blank white area at the top where typed numbers would appear. When a Paste button appears, tap it, and if the Phone app recognizes the number correctly, tap the green Call button to place the call.

(Featured image by Markus Spiske temporausch.com from Pexels)

Some May Like It Hot… But Your Technology Prefers to Stay Cool

When summer brings sunny days and rising temperatures, you may have ditched your business suit for shorts or skirts to stay comfortable, but your technological gear can’t do the same. And keeping your tech cool is about more than comfort—as temperatures rise, performance can suffer, charging may get slower or stop, various components might be disabled, and devices can become unreliable.

How Hot Is Too Hot?

You might be surprised by the recommended operating temperatures for Apple gear—whether you’re talking about an iPhone X or a MacBook Pro, the company recommends staying under 95° F (35° C).

Such temperatures happen regularly throughout the summer. Even in cooler climes, the temperature in a parked car in the sunshine can easily hit 130º F (54º C) in an hour and rise higher as time passes. And no, cracking the windows a couple of inches won’t make a significant difference. We hope you’re already thinking about that with regard to children and pets, but as you can see, tech gear should also be protected. Apple says its products shouldn’t even be stored—turned off—at temperatures over 113º F (45º C).

It’s not just cars you have to think about. Temperatures in homes and offices without air conditioning can also rise higher than electronics would prefer, and that’s especially true for computers that stay on most of the time and aren’t located in well-ventilated areas.

What’s the Danger?

First off, remember that all electronic devices produce their own heat on top of the ambient heat in the environment, so the temperature inside a device can be much, much hotter than outside. The CPU in an iMac can hit 212º F (100º C) under heavy loads.

Temperatures higher than what components are designed for can have the following effects:

  • Chips of all types can behave unpredictably as increased thermal noise (electrons vibrating more) causes a higher bit error rate. Because electrical resistance increases with heat, timing errors can also occur.
  • Lithium-ion batteries discharge well in high temperatures, but the increased rate of chemical reactions within the battery will result in a shorter overall lifespan.
  • As devices heat and cool, the uneven thermal expansion of different materials can cause microscopic cracks that can lead to a variety of failures over time.

Some heat-related problems are temporary, so when the device or component cools down, it will resume working correctly. But others, particularly drops in battery life—are irreversible and particularly worth avoiding.

When a Mac gets too hot, it will spin up its fans in an attempt to keep its internal components cool. If your Mac’s fans are ever running at full tilt, first quit apps you aren’t using, particularly those that might be CPU-intensive and thus creating a lot of heat. If that doesn’t make a difference, restart it to make sure the problem isn’t some rogue process. If the fans come back on at full speed quickly, shut it down and let it cool off for a bit. In the worst case, an overheated Mac will start acting unpredictably or crash.

iOS devices don’t have fans, so they employ other coping mechanisms. If your iPhone or iPad gets too hot, the device will alert you.

Apple says you might notice some of the following behaviors:

  • Charging, including wireless charging, slows or stops.
  • The display dims or goes black.
  • Cellular radios enter a low-power state. The signal might weaken during this time.
  • The camera flash is temporarily disabled.
  • Performance slows with graphics-intensive apps or features.

If you’re using Maps on an overheating iPhone for GPS navigation in the car, it may show a “Temperature: iPhone needs to cool down.” screen instead of the map. You’ll still get audible turn-by-turn directions, and the screen will wake up to guide you through turns,

How to Keep Your Tech Cool

For the most part, keeping Apple devices cool just requires common sense, since you’d do the same things for yourself.

  • As Apple’s specifications recommend, avoid using devices when the temperature is over 95º F (35º C). If you can’t avoid it entirely, keep usage to a minimum.
  • Don’t leave devices in cars parked in the sun for long periods of time. If it happens accidentally, let the device cool before using it.
  • Provide good ventilation so air can cool the device. Don’t block ventilation ports in the back of desktop Macs, and don’t use Mac laptops in bed, propped on a pillow, or under the covers. It can be worth vacuuming dust out of ventilation ports every so often.
  • Never put anything on the keyboard of an open Mac laptop.
  • Avoid stacking things on top of a Mac mini.
  • Monitor the temperature of server closets. If they get too hot, keep the door open, add a fan, or run the air conditioning.

Luckily, the temperatures that cause problems for Apple hardware aren’t terribly comfortable for people either, so if you’re way too hot, that’s a good sign your gear is as well.

(Featured image by Alfonso Escalante from Pexels)


Social Media: How hot is too hot for your Apple devices? You may be surprised by the answer.

A Quick Way to Check Battery Levels on Your iPhone, Apple Watch, and AirPods

Apple’s Batteries widget is a little known but highly useful tool for quickly assessing which of your small Apple devices is lowest on power—something you may wish to do when traveling with only one charging cable. To access it, switch to Today view on the iPhone, accessible by swiping right on the Home screen or Lock screen. If the Batteries widget isn’t already there, scroll to the bottom, tap Edit, and tap the green + button to the left of Batteries in the list. Of course, if you just want to check the battery status on one device, that’s possible too. It’s easy to figure out how much power remains in your iPhone’s battery because of the indicator at the top right of the screen (swipe down on it to invoke Control Center and see the percentage on the iPhone X and later). On the Apple Watch, swipe up on the screen to see its battery percentage in Control Center. For AirPods, open the case and wait for the pop-up to appear on your iPhone’s screen.

(Featured image by Adam Engst)

A Quick Trick to Turn Your iPhone into a Magnifying Glass

It’s maddening to want to read a serial number or other bit of fine print that you can barely see. But fret no longer—your iPhone or iPad makes a fabulous magnifying glass! Assuming Magnifier is enabled in Settings > General > Accessibility > Magnifier, you can bring it up by pressing the Home button (for Touch ID devices) or side button (for Face ID devices) three times quickly. If that’s too hard to remember, you can also add a Magnifier button to Control Center in Settings > Control Center > Customize Controls. The special camera viewfinder is zoomed automatically, but you can change the zoom level with the slider, tap the flash icon to turn on the LED light (if available on your device), enable a filter to change the color or contrast, or lock the focus by tapping the lock icon. You can also freeze the image by tapping the white shutter button, which is great for grabbing a picture of a tiny serial number on the back of some device (tap that button again to resume using Magnifier). To leave Magnifier, press the Home button or swipe up from the bottom of the screen.