Managing Digital Images on Memory Cards and Files
Article © 2018 by Jenna Caplette, with tips from the staff of
F-11 Photo & The Print Refinery™
You’ve captured some great digital images. Now what? Here are the next steps you should take:
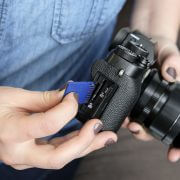
First, save the images from your camera to your hard drive. Its best to use a card reader to download pictures from your camera’s memory card. If you have to use the camera itself, be sure the batteries are new, fully charged, or use an AC adapter. Then, save your images to your computer’s hard drive or other media. Don’t put a card with edited images back into the camera.
To extend the life of the memory card you just popped back in to your camera, here are some basic tips:
• Always turn the camera off before inserting or removing the card.
• Never remove a card from the camera or turn the camera off while it’s accessing the images.
• Never force a card into a slot.
• Protect your card from dirt, static and moisture. There are some great, safe, storage options available.
• Use only the camera you are shooting with—not the computer or another camera—to format the card after you’ve successfully downloaded and saved the images to your computer. Do format instead of using delete all.
At least twenty percent of digital images that have been taken have been already lost because they weren’t properly saved, backed up and printed. Ideally, you should have three copies of every image you take. One on the computer hard drive where you can access it and use it, one on archival media stored in a dark, dry place, and a third stored far enough away from your home so that in the event of a natural disaster, your images are still safe.
One of the easiest ways to take care of the off-site storage is to use a Cloud service. You can utilize a free photo sharing site like that offered by Bozeman’s F-11 Photo & The Print Refinery™ or something like Drop Box to accomplish the same thing. Make sure you can upload files in their original size, that you can access them when you want to and you can easily download them. Make sure that you keep your contact information up to date, as most services require you to log in from time to time so they know you still want your images.
Choose your best images and have prints made. Don’t wait until you’ve had time to come up with the perfect version. Let yourself enjoy sharing them while your memory of taking the shots is still fresh.
If you don’t use software that helps organize your images for you like Adobe Lightroom or Apple Photos, think through how you’ll look for them. Create a system for naming folders that makes sense to you and that will continue to make sense twenty folders—or twenty years down the line. For a visit to a friend’s ranch from this month, this year, you might name that “ranchvisit2018_02.” When you have a system like this, you’ll be able to find the images you are looking for. If you use discs, label them the same way. Remember to make incremental back ups of everything, including edited and unedited files. Don’t just store them on the hard drive.
To recap these basics: take care of your memory card. Organize your image files on your computer. Download your images and immediately make back ups. If you use discs as part of your backup plan, make sure they are archival quality, not cheapies that will rot. M-disc is currently the most archival product made.
Getting organized can be a challenging process but once you have a system, the task of downloading and editing images becomes far less daunting.
Stuff happens. When it does, having proper back ups and printed images makes all the difference.

