We’re taking a brief break from helping you become more productive to recommend a feature that could spark moments of joy for Apple Watch users. In watchOS 11, the new Photos watch face can display a photo from a shuffled set of images each time you raise your wrist (or tap the screen). Like the Lock Screen customization feature on the iPhone and iPad, the Photos face can dynamically select images of your favorite people, nature, and cities from your photo library. (You can also choose photos manually.) The time appears in an appropriate spot and size. Before the Photos face, we often relied on the complication-heavy Modular face, but we now find being surprised by lovely images from our photo library to be delightful. To add the Photos face to your Apple Watch, open the Watch app on your iPhone, tap Face Gallery, and tap the Photos face. Then, choose where the content will come from, select the time size, and add any desired complications. Once it’s on the Apple Watch, you can tweak style settings there too.
(Featured image by Adam Engst)
Social Media: Let’s take a step back from how technology can enhance productivity to appreciate watchOS 11’s new Photos watch face. The way it unearths photos from your photo library on every wrist raise is delightful.
https://f11photo.com/wp-content/uploads/sites/13/2023/06/PR-F11Photo-logo.jpg00F-11 Photohttps://f11photo.com/wp-content/uploads/sites/13/2023/06/PR-F11Photo-logo.jpgF-11 Photo2025-02-07 10:05:002025-03-06 23:26:41For Moments of Joy, Use watchOS 11’s Photos Watch Face
The devastating losses caused by the Los Angeles wildfires have underscored the need to protect data from catastrophic events. A traditional offsite backup—periodically moving a hard drive to another location—might not have sufficed in areas affected by wildfires, where many structures were destroyed. An online backup using a service like Backblaze or CrashPlan is often a better solution, although it can become costly for multiple Macs, and some individuals and organizations are uncomfortable storing their data online, even with encryption.
What about a safe? Would storing one or more backup drives in a safe provide adequate protection? Possibly, but the details are critical. Some safes are designed solely to guard against theft, focusing on preventing thieves from opening the door. However, paper ignites at 451ºF (it chars around 387ºF), and most house fires reach temperatures between 800ºF and 1200ºF, so you may think that all you need to do is look for a “fireproof” safe. That’s a good start, but paper is actually much more resilient than magnetic and optical media.
Fireproof safes come with ratings that indicate the internal temperature they can maintain, with the most common being:
Class 350: Safes maintain an internal temperature of 350ºF, suitable only for paper.
Class 150: Safes keep the interior below 150ºF, which should protect magnetic media.
Class 125: Safes maintain temperatures under 125ºF, appropriate for optical media.
It is also important to determine how long the safe can maintain that temperature. Generally speaking, a fireproof safe is rated for 1 or 2 hours, indicating it can maintain the specified internal temperature for at least that duration. Time ratings represent minimums, not maximums, so the actual protection time may be longer.
In most cases, the protection time is likely to be longer. That’s because safes are tested in furnaces at temperatures that can be two to three times hotter than the average house fire. For example, Underwriters Laboratory (one of several independent testing labs) conducts tests at 1700ºF or 1850ºF. Additionally, while a house fire may burn for several hours, the average fire will consume everything near the safe within 20 minutes and then move on.
Wildfires are a different story. In extreme conditions, wildfire temperatures can range from 1500ºF to 2200ºF, approaching or exceeding the testing conditions. Wildfires also last longer, so a safe in a destroyed building may remain in embers for hours or even days before it can be recovered.
While temperature over time is the main factor to consider when researching a fireproof safe, also look for two other variables being mentioned as well:
Water resistance: Where there’s fire, there’s usually water. Thousands of gallons of water, some of which will undoubtedly affect the safe. Not all fireproof safes are waterproof, so verify whether a specific safe can withstand being doused by firefighters.
Impact protection: If the floor collapses, a safe on an upper story could fall a considerable distance. If you are considering such a location, ensure the safe can withstand the impact. To simulate realistic fire conditions, the test may involve withstanding a 30-foot drop onto a concrete floor, followed by reheating.
Finally, remember that if your safe is in a fire, the heat will cause its insulation to swell up, rendering the lock useless, regardless of its type. Typically, you will need to hire a locksmith to access the safe using instructions from the manufacturer.
If you’re going to trust your data to a fireproof safe, do your research to ensure that whatever you buy will meet your needs for fire, water, and impact protection. It won’t be cheap—depending on the size and other factors, a good fireproof safe can cost many hundreds or even thousands of dollars. However, this is one area where you definitely shouldn’t cut corners.
(Featured image based on originals by iStock.com/phive2015 and Hanna Plonsak)
Social Media: If the wildfires in Los Angeles have you considering a fireproof safe to safeguard backups and important documents, make sure to research temperature ratings over time and be mindful of water and impact resistance.
https://f11photo.com/wp-content/uploads/sites/13/2023/06/PR-F11Photo-logo.jpg00F-11 Photohttps://f11photo.com/wp-content/uploads/sites/13/2023/06/PR-F11Photo-logo.jpgF-11 Photo2025-02-07 10:04:002025-02-19 18:27:39When Purchasing a Fireproof Safe, Pay Attention to the Details
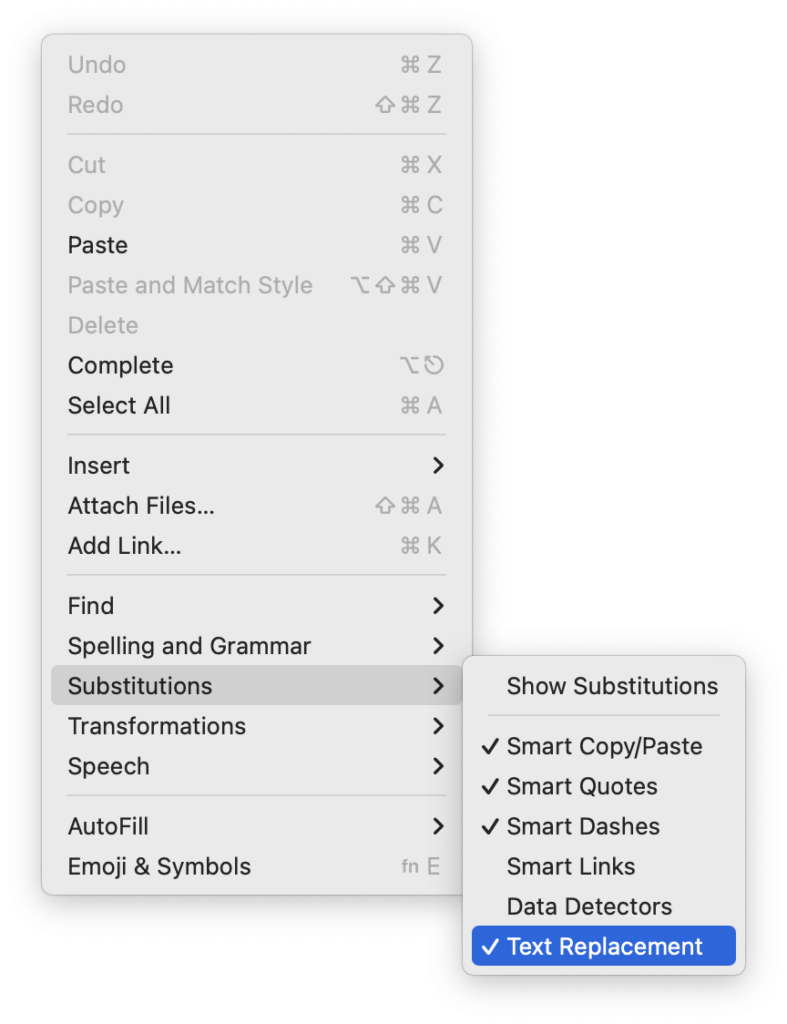
Apple provides a handy ecosystem-wide feature that replaces a typed abbreviation—say “eml”—with text you specify, like your email address. (Seriously, copy that one so you don’t have to type your email address repeatedly.) These automatic text replacements sync via iCloud so you can use them on the Mac, iPhone, and iPad. Find them on the Mac in System Settings > Keyboard > Text Replacements and on the iPhone and iPad in Settings > General > Keyboard > Text Replacement. They’re great, but it can be mysterious when they stop working on the Mac. The culprit? A menu item being turned off. So, if text replacements aren’t working in a particular app, choose Edit > Substitutions > Text Replacement to turn them back on.
(Featured image by iStock.com/tookitook)
Social Media: Apple’s built-in text replacement feature expands a short abbreviation you type into something longer, but a simple menu option can prevent it from working in a Mac app. Here’s how to fix it.
https://f11photo.com/wp-content/uploads/sites/13/2023/06/PR-F11Photo-logo.jpg00F-11 Photohttps://f11photo.com/wp-content/uploads/sites/13/2023/06/PR-F11Photo-logo.jpgF-11 Photo2025-01-03 14:08:002025-02-06 14:54:36Text Replacements Not Working on the Mac? Check This Setting
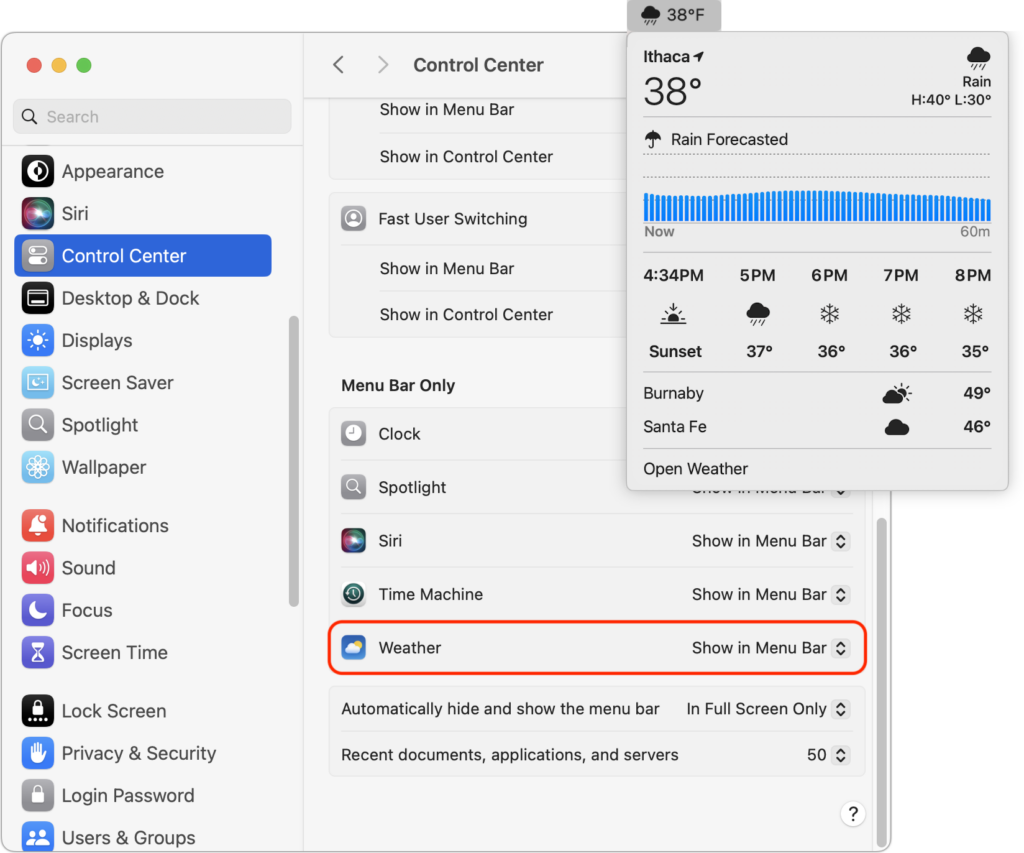
In macOS 15.2 Sequoia, Apple added the option to display the current weather conditions in the menu bar but hid the switch deep in the bowels of System Settings. To turn this option on, open System Settings > Control Center, scroll to the bottom, and in the Menu Bar Only section, for Weather, choose Show in Menu Bar. A new item with the current conditions at your location will appear in the menu bar; click it to see the forecast and access other locations in Apple’s Weather app.
(Featured image by iStock.com/trangiap)
Social Media: In macOS 15.2 Sequoia, you can display the current weather conditions in your Mac’s menu bar. Here’s how to enable that feature.
https://f11photo.com/wp-content/uploads/sites/13/2023/06/PR-F11Photo-logo.jpg00F-11 Photohttps://f11photo.com/wp-content/uploads/sites/13/2023/06/PR-F11Photo-logo.jpgF-11 Photo2025-01-03 14:07:002025-02-06 14:54:36Add Weather to Your Mac’s Menu Bar with This Sequoia Tip
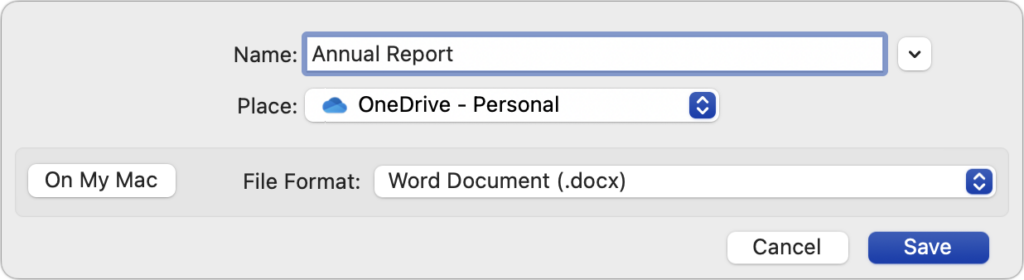
By default, Microsoft Office apps—Word, Excel, and PowerPoint—try to save files on Microsoft OneDrive as a way of promoting the company’s cloud storage. If that’s undesirable, you can easily keep your files locally on your Mac or in a different cloud storage location. In the Save dialog, click the On My Mac button to switch to a standard Save dialog showing all your other storage options. There’s no way to set On My Mac as the default location, but the Save dialog automatically remembers your last saved location. That should be sufficient most of the time, although it’s not unheard of for an Office update to flip the Save dialog back to OneDrive.
(Featured image based on an original by iStock.com/pzAxe)
Social Media: Microsoft Office apps save documents in the cloud-based OneDrive by default, but you can easily switch to saving files elsewhere. The apps generally remember your change but may forget after an update.
https://f11photo.com/wp-content/uploads/sites/13/2023/06/PR-F11Photo-logo.jpg00F-11 Photohttps://f11photo.com/wp-content/uploads/sites/13/2023/06/PR-F11Photo-logo.jpgF-11 Photo2025-01-03 14:06:002025-02-06 14:54:37How to Convince Microsoft Office Apps to Save Files on Your Mac
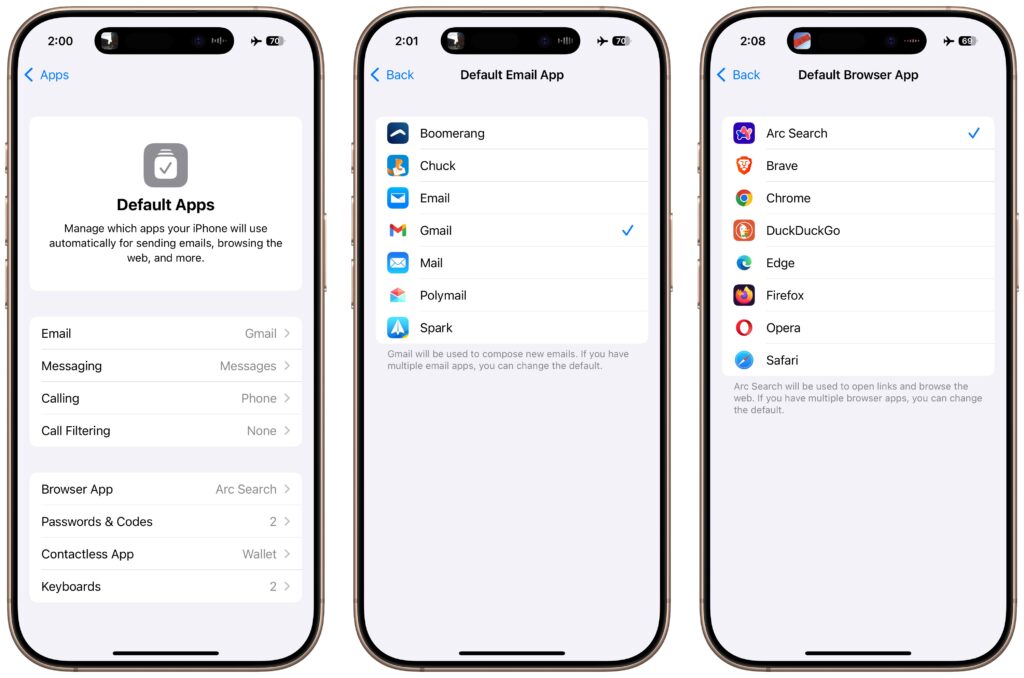
An unheralded feature in iOS 18.2 and iPadOS 18.2 helps you manage the default apps on your iPhone and iPad. A default app is one that opens automatically for a particular function, like opening a Web link or inserting a saved password. Previously, the only way to change a default app was within the settings for that app, but now you can go to Settings > Apps > Default Apps to see and set all your options in one place. The Calling and Messaging options are new in 18.2, but Apple hasn’t yet given any third-party apps permission to appear in those lists. This new screen isn’t that big of a deal, but we wanted to use it as a reminder that alternatives to Mail and Safari might better fit your needs.
(Featured image based on an original by iStock.com/Thicha Satapitanon)
Social Media: Many people don’t realize they can choose alternatives to Apple’s Mail and Safari on the iPhone and iPad. A new Default Apps screen simplifies reviewing your options and changing your defaults.
https://f11photo.com/wp-content/uploads/sites/13/2023/06/PR-F11Photo-logo.jpg00F-11 Photohttps://f11photo.com/wp-content/uploads/sites/13/2023/06/PR-F11Photo-logo.jpgF-11 Photo2025-01-03 14:05:002025-02-06 14:54:37Manage Default Apps in One Place in iOS 18.2 and iPadOS 18.2
The first set of Apple Intelligence features appeared in macOS, iOS, and iPadOS in October. Apple has now debuted the second set in the December releases of macOS 15.2 Sequoia, iOS 18.2, and iPadOS 18.2. Apple still considers them to be in beta, which is a nice way of saying that they may not work perfectly. However, they usually do what they promise.
Remember, Apple Intelligence features work only on a Mac with Apple silicon, an iPad with an A17 Pro or M-series chip, or an iPhone 15 Pro or any iPhone 16. Intel-based Macs and older iPhones and iPads can’t play. If you’ve been holding off on upgrading, this is a fine time to make the jump. Regardless, you must turn on Apple Intelligence, which you do on the Mac in System Settings > Apple Intelligence & Siri and in Settings > Apple Intelligence & Siri on the iPhone and iPad.
What can you look forward to with this second set of Apple Intelligence features?
Image Playground Helps Make Fun Images
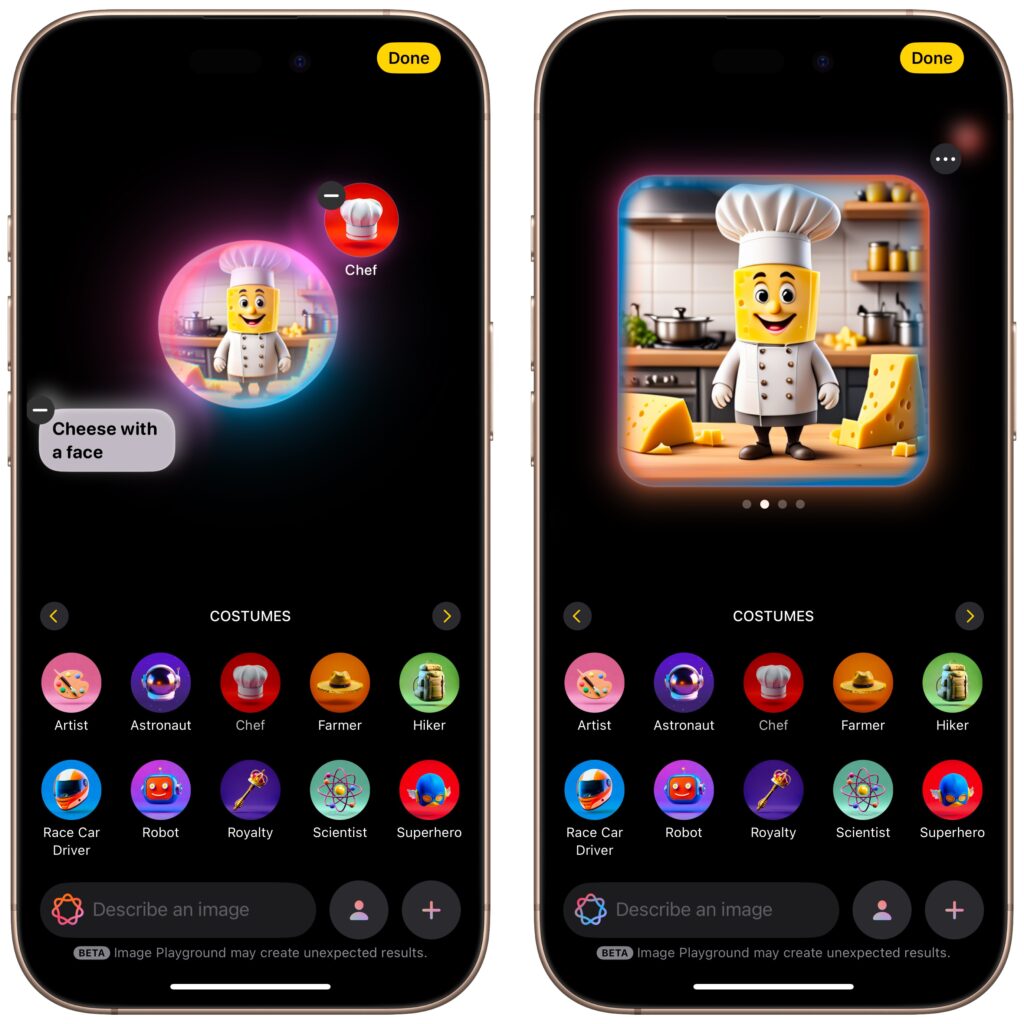
With Image Playground, Apple is dipping its toe into AI-driven image generation. The standalone Image Playground app lets you create amusing images with text descriptions, either starting from scratch or from a photo. You can choose from two styles: Animation, which Apple describes as “a modern 3-D animated look,” and Illustration, which “offers images with simple shapes, clear lines, and colorblocking.” (A third Sketch style will appear in a future release, and you can use ChatGPT in Writing Tools to create images in many other styles.) You can also create images directly in Messages, Freeform, Keynote, and other apps.
Once you’ve entered a few words of description or selected a person, you can embellish the image by tapping the buttons for suggested themes, costumes, accessories, and places. Each addition causes Image Playground to generate a new image, and swiping left on that image pushes it to try again. Tap the ••• button to save or share an image you like. Saved images become available on all your devices.
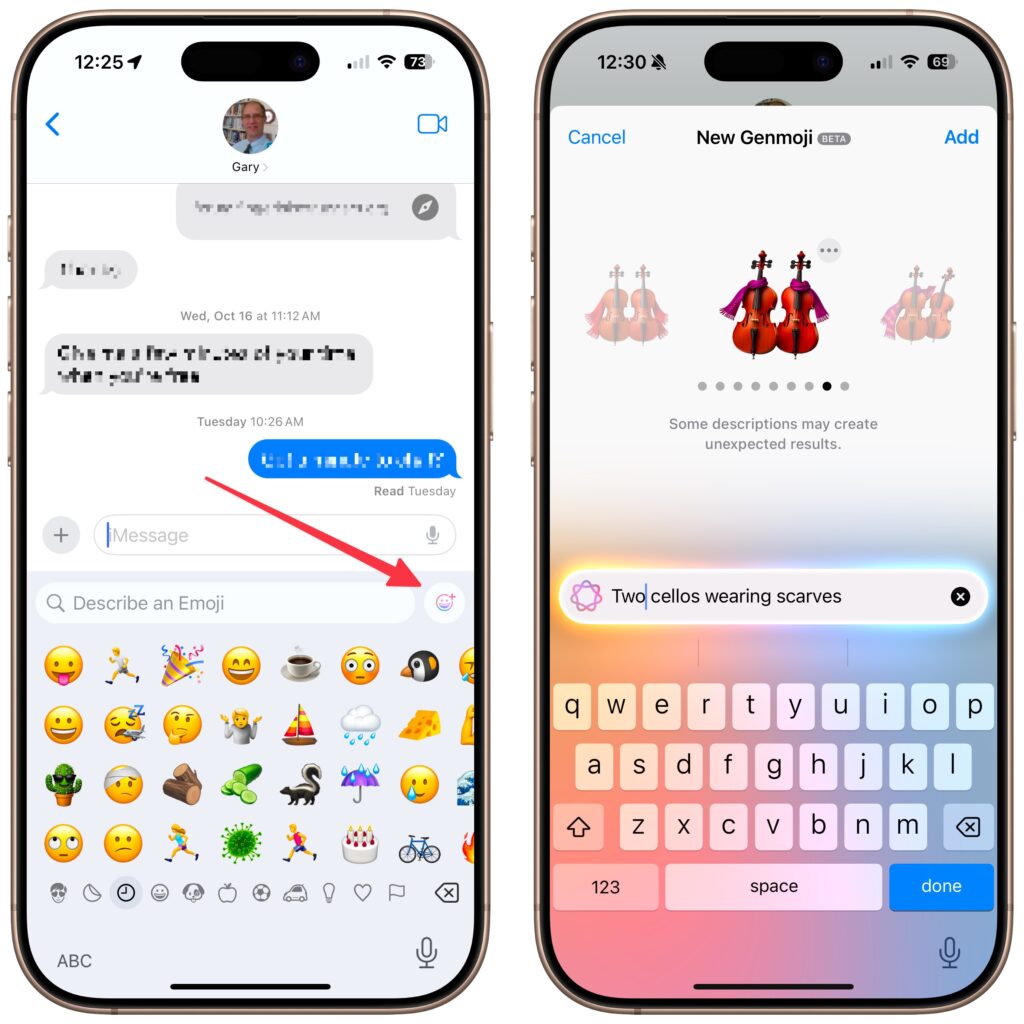
Genmoji Spice Up Chats on the iPhone
Less ambitious but potentially more fun are Genmoji, which are custom emoji that you create with text descriptions. Want to emote about the cold to a fellow musician? Create an emoji featuring two cellos wearing scarves.
To do this, switch to the emoji keyboard, tap the Genmoji button to the right of the search field, and describe your desired emoji. As with Image Playground, you can keep swiping left on the generated image to create more variations. When you get what you like, tap it to insert it into your chat or document.
Remember that a single emoji sent by itself in Messages is quite large; two or three emoji are medium-sized, and inserting any more than that or adding text causes them to display at the smallest size.
Created Genmoji are added to your emoji collection on all your devices, but they’re actually stickers. You can remove them by tapping the ⊕ button in Messages, tapping Stickers, and using touch-and-hold on a Genmoji to access the Remove button. You can’t create Genmoji in macOS right now, but Apple has promised that feature for a future release.
Image Wand Cleans Up Apple Pencil Sketches
In iPadOS 18.2, the Notes app now offers an Apple Intelligence-powered Image Wand tool for those taking notes with an Apple Pencil. Make a rough sketch with your Apple Pencil, select Image Wand, draw a circle around your sketch, and Image Wand will turn it into a polished image. If your circle also contains text, Image Wand considers it when building the final image.
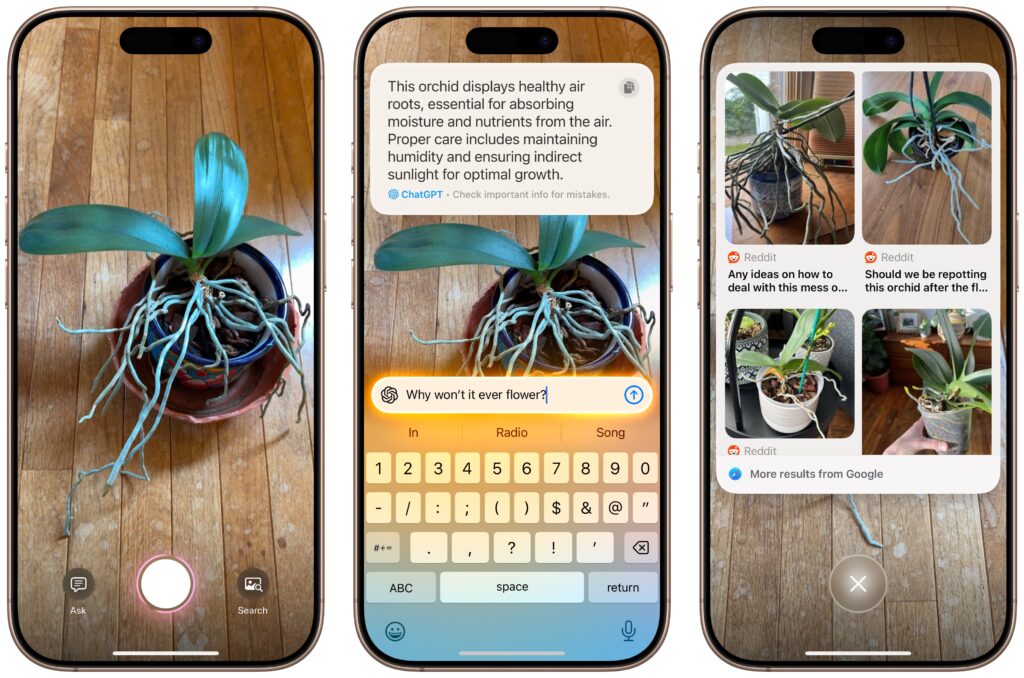
Visual Intelligence Explains What You See
When you upgrade to iOS 18.2 on an iPhone 16, the Camera Control button gains a new capability: Visual Intelligence. Press and hold it (whenever the Camera app isn’t already open, since that will trigger video recording), and Visual Intelligence presents Ask and Search buttons on either side of the shutter button. Tapping Ask causes ChatGPT to describe the image and lets you pose follow-up queries, and tapping Search performs a Google reverse image search; tap any of the results to load it. (If you can’t immediately tap Ask or Search, press the Camera Control button again or tap the shutter button to freeze the image temporarily.)
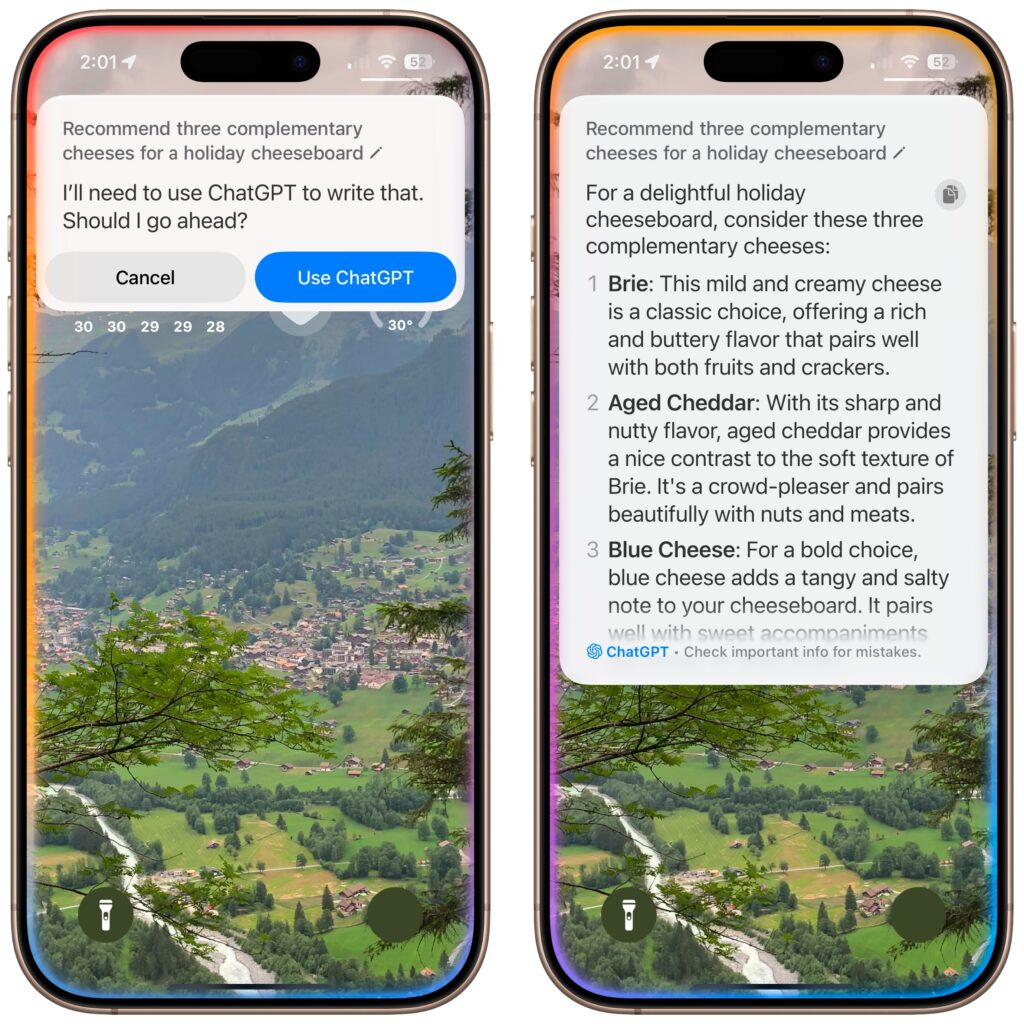
Siri Channels ChatGPT
Perhaps the most anticipated enhancement to Apple Intelligence is the integration of ChatGPT into Siri. Unfortunately, if your goal is to converse fluidly with ChatGPT, you may be better off using OpenAI’s ChatGPT app, perhaps triggered by the Action button or a widget. The problem is that unless you explicitly direct a Siri query by starting with “Ask ChatGPT,” Siri may try to answer with its own Web search or trigger a command, leading to inexplicable and unhelpful responses. Even when you get Siri to ask ChatGPT for a response, there’s no option to have it read back to you aloud, as with ChatGPT’s Advanced Voice Mode.
If you want to use ChatGPT through Siri, turn the feature on in Settings > Apple Intelligence & Siri > ChatGPT. While you’re there, you’ll probably want to turn off Confirm ChatGPT requests, which otherwise ask if you want to use ChatGPT every time it comes up. Although it may not be obvious, once you’re in a conversation with ChatGPT, you can keep talking as long as the Siri animation continues around the edge of the screen. Unfortunately, you cannot scroll back to any previous response while Siri is channeling ChatGPT; for full transcripts, you must revert to the ChatGPT app or website.
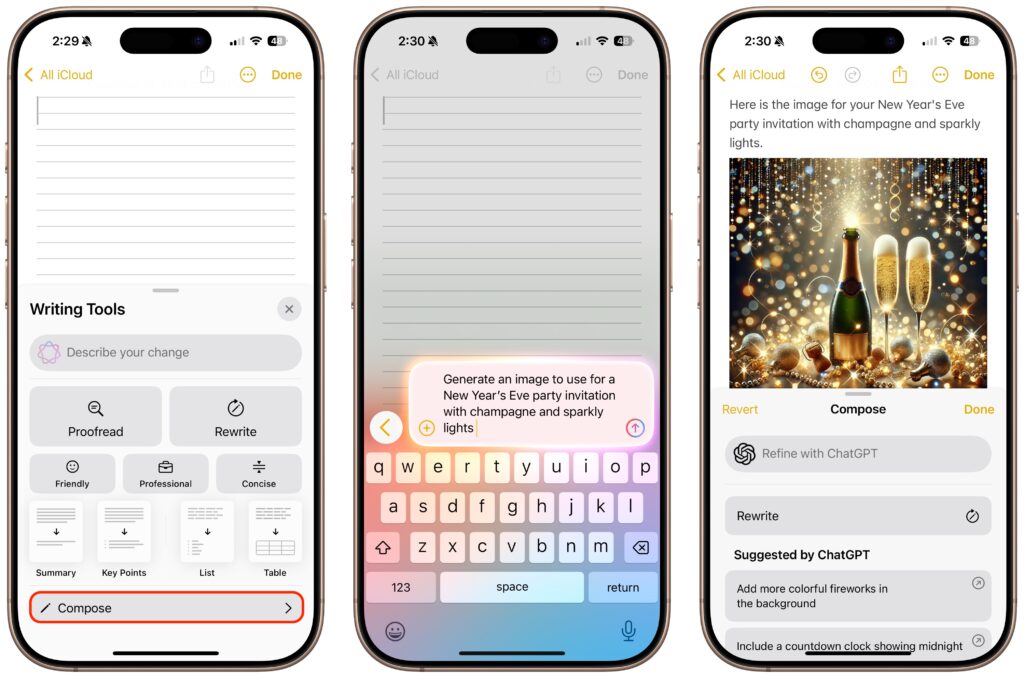
ChatGPT Enhances Writing Tools
The final place ChatGPT appears in Apple Intelligence is in Writing Tools, which may be more useful than its Siri integration. The new Compose option leverages ChatGPT to generate content wherever you’re writing, and you can also use it to create images using ChatGPT’s image-generation capabilities. Writing Tools also now allows users to request their own changes to selected text (including recasting it as a haiku, for example) instead of relying solely on the canned options to make the text friendlier, more professional, or more concise.
To do this, bring up Writing Tools in any app (by choosing Edit > Writing Tools > Show Writing Tools or Control-clicking selected text and choosing from the Writing Tools menu). Tap Compose and describe what you want ChatGPT to create. If it’s not quite what you want, which is likely, keep asking for refinements or go in a different direction.
What’s Next for Apple Intelligence?
Although this second wave of Apple Intelligence features largely fulfills Apple’s main promises, a few major additions remain for 2025. Most notable are significant changes to Siri that will enable it to take your personal context—your email, messages, and photos, for instance—into account. Siri will also gain onscreen awareness to include what you see in its responses. Finally, Apple is giving Siri access to hundreds of new actions in Apple and third-party apps, which should make it more capable of acting on your behalf. The other notable upcoming change is Priority Notifications, which will evaluate the notifications from all your apps and help you focus on the most important ones.
We also hope Apple will continue to refine and improve the existing Apple Intelligence features. While they’re well integrated into the overall Apple experience, they seldom measure up to ChatGPT, Claude, Gemini, and other leading AI systems.
(Featured image by Apple)
Social Media: We look at the latest wave of Apple’s AI features and help you start using them for discussions with ChatGPT, creating images, making custom emoji, learning about your environment, and more.
https://f11photo.com/wp-content/uploads/sites/13/2023/06/PR-F11Photo-logo.jpg00F-11 Photohttps://f11photo.com/wp-content/uploads/sites/13/2023/06/PR-F11Photo-logo.jpgF-11 Photo2025-01-03 14:04:002025-02-06 14:54:39What You Can Do with the December Wave of Apple Intelligence Features
If you are accustomed to opening the Camera app on your iPhone by tapping its Home Screen app icon or Lock Screen widget icon, you may find it challenging to remember to use the new Camera Control button on the side of an iPhone 16. That button is a big win for easy access to the camera and its settings. To help retrain your camera habits, hide the Camera app icon on a secondary Home Screen or in a folder and remove it from the Lock Screen. To conceal it from your Home Screen, touch and hold it to enter jiggle mode, then drag it to another screen or into a folder. To remove it from the Lock Screen, touch and hold the Lock Screen, tap Customize, tap the Lock Screen, and then tap the minus button on the Camera widget. Replace it with another widget you’ll find useful.
(Featured image by iStock.com/valiantsin suprunovich)
Social Media: The iPhone 16’s new Camera Control button is a welcome shortcut, but you may need to retrain your brain so you remember to use it.
https://f11photo.com/wp-content/uploads/sites/13/2023/06/PR-F11Photo-logo.jpg00F-11 Photohttps://f11photo.com/wp-content/uploads/sites/13/2023/06/PR-F11Photo-logo.jpgF-11 Photo2024-12-02 14:08:002025-01-03 06:38:06How to Train Yourself to Use the iPhone 16’s New Camera Control Button
Widgets on the iPhone or iPad Home Screen are enhanced versions of app icons that display extra information. You can now bypass the complicated widget creation process and experiment with widgets more easily. No longer do you have to edit the Home Screen, tap the Edit button, tap Add Widget, choose a widget from the full set of choices, and position it as desired. Instead, touch and hold an app’s icon and tap the desired widget size from the bottom of the menu. The first icon represents a standard icon; the remaining three display the app as a 2×2 widget, a 4×2 widget, or a 4×4 widget. The menu appears only for apps with widgets, and unavailable options indicate that the app lacks a widget of that size. Repeat the process to change a widget’s size or revert a widget to an icon.
(Featured image by iStock.com/Marvin Samuel Tolentino Pineda)
Social Media: A new shortcut in iOS 18 and iPadOS 18 makes it easy to convert an app’s icon on the Home Screen into a widget of any size supported by that app.
https://f11photo.com/wp-content/uploads/sites/13/2023/06/PR-F11Photo-logo.jpg00F-11 Photohttps://f11photo.com/wp-content/uploads/sites/13/2023/06/PR-F11Photo-logo.jpgF-11 Photo2024-12-02 14:07:002025-01-03 06:38:07In iOS 18 and iPadOS 18, Quickly Turn Home Screen App Icons into Widgets
One of macOS 15 Sequoia’s most noticeable additions is a new form of window tiling. Drag a window to the menu bar to expand it to fill the screen, to the left or right edge to resize it to half the screen, or to a corner to resize it to that quarter of the screen. As you drag, a white outline shows what will happen when you drop the window. Unfortunately, accidentally invoking window tiling can be surprising and disruptive. The easiest way to ensure that dragging windows tiles them only when you want is to open System Settings > Desktop & Dock, scroll down to the Windows section, and turn off “Drag windows to screen edges to tile” and “Drag windows to menu bar to fill screen.” The important setting to leave turned on is “Hold Option key while dragging windows to tile” because from now on, your windows will tile only when you Option-drag them.
(Featured image based on an original by iStock.com/Jakob Berg)
Social Media: Those who are disconcerted by dragged windows suddenly resizing accidentally in macOS 15 Sequoia, take note: you can tweak settings to make Sequoia’s new window tiling feature activate only when you want.