Posts

Use iOS 17’s Check In Feature to Reduce Worry

We’ve all had a friend or family member say, “Text me when you get home,” because they want the peace of mind from knowing you arrived safely. But what if something goes wrong—or you forget—so they never receive that text? They’ll be worried and won’t know where you are, if you’re OK, and so on.

In iOS 17, Apple has introduced the Check In feature to provide peace of mind—or in the worst case, to help emergency services. It’s conceptually simple. Before you leave to go somewhere, you create a Check In with someone—call them a safety partner—in Messages. You specify where you’re going and whether you’re driving, taking transit, or walking. Then, when you arrive, the Check In automatically ends, alerting your safety partner that you arrived. If you’re delayed en route, Check In takes that into account and extends the expected arrival time appropriately. If you fail to arrive, Check In shares your location and route with your safety partner. Also, if you make an Emergency SOS call or your iPhone or Apple Watch calls emergency services automatically during the Check In, it notifies your safety partner.

Not all situations revolve around following a specific route to a location, so Check In also supports timers. Perhaps a college student is going for an hour-long trail run and wants a friend to check on her if she’s not back as expected. She can use Check In to set a timer for 1 hour, share it with her friend, and when the timer ends, either tap the End button if she’s back or add more time if the run is going fine but taking longer than expected.

Although Check In may seem targeted at friends and family, it could have business uses as well. For instance, a destination Check In might work well for keeping tabs on a colleague traveling to a make-or-break pitch presentation.

Before you start using Check In with someone—in either direction—explain Check In to them and discuss an appropriate response if you or they fail to end Check In successfully. Responses should probably start with a quick text, followed by a phone call. If initial efforts to reach out are met with silence, contacting other people—friends, family members, neighbors, etc.—may be appropriate. At some point, depending on various factors, it will be time to call law enforcement. Of course, if the other person triggers an Emergency SOS during the Check In, call law enforcement immediately. At least in the US, if the person isn’t in your area, don’t call 911. Instead, find the law enforcement website for where the person is and call that organization’s 10-digit number. And here’s hoping it never comes to that!

Create a Check In

To get started with Check In, follow these steps:

  1. In Messages, open a conversation with the person you want to be your safety partner (Check In doesn’t currently work with group conversations).
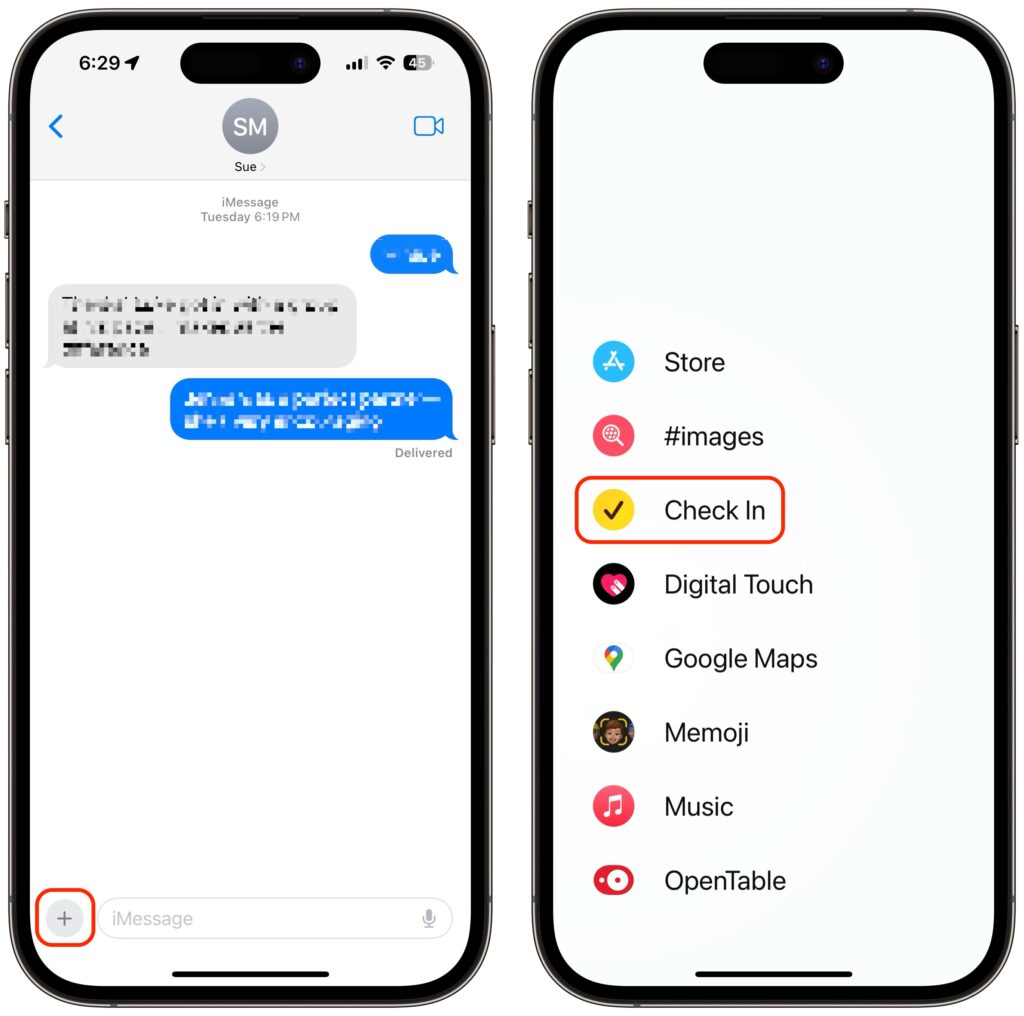
  2. Tap the ⊕ button to the left of the message field, tap More at the bottom, and tap Check In.
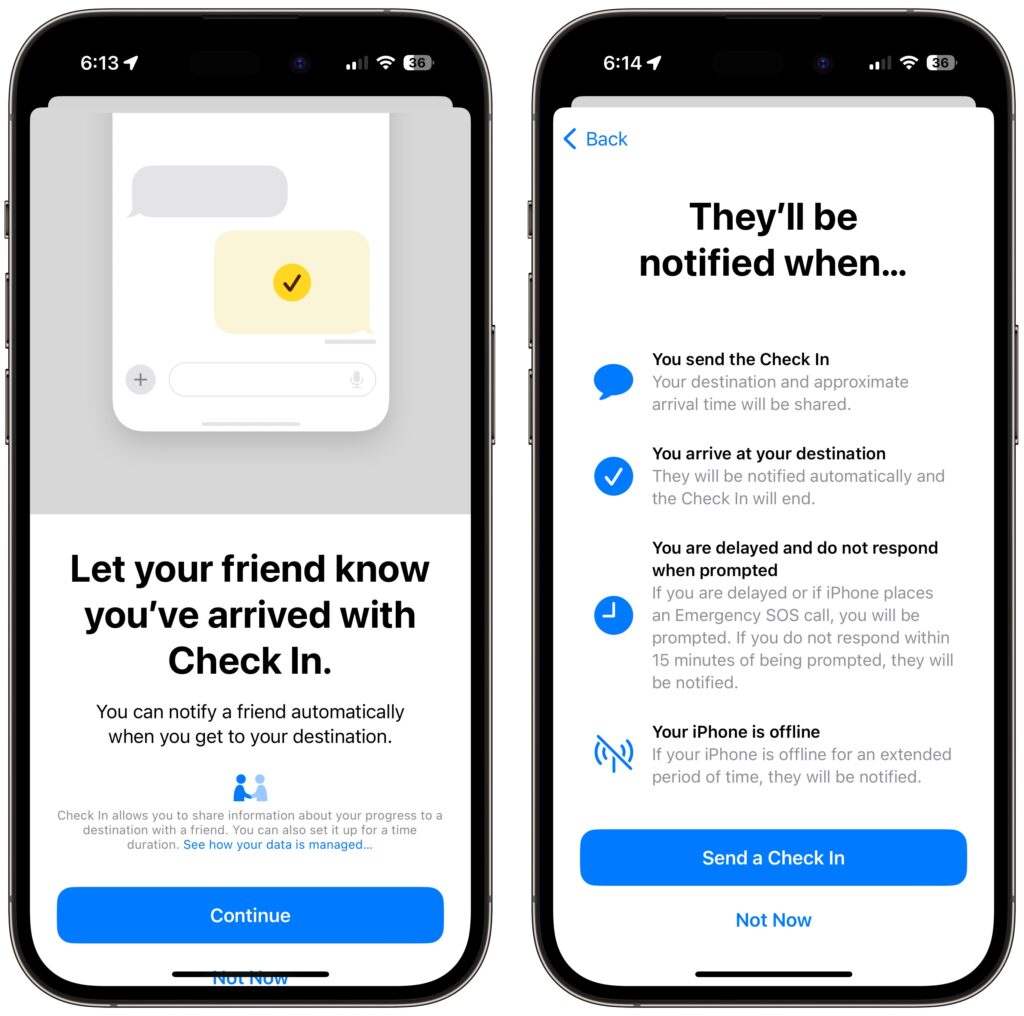
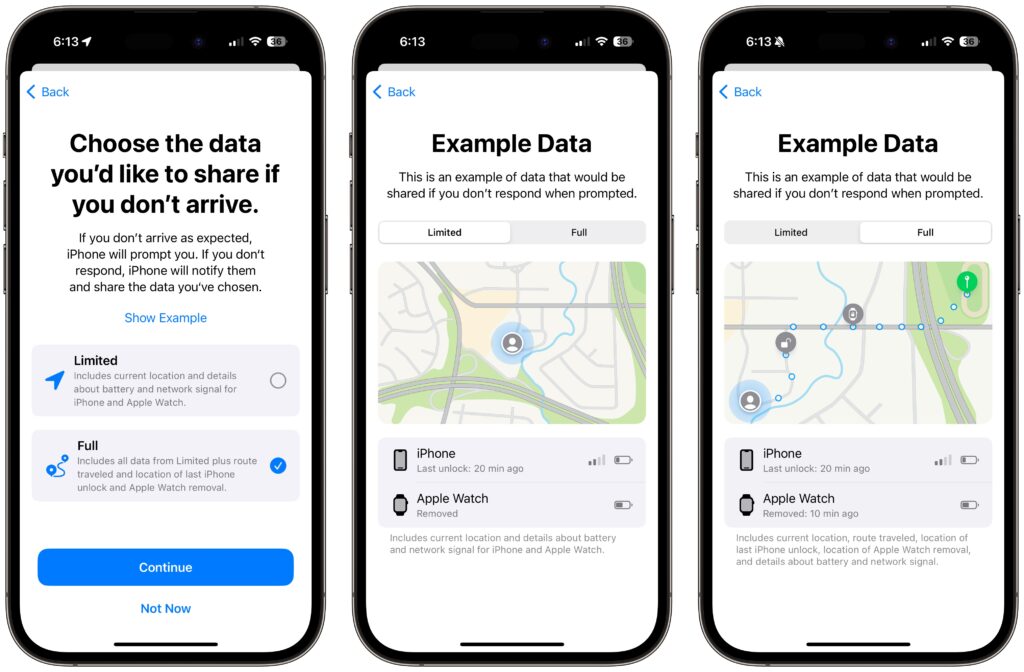
  3. The first time you invoke Check In, Messages walks you through a series of explanatory screens, one of which is important—the privacy level of the data shared with your safety partner if you don’t arrive. Select Full—we can see almost no reason why you wouldn’t want that person to be able to share your exact location and route with emergency services if something has gone wrong. (If necessary, tweak this setting later in Settings > Messages > Data.)
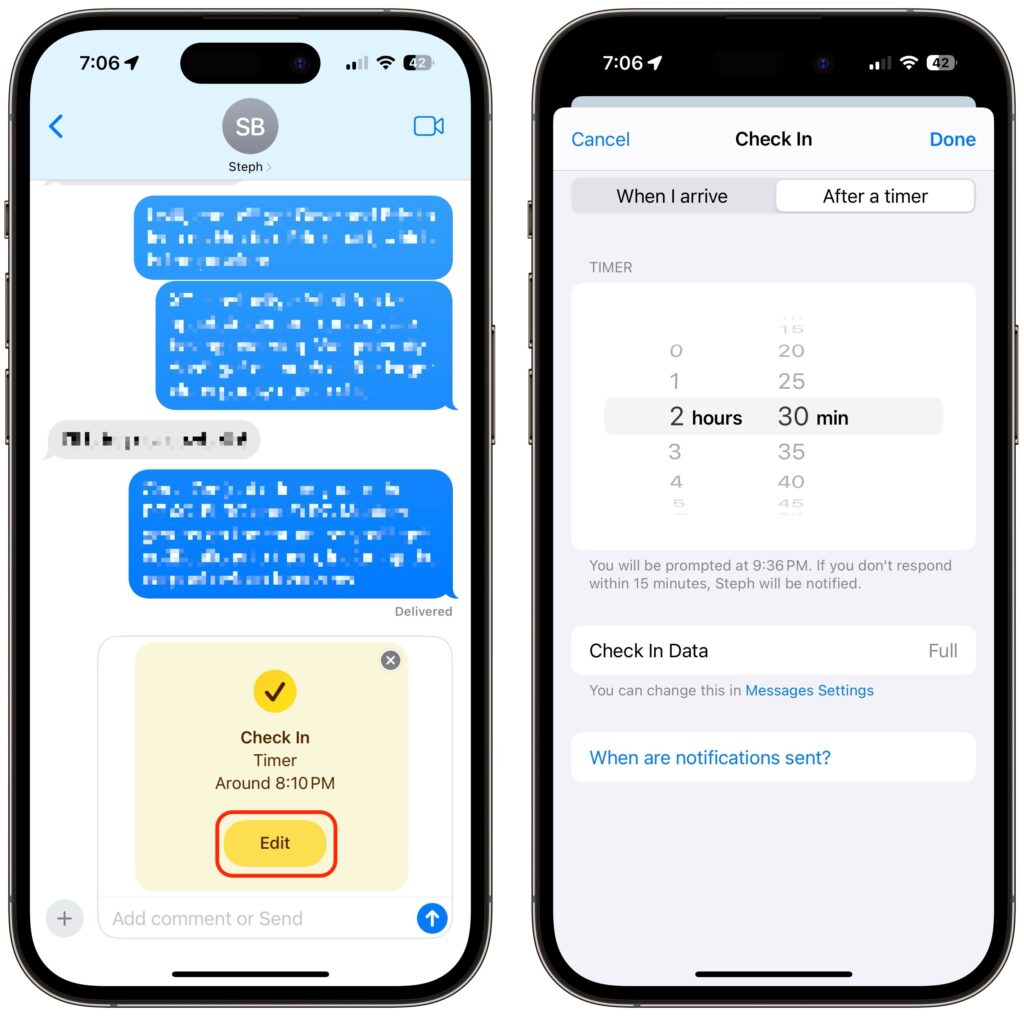
  4. On subsequent uses of Check In, an unsent card appears in the Messages conversation, usually set for an hour in the future. The card isn’t sent automatically so you can customize it before sending it.
  5. Tap the Edit button to adjust the timer or destination.
  6. To change the timer duration, use the time picker and tap Done. Skip to the last step in this list.
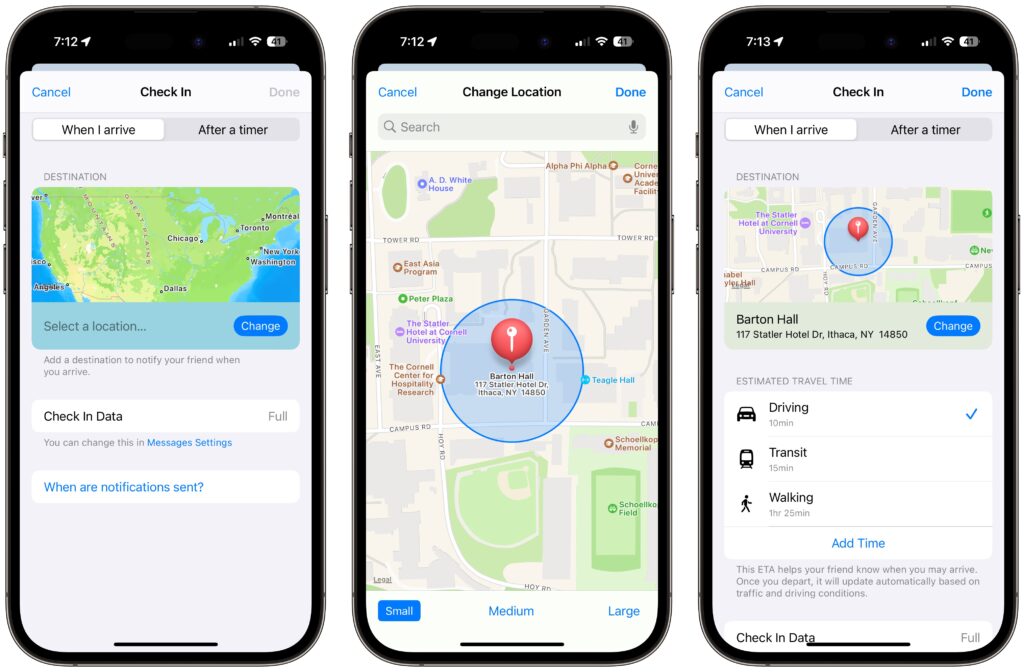
  7. To set a destination instead of a timer, tap “When I arrive” at the top of the screen.
  8. Tap the Change button, and in the map, either search for a location or find one manually by pinching and zooming—touch and hold the map to drop a destination pin. At the bottom of the screen, select Small, Medium, or Large to set the size of the area in which you’ll arrive.
  9. Tap Done to close the map and then select Driving, Transit, or Walking so Check In can estimate your arrival time based on your method of transportation.
  10. If you want additional buffer time, tap Add Time and give yourself 15, 30, or 60 minutes beyond when Check In thinks you’ll arrive. This shouldn’t usually be necessary.
  11. Tap Done.
  12. Once you’re back to the Check In card in the Messages conversation, tap the Send button to start the Check In.

Note that safety partners can’t reject Check In cards.

End a Check In

Once you trigger a Check In, it can end in a few ways. First, you can cancel it before the timer completes or you arrive at your destination. Second, it can end successfully when you tap End when the timer finishes or when you arrive at your specified location. Third and finally, there’s the core purpose of the Check In, which is to alert your safety partner if you fail to respond to a timer or arrive where and when you said you would.

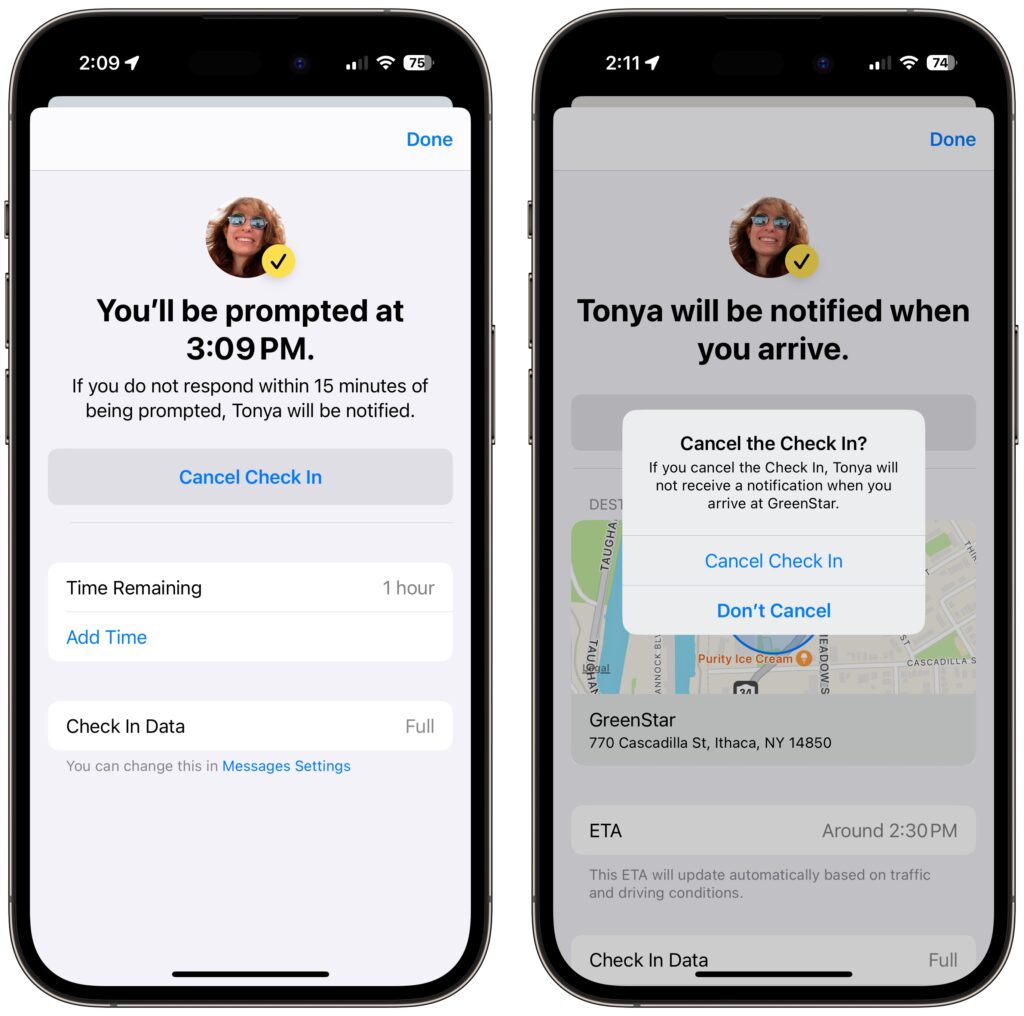
  • Cancel: To cancel a Check In, tap the Details button on the Check In card in Messages, tap Cancel Check In, and agree that you don’t want your safety partner notified. Timer and destination Check Ins look slightly different but act the same way. Your safety partner will only see that the Check In card in Messages says it has ended.
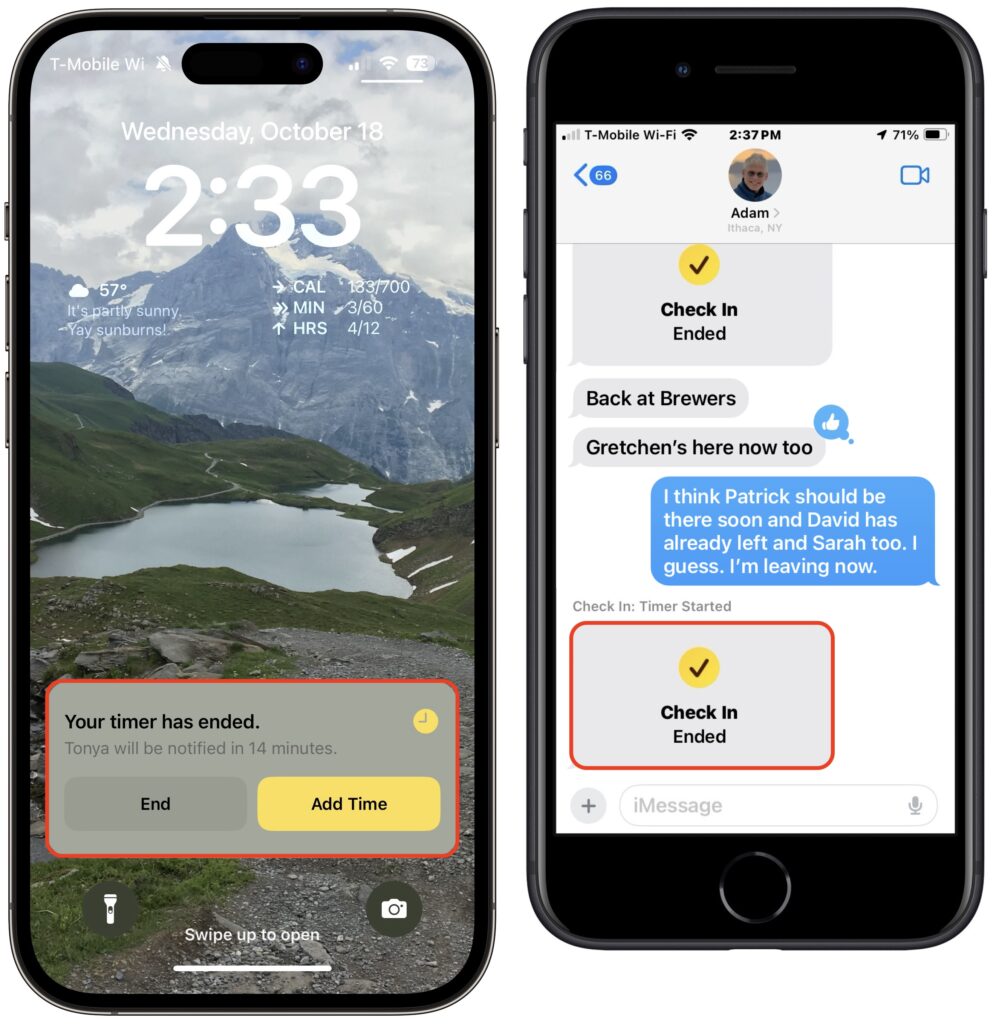
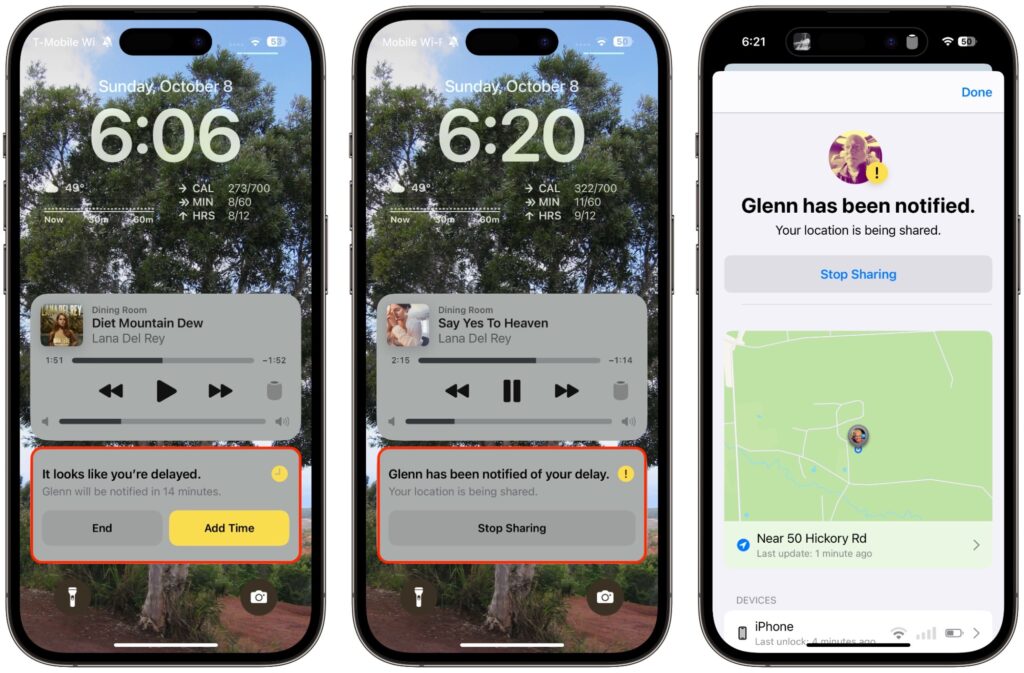
  • End successfully: For a timer Check In to end successfully, you must respond when the iPhone prompts you (below left). All your safety partner sees when that happens is a note in the Check In card that the timer ended (below right). You don’t need to interact with your iPhone for a destination Check In to end successfully—just arrive at the specified location. The safety partner’s Check In card updates to say that you arrived.
  • Check In fails to end (initiator): If you don’t arrive at your destination or fail to tap End when prompted, Check In gives you the option of adding time (below left) but after 15 minutes, tells you that it has alerted your safety partner (below center and right).
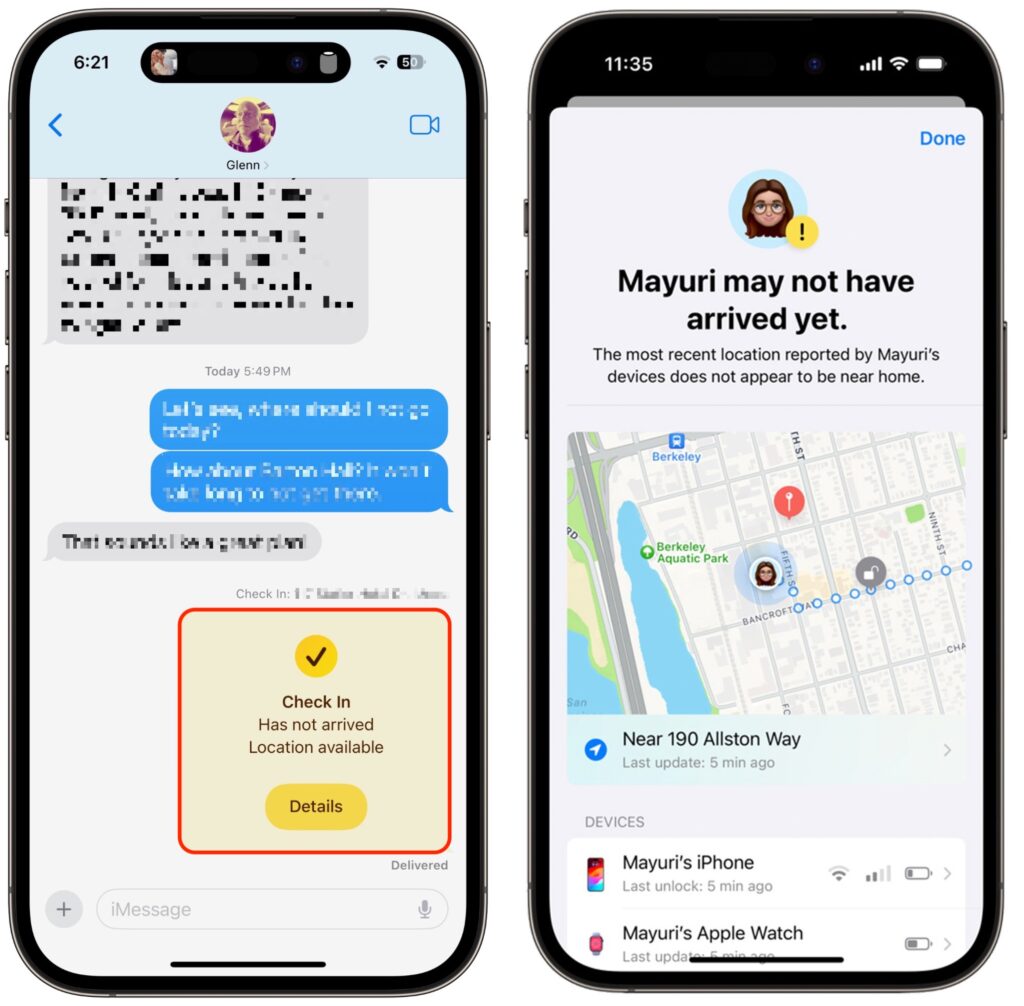
  • Check In fails to end (safety partner): More interesting is what your safety partner sees if you fail to complete a Check In. They’ll be alerted and can tap Details to see your location, when your devices were last unlocked, and more. They then have to figure out the best way to respond given your setup conversation.

It can take some practice to become fluid with Check In, so it’s worth testing it in everyday situations before using it when it might really matter. Once you use it a few times, you may notice Siri Suggestions offering to start it for you, making it even easier to initiate regularly. We hope you find that it provides some peace of mind and, in the worst-case scenario, helps someone in need of emergency services.

(Featured image by iStock.com/PeopleImages)


Social Media: The new Check In feature of iOS 17 can provide peace of mind by letting you specify a safety partner who will automatically be notified if you fail to arrive at your destination or complete a timer.
With Storms Increasing, Protect Your Tech Gear from Damaging Power Fluctuations

It has been a tough year for extreme weather events. While the connection between weather and technology may seem tenuous, heat waves, high winds, and lightning strikes can play havoc with all sorts of powered and networked electronic devices.

Anything that causes power fluctuations—spikes, surges, sags, brownouts, and blackouts—can hurt your tech gear. Protecting your most vulnerable devices doesn’t have to be expensive, but don’t be complacent because you plug your Mac into a cheap surge protector you’ve had since college. And note that many power strips offer no surge protection at all.

First off, why are power fluctuations problematic? There are two scenarios:

  • Too little power: Sags and brownouts are drops in voltage; a sag is a short-term dip, whereas brownouts last longer. Blackouts are complete power outages. Although they’re less damaging than surges, sags and brownouts can cause electronic devices to behave erratically or crash, and the fluctuation in voltage—particularly when coming back from an outage—can stress components. Losing power entirely will cause you to lose any unsaved work and possibly end up with document or even drive corruption.
  • Too much power: Spikes and surges are sudden, brief increases in voltage; the difference is that spikes are shorter than surges. Either way, the excessive power can degrade or damage sensitive electronic components, reducing lifespan or causing immediate failures.

The best solution to these scenarios is an uninterruptible power supply (UPS). Put simply, a UPS is a big battery into which you plug your Mac and other peripherals. It then plugs into a wall outlet and monitors the incoming power. If the power surges, falls below a certain threshold, or fails outright, the UPS switches the power source to its internal battery. This happens so quickly that your Mac never even notices.

If your gear is plugged into a UPS when a blackout hits, you get some time to save your work and shut down gracefully, ensuring that you don’t lose data or flirt with drive corruption. A UPS also protects against spikes and surges, filtering out the excess voltage so it can’t harm the devices plugged into it. The downsides to UPSes are that they’re an extra expense, their batteries need replacing every few years, and they take up space under your desk. For a home or small office UPS, consult Wirecutter’s recommendations. For larger installations, contact us.

If power outages are rare in your location, you may prefer to rely on a surge protector instead of a UPS. As the name implies, surge protectors filter out voltage spikes and surges so they won’t damage your gear. Surge protectors are smaller and less expensive than UPSes, and while they don’t have batteries to fail, their protection circuitry degrades over time, so they should be replaced every few years as well. Better surge protectors alert you or stop working entirely when they can no longer provide protection. Again, Wirecutter has good recommendations.

If most of your expensive tech gear is battery-powered, you could forgo even a surge protector. Outages aren’t an issue, and a MacBook or iPhone power adapter will protect against most sags, brownouts, spikes, and surges. The power adapter may incur damage, but it’s inexpensive to replace.

One final thought. No UPS, surge protector, or power adapter can protect against a direct lightning strike. Lightning is too fast and too powerful—it’s millions or even hundreds of millions of volts. Even turning your equipment off isn’t sufficient because lightning that has traveled miles through the air to hit the ground can easily jump across an open switch. If lightning strikes are common in your area, unplug your most expensive devices entirely during severe storms.

To sum up:

  • For a desktop Mac and peripherals, a UPS is a worthwhile investment if you ever suffer from power outages. Also, consider a UPS for essential networking gear—cable modems, routers, switches, and network-attached storage.
  • If power outages are extremely rare, or for equipment that doesn’t need to remain on during an outage, get a good surge protector. If it doesn’t automatically disable itself when it’s no longer effective, write the date on the bottom and replace it in a few years.
  • Although there’s no harm in doing so, it’s not necessary to plug battery-powered device chargers into a surge protector or UPS. A spike or surge may damage them, but they’ll probably sacrifice themselves to protect your gear.
  • When in doubt during severe storms, unplug your most valuable equipment to protect against a direct lightning strike.

(Featured image by iStock.com/HardRockShotz)


Social Media: How can you protect your tech gear from unexpected power fluctuations? A UPS is best in some scenarios, but a not-too-old surge protector is often sufficient.  You can also let your Apple chargers do their job without worrying about what they are plugged into.

Apple Works to Improve Safety in the Wake of AirTag Stalking Reports

Over the past few months, there has been a spate of media reports about how people may have been tracked without their knowledge using AirTags, Apple’s elegant location trackers. Like many mainstream media forays into the tech world, the reports are often short on detail and sometimes unclear on the reality of how the AirTags work. Nor is it clear that there have been many successful cases of AirTag abuse, but the mere fact that people are trying to use AirTags to stalk others is concerning.

Apple put significant effort into preventing such abuses, revolving around three features:

  • Safety alerts: If you have an iPhone or iPad running iOS 14.5 or later and an unknown AirTag is traveling with you, your device will alert you to that fact. Although safety alerts aren’t available for those using Android smartphones, Android users can download Apple’s Tracker Detect app to scan manually.
  • Safety sounds: After an AirTag has been separated from its owner for several days, it will make a sound the next time it moves.
  • NFC identification: If you find an AirTag, you can hold it up to an iPhone or other NFC-capable smartphone to load a website that reveals the AirTag’s serial number and the last four digits of the owner’s phone number. The police can use this information to learn the owner’s identity from Apple.

Sadly, those precautions haven’t been sufficient either to dissuade all would-be stalkers or to educate potential stalking victims (and let’s be real—dissuading stalkers is also a matter of educating people that it’s unethical, likely dangerous, and often illegal to abuse an AirTag in this way). Apple has responded in two ways, one general, the other specific to AirTags.

Personal Safety User Guide

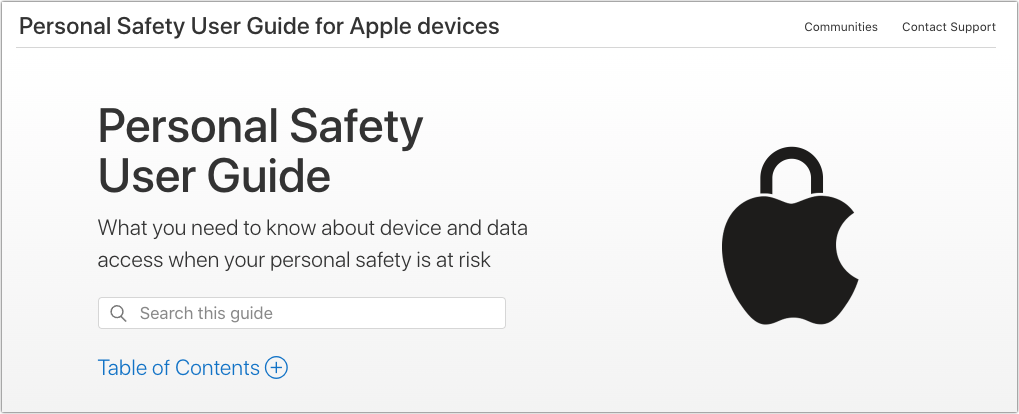
Apple documents its products and services quite well, but the company tends to generate many focused pages without much high-level organization. It’s all too easy to flail around within Apple’s support documentation looking for help if you don’t know what search terms are likely to work. In an effort to mitigate that problem for issues surrounding personal safety, Apple has created the Personal Safety User Guide website, also available as a downloadable 56-page PDF.

The Personal Safety User Guide brings together numerous Apple support articles in two main sections:

  • Review and take action: The first section helps you review how your devices and apps are set up, with a focus on settings that could expose you to harm. It helps you manage sharing settings, look at location sharing, control your Home accessories, and more. You’ll also learn how to block unknown sign-in attempts, document suspicious activity, delete suspicious content, and avoid fraudulent requests to share information, among much else. The main criticism here is that the section on AirTag safety doesn’t explain or link to all the features Apple provides.
  • Safety and privacy tools: The second section is a bit more generic, providing support documentation that encourages you to take advantage of the features Apple has provided to protect your safety and privacy. Among other topics, it discusses passcodes, setting up Face ID and Touch ID, using two-factor authentication, seeing which apps are accessing your data, blocking unwanted calls and messages, and using Emergency SOS.

The Personal Safety Guide ends with three checklists, each of which walks you through a series of steps. These are extremely useful because almost no one would necessarily know or remember all the places to check. The checklists help you:

  • See who has access to your device or accounts
  • Stop sharing with someone
  • Control how someone else can see your location

The Personal Safety User Guide website is best when you want an answer to a specific question, but it doesn’t lend itself to reading front to back. For that, we recommend downloading the PDF, which you can read at whatever depth you desire. But do at least scan the entire thing to get a sense of what it contains should you need that information later.

Apple AirTag Announcement

Shortly after releasing the Personal Safety Guide, Apple also posted a short but detailed statement on its website. In it, the company makes it clear that it is actively working with law enforcement on all cases involving AirTag abuse. Apple also says that it has updated its unwanted tracking documentation to explain AirTag safety features more clearly to users and to include resources for those who feel their safety is at risk.

Apple also outlined important advancements that will be coming to the AirTag and Find My network systems via software updates later this year:

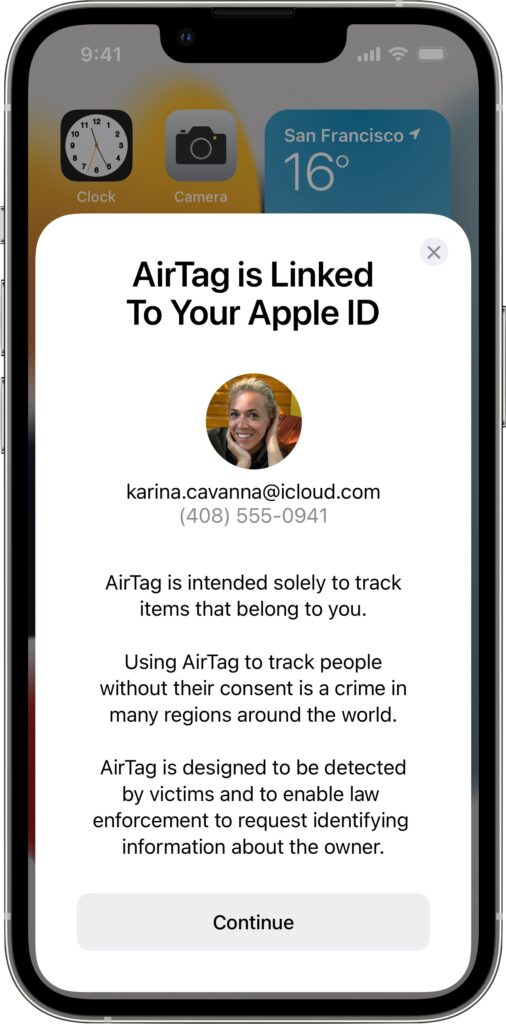
  • New privacy warnings during AirTag setup: To ensure that everyone understands the utility of AirTags and the implications of abuse, people setting up an AirTag for the first time will see a message that clearly states that AirTags are meant to track their own belongings, that tracking people without their consent is a crime in many places, that AirTags are designed to alert victims to their presence, and that law enforcement can request identifying information about the owner of an AirTag.
  • Better alerts for AirPods: Instead of an “Unknown Accessory Detected” alert when your iPhone detects Find My network-compatible AirPods traveling with you, the alert will specify that AirPods are involved, not an AirTag. (There are third-party Find My network accessories that will still generate this alert, such as the Chipolo ONE Spot.)
  • Refined unwanted tracking logic: Apple will be updating its unwanted tracking alert system to notify users sooner that an unknown AirTag or Find My network accessory is traveling with them.
  • Precision Finding for unknown AirTags: Those with an iPhone 11, iPhone 12, or iPhone 13 will be able to take advantage of Find My’s Precision Finding feature to home in on the location of an unknown AirTag. Previously, this capability was limited to your own AirTags.
  • Display alerts with unknown AirTag sound: When an unknown AirTag emits a sound to alert anyone nearby to its presence, and it’s detected moving with your iPhone or iPad, an alert will also appear to help you play the sound again or use Precision Finding, if available. This should help when an unknown AirTag is in a place that blocks sound or if its speaker has been disabled.
  • More obvious AirTag alert sound: Apple will be adjusting the tone sequences to make an unknown AirTag’s alert sound easier to hear and find.

Overall, these changes are welcome, and it’s a testament to the care Apple took when designing the AirTag and Find My network systems that it can make such enhancements through software updates—no hardware changes are necessary. It’s also good to see Apple taking the problem—however small it might actually be—seriously and working to reduce it even further.

(Featured image by Apple)


Social Media: Media reports suggest that miscreants are trying to use Apple’s AirTag location trackers to stalk people. Apple has responded with personal safety advice and promised AirTag safety enhancements.

Beware Scammers when Selling Your Old Tech Hardware Online

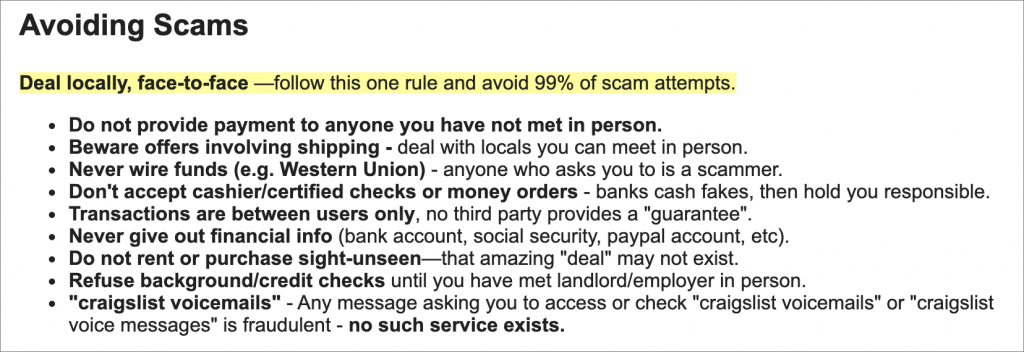
Whenever Apple releases hot new hardware, it’s tempting to order the latest and greatest and then put your old Mac or iPhone up for sale on a classifieds site like Craigslist. If you do that, be cautious about potential buyers—it’s increasingly common for a scammer to request that you ship them the device and then to “pay” you by forging payment email from PayPal or using a stolen PayPal account (whose owner will likely get PayPal to take the money back from you). Instead, insist on an in-person meeting in a public place and payment in cash or via a digital method like Apple Pay Cash or Venmo that can’t be canceled once you accept the money. Or, if the location and payment amount (under $1000) work, meet in a nearby post office and request payment via money order (US or Canada) that you can verify on the spot. Craigslist has more advice.

(Featured image modified from an original by Vitabello from Pixabay)