
macOS 26.4 Warns Against Terminal-Based Malware Attacks
Please visit https://tcn.tidbits.com/macos-26-4-warns-against-terminal-based-malware-attacks/ to access this member content.
Please visit https://tcn.tidbits.com/macos-26-4-warns-against-terminal-based-malware-attacks/ to access this member content.

Here’s something new to watch out for: poisoned chatbot conversations surfaced in Google searches. The sharing features in ChatGPT, Claude, Gemini, Grok, and other chatbots allow users to publish their conversations as public Web pages, which can be indexed by search engines and appear alongside traditional websites in search results. Attackers can seed those conversations with malicious commands, and the conversations themselves look trustworthy in search results because the URL points to a well-known AI company. This risk isn’t theoretical—security firm Huntress documented a macOS malware infection that began with a Google search result linking to a shared chatbot conversation that contained malicious Terminal instructions. Treat chatbot conversations found via Google as you would random forum posts—potentially useful for background or ideas to start your own conversation, but not as authoritative instructions. Be especially suspicious when they offer step-by-step guidance or ask you to copy anything verbatim.

(Featured image by iStock.com/tadamichi)
Social Media: Hackers have learned how to poison shared chatbot conversations with malware—and get Google to display them in search results. Never trust step-by-step instructions or Terminal commands from user-generated chatbot pages.

We’re approaching the end of 2025, so we encourage you to consider your New Year’s resolutions. For many people, the new year offers an opportunity to reflect on habits we’d like to adopt or solidify. Although we support reducing social media use and making other positive lifestyle changes, we’d like to suggest a few additional resolutions to improve your digital security and reduce the risk of bad things happening to you online.
If you read through this list and think, “I’m already doing all that,” then you’re done. Keep up the good work!
The most important thing you can do to avoid digital disasters is to back up your data regularly. Bad things happen to good devices, like a Mac’s SSD failing, an iPhone falling into a pool, or data being lost due to theft, fire, or flood. With a solid backup plan, you can recover from nearly any problem.
For the Mac, the easiest way to back up is to use an external drive with Time Machine, but an off-site or Internet backup is also essential. Backblaze is a good choice, but there are numerous online backup services. For iPhones and iPads, it’s simplest to back up to iCloud, which automatically happens every night if you turn it on in Settings > Your Name > iCloud > iCloud Backup. You can also back up iPhones and iPads to your Mac if you do not have enough iCloud storage space. Apple Watches automatically back up to their paired iPhones, and that Watch data is included in iPhone backups, making restores straightforward. Whatever your setup, restore a few files periodically as a test to make sure your backups are working.

An important step to enhance your security is to install new operating system updates and security updates promptly after Apple releases them. While the specifics rarely make headlines because they are highly technical and detailed, you can gauge the significance of security updates by noting that a typical update fixes 10–30 vulnerabilities identified by Apple or external researchers. Other security updates include only one or two fixes, as they’re aimed at addressing zero-day vulnerabilities currently being exploited in the wild.

It’s usually wise to wait a few days after an update appears before installing it, in case it causes any undesirable side effects. Although such problems are rare, when they do happen, Apple quickly pulls the update, resolves the issue, and releases a new version, typically within a few days.
We’ll keep emphasizing the importance of a password manager until passkeys—the replacement for passwords—become widespread, which will take years. Until then, if you’re still typing passwords manually or copying and pasting from a list stored in a file, please start using a password manager like 1Password or Apple’s Passwords, which is now pretty good. A password manager provides six significant benefits:
A bonus benefit for families is password sharing. It allows couples to share essential passwords or parents and teens to share specific passwords.

Using a password manager is quicker, simpler, and more secure. If you need assistance getting started, reach out.
Individuals and businesses often experience security breaches due to phishing, which involves fake emails that trick someone into revealing login details, credit card numbers, or other sensitive data. While spam filters catch many of these attacks, you must stay alert. Here’s what to watch out for:

When unsure, avoid clicking the link or replying to the email. Instead, reach out to the sender via another method to verify the message’s authenticity. Legitimate companies—especially Apple, financial institutions, and cellular carriers—will never ask for your password or two‑factor codes by email, text, or voice.
Phishing attacks increasingly take place via texts and phone calls—and even some via deepfake audio and video. Because of weaknesses in the telephone system, these messages and calls can appear to come from trusted companies like Apple and Amazon. Other common scams warn about unauthorized logins or payments to trick recipients into calling scammers, advertise fake deliveries with malicious tracking links, or send fake two-factor authentication messages that prompt recipients to click a link to “secure” their account.

Avoid clicking links in texts unless you recognize the sender and it makes sense for you to receive that link. (For example, Apple might send text messages with delivery details for a recently placed order.) Never enter login information on a website you reach through a link because you can’t be sure it’s legitimate. Instead, if you’re interested in more details, go directly to the company’s official website by typing its URL into your browser, then log in from there.
For calls from companies, unless you’re expecting a callback regarding a support ticket you opened, don’t answer—caller ID can be spoofed. Let the call go to voicemail, and if you believe it’s important to respond, look up the company’s phone number from a reliable source and contact someone at that number instead of using the one provided by voicemail.
We won’t dwell on this last point, but it’s worth noting that you’re much more likely to encounter malware on fringe websites or those that cater to societal vices. The more you can steer clear of sites that deal with pirated software, cryptocurrency, adult content, gambling, or the sale of illicit substances, the safer you’ll be. That’s not to say reputable sites haven’t been hacked and used to spread malware, but such cases are far less frequent.
Don’t call numbers from pop‑ups or ads, don’t grant remote access, and don’t pay for any service you didn’t seek out unprompted. Instead, go directly to the company’s official site (type the URL) or contact us for help. And never paste commands into Terminal from websites or “verification” pages—you could install malware without realizing it. If you are worried after spending time in the darker corners of the Web, download a free copy of Malwarebytes and manually scan for malware.

Let’s raise a glass to staying safe online in 2026!
(Featured image by iStock.com/Marut Khobtakhob)
Social Media: Kick off 2026 with smart security habits: back up every device, stay current on software updates, outsmart phishing attempts, avoid sketchy sites, and streamline your logins with a password manager.
Phishing scams have entered a new, AI-powered phase and can now convincingly mimic real people. Attackers can generate fake voice or video deepfakes to impersonate CEOs authorizing urgent payments, IT staff requesting access, or family members needing help. If you receive a voice or video call from someone you know at an unknown number who urges you to reveal confidential information or send money immediately, slow down, check for telltale signs, and verify before acting. Listen for unnatural pauses, overly smooth phrasing, or odd emotional timing. Visually, look for inconsistent lighting or shadows, artifacts around the hairline, ears, or teeth—or anything that seems “off,” especially around the mouth and eyes when the person moves. For verification, ask for a detail that only they would know. If you’re at all unsure whether the call is legitimate, hang up and contact them—or someone else who will know more—through a separate, trusted channel. A few seconds of skepticism can prevent a costly mistake.

(Featured image by iStock.com/Tero Vesalainen; article image by iStock.com/Boris023)
Social Media: Phishing has a new face—literally. Scammers can now use AI tools to fake voices and videos that look real. Before you act on an “urgent” request, look for audio or visual clues and verify through another channel.
The first feature update to iOS 26 is now available—go to Settings > General > Software Update to install iOS 26.1. It doesn’t introduce any game-changers, but there are a few new options and tweaks worth knowing about.
For many people, Liquid Glass’s aggressive transparency can make some interface elements, especially notifications, difficult to read. Until now, your best bet for improving readability was to turn on Settings > Accessibility > Display & Text Size > Reduce Transparency. In iOS 26.1, Apple bowed to user feedback and added a new Tinted view in Settings > Display & Brightness > Liquid Glass, which adds a subtle tint and increases the opacity of many Liquid Glass interface elements. In the screenshot below, the left image uses the default Liquid Glass Clear view, the middle one uses the Tinted view, and the right one uses Clear with Reduce Transparency. You can decide which you like best.

For many years, a fast way to get to the Camera app has been to swipe left on the Lock Screen. With new iPhones featuring the Camera Control button for quick access to the Camera app, Apple has given us the option to disable the Lock Screen left swipe. If you find yourself accidentally opening the Camera app from the Lock Screen, you can now prevent that from happening by turning off Settings > Camera > Lock Screen Swipe to Open Camera.

Several years ago, Apple introduced Rapid Security Responses, focused security updates that aimed to reduce update hesitancy with small downloads, automatic installation, and easy reversal. For unknown reasons, Apple used them only a couple of times before reverting to traditional operating system updates. Now, Rapid Security Responses seem to have returned under a new name: Background Security Improvements. They’re enabled by default in Settings > Privacy & Security > Background Security Improvements > Automatically Install. If you prefer to approve these updates in advance, you can turn that off. (A similar setting is available for macOS 26.1.)

In iOS 26, Apple increased the size of the buttons that appear when alarms or timers go off, but the large Stop button was easy to hit when you meant to tap Snooze (for alarms) or Repeat (for timers). Apple made that mistake much less likely in iOS 26.1 by requiring you to slide the on‑screen control to stop the alarm or timer.

Sure, you could just tap a song in the album or playlist you’re viewing, but iOS 26.1 adds a subtle way to move to the next or previous track: swipe left (next) or right (previous) on the MiniPlayer at the bottom of the screen.

iOS 26 introduced Live Translation with the AirPods 4 with Active Noise Cancellation, AirPods Pro 2, and AirPods Pro 3. Initially, it supported English (US and UK), French, German, Portuguese (Brazil), and Spanish (Spain). In iOS 26.1, Apple added Chinese (Mandarin, simplified and traditional), Italian, Japanese, and Korean. To avoid delays in getting new languages when you are out and about, download the languages you expect to need ahead of time, when you have a fast Internet connection. Go to Settings > Bluetooth and tap the ⓘ next to your AirPods. Scroll to and tap Languages, then select the desired language. For actual use, open the Translate app, tap Live, and select the two languages you want to translate between.
![]()
There are a few other tweaks that most people won’t notice, such as support for the new AutoMix transitions between songs in Music when playing over AirPlay, better FaceTime audio quality in low-bandwidth conditions, manual logging of workouts in the Fitness app, and improvements when recording audio with external USB mics.
If you’re already running iOS 26, we recommend updating to iOS 26.1—the changes (and numerous security fixes) are worthwhile. If you haven’t upgraded from iOS 18 yet, now’s a fine time to make the jump.
(Featured image based on an original by Apple)
Social Media: Struggling with Liquid Glass transparency or accidental camera launches? iOS 26.1 addresses both and adds a safer slide‑to‑stop alarm control, swiping to switch songs in Music, Background Security Improvements, and more Live Translation languages.
One small way Apple’s Passwords app lagged behind top password managers like 1Password was in its lack of a password history. It’s sometimes helpful—such as when trying to figure out why a seemingly correct password isn’t being accepted—to see previous passwords for a site and when they were changed. In macOS 26 Tahoe, iOS 26, and iPadOS 26, the Passwords app adds that feature. Click or tap View History to review the history of a particular site’s passwords.

(Featured image by iStock.com/designer491)
Social Media: Apple’s Passwords app can now show your password history in macOS 26 Tahoe, iOS 26, and iPadOS 26, helping you track down why that “correct” password isn’t working.
Here’s a new scam to watch for. A client reported running across a suspicious website masquerading as a human verification test. Instead of asking him to click pictures or solve a math equation, this one asked him to copy some text from the page and paste it into Terminal. The text was actually an encoded script that—if pasted into Terminal and executed—would have downloaded and installed malware designed to steal user data. Infected users could lose their login password, browser history and cookies, cryptocurrency wallet information, keychain data, Notes data, and a wide variety of personal files. The moral of the story: never paste unsolicited commands into Terminal. They may seem innocuous or even unintelligible, but they’re fully capable apps that can wreak havoc on your Mac.

(Featured image by iStock.com/stevanovicigor)
Social Media: A clever new scam masquerades as a CAPTCHA test, asking users to paste text into Terminal to prove they’re human. Instead, it installs malware designed to steal passwords, browser data, and other sensitive information.
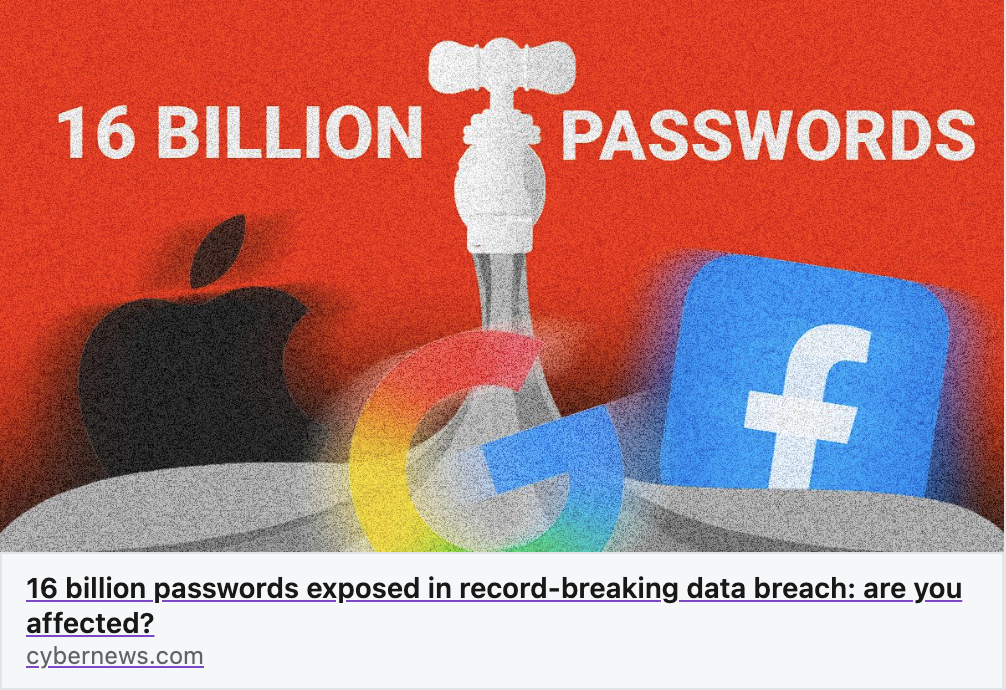
Data breaches keep coming, and the latest one revealed by Cybernews involves 16 billion passwords. There’s no way to know for sure if your passwords are included, though it’s always worth checking Have I Been Pwned and paying attention to monitoring features in password managers. Some media reports claim that passwords from accounts at Apple, Facebook, and Google were leaked, but this is likely overblown. While some accounts at those companies were compromised by infostealers, there were no centralized breaches. Our advice remains the same: use a password manager to ensure that each of your accounts has a strong, unique password and turn on two-factor authentication whenever possible.
(Featured image by iStock.com/tsingha25)
Social Media: Another day, another breach—this time involving 16 billion passwords. Despite alarming headlines about Apple, Facebook, and Google accounts, there’s no need to panic. Our advice? Use unique passwords and enable 2FA.
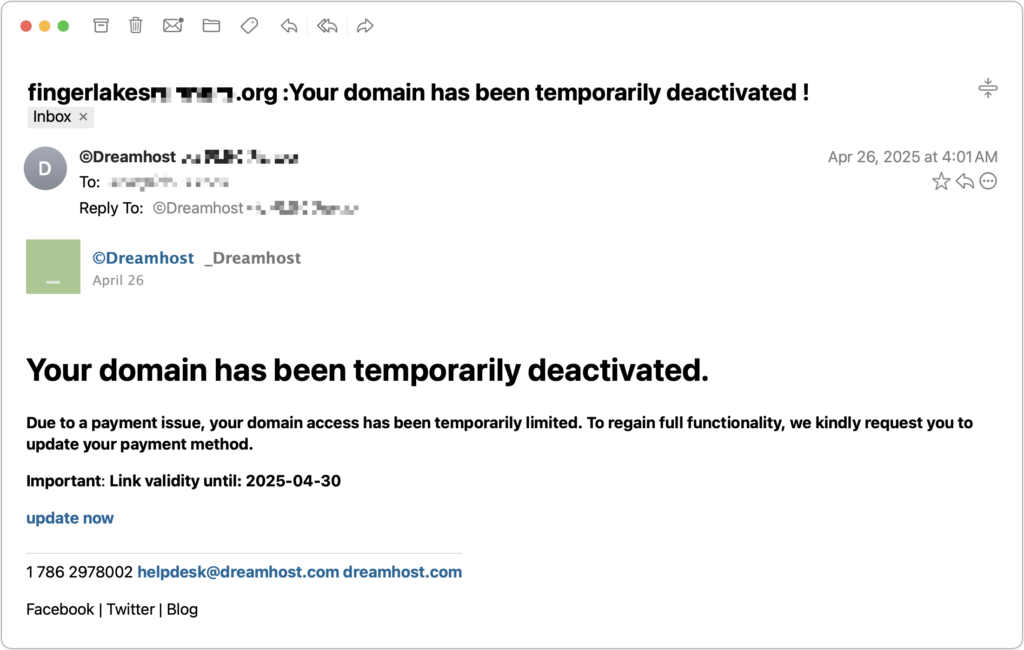
Most phishing attacks are easy to identify, but we’ve just seen one that’s more likely to evade detection. Those who own personal or business Internet domain names—to personalize their email or provide an online presence for their website—may receive fake messages claiming that a domain has been deactivated due to a payment issue. Because scammers can determine when domain names are due to expire and the name of the company hosting the domain, the urgency triggered by a message that appears to be from the domain host and arriving near the renewal date may cause someone to click a link they shouldn’t. This particular one wasn’t even that well crafted and still caused the recipient brief concern until they manually went to DreamHost and verified that nothing was wrong with their domain payment. Stay alert out there!
(Featured image by iStock.com/weerapatkiatdumrong)
Social Media: Phishing scams are becoming more sophisticated. A message that seems to come from an Internet domain host and arrives around the time of a domain renewal could deceive even experienced users.
When discussing digital security, we typically focus on preventive measures, such as using strong passwords with a password manager, enabling multi-factor authentication, keeping systems up to date, maintaining regular backups, and training employees to recognize potential security threats. While these practices are essential, they don’t guarantee complete protection.
No one is immune to online attacks—the most security-conscious organizations and individuals can still become victims. Even security experts occasionally click something they shouldn’t have or forget to keep a little-used system up to date. A single employee opening a convincing phishing email, a momentary lapse in judgment, or a zero-day vulnerability can lead to devastating consequences.
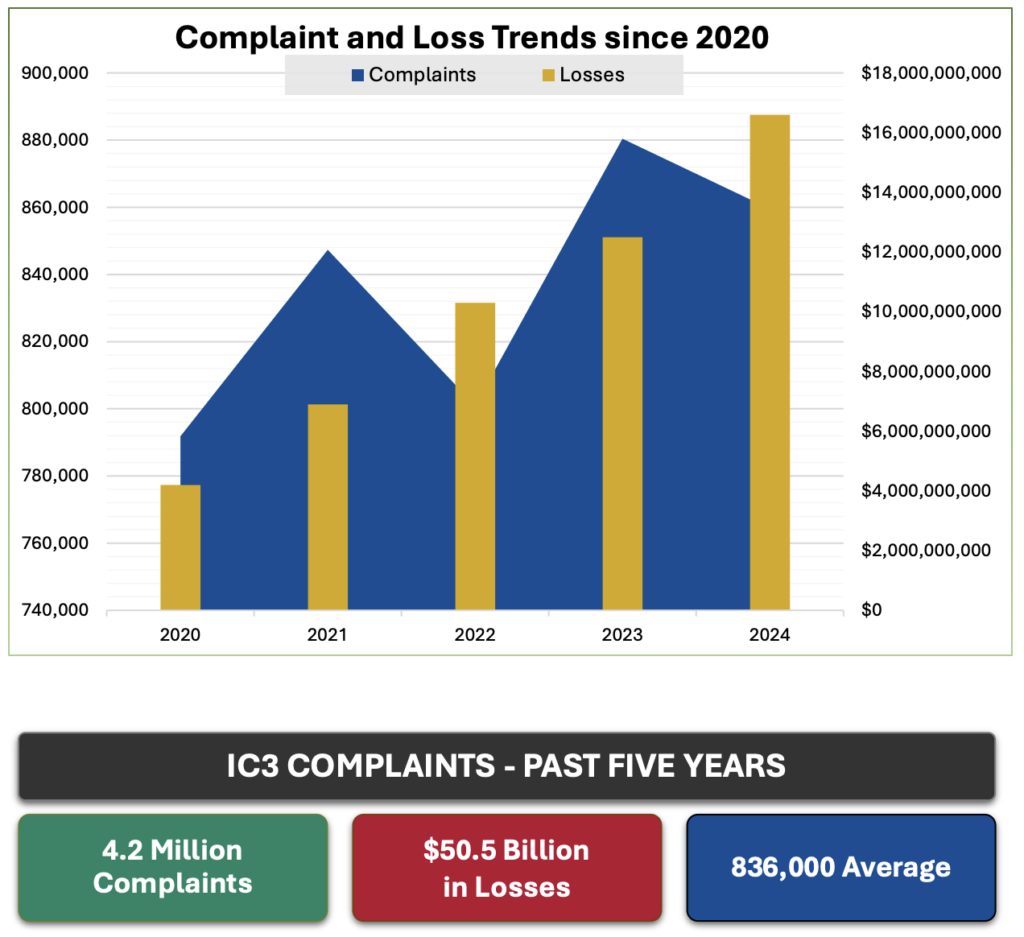
According to the FBI’s Internet Crime Complaint Center (IC3), cybercrime-related losses from 2020 through 2024 are estimated at $50.5 billion, with IC3 receiving 4.2 million complaints. Most concerning is the rising trend in the frequency and severity of these attacks.
Given these statistics and the reality that perfect security is impossible, many are looking to protect themselves from possible financial losses. Just as fires and accidents make home and auto insurance necessary, these ever-increasing threats from phishing, malware, and other forms of digital attack make cyber insurance an important consideration for both companies and individuals. We’ll focus on businesses here and explore personal cyber insurance in a future article.
Cyber insurance for businesses helps companies recover from security breaches and online attacks. Unlike traditional business insurance policies, cyber insurance focuses on the risks of using technology to operate or to store sensitive data online. Businesses of all sizes are vulnerable, but small and medium-sized businesses are often targeted because they lack the robust security infrastructure of larger enterprises.
Industries that are especially at risk include healthcare, financial services, retail, and professional services, but no sector is immune. You may have cause for additional concern if your company collects customer information, processes payments, or maintains a significant online presence, but realistically, every business that uses email or conducts online banking is vulnerable.
A business cyber policy typically includes two core types of coverage:
However, it’s essential to be aware of common exclusions to business cyber insurance, the most important of which are:
How much will business cyber insurance cost? It varies based on your company size and revenue, industry sector, type and amount of sensitive data stored, security practices, coverage limits and deductibles, and claims history. That said, small businesses with yearly revenues under $1 million typically have annual premiums ranging from $500 to $2,000. Mid-sized firms often pay between $2,000 and $10,000, and large companies can expect premiums in the tens of thousands.
It’s common—and entirely understandable—to hesitate to purchase cyber insurance due to concerns about the cost. However, the potential financial impact of an incident is often significant. IBM’s 2024 Cost of Data Breach Report found that the average cost of a data breach was $4.9 million globally, but $9.4 million in the United States. Although IBM doesn’t break out costs by company size, those costs are likely for larger companies. Nonetheless, a Financial Times report notes that users at small and medium-sized businesses were twice as likely to encounter threats as those at large companies.
Choosing the right cyber insurance broker is as important as selecting the policy itself, and you’ll want to involve your security team in the search. Look for someone specializing in cyber coverage who has technical expertise in cybersecurity practices, strong relationships with underwriters, and a track record of providing active claims support. A good broker will not only find competitive pricing but also help tailor coverage to your specific risks and ensure you’re prepared to meet underwriting requirements.
When comparing cyber insurance options, pay attention to the details. Confirm that the policy addresses risks specific to your situation and provides sufficient financial protection for your potential exposure. Pay close attention to exclusions—there will be more than those listed above. Research the insurer’s claims process and reputation for responsiveness, as timely support during an incident is crucial. Finally, inquire about additional risk management services offered by the insurer that may provide valuable preventative resources to complement your coverage.
Unfortunately, the frequency and risk of cyber attacks are on the rise. Proactive security measures are key, but a single mistake or oversight could have dire outcomes. Cyber insurance provides an important safety net in the event of a breach or attack that evades your best efforts.
We won’t pretend that finding and purchasing cyber insurance is simple, but we can help with finding a good cyber insurance broker, evaluating the policy, answering application questions, and ensuring that your company meets the necessary security requirements.
(Featured image by iStock.com/Who_I_am)
Social Media: Cyber insurance can protect your business from crippling financial losses after a security breach. Learn what’s covered, what’s not, and how to shop for the right policy for your company.