Posts

Strategies for Moving from Mojave to Catalina

For some Mac users, macOS 10.15 Catalina is no longer a choice. That’s because the new 16-inch MacBook Pro and the 2019 Mac Pro that Apple released late last year ship with Catalina installed and can’t run any previous version of macOS.

But for most people, it’s time to consider an upgrade to Catalina. Most backup software now works with Catalina’s bifurcated drive approach that puts the system on a separate, read-only volume from your data and apps. We’ve all had several months to come to terms with the fact that old 32-bit apps won’t even launch in Catalina. And Apple has shipped several updates that bring Catalina to version 10.15.3, addressing most of the complaints users had with the initial release.

If you are ready to try Catalina but still want to use 10.14 Mojave, we have some advice for how to make that happen. This could be the case for someone who has purchased a new Mac that does support Mojave but came with Catalina installed, for someone who wants to test Catalina while still using Mojave, or for someone who wants to move on to Catalina but has a 32-bit app that they aren’t ready to say good-bye to.

Downgrade from Catalina to Mojave on Some New Macs

Apple has started installing Catalina on new Macs other than the 16-inch MacBook Pro and 2019 Mac Pro, but since these older Macs can still run Mojave, it’s possible—if a bit tricky—to downgrade them to Mojave.

System engineer Armin Briegel has worked out a way of downgrading new Macs to Mojave. First, you create a Mojave Installer USB drive. To use that drive to boot a Mac with a T2 security chip, you must allow external booting from the Security Utility on the Recovery partition. Once you’ve booted from your Mojave Installer drive, use Disk Utility to erase the entire internal drive. Then install Mojave.

Use Virtualization to Keep 32-bit Apps Running

For some people, what’s keeping them on Mojave is a single 32-bit app that will never be updated in an appropriate fashion. Quicken 2007 falls into this category, as does the ScanSnap Manager app for the ScanSnap S1300, S1500, and S1500M scanners. Sure, you can get a current version of Quicken, but it may not do precisely what you want, and Fujitsu would be happy to sell you a new ScanSnap scanner that does come with 64-bit software, but then you’ll have to figure out what to do with your old scanner.

So if you’re ready to upgrade to Catalina in general but need to maintain access to one or two apps, one solution is virtualization software: either Parallels Desktop or VMware Fusion. Both apps let you run nearly any operating system—including older versions of macOS like Mojave—in a virtual machine. In essence, they fool the guest operating system, whether it’s Mojave or Windows, into thinking it’s running normally on a computer, when it’s actually running in a virtual environment.

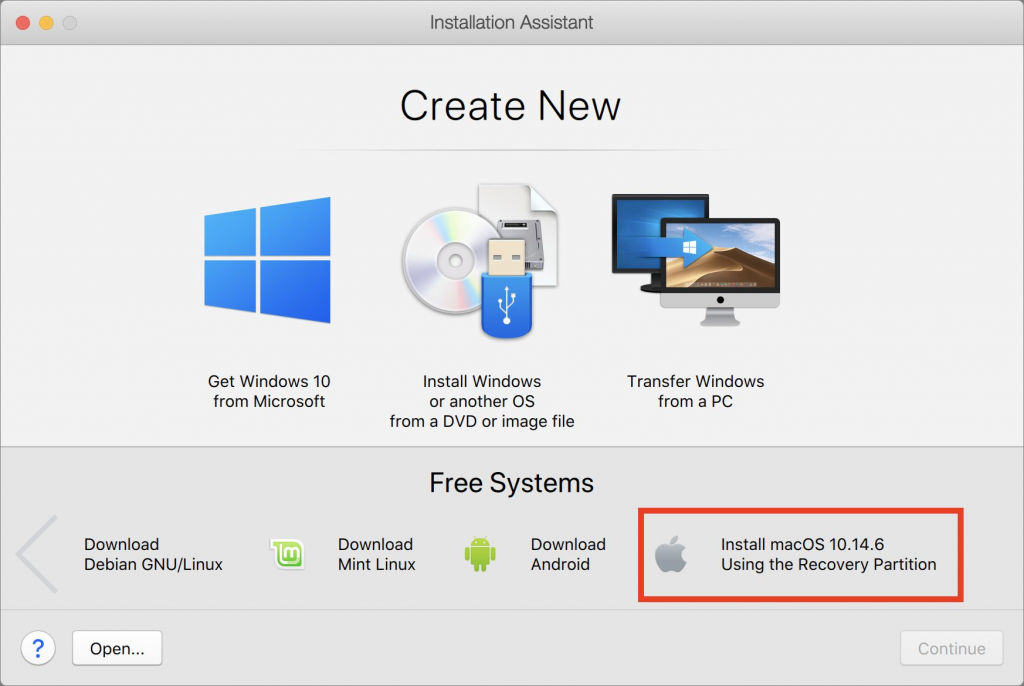
These apps cost about $80, and while there’s a bit of work in setting them up (the screenshot below shows the option for installing Mojave in Parallels Desktop during setup), once you have them configured, it’s easy to run older apps alongside newer ones with little or no performance hit. This approach is also perfect for a 16-inch MacBook Pro or Mac Pro that can’t run Mojave in any other way.

Install Catalina and Mojave on Separate APFS Volumes and Switch Boot

Finally, there’s one other option that lets you switch back and forth between Mojave and Catalina, assuming your Mac supports Mojave. You can create an APFS volume on your internal drive and install another version of macOS on that. It’s easy, and Apple provides full instructions. The only problem with this approach is that you’ll have to restart to switch operating systems, whereas both are available simultaneously with the virtualization solution.

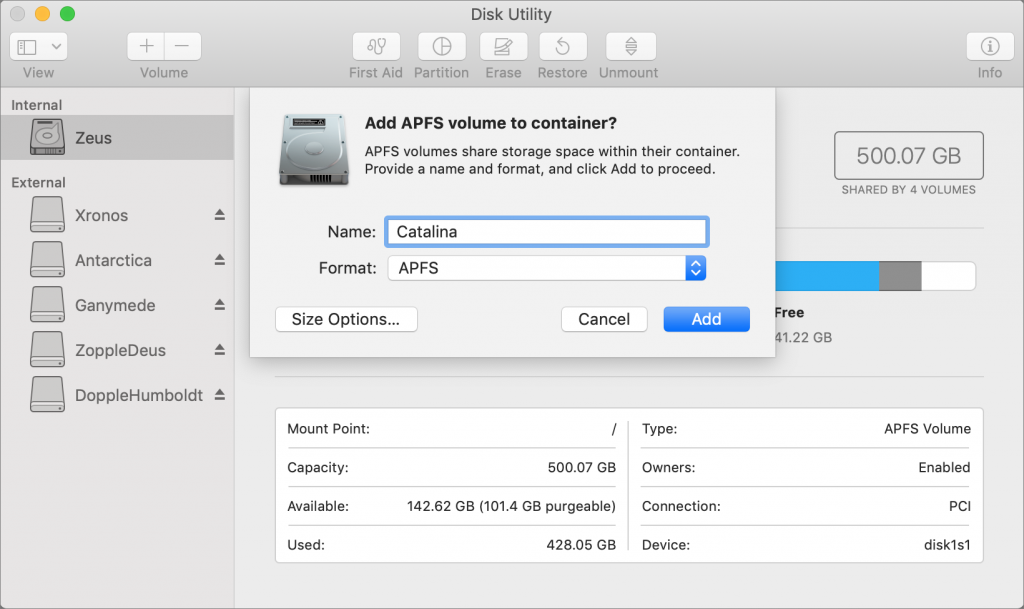
First, make sure you have at least one current backup of your Mac, since it’s foolhardy to adjust your drive structure without one. Next, in Disk Utility, select your internal drive, choose Edit > Add APFS Volume, and click Add. We recommend naming the drive such that it will be clear what’s on it.

Then boot into macOS Recovery and install the desired version of macOS on your new volume. The keys you hold down to get into Recovery determine which version of macOS you’ll get:

  • Command-R reinstalls the latest version of macOS that was installed on your Mac.
  • Command-Option-R upgrades to the latest version of macOS that’s compatible with your Mac.
  • Command-Shift-Option-R reinstalls the version of macOS that came with your Mac, or the closest version still available.

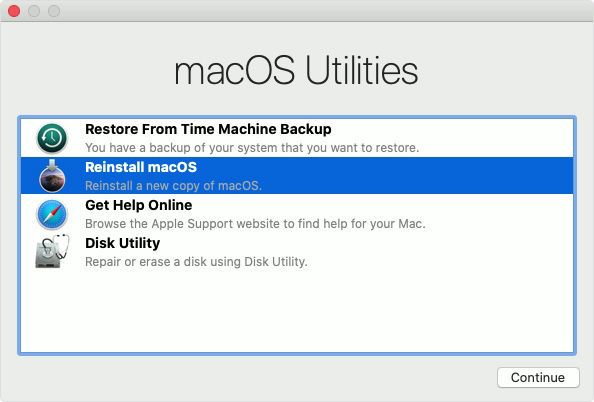
Choose Reinstall macOS from the macOS Utilities window and proceed from there.

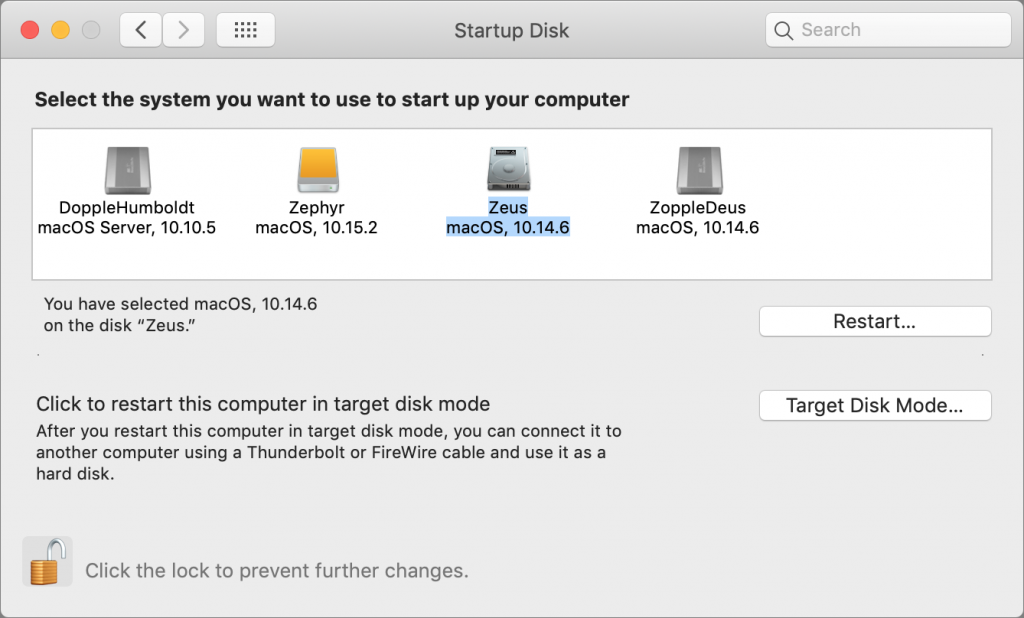
Once the installation is complete, to switch from one version of macOS to another, open System Preferences > Startup Disk, choose the desired volume to boot from, and then click Restart. Or, press Option at startup and select the desired volume from the Startup Manager screen.

Needless to say, the decision about when and how to upgrade to Catalina isn’t a trivial one, so feel free to contact us to discuss your particular situation or to get help with any of the procedures that we’ve described in this article.

(Featured image by Apple)


Social Media: Considering upgrading to Catalina? Or maybe you have a new Mac that came with it already installed? Read on for strategies for downgrading to Mojave or running both Catalina and Mojave.

AirDrop Reception Not Working? Here’s the Likely Fix

AirDrop has become a fast and reliable way to transfer data from one iPhone to another that’s nearby. Just tap the share icon and in iOS 13’s activity view, either tap an AirDrop shortcut in the top row or tap AirDrop in the second row and select choose a person or device in the subsequent AirDrop screen. But what if your iPhone doesn’t appear for the person who wants to share with you? Assuming Wi-Fi and Bluetooth are both on, the fix is generally to go to Settings > General > AirDrop and select Everyone. If you’re concerned about unwanted transfers, switch to Contacts Only afterward.

(Featured image by Günther Schneider from Pixabay)

Don’t Succumb to iOS 13 Update Fatigue!

Does it seem like that red badge on the Settings app indicating that there’s a new iOS 13 or iPadOS 13 update pops up at least once per week? You’re not imagining things—Apple has been frantically squashing bugs in its mobile operating systems since their release in mid-September.

If you haven’t yet upgraded from iOS 12, there’s no harm in waiting until the new year to see if things have settled down. (Well, no harm as long as you don’t receive a pair of Apple’s snazzy new AirPods Pro as a holiday gift, since they work only with devices running at least iOS 13.2, iPadOS 13.2, watchOS 6.1, tvOS 13.2, and macOS Catalina 10.15.1.)

That said, given Apple’s generally reliable record with major iOS updates, many people have upgraded to iOS 13. You shouldn’t feel bad if you have done so, either. Despite Apple’s flurry of bug fix updates, the overall user experience with iOS 13 has been generally acceptable.

Even if you haven’t noticed problems with iOS 13, it is important that you keep installing all these smaller updates, because they fix problems that could be serious. More important yet, if you do have trouble with your iPhone or iPad, and you’re not running the latest version of iOS or iPadOS, updating is the first fix to try.

To hammer home why you should stay up-to-date with iOS releases, here’s a brief timeline of Apple’s fixes so far:

  • iOS 13.0 (September 19): This was the initial release of iOS 13 for the iPhone, with oodles of new features… and lots of bugs. Apple promised iOS 13.1 and the first release of iPadOS 13.1 for September 29th, with additional features and bug fixes.
  • iOS 13.1 (September 24): After iOS 13.0 received scathing reviews in early iPhone 11 reviews, Apple moved the release date of iOS 13.1 up by five days. It added more features and addressed numerous bugs with Mail, Messages, Reminders, Notes, Apple ID sign-in, the Lock screen, and more.
  • iOS 13.1.1 (September 27): This quick Friday release the same week as iOS 13.1 fixed bugs that could prevent an iPhone from restoring from backup, cause batteries to drain too quickly, reduce Siri recognition accuracy, bog down Reminders syncing, and allow third-party keyboard apps to access the Internet without your permission.
  • iOS 13.1.2 (September 30): The next Monday brought iOS 13.1.2, which ensured that the progress bar for iCloud backups would disappear after a successful backup, addressed bugs that caused the Camera app and flashlight to fail, and improved the reliability of Bluetooth connections in some vehicles.
  • iOS 13.1.3 (October 15): After a two-week breather, this update addressed bugs that could prevent incoming calls from ringing, block meeting invites from opening in Mail, cause incorrect data in Health after daylight saving time changes, prevent apps and voice memos recordings from downloading after restoring from iCloud Backup, stop an Apple Watch from pairing successfully, and cause Bluetooth connection problems with vehicles (again) and hearing aids.
  • iOS 13.2 (October 28): With this update, Apple delivered additional promised features, including support for the HomePod, Siri privacy options, HomeKit Secure Video, new emoji, Deep Fusion in the iPhone 11 Camera app, and AirPods Pro support. It also fixed a bug with password autofill in third-party apps, resolved an issue that prevented swipe to go home from working on the iPhone X and later, eliminated a problem that caused saved notes to disappear temporarily, and ensured that manual iCloud backups completed successfully.
  • iOS 13.2.1 (October 30): As it turned out, iOS 13.2 could brick HomePods during installation or after a reset. This HomePod-exclusive update fixed that bug.
  • iOS 13.2.2 (November 7): This update stomped a big bug that could cause apps to quit unexpectedly in the background, potentially causing data loss and draining the battery more quickly. It also addressed two bugs that could cause an iPhone to lose cellular service.
  • iOS 13.2.3 (November 18): This release resolved one bug that could cause searches in Mail, Files, and Notes to fail and another that prevented photos, links, and other attachments from displaying in the Messages detail view. It also addressed problems that could prevent apps from downloading content in the background and prevent Mail from fetching new messages and including and quoting original content when replying.

With luck, you never ran into any of these bugs—they weren’t universal. But the problems were real, and they inconvenienced plenty of people. Just like with vaccinations, staying current with your iOS updates is the best way to keep the bugs at bay.

(Featured image modified slightly from an original by energepic.com from Pexels)


Social Media: Apple has been squashing bugs in iOS 13 and iPadOS 13 left and right, with numerous updates since their September release. If you’ve upgraded already, we recommend that you keep installing maintenance fixes as they come out.

Be Careful in iOS 13’s Mail App—the Trash Button Is Where Reply Used to Be!

For unknown reasons, Apple redesigned the toolbar in the iOS 13 version of Mail. Such things happen, but this time, Apple made a big mistake and moved Mail’s Trash button to where its Reply button used to be. Lots of people who have become accustomed to tapping Reply are now finding themselves deleting messages inadvertently, since a tap in the same location in iOS 13 deletes the message. It’s hard to retrain muscle memory—the ability to reproduce a particular movement without conscious thought—but if you find yourself deleting messages accidentally, you’ll need to slow down and remember to tap the new location of the Reply button.

(Featured image by Skitterphoto from Pexels)

Consider USB Peripherals When Troubleshooting Mac Problems

If you’re experiencing a sporadic problem with your Mac, the sort of thing that happens often enough to be annoying but not so frequently as to be reproducible, allow us to suggest one little-known troubleshooting tip. Malfunctioning USB devices—keyboards, mice, hubs, printers, etc.—can sometimes cause truly inscrutable problems ranging from startup issues to kernel panics. USB-caused issues aren’t common, but when they do happen, they can be challenging to track down. If you’ve tried everything else, disconnect all unnecessary USB devices and, if possible, swap your wired keyboard and mouse for another set. Then see if the problem goes away.

(Featured image by Adam Engst)

Which Precise Mac Model Do You Have? Here’s How to Find Out

Apple likes to keep Mac names simple, but that’s not always helpful. For instance, if you want to add RAM to your Mac, it’s not good enough to know that it’s an iMac. You’ll need to know that it’s a 27-inch iMac with Retina display from late 2014. To find that out, choose About This Mac from the Apple menu. In some cases, you might even need to know the model identifier, which is a numeric code that’s accessible if you click the System Report button in the About This Mac window, and then click Hardware at the top left of the System Information window. It will be something like iMac15,1.

(Featured image modified from an original by Startup Stock Photos from Pexels)

Need to Restart a Mac That Has Frozen? Here’s How

It’s extremely uncommon for a Mac to freeze or crash these days, but it can happen. What should you do if your Mac locks up and becomes completely unresponsive to the mouse and keyboard? The trick is to press and hold the power button until the Mac turns off. Wait 5 or 10 seconds, and press it again to turn the Mac back on. You will lose any unsaved changes if you do this, so use it only as a last resort when you can’t restart normally. Look for the power button on the back of a desktop Mac, and at the top right of the keyboard on most laptop Macs. For a recent MacBook Air or a MacBook Pro with a Touch Bar, press and hold the Touch ID button.

(Featured image by Adam Engst)

Some May Like It Hot… But Your Technology Prefers to Stay Cool

When summer brings sunny days and rising temperatures, you may have ditched your business suit for shorts or skirts to stay comfortable, but your technological gear can’t do the same. And keeping your tech cool is about more than comfort—as temperatures rise, performance can suffer, charging may get slower or stop, various components might be disabled, and devices can become unreliable.

How Hot Is Too Hot?

You might be surprised by the recommended operating temperatures for Apple gear—whether you’re talking about an iPhone X or a MacBook Pro, the company recommends staying under 95° F (35° C).

Such temperatures happen regularly throughout the summer. Even in cooler climes, the temperature in a parked car in the sunshine can easily hit 130º F (54º C) in an hour and rise higher as time passes. And no, cracking the windows a couple of inches won’t make a significant difference. We hope you’re already thinking about that with regard to children and pets, but as you can see, tech gear should also be protected. Apple says its products shouldn’t even be stored—turned off—at temperatures over 113º F (45º C).

It’s not just cars you have to think about. Temperatures in homes and offices without air conditioning can also rise higher than electronics would prefer, and that’s especially true for computers that stay on most of the time and aren’t located in well-ventilated areas.

What’s the Danger?

First off, remember that all electronic devices produce their own heat on top of the ambient heat in the environment, so the temperature inside a device can be much, much hotter than outside. The CPU in an iMac can hit 212º F (100º C) under heavy loads.

Temperatures higher than what components are designed for can have the following effects:

  • Chips of all types can behave unpredictably as increased thermal noise (electrons vibrating more) causes a higher bit error rate. Because electrical resistance increases with heat, timing errors can also occur.
  • Lithium-ion batteries discharge well in high temperatures, but the increased rate of chemical reactions within the battery will result in a shorter overall lifespan.
  • As devices heat and cool, the uneven thermal expansion of different materials can cause microscopic cracks that can lead to a variety of failures over time.

Some heat-related problems are temporary, so when the device or component cools down, it will resume working correctly. But others, particularly drops in battery life—are irreversible and particularly worth avoiding.

When a Mac gets too hot, it will spin up its fans in an attempt to keep its internal components cool. If your Mac’s fans are ever running at full tilt, first quit apps you aren’t using, particularly those that might be CPU-intensive and thus creating a lot of heat. If that doesn’t make a difference, restart it to make sure the problem isn’t some rogue process. If the fans come back on at full speed quickly, shut it down and let it cool off for a bit. In the worst case, an overheated Mac will start acting unpredictably or crash.

iOS devices don’t have fans, so they employ other coping mechanisms. If your iPhone or iPad gets too hot, the device will alert you.

Apple says you might notice some of the following behaviors:

  • Charging, including wireless charging, slows or stops.
  • The display dims or goes black.
  • Cellular radios enter a low-power state. The signal might weaken during this time.
  • The camera flash is temporarily disabled.
  • Performance slows with graphics-intensive apps or features.

If you’re using Maps on an overheating iPhone for GPS navigation in the car, it may show a “Temperature: iPhone needs to cool down.” screen instead of the map. You’ll still get audible turn-by-turn directions, and the screen will wake up to guide you through turns,

How to Keep Your Tech Cool

For the most part, keeping Apple devices cool just requires common sense, since you’d do the same things for yourself.

  • As Apple’s specifications recommend, avoid using devices when the temperature is over 95º F (35º C). If you can’t avoid it entirely, keep usage to a minimum.
  • Don’t leave devices in cars parked in the sun for long periods of time. If it happens accidentally, let the device cool before using it.
  • Provide good ventilation so air can cool the device. Don’t block ventilation ports in the back of desktop Macs, and don’t use Mac laptops in bed, propped on a pillow, or under the covers. It can be worth vacuuming dust out of ventilation ports every so often.
  • Never put anything on the keyboard of an open Mac laptop.
  • Avoid stacking things on top of a Mac mini.
  • Monitor the temperature of server closets. If they get too hot, keep the door open, add a fan, or run the air conditioning.

Luckily, the temperatures that cause problems for Apple hardware aren’t terribly comfortable for people either, so if you’re way too hot, that’s a good sign your gear is as well.

(Featured image by Alfonso Escalante from Pexels)


Social Media: How hot is too hot for your Apple devices? You may be surprised by the answer.

Use Dropbox’s Selective Sync to Save Space on Small Drives

If you’re like many of our clients who use Dropbox intensively, you have a desktop Mac with a large drive and a MacBook with much less drive space. How do you prevent your large Dropbox account from overwhelming the laptop Mac’s available storage? The answer is Dropbox’s Selective Sync feature. On the MacBook, click the Dropbox icon in the menu bar, click your avatar in the upper-right corner, and choose Preferences. In the Preferences window, click Sync and then click the Choose Folders to Sync button. Deselect the folders you want to prevent from syncing to the MacBook and click Update. If you need to access any files in those folders from the MacBook, go to dropbox.com in your Web browser instead, or adjust your Sync preferences to bring in the needed folder.

(Featured image based on a photo by Daniele Levis Pelusi on Unsplash)

Can’t Remember When Your Warranty Expires? iOS 12.2 Lays It Out

With luck, you should never need to check your iPhone’s or iPad’s warranty status. But bad things do happen to good devices. In iOS 12.2, Apple has just made it easier to figure out if your device is still under warranty or covered by AppleCare+. Go to Settings > General > About, where you’ll find a new entry that’s either called Limited Warranty (the basic Apple warranty) or AppleCare+ (the extended warranty you can buy). The entry shows the expiration date, and tapping it provides more details on the Coverage screen. If your iPhone or iPad doesn’t have AppleCare+ but is eligible for it, you can even buy it from this screen. You won’t see anything if your device is out of warranty and no longer eligible for AppleCare+.