Posts

How to Merge Two Similar Folders in the Mac’s Finder

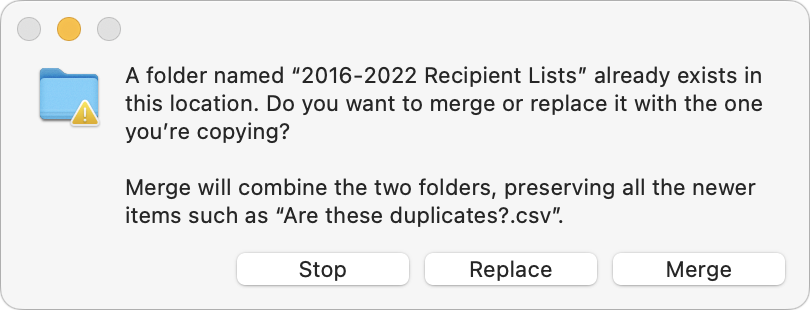
You’ve ended up with two folders whose contents—hundreds of files or more—are similar but not identical. Perhaps you’re recovering from a sync failure, or maybe you pulled an old version of the folder from a backup and aren’t sure what’s different. Regardless, here’s how you can merge them in the Finder. Make sure the folders are named identically and are in two different locations on your Mac. Press and hold the Option key, then drag the folder that contains more files to the location that contains the folder with fewer files. In the dialog that appears, click Merge to copy only newer files from the source and those not already in the destination. (It’s not a two-way sync; for that, you need an app like ChronoSync.) The Merge button appears only if the source folder contains files not in the destination; if the folders contain just different versions of identically named files, you’ll get only Stop and Replace buttons. For safety, always work on copies of your folders and check your work afterward to ensure the right things happened.

(Featured image by iStock.com/RerF)


Social Media: If you want to merge two folders that contain some of the same data, a little-known Finder feature can do it for you.

Clean Up Your Mac’s Desktop with Sort Options

When we help someone with their Mac for the first time, we often notice that their desktop is a disaster. Icons are scattered willy-nilly and often piled on top of one another, making it hard to locate anything. For most people, the solution is easy—sort the contents of the desktop. In the Finder, choose View > Show View Options. We recommend choosing Date Modified from the Sort By pop-up menu to put your most recently used files in the upper-right, but other criteria might work better for you. If you have so many icons that they overlap, try reducing the icon size or grid spacing. You could also choose Date Modified from the Stack By pop-up menu to collect icons into stacks by date.

(Featured image by iStock.com/Liudmila Chernetska)


Social Media: We can’t help with a messy office desk, but if your Mac’s desktop is a confusing mess of randomly placed icons, using the Finder’s sort options will make it nice and orderly.

Convert Image Formats Directly in the Finder

If you need to convert images to JPEG, PNG, or (unlikely) HEIF, try this hidden Finder feature: Control-click an image in one of those formats or other common image formats like TIFF, GIF, or PSD, and choose Quick Actions > Convert Image. A dialog lets you choose the destination format, the image size, and whether you want to preserve metadata. For straight conversions, stick with Actual Size, but if your goal is to shrink the file as well, you can choose a smaller image size. Leave Preserve Metadata selected unless you want to remove things like location metadata for privacy reasons. You can even select multiple files to convert them all at once.

(Featured image based on an original by iStock.com/marekuliasz)


Social Media: A hidden feature of the macOS Finder lets you quickly convert selected images from their original format to JPEG, PNG, or HEIF. If you regularly need to convert images between formats, it could save you some time.

Reveal Your Desktop Quickly with a Keyboard Shortcut

The Mac’s Desktop is a remarkably useful place. It’s a good spot for in-progress documents, screenshots, images dragged out of Web pages, and more. However, app windows tend to obscure the Desktop, making it harder to use. There are two quick ways you can temporarily hide windows, making it easy to access icons on the Desktop. In macOS 13 Ventura, in System Settings > Desktop & Dock, click the Shortcuts button at the bottom and assign a keyboard shortcut to Show Desktop (we like the Right Option key). Or click Hot Corners and choose Desktop for one of the corners. (In macOS 12 Monterey and earlier, look in System Preferences > Mission Control.) Then, press that keyboard shortcut or put your pointer in that corner to move your windows aside temporarily. When you’re done, press the key or move the pointer there again to put the windows back.

(Featured image based on an original by iStock.com/AmnajKhetsamtip)


Social Media: The Mac’s Desktop is a great place for in-progress documents, screenshots, and other things you’re working on, but only if you can get to it easily. Read on for two little-known tricks for temporarily pushing windows aside.

Quickly Put Lots of Files in a Folder with One Command

Imagine that you’re working with a bunch of files, and you want to put a set of them in a new folder. You could stop what you’re doing, make a new folder, select all the files, and drag them into the folder, like an animal. Or you could take advantage of a slick Finder command that Apple added in macOS 11 Big Sur. Simply select the files you want to put in a folder, Control-click one of them, and choose New Folder with Selection (X Items) from the top of the contextual menu. A folder called “New Folder With Items” appears, with your selected files inside. This feature may not be life-changing, but some people use it often.

(Featured image by iStock.com/ArLawKa AungTun)

Go Beyond Get Info with the Finder’s Inspector Window

You probably know that selecting a file in the Finder and choosing File > Get Info (Command-I) brings up the Get Info window. This window provides information about the file, including its name, kind, size, creation and modification dates, and much more. You can also use Get Info to hide or show filename extensions, lock and unlock files, and change permissions. But what if you want to do those things to multiple files or figure out how large a set of files is? Turn to the Finder’s Inspector window instead. Select multiple files, hold down the Option key, and choose File > Show Inspector (Command-Option-I). The Inspector window looks and works almost exactly like the Get Info window. As a bonus, if you leave the Inspector window open, it updates to reflect whatever you select in the Finder—that’s faster than opening Get Info repeatedly for different items.

(Featured image by iStock.com/ipuwadol)

Apple Hid the Proxy Icon in Big Sur’s Finder. Here’s How to Reveal It

This is a twofer tip. You may not have known that every document window in macOS has long had a proxy icon in the title bar, next to the filename. The proxy icon is not just cosmetic. You can drag it to Mail to attach the document to a message, to a Web browser to upload it, or to any other location you can drag a document’s icon in the Finder (top screenshot, below, showing Preview in Catalina). You can also drag proxy icons from Finder windows to Open and Save dialogs to navigate to the location of the proxy icon and even pre-fill the filename when saving. Alas, in macOS 11 Big Sur, in at least the Finder and Preview, Apple chose to hide the proxy icon and the drop-down menu that lets you rename, tag, or move files using controls on the title bar (middle screenshot, below). Plus, the new title bar design tends to truncate file names. Happily, mousing over the filename expands the name and reveals both the proxy icon and the drop-down menu (bottom screenshot, below). Apple’s desire to reduce onscreen clutter makes usage more cumbersome than before, but all the functionality is still present.

(Featured image by Harrison Haines from Pexels)

Having Trouble Finding Files on Your Mac? Here’s How to Reset Spotlight

For the most part, Spotlight works well. Press Command-Space or use the Search field in a Finder window, and it finds everything that matches your search term. Sometimes, however, Spotlight fails to turn up a file that you know is present, likely due to index corruption. To fix the problem, you can force Spotlight to rebuild its index. (Don’t do this unless it’s necessary since reindexing can take a long time and may impact the performance of your Mac while it’s happening.) Open System Preferences > Spotlight > Privacy, and then drag your drive (or the drive on which Spotlight isn’t finding files) into the list of locations that Spotlight shouldn’t search. That deletes the old Spotlight index. Still working in the Spotlight Privacy list, select the drive and click the – button below the list. Spotlight now reindexes the contents of the drive and should find your files properly in the future.

(Featured image by cottonbro from Pexels)

Reclaim Local Storage Space by Removing iCloud Drive Downloads

With iCloud Drive, Apple provides an Optimize Mac Storage checkbox that, when checked, stores the full contents of iCloud Drive on the Mac only if there’s enough space. However, you may wish to recover local storage space without selecting that option—luckily, that’s easy to do. Open iCloud Drive in the Finder, Control-click a file, and choose Remove Download. The file remains in iCloud Drive, and if you need it locally, you can click the cloud icon next to its name to download it. If you’re not sure which files in the iCloud Drive window occupy the most space, choose View > As List, and then click the Size column so the largest files sort to the top (click again if they’re sorting to the bottom).

(Featured image based on originals by Denny Müller on Unsplash and Mahir Uysal on Unsplash)

A Quick Shortcut to Create an Instant Slideshow from a Folder of Images

You probably know that you can select an image in the Finder and press the Space bar to preview it in a Quick Look window. And you may know that you can use the arrow keys to preview other files in the same folder without closing and reopening the Quick Look window. But did you know that if you select multiple images in the Finder and hold down the Option key when pressing the Space bar, the Finder will run a full-screen slideshow with a 5-second interval between images? Move the cursor to display slideshow controls, including a button to bring up an index sheet. This feature isn’t something most people need every day, but it can be a lifesaver when you need to run a quick slideshow at a party or presentation.

(Featured image by 祝 鹤槐 from Pexels)