Last year, a series of articles by Wall Street Journal reporters Joanna Stern and Nicole Nguyen highlighted a troubling form of crime targeting iPhone users. A thief would discover the victim’s iPhone passcode, swipe the iPhone, and run. With just the passcode, the thief could quickly change the victim’s Apple ID password, lock them out of their iCloud account, and use apps and data on the iPhone to steal money, buy things, and wreak digital havoc.
In essence, Apple allowed the passcode, which could be determined by shoulder surfing, surreptitious filming, or social engineering, to be too powerful, and criminals took advantage of the vulnerability. It’s best to use Face ID or Touch ID, especially in public, but some people continue to rely solely on the passcode.
Apple has now addressed the problem for iPhone users with the new Stolen Device Protection feature in iOS 17.3. It protects critical security and financial actions by requiring biometric authentication—Face ID or Touch ID—when you’re not in a familiar location like home or work. The most critical actions also trigger an hour-long security delay before a second biometric authentication. We recommend everyone who uses Face ID and Touch ID turn on Stolen Device Protection. The feature is not available for the iPad or Mac, but neither is as likely to be used in places like the crowded bars where many iPhones have been snatched.
How Stolen Device Protection Works
The location aspect of Stolen Device Protection is key. When you’re in a “significant location,” a place your iPhone has determined you frequent, you can do everything related to security and financial details just as you have been able to in the past, including using the passcode as an alternative or fallback.
However, when you’re in an unfamiliar location, as you would likely be if you were out in public where someone might steal your iPhone, Stolen Device Protection requires biometric authentication to:
- Use passwords or passkeys saved in Keychain
- Use payment methods saved in Safari (autofill)
- Turn off Lost Mode
- Erase all content and settings
- Apply for a new Apple Card
- View an Apple Card virtual card number
- Take certain Apple Cash and Savings actions in Wallet (for example, Apple Cash or Savings transfers)
- Use your iPhone to set up a new device (for example, Quick Start)
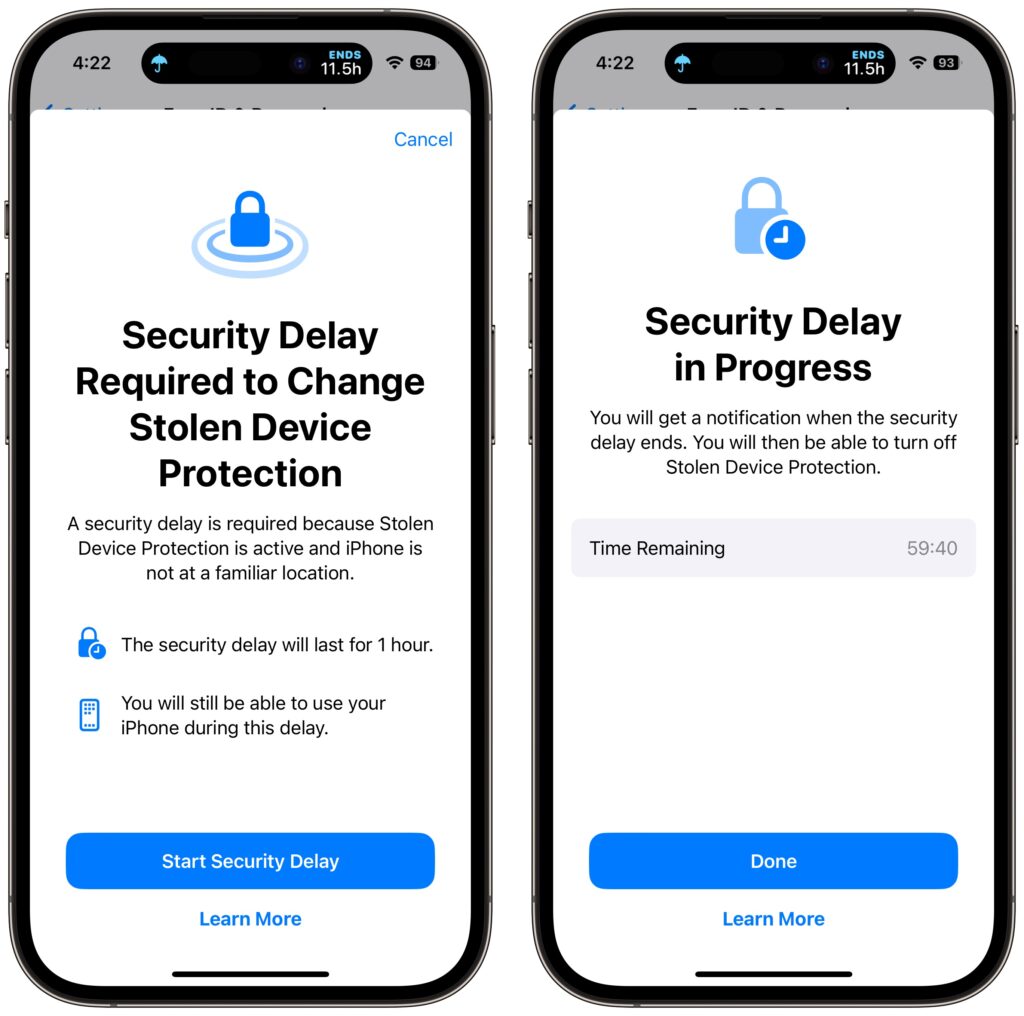
Some actions have even more serious consequences, so for them, Stolen Device Protection requires biometric authentication, an hour security delay—shown with a countdown timer—and then a second biometric authentication. The delay reduces the chances of an attacker forcing you to authenticate with the threat of violence. You’ll need to go through the double authentication plus delay when you want to:
- Change your Apple ID password (Apple notes this may prevent the location of your devices from appearing on iCloud.com for a while)
- Sign out of your Apple ID
- Update Apple ID account security settings (such as adding or removing a trusted device, Recovery Key, or Recovery Contact)
- Add or remove Face ID or Touch ID
- Change your iPhone passcode
- Reset All Settings
- Turn off Find My
- Turn off Stolen Device Protection
There are a few caveats to keep in mind:
- The iPhone passcode still works for purchases made with Apple Pay, so a thief could steal your passcode and iPhone and buy things.
- Although Apple says it’s required, you can turn off Significant Locations to require the extra biometric authentication and security delay everywhere. That would eliminate the worry about a thief using Significant Locations to go to your most recent familiar spot in an attempt to sidestep the extra authentication.
- If you plan to sell, give away, or trade in your iPhone, make sure to turn off Stolen Device Protection first. Once it’s out of your physical control, no one else will be able to reset it.
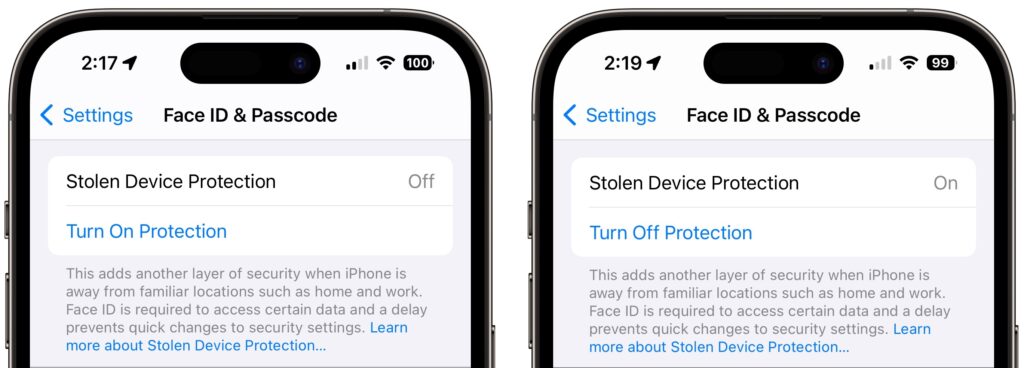
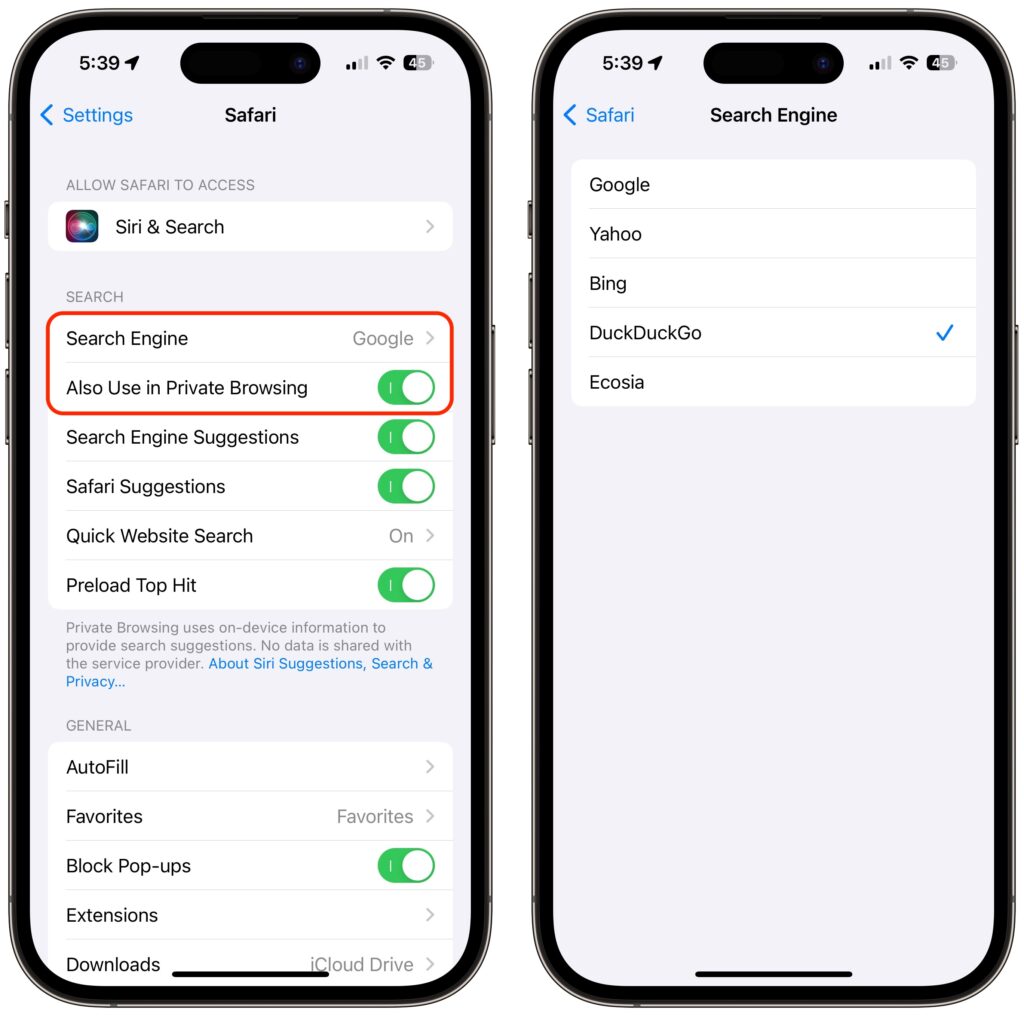
Turn On Stolen Device Protection
Before you get started, note that Apple says you must be using two-factor authentication for your Apple ID (everyone should be anyway), have a passcode set up for your iPhone (ditto), turn on Face ID or Touch ID, enable Find My, and turn on Significant Locations (Settings > Privacy & Security > Location Services > System Services > Significant Locations), although this last one doesn’t actually seem to be required.
Then, go to Settings > Face ID/Touch ID & Passcode, enter your passcode, and tap Turn On Protection. (If it’s enabled, tap Turn Off Protection to remove its additional safeguards.)

Once Stolen Device Protection is on and you’re in an unfamiliar location, the actions listed above will require either biometric authentication or two biometric authentications separated by the hour-long security delay.
There is one group of people who should not turn on Stolen Device Protection: those for whom Face ID or Touch ID don’t work. Most people have no trouble with Apple’s biometric technologies, but some people have worn off their fingerprints or have other physical features that confuse Touch ID or, less commonly, Face ID.
If that’s you, stick with our general recommendation for discouraging possible iPhone thefts: Never enter your iPhone passcode in public where it could be observed.
(Featured image by iStock.com/AntonioGuillem)
Social Media: In iOS 17.3, Apple has introduced Stolen Device Protection to discourage iPhone thefts enabled by a revealed passcode. It requires additional biometric authentication, and we recommend that everyone who uses Face ID or Touch ID enable it.