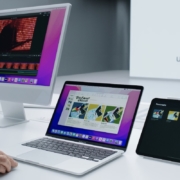
At its March 8th Peek Performance event, Apple freshened its iPhone and iPad product lines with a new third-generation iPhone SE and fifth-generation iPad Air, along with new green hues for the iPhone 13 line. Then Apple focused on the big announcements of the day: the entirely new Mac Studio, powered by the insanely fast M1 Ultra chip and accompanied by the stunning 27-inch Studio Display.
Mac Studio with M1 Ultra and Studio Display Redefine the Mac Lineup
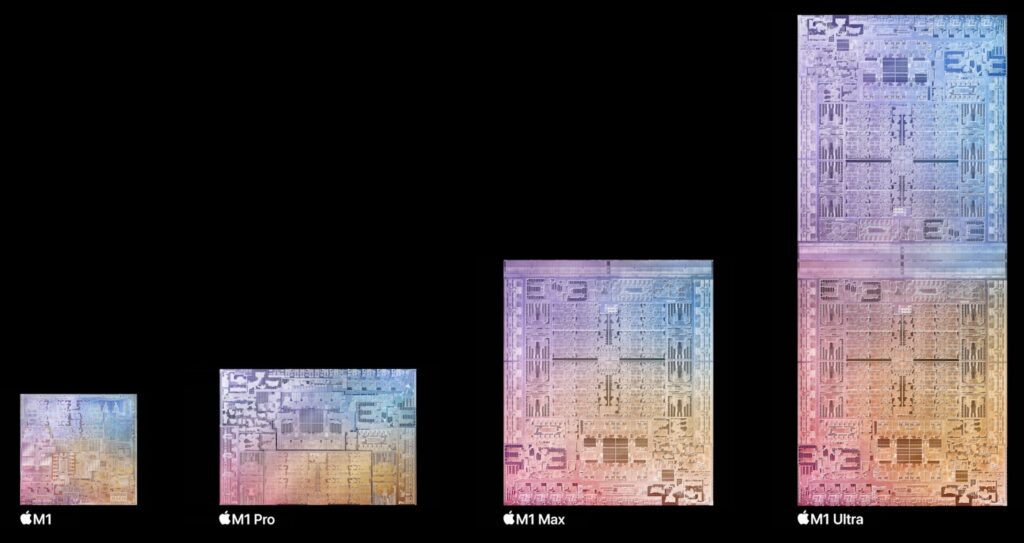
In 2020, Apple started to transition Macs away from Intel processors to Apple silicon, beginning with the M1 system-on-a-chip and a year later adding the even more powerful M1 Pro and M1 Max to the family. The performance of those chips, particularly when measured against their low power requirements, was stellar. Apple has now unveiled the M1 Ultra, which bonds two M1 Max chips together for double the performance.

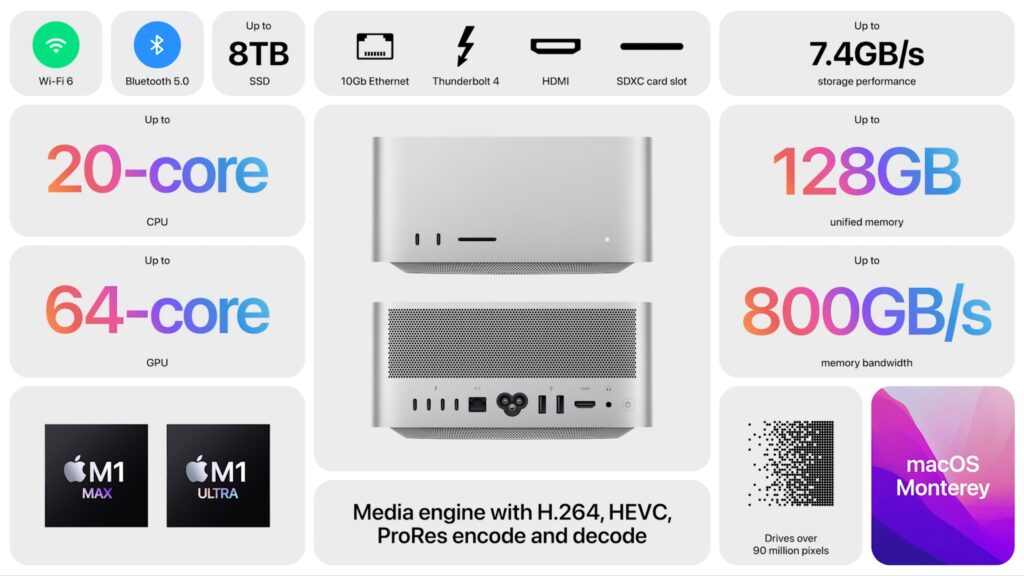
To hold the M1 Ultra—or a less expensive M1 Max—Apple introduced an entirely new Mac that looks like an inflated Mac mini. The Mac Studio has the same 7.7-inch (19.7 cm) square outline, but is more than twice as tall, clocking in at 3.7 inches (9.5 cm) high. Much of that vertical space is occupied by cooling fans, but Apple says the Mac Studio makes minimal noise.
The Mac Studio also expands the Mac mini’s price, with the M1 Max model starting at $1999 and the M1 Ultra model at $3999. You can kit a Mac Studio out with an impressive set of options:
- Chip: For $1999, the M1 Max model offers 10 CPU cores, either 24 or 32 (add $200) GPU cores, and 16 Neural Engine cores. The $3999 M1 Ultra model doubles those numbers with 20 CPU cores, 48 or 64 ($1000) GPU cores, and 32 Neural Engine cores.
- Memory: With the M1 Max, you can choose between 32 GB or 64 GB ($400) of unified memory. With an M1 Ultra, you can opt for either 64 GB or 128 GB ($800) of unified memory.
- Storage: Internal SSD storage starts at 512 GB, with options of 1 TB ($200), 2 TB ($600), 4 TB ($1200), and 8 TB ($2400).
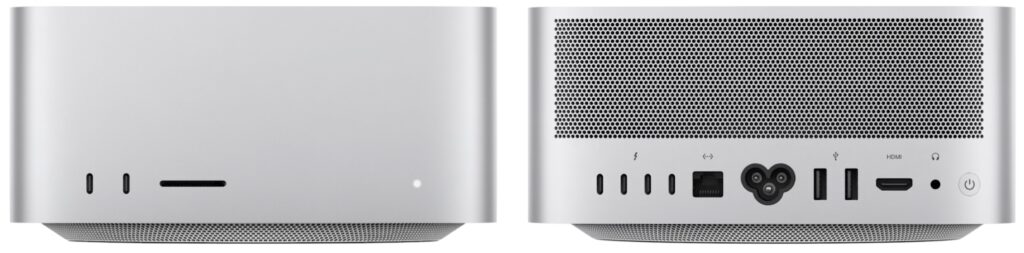
Because of Apple’s focus on creative professionals, the Mac Studio offers a solid set of ports. On the back, it has four Thunderbolt 4 ports, a 10-gigabit Ethernet port, two USB-A ports, an HDMI port, and a 3.5 mm headphone jack. 802.11ax Wi-Fi 6 is built in, as is Bluetooth 5.0. For ease of access, Apple finally put ports on the front, too. The M1 Max model features two USB-C ports, whereas the M1 Ultra model offers two Thunderbolt 4 ports. Both provide an SDXC card slot.
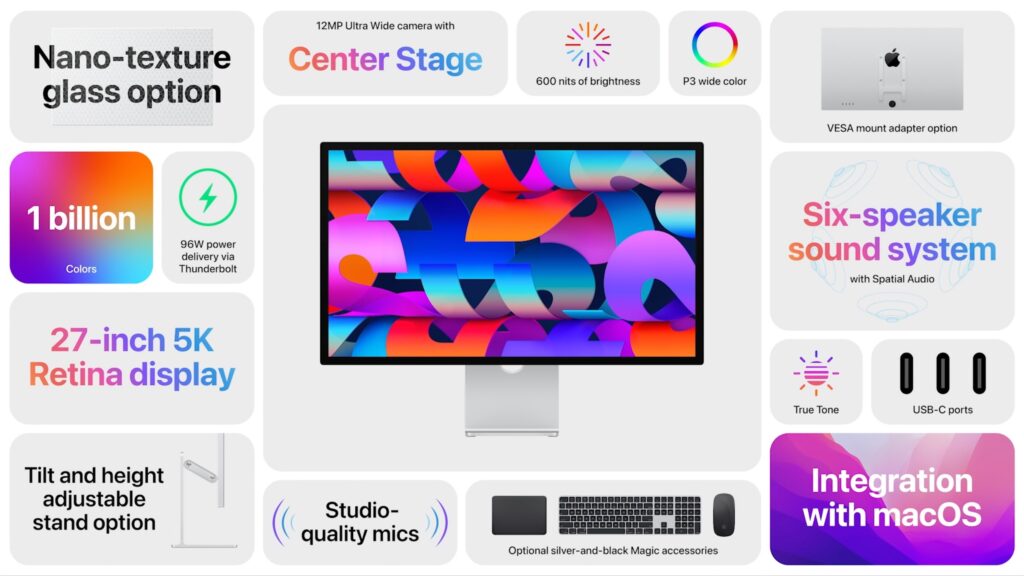
To address the Mac Studio’s lack of a screen, Apple introduced the $1599 Studio Display. It’s a 27-inch 5K Retina display with a native resolution of 5120-by-2800, P3 wide color, and True Tone technology. Nano-texture glass is a $300 option if you need less reflectivity. There are three stand options: a 30º tilt default, a VESA mount adapter, or a tilt- and height-adjustable stand for $400 more. Note that you can’t swap one for another later. The Studio Display offers one Thunderbolt 3 port to connect to a Mac—complete with 96-watt charging—and three USB-C ports for connecting peripherals.
What sets the Studio Display apart from other monitors is that it uses an A13 Bionic chip—the same brains in the iPhone 11—to power a 12-megapixel Ultra Wide camera with Center Stage (Apple’s technology for smoothly keeping you in the frame as you move around on a video call), a three-mic array with directional beamforming, and a high-fidelity six-speaker system. In short, this is the ultimate Mac videoconferencing setup. It even supports spatial audio when playing music or video with Dolby Atmos, and you can use “Hey Siri” with it.
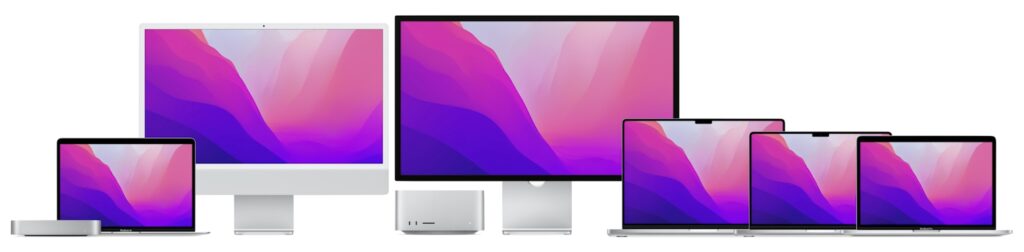
There’s one other fact you need to know before we put all this together: Apple said that the only remaining Mac to transition to Apple silicon is the Mac Pro, which means that it’s dropping the popular 27-inch iMac from the lineup. We’re sad since that iMac was a terrifically good deal, but if you’ve been waiting for an Apple silicon 27-inch iMac, the Studio Display suggests four alternative directions, depending on your needs. Remember that even the entry-level M1 chip outperforms the most recent Intel-based 27-inch iMac.
- Minimize desktop cost: If keeping costs down while sticking with Apple-designed desktop gear is important to you, couple a Mac mini with the Studio Display.
- Maximize desktop performance: Need the maximum performance on your desk? A Mac Studio driving one or more Studio Displays is the ultimate professional setup today.
- Minimize portability cost: Those who need portability and desktop screen real estate can get both without breaking the bank by combining a MacBook Air or 13-inch MacBook Pro and the Studio Display.
- Maximize portability performance: For top-notch portability, performance, and productivity, a 14-inch or 16-inch MacBook Pro is unbeatable when matched with one or even two Studio Displays.
Finally, don’t discount the 24-inch iMac. Although its screen is smaller than the 27-inch iMac’s, its Retina screen resolution isn’t far off, and it’s notably less expensive. If you mostly like the all-in-one nature of the 27-inch iMac and don’t need the performance of the Mac Studio or MacBook Pro, you won’t go wrong with a 24-inch iMac.
Both the Mac Studio and Studio Display are available to order now, with shipments starting on March 18th, although demand is already pushing some ship dates into April. Note that the Mac Studio doesn’t include any input devices, but Apple also introduced a new silver-and-black Magic Keyboard with Touch ID and Numeric Keypad ($199), Magic Mouse ($99), and Magic Trackpad ($149) designed to complement the Studio Display.
Third-generation iPhone SE Gains A15 Bionic and Better Camera
Not everyone wants—or at least wants to pay for—the latest and greatest. For those looking for a small iPhone at a reasonable price, the new third-generation iPhone SE is still a bargain. Prices start at $429 thanks to its 4.7-inch screen in an iPhone 8 design and Touch ID-enabled Home button. That’s $30 more than the previous generation, but you get the same A15 Bionic chip that’s in the iPhone 13 line and Apple’s promise that iOS will support it for years to come. The new iPhone SE also gains 5G support for faster cellular Internet connectivity, though it doesn’t support the fastest millimeter-wave flavor of 5G.
The A15 Bionic’s processing power enhances the 12-megapixel camera, providing computational photography capabilities like Smart HDR 4, Photographic Styles, Deep Fusion, and Portrait mode. The A15 Bionic’s image signal processor also improves video quality, particularly in low-light situations. Despite the increased performance, Apple says the new iPhone SE features better battery life than the second-generation iPhone SE and all previous 4.7-inch iPhone models. (Generally speaking, the bigger the iPhone, the better the battery life, thanks to additional room inside.)
You can order the new iPhone SE, which comes in midnight (black), starlight (white), and PRODUCT(RED), starting at 8 AM Eastern on March 11th, with delivery starting on March 18th. The 64 GB model costs $429, 128 GB costs $479, and 256 GB is $579.
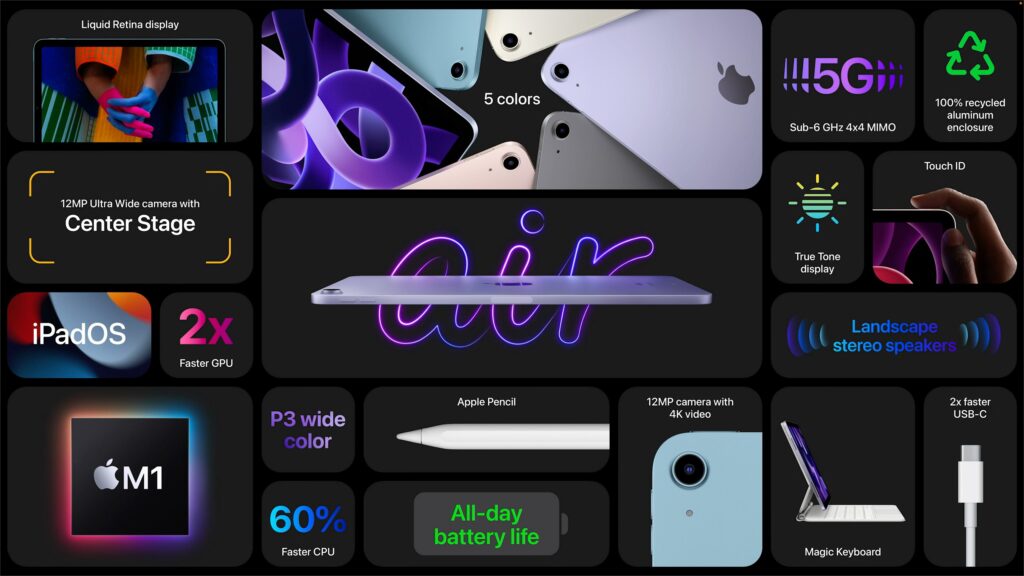
Fifth-generation iPad Air Moves to M1 and 5G
For many people, the $599 iPad Air is the sweet spot of the iPad line, fitting nicely between the $329 iPad and the $799 11-inch iPad Pro. However, the fourth-generation iPad Air had fallen behind in a few ways, making its price less palatable.
The new fifth-generation iPad Air makes the price compelling again, thanks to the move to the same M1 chip used in the iPad Pro (and many Macs). It boasts up to 60% faster CPU performance than the previous model and twice the graphics performance. Even more noticeable in this age of videoconferencing is the addition of an Ultra Wide front-facing camera with Center Stage. Those who need speedy connectivity on the go will appreciate the new 5G support, though it doesn’t support the fastest millimeter-wave 5G. Apple also doubled the throughput for the iPad Air’s USB-C port, but it remains slower than the Thunderbolt port in the iPad Pro models.
Other key specs remain the same, including the size and industrial design, Touch ID in the top button, support for the second-generation Apple Pencil, rear-facing camera, and battery life.
As with the new iPhone SE, pre-orders for the new iPad Air open at 8 AM Eastern on March 11th, with delivery starting on March 18th. It comes in five new colors: space gray, pink, purple, blue, and starlight (white). $599 gets you 64 GB of storage, whereas 256 GB costs $749. Add another $150 for a cellular-capable model.
(Featured image by Apple)
Social Media: At its March 8th Peek Performance event, Apple unveiled the impressive new Mac Studio—powered by the M1 Ultra chip—and Studio Display. The company also introduced an updated iPhone SE and iPad Air. Read on for details: