Posts

Unsubscribe from Marketing Email to Lighten Your Inbox Load

Are you overwhelmed by email? Is your Inbox filled with promotions, special offers, and the like? These messages aren’t spam—you almost always bought something from the company or have some sort of relationship with the sender—but that doesn’t mean you want to hear from them repeatedly. Luckily, it’s easy to get off the lists of legitimate senders. Just scroll to the bottom of each message and look for an unsubscribe link. Often it will be the word “Unsubscribe” or an instruction to “click here to remove yourself.” Click the link and, if necessary, click an Unsubscribe button on the resulting Web page. Then delete the message and move on to the next one. After a week or so of doing this regularly, you should start to notice a marked decrease in unwanted messages.

(Featured image by Sharon McCutcheon on Unsplash)

Invoke Split View More Easily in Catalina

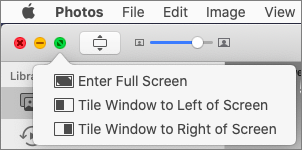
Split View on the Mac helps you focus on your work in one app—perhaps a word processor—while providing access to one other app, like a Web browser. (Make sure “Displays have separate Spaces” is selected in System Preferences > Mission Control.) Before macOS 10.15 Catalina, you had to click and hold on the green full-screen button in the upper-left corner of any window, drag that window to one side of the screen, and click a window on the other side to put them side by side. Catalina makes this easier to discover: hover over the green full-screen button briefly and then choose Tile Window to Left of Screen or Tile Window to Right of Screen before selecting a window on the other side of the screen. If you don’t want a 50-50 split, drag the black divider bar between the windows to adjust the proportions. To leave Split View, move your pointer to the top of the screen to reveal the menu bar and then click the green full-screen button.

(Featured image by Adam Engst)

Set Your Preferred Name and Photo for Messages in iOS 13

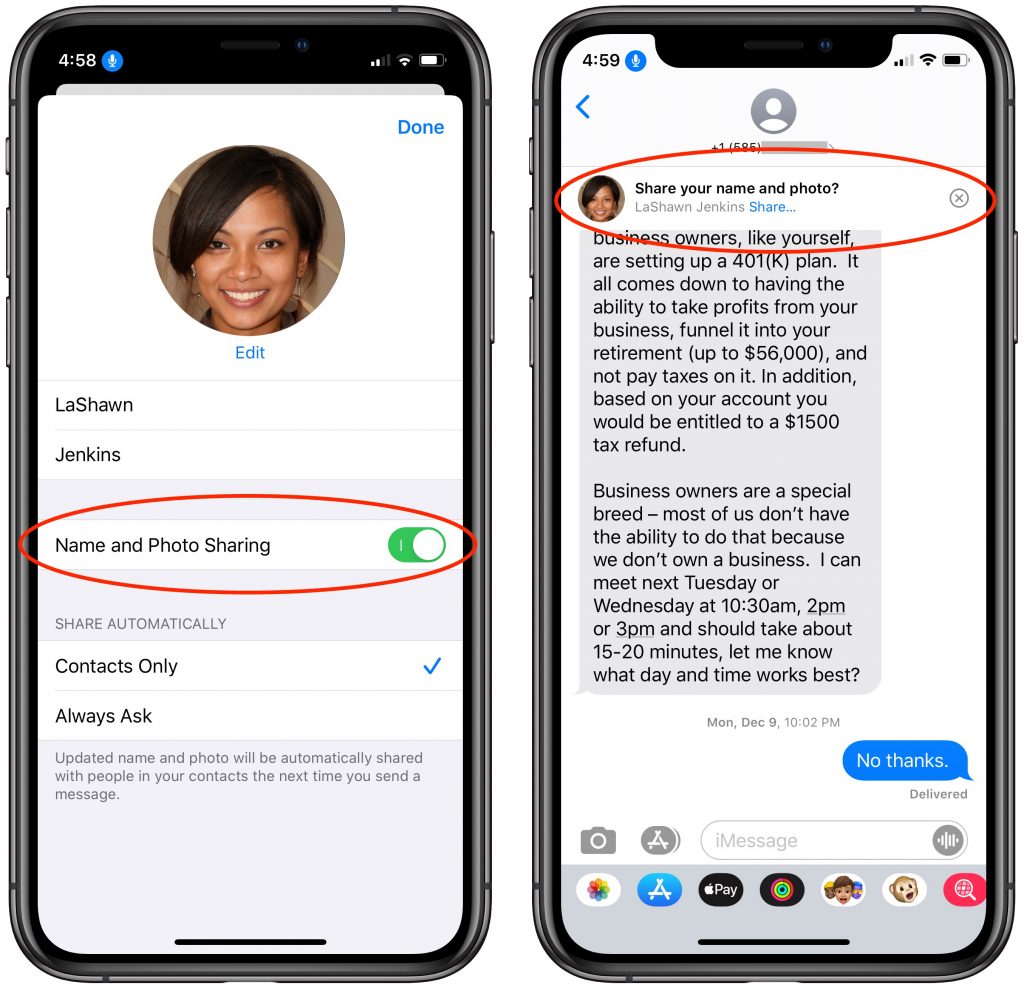
In your list of conversations in Messages, you probably have lots of people who have generic icons next to their names or numbers. You likely look like that to other people as well, but a new feature in iOS 13 lets you share your preferred name and avatar picture with other iMessage users (blue-bubble friends). In Messages, first tap the ••• button and then Edit Name and Photo. Then, in the activity view that appears, tap Edit under your photo to select a new photo and set your name as you want it. Make sure Name and Photo Sharing is enabled before tapping Done. From now on, for any iMessage conversations, you’ll see a little banner at the top that asks if you want to share your name and photo. Do so and your recipient will get a prompt to replace whatever they’re seeing for you. (And if, as a recipient, you don’t want to accept the new photo, tap the X button at the right of the prompt.)

(Featured image by Daniel Frese from Pexels)

Disable or Remap the Caps Lock Key to Avoid Accidental ALL CAPS

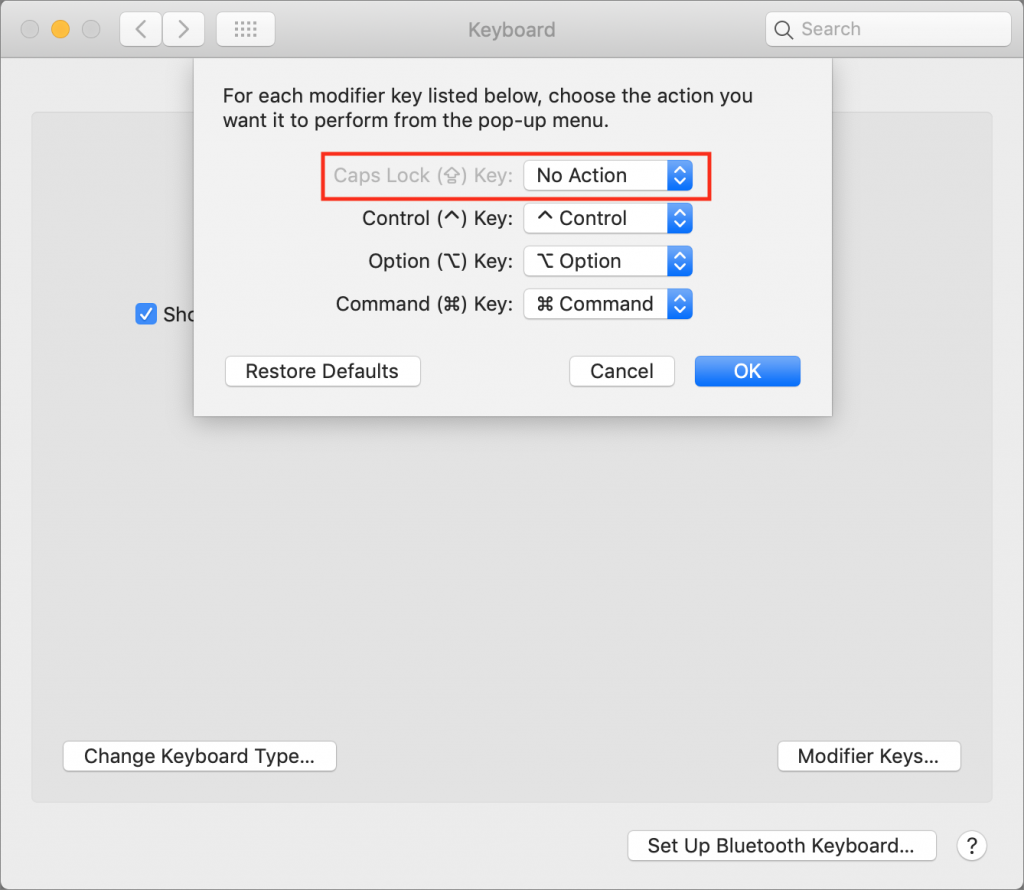
As you undoubtedly know, TYPING IN ALL CAPS is considered shouting on the Internet. Doesn’t it bug you when you accidentally tap the Caps Lock key and start writing in uppercase? The Caps Lock key is vestigial—it was invented as a “Shift lock” key to make it easier to type the second characters on the keys of a mechanical typewriter without also holding down the Shift key the entire time. It’s seldom useful on a computer; Google replaced it with a Search key on Chromebook keyboards. It still appears on all of Apple’s keyboards, but macOS lets you disable or remap it. In System Preferences > Keyboard > Keyboard, click the Modifier Keys button. In the dialog that appears, choose No Action (or another key) from the pop-up menu next to Caps Lock. Click OK and you’re free from accidental capitalizations.

(Featured image based on an original by Scott Webb from Pexels)

Preparing Your Organization for a Possible COVID-19 Quarantine

As of this writing, the respiratory disease COVID-19 has caused nearly 3000 deaths and infected over 80,000 people worldwide. There are relatively few cases in North America currently, but that could increase significantly. For high-quality information about COVID-19, turn to the World Health Organization and the US Centers for Disease Control and Prevention.

For now, the Centers for Disease Control are recommending sensible precautions. They include regular hand washing or using alcohol-based hand sanitizer, covering coughs and sneezes (with your elbow), and staying home and avoiding public spaces if you’re feeling unwell. (These are smart things to do during flu season anyway, given that 10,000 people in the US have died of influenza already this season.)

What if local health officials were to declare a quarantine? Without lapsing into doomsday scenarios, it is always reasonable to make sure that you are personally ready for a natural disaster or other emergency. The Prepared has a detailed guide to help you prepare for a COVID-19 scare or quarantine.

We want to focus on how organizations—either those you run or work for—might prepare for a public health scare or possible quarantine, particularly in the context of your technology use. Here are our thoughts, and contact us if you want help with your preparedness plans.

Infection Prevention

If your organization has numerous employees or serves the public, put some thought into how you can reduce the chance of infection. That might include providing hand sanitizer dispensers, wiping down frequently touched surfaces with household cleaners, and a more frequent cleaning schedule for restrooms.

For an Apple-specific tip, try using or encouraging the use of Apple Pay to reduce the need to touch credit card terminals!

Also, it’s best to avoid shaking hands with customers and colleagues. Perhaps the Japanese custom of bowing will gain traction elsewhere in the world.

Internal Communications

In the event that public health officials discourage people from gathering, think about how your company will communicate internally with people working from home. Many organizations allow such flexibility now anyway, so it’s likely that yours has at least informal communication channels via phone and email, and chat systems like Slack.

Consider formalizing those channels if need be, and if your directory service doesn’t already contain this information, publish a list of phone numbers and email addresses so everyone can contact co-workers easily. If your organization relies on IP telephony, make sure everyone understands how to use softphones or can configure an office phone at home. If you have a switchboard, investigate how it can be operated remotely.

If your organization’s email system is usually available only from computers owned by the organization, make sure webmail access is enabled and that everyone understands how to access it. Similarly, it’s worth making sure everyone has email access from their phones.

Chat systems like Slack or Microsoft Teams can be effective ways for far-flung groups to communicate because they provide real-time communication segregated into topic- or group-specific channels. If you’re not already using such a system and would like to investigate adding it to your communications strategy, contact us for advice.

Remote Access to Organizational Services

For connectivity to office-based file servers and other systems, make sure everyone has access to your VPN and knows how to use it. (Don’t have a VPN, or virtual private network? Again, call us—a VPN is an essential way to provide remote access while ensuring security.)

Are there any specialized servers or services, such as an accounting system, that have security safeguards related to specific access points? Think about what additional access may need to be provided for an employee working from home.

Physical Environment

If most or all employees are working from home, what does that mean for your office? Do physical security systems or climate settings need to be adjusted? Do you want to set up video cameras or other remote monitoring hardware? Who’s going to water the plants? On a more serious note, if you have on-premises servers, make sure they can be administered entirely remotely, including power cycling.

It’s also worth determining who will have responsibility for the office in the event of problems, which could still occur even if no one is there. What if a water pipe in the building breaks, or there’s a burglary? Make sure it’s clear who will respond.

Business Functions

Think about the regularly scheduled aspects of running the business, with an eye toward those that might assume the presence of certain people. Can they run payroll, accounts receivable, and accounts payable remotely? Make sure that every key position has at least one backup, so if one person falls ill, the organization’s ability to function won’t be compromised.

If international travel is a significant part of your organization’s mission, you’re already figuring out how to compensate through videoconferencing and similar technologies. But if you regularly travel only within the country or your area, think about which trips are essential and which can be replaced using online conferencing tools.

Finally, consider how your clients and customers will react to the situation. It’s unfortunately likely that there will be less work taking place, so you may see decreased revenues, but certain organizations may see an increased workload. For instance, if the number of patients in hospitals skyrockets, those who support healthcare systems may struggle under the load alongside the doctors and nurses.

We certainly hope that all these preparations prove unnecessary, but they’re worthwhile regardless. Too many businesses have failed after a fire, hurricane, or earthquake renders an office uninhabitable, and such natural disasters are all too common. As the Boy Scout motto says, “Be prepared.”

(Featured image based on an original by Gerd Altmann from Pixabay)


Social Media: How would your organization react to a COVID-19 scare or quarantine? Here’s how you can use technology to respond to such an event.

Make Your Own Keyboard Shortcuts on the Mac

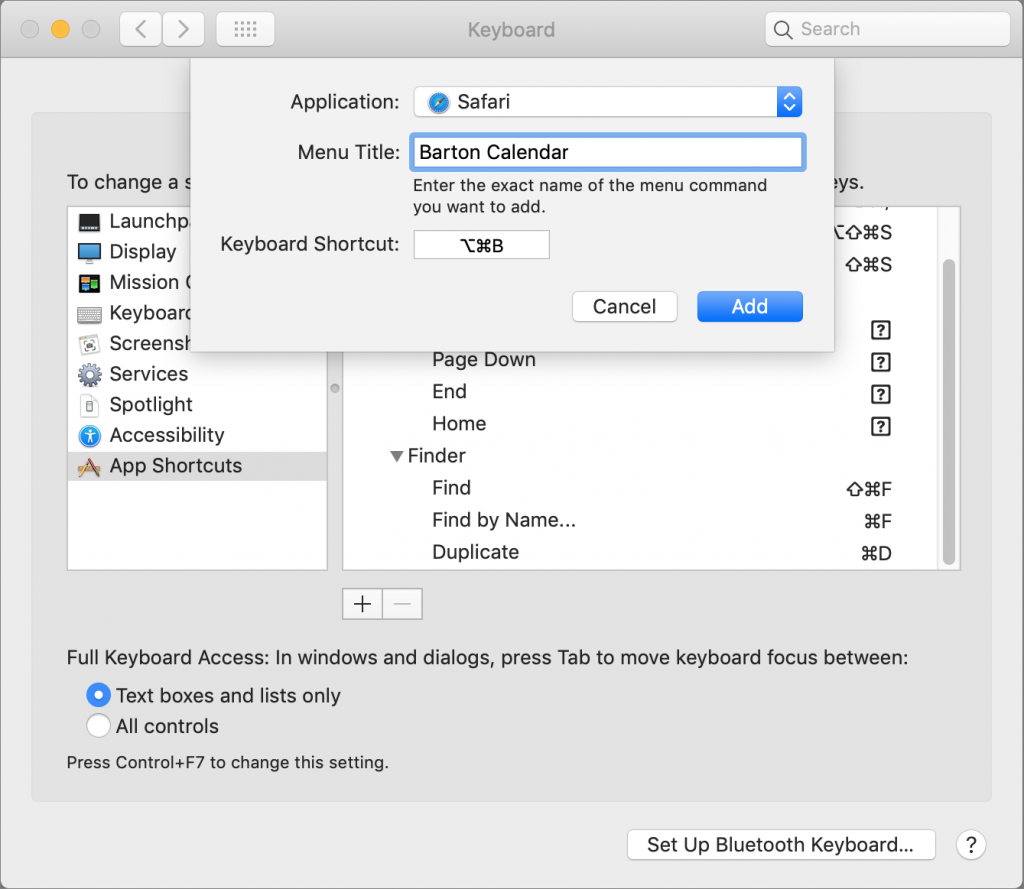
Power users like keyboard shortcuts because it’s faster to press a couple of keys than to navigate lengthy menus. If you have trouble remembering shortcuts, check out KeyCue, which displays a concise table of all currently available shortcuts. But what about menu items that lack shortcuts? Make your own in System Preferences > Keyboard > Shortcuts > App Shortcuts. Click the + button, choose an app from the Application menu, fill in the Menu Title field, click the Keyboard Shortcut field, press your desired key combination, and click Add. You can even make shortcuts for Safari bookmarks, since they appear in the Bookmarks menu. If a shortcut doesn’t work, make sure you typed its menu title exactly right, including any punctuation like three periods for an ellipsis. To edit an item, double-click its title or shortcut in the list. If you no longer want an item, select it and click the – button.

(Featured image by Ilya Pavlov on Unsplash)

Is Your iPhone Reporting “No Service” When You Know There’s a Signal?

Have you ever seen the dreaded “No Service” label at the top of your iPhone’s screen, even when you’re pretty sure there should be cellular reception? It’s not common, but the iPhone’s cellular radio can occasionally get confused. Luckily, you can easily fix the problem. Open Control Center (swipe down from the upper-right corner on an iPhone X or later or an iPad; or up from the bottom on an earlier iPhone) and tap the airplane icon to put the iPhone in airplane mode. That turns off the cellular radio. Wait a few seconds and tap the airplane icon again to re-enable the cellular radio. If that doesn’t work, power-cycle your iPhone by holding the side or Sleep/Wake button until you see the Power Off slider. Slide it to turn the iPhone off, then press and hold the side or Sleep/Wake button again until the iPhone restarts.

(Featured image based on an original by Pexels from Pixabay)

Make Your Mac More Useful by Managing Menu Bar Icons

If your Mac is anything like ours, it’s suffering from an infestation of menu bar icons. Sure, the Wi-Fi menu is essential, and many others can be helpful. But if you have too many, or they’re in random order, finding one when you need it can be frustrating. You can employ two techniques to increase the accessibility of your menu bar icons:

  • Delete any Apple-provided status icon you don’t use by holding down the Command key and dragging it off the menu bar. (To put it back, select the “Show icon-name status in menu bar” checkbox in the associated System Preference pane.) Command-dragging to delete won’t work for most apps with a menu bar icon; for them, look for a preference in the app itself.
  • Rearrange the menu bar icons in an order that makes sense to you by Command-dragging them around. You can’t move the Notification Center icon or put anything to its right, but every other icon is movable.

(Featured image based on an original by Patrick Ward on Unsplash)

The Fastest Way to Change Wi-Fi Networks in iOS 13

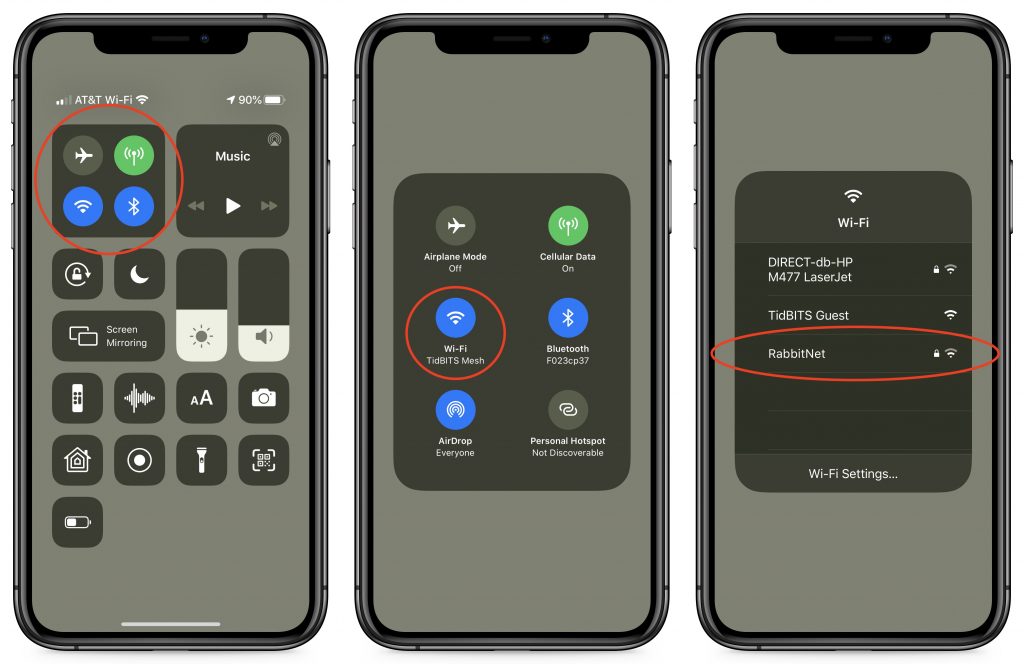
Historically, picking a new Wi-Fi network has required you to open the Settings app and tap Wi-Fi, forcing you to unlock your iPhone or switch away from what you were doing. In iOS 13, however, Apple added a better way to connect to a new Wi-Fi network. Open Control Center (swipe down from the upper-right corner on an iPhone X or later or an iPad; or up from the bottom on an earlier iPhone), press and hold on the network settings card in the upper-left corner to expand it, and then press and hold on the Wi-Fi icon to reveal a list of Wi-Fi networks. Tap one to switch to it.

(Featured image by Paul Hanaoka on Unsplash)

Strategies for Moving from Mojave to Catalina

For some Mac users, macOS 10.15 Catalina is no longer a choice. That’s because the new 16-inch MacBook Pro and the 2019 Mac Pro that Apple released late last year ship with Catalina installed and can’t run any previous version of macOS.

But for most people, it’s time to consider an upgrade to Catalina. Most backup software now works with Catalina’s bifurcated drive approach that puts the system on a separate, read-only volume from your data and apps. We’ve all had several months to come to terms with the fact that old 32-bit apps won’t even launch in Catalina. And Apple has shipped several updates that bring Catalina to version 10.15.3, addressing most of the complaints users had with the initial release.

If you are ready to try Catalina but still want to use 10.14 Mojave, we have some advice for how to make that happen. This could be the case for someone who has purchased a new Mac that does support Mojave but came with Catalina installed, for someone who wants to test Catalina while still using Mojave, or for someone who wants to move on to Catalina but has a 32-bit app that they aren’t ready to say good-bye to.

Downgrade from Catalina to Mojave on Some New Macs

Apple has started installing Catalina on new Macs other than the 16-inch MacBook Pro and 2019 Mac Pro, but since these older Macs can still run Mojave, it’s possible—if a bit tricky—to downgrade them to Mojave.

System engineer Armin Briegel has worked out a way of downgrading new Macs to Mojave. First, you create a Mojave Installer USB drive. To use that drive to boot a Mac with a T2 security chip, you must allow external booting from the Security Utility on the Recovery partition. Once you’ve booted from your Mojave Installer drive, use Disk Utility to erase the entire internal drive. Then install Mojave.

Use Virtualization to Keep 32-bit Apps Running

For some people, what’s keeping them on Mojave is a single 32-bit app that will never be updated in an appropriate fashion. Quicken 2007 falls into this category, as does the ScanSnap Manager app for the ScanSnap S1300, S1500, and S1500M scanners. Sure, you can get a current version of Quicken, but it may not do precisely what you want, and Fujitsu would be happy to sell you a new ScanSnap scanner that does come with 64-bit software, but then you’ll have to figure out what to do with your old scanner.

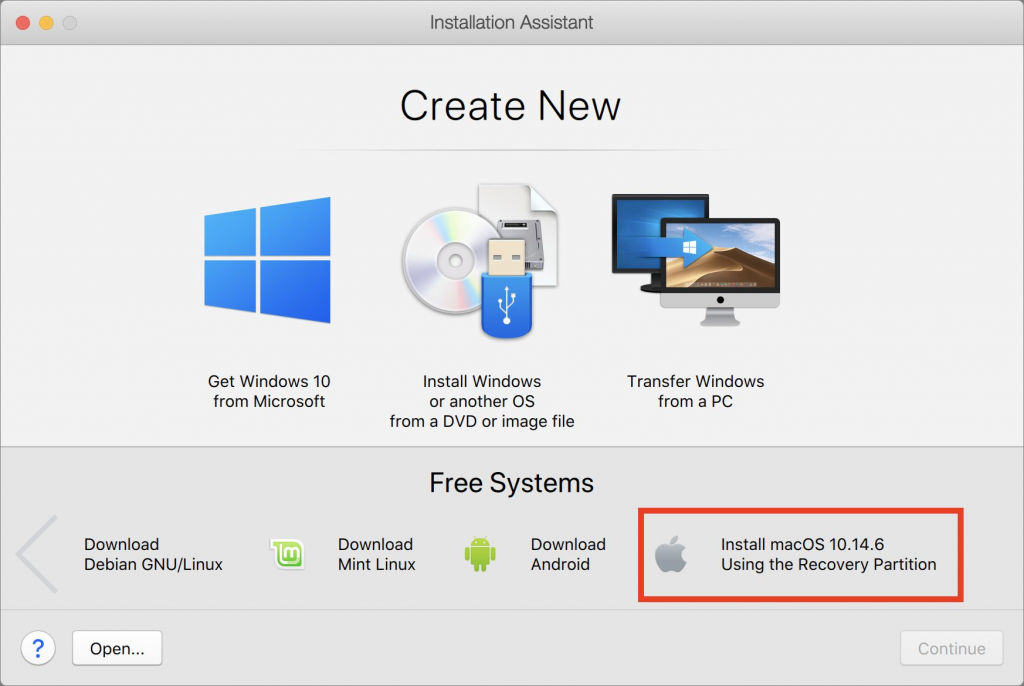
So if you’re ready to upgrade to Catalina in general but need to maintain access to one or two apps, one solution is virtualization software: either Parallels Desktop or VMware Fusion. Both apps let you run nearly any operating system—including older versions of macOS like Mojave—in a virtual machine. In essence, they fool the guest operating system, whether it’s Mojave or Windows, into thinking it’s running normally on a computer, when it’s actually running in a virtual environment.

These apps cost about $80, and while there’s a bit of work in setting them up (the screenshot below shows the option for installing Mojave in Parallels Desktop during setup), once you have them configured, it’s easy to run older apps alongside newer ones with little or no performance hit. This approach is also perfect for a 16-inch MacBook Pro or Mac Pro that can’t run Mojave in any other way.

Install Catalina and Mojave on Separate APFS Volumes and Switch Boot

Finally, there’s one other option that lets you switch back and forth between Mojave and Catalina, assuming your Mac supports Mojave. You can create an APFS volume on your internal drive and install another version of macOS on that. It’s easy, and Apple provides full instructions. The only problem with this approach is that you’ll have to restart to switch operating systems, whereas both are available simultaneously with the virtualization solution.

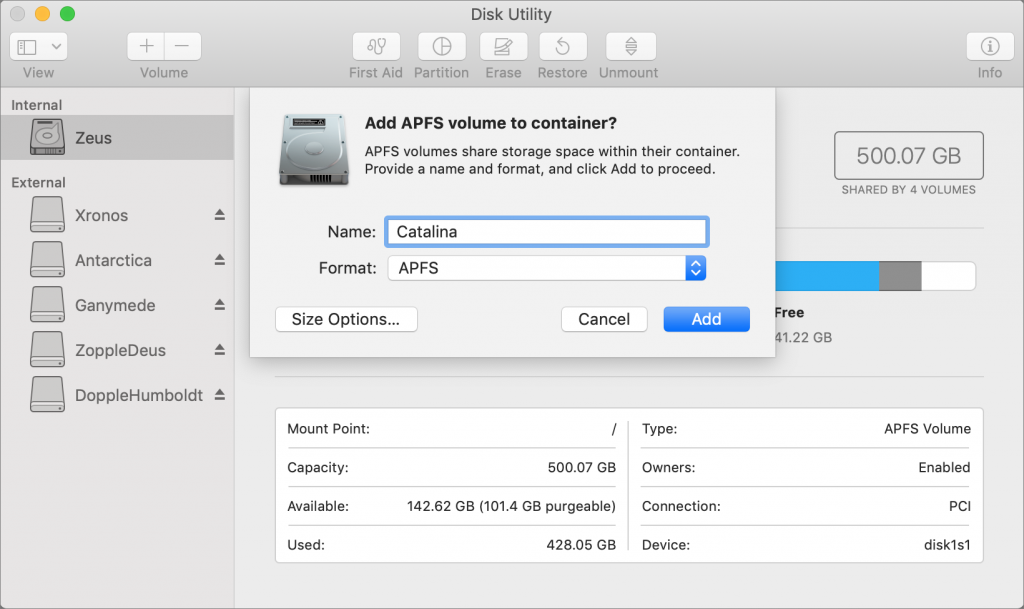
First, make sure you have at least one current backup of your Mac, since it’s foolhardy to adjust your drive structure without one. Next, in Disk Utility, select your internal drive, choose Edit > Add APFS Volume, and click Add. We recommend naming the drive such that it will be clear what’s on it.

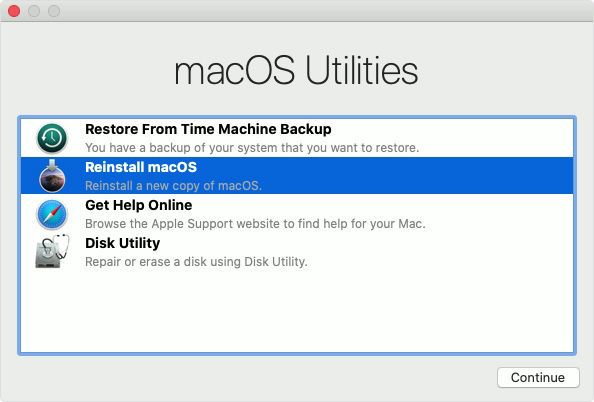
Then boot into macOS Recovery and install the desired version of macOS on your new volume. The keys you hold down to get into Recovery determine which version of macOS you’ll get:

  • Command-R reinstalls the latest version of macOS that was installed on your Mac.
  • Command-Option-R upgrades to the latest version of macOS that’s compatible with your Mac.
  • Command-Shift-Option-R reinstalls the version of macOS that came with your Mac, or the closest version still available.

Choose Reinstall macOS from the macOS Utilities window and proceed from there.

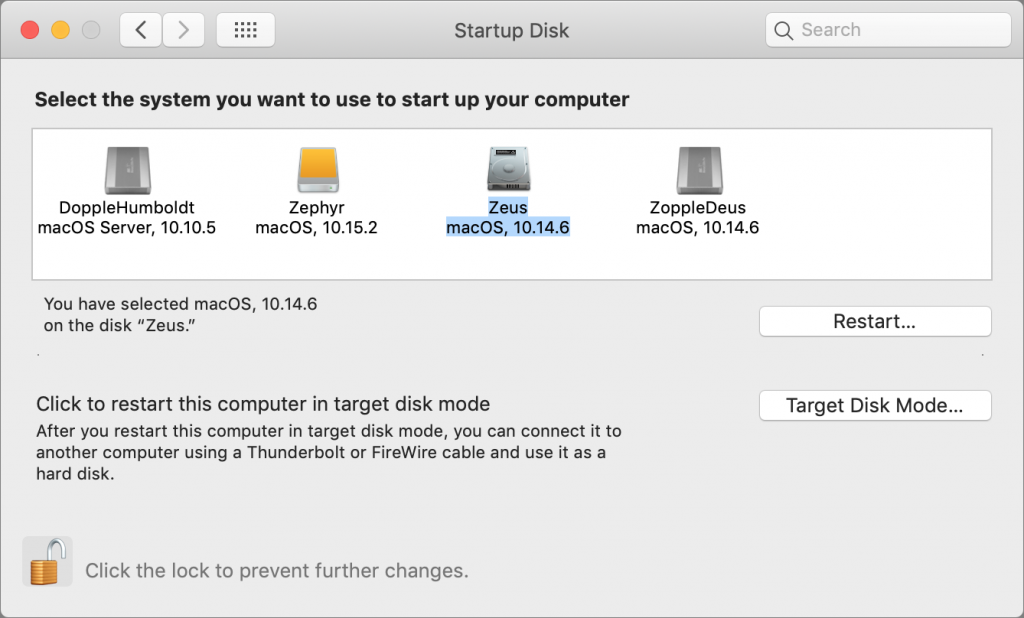
Once the installation is complete, to switch from one version of macOS to another, open System Preferences > Startup Disk, choose the desired volume to boot from, and then click Restart. Or, press Option at startup and select the desired volume from the Startup Manager screen.

Needless to say, the decision about when and how to upgrade to Catalina isn’t a trivial one, so feel free to contact us to discuss your particular situation or to get help with any of the procedures that we’ve described in this article.

(Featured image by Apple)


Social Media: Considering upgrading to Catalina? Or maybe you have a new Mac that came with it already installed? Read on for strategies for downgrading to Mojave or running both Catalina and Mojave.