When discussing digital security, we typically focus on preventive measures, such as using strong passwords with a password manager, enabling multi-factor authentication, keeping systems up to date, maintaining regular backups, and training employees to recognize potential security threats. While these practices are essential, they don’t guarantee complete protection.
No one is immune to online attacks—the most security-conscious organizations and individuals can still become victims. Even security experts occasionally click something they shouldn’t have or forget to keep a little-used system up to date. A single employee opening a convincing phishing email, a momentary lapse in judgment, or a zero-day vulnerability can lead to devastating consequences.
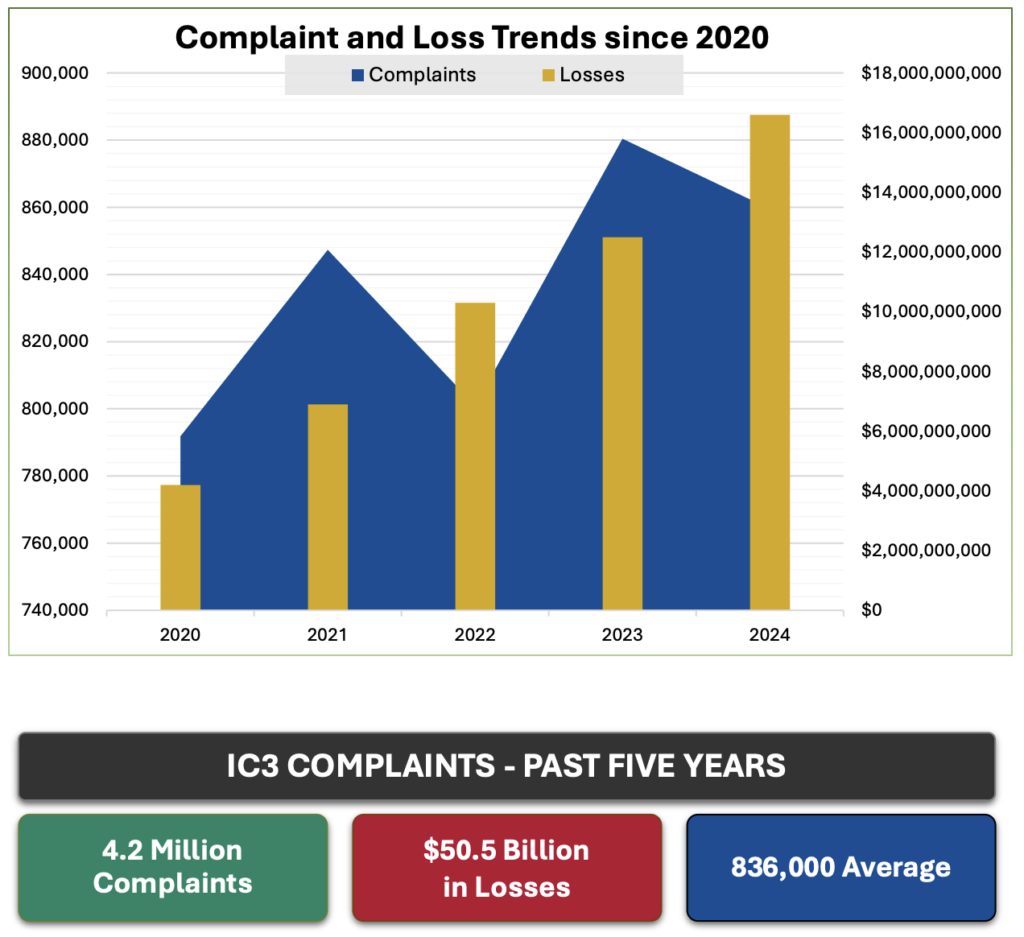
According to the FBI’s Internet Crime Complaint Center (IC3), cybercrime-related losses from 2020 through 2024 are estimated at $50.5 billion, with IC3 receiving 4.2 million complaints. Most concerning is the rising trend in the frequency and severity of these attacks.

Given these statistics and the reality that perfect security is impossible, many are looking to protect themselves from possible financial losses. Just as fires and accidents make home and auto insurance necessary, these ever-increasing threats from phishing, malware, and other forms of digital attack make cyber insurance an important consideration for both companies and individuals. We’ll focus on businesses here and explore personal cyber insurance in a future article.
What Is Business Cyber Insurance
Cyber insurance for businesses helps companies recover from security breaches and online attacks. Unlike traditional business insurance policies, cyber insurance focuses on the risks of using technology to operate or to store sensitive data online. Businesses of all sizes are vulnerable, but small and medium-sized businesses are often targeted because they lack the robust security infrastructure of larger enterprises.
Industries that are especially at risk include healthcare, financial services, retail, and professional services, but no sector is immune. You may have cause for additional concern if your company collects customer information, processes payments, or maintains a significant online presence, but realistically, every business that uses email or conducts online banking is vulnerable.
What’s Covered
A business cyber policy typically includes two core types of coverage:
- First-party coverage: This coverage responds to direct costs incurred by your company, including legal expenses, data breach response and notification costs, ransomware payments and recovery expenses, business interruption losses, data restoration, system replacement, and crisis management.
- Third-party coverage: Also known as liability insurance, this coverage protects you against claims from others affected by the breach, including legal defense costs, settlements, regulatory fines and penalties, and PCI-related fines associated with credit card processing.
What’s Not Covered
However, it’s essential to be aware of common exclusions to business cyber insurance, the most important of which are:
- Weak security processes: Insurance doesn’t exempt you from maintaining a strong security stance—if you aren’t requiring strong passwords, providing security training, and correcting known vulnerabilities, the policy won’t cover you. Insurers will likely require verification of minimum cybersecurity practices before providing coverage.
- Prior breaches: Just as health insurance may not cover pre-existing conditions, cyber insurance typically does not cover events that occurred before the policy was taken out.
- Insider attacks or misconduct: Deliberate or fraudulent acts by company leadership or employees generally aren’t covered. Employees are a company’s greatest resource, but they can also be its greatest weakness.
Shopping for Business Cyber Insurance
How much will business cyber insurance cost? It varies based on your company size and revenue, industry sector, type and amount of sensitive data stored, security practices, coverage limits and deductibles, and claims history. That said, small businesses with yearly revenues under $1 million typically have annual premiums ranging from $500 to $2,000. Mid-sized firms often pay between $2,000 and $10,000, and large companies can expect premiums in the tens of thousands.
It’s common—and entirely understandable—to hesitate to purchase cyber insurance due to concerns about the cost. However, the potential financial impact of an incident is often significant. IBM’s 2024 Cost of Data Breach Report found that the average cost of a data breach was $4.9 million globally, but $9.4 million in the United States. Although IBM doesn’t break out costs by company size, those costs are likely for larger companies. Nonetheless, a Financial Times report notes that users at small and medium-sized businesses were twice as likely to encounter threats as those at large companies.
Choosing the right cyber insurance broker is as important as selecting the policy itself, and you’ll want to involve your security team in the search. Look for someone specializing in cyber coverage who has technical expertise in cybersecurity practices, strong relationships with underwriters, and a track record of providing active claims support. A good broker will not only find competitive pricing but also help tailor coverage to your specific risks and ensure you’re prepared to meet underwriting requirements.
When comparing cyber insurance options, pay attention to the details. Confirm that the policy addresses risks specific to your situation and provides sufficient financial protection for your potential exposure. Pay close attention to exclusions—there will be more than those listed above. Research the insurer’s claims process and reputation for responsiveness, as timely support during an incident is crucial. Finally, inquire about additional risk management services offered by the insurer that may provide valuable preventative resources to complement your coverage.
Start Researching Cyber Insurance Now
Unfortunately, the frequency and risk of cyber attacks are on the rise. Proactive security measures are key, but a single mistake or oversight could have dire outcomes. Cyber insurance provides an important safety net in the event of a breach or attack that evades your best efforts.
We won’t pretend that finding and purchasing cyber insurance is simple, but we can help with finding a good cyber insurance broker, evaluating the policy, answering application questions, and ensuring that your company meets the necessary security requirements.
(Featured image by iStock.com/Who_I_am)
Social Media: Cyber insurance can protect your business from crippling financial losses after a security breach. Learn what’s covered, what’s not, and how to shop for the right policy for your company.