Website Owners: Identifying Copyright Infringement Link Insertion Scams
We regularly warn Internet users about online scams and phishing attacks. Most of these are relatively easy to identify and avoid once you’re aware of telltale signs. Unfortunately, we’ve encountered a newer type of scam that’s more difficult to identify, partly because it plays on fears of legal action.
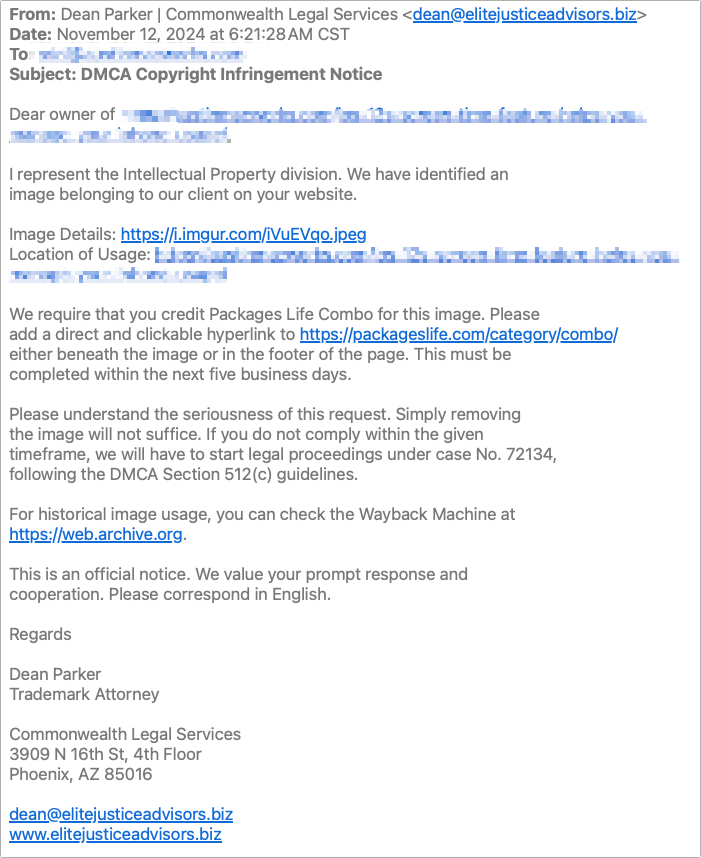
Website owners are the target of this scam email, which purports to come from a lawyer. The message states that an image on your site has been used without permission. Such a claim is all too believable for many, especially those who may not have been as careful about usage permissions in the distant past as they are today. The message includes a link to the image, a link to the purportedly infringing page, and a threat to initiate legal action if certain actions aren’t taken within five business days
Unusually, the email doesn’t ask you to take down the infringing image or pay a retroactive licensing fee. Instead, it says you must credit the image’s copyright holder and include a link. Such a simple request seems like a huge win—instead of paying a licensing fee or worrying about being sued, you can twiddle a little HTML and move on with your life.
Don’t do it! This is what’s called a “link insertion scam.” It exploits the search engine optimization principle that links on reputable sites provide legitimacy to linked sites, helping them move up in the search rankings. Unfortunately, the reverse is also true; linking to a scammer from your website will cause Google and other search engines to penalize your site in the search rankings.
Unfortunately, these copyright infringement scams look legitimate at first glance, as you can see in this example. The From and Subject lines don’t seem forged or malformed, and there are no obvious grammatical errors or indications that the writer doesn’t speak fluent English. And when you click the link in the signature, you end up at what appears to be the website of a real law firm. What should you do if you receive a message like this?
First, don’t panic. Just because the message looks legitimate doesn’t mean it comes from a real lawyer. Also, don’t call your lawyer unless they’re willing to work for free. You can save stress, time, and money by evaluating the message yourself.
A few details in the message suggest that it’s not real:
- The domain in the From line’s email address—elitejusticeadvisors.biz—sounds sketchy and doesn’t match the company name.
- The Subject line of “DMCA Copyright Infringement Notice” sounds official, but those familiar with the DMCA will know that it can be used only for a formal notice-and-takedown process, not to make demands for attribution or payment. But most people won’t know that.
- The message is addressed to the generic “Dear owner of,” whereas legitimate messages from a lawyer would be addressed to a specific entity.
- The required link URL points to a telecom news site in Sri Lanka, and it’s odd that an Arizona lawyer would be working for such a client.
- The example of the purportedly infringing image is hosted at Imgur, a consumer image-hosting site known for funny pet pictures and cringeworthy GIFs. Legal firms would always use some sort of case management site.
Those details may feel wrong, but they’re insufficient to prove it’s a scam. You’ll need to dig deeper. Here are some ways you can do that:
- Investigate the domain: Do a Web search on the domain in question: elitejusticeadvisors.biz. Because others have written about this scam, articles identifying it as a scam will appear on the first page of the results.
- Search for the lawyer and firm: The lawyer’s name is too generic to yield revealing results, but if you do a Web search on “Dean Parker Commonwealth Legal Services,” you’ll once again see that others have identified it as a scam.
- Check a state bar association directory: Most state bar associations or state courts have a searchable directory of licensed legal professionals. A quick search of the State Bar of Arizona’s member directory reveals that no “Dean Parker” is licensed in Arizona.
- See if the headshot matches a real person: If the website provides a headshot, you can copy the image (Control-click it and choose Copy Image) and paste it into the TinEye reverse image search engine. Since all the results say “generated.photos,” it’s a good bet that the image was AI-generated.

- Search for the company’s full name and address: As with the name of the lawyer, the generic-sounding name of the law firm will probably match other companies. However, if you search for the full name and address, you’ll likely turn up articles about it being fake.
- Visit the address virtually: With Apple Maps and Google Maps, you can verify that a business is present at a location (or not) and often view the offices using Google Street View. Both mapping tools show no law firm at the provided address. Additionally, the building does not have a fourth floor, as specified in the address.
- Ask ChatGPT: Now that ChatGPT has access to current Web information, it’s worth pasting the complete contents of the message into a ChatGPT conversation and asking it to tell you about the message. Start generally, but then ask if it thinks the message might be a scam, and if so, to suggest ways you could verify your suspicions.


Some of the above search suggestions identify the scam only because the scammer has reused the same company name, lawyer name, physical address, and website. If you were the first to be targeted by a new scam, the state bar association search and physical address check would be the most likely to expose it.
Let us leave you with an important caveat. You shouldn’t assume that all copyright infringement messages are scams. A legitimate DMCA takedown notice will ask you to remove the content, and a real copyright infringement message—probably from a company that specializes in such matters rather than a lawyer—will likely demand payment. In both cases, take down the offending image right away. If you really were using an image without permission, some payment may be required, and if the amount feels excessive, contact a lawyer specializing in copyright infringement cases. They may be able to negotiate a lower payment or point out issues that will make the claim go away.
(Featured image based on an original by iStock.com/Olivier Le Moal)
Social Media: If you receive what looks like a copyright infringement message complaining about an image on your website, don’t panic—it might be a scam. We help you identify such scams and explain what to do if the message turns out to be real.