Posts

Ever Wanted to Get a Custom Email Address? Here’s How (and Why)

Some facts about ourselves are difficult or impossible to change, but your email address doesn’t have to be one of them. Switching to a custom email address might seem overwhelming, and it will take some time, but it’s not that hard or expensive (and we’re always happy to help if you get stuck).

Why Consider Switching to a Custom Address?

Why would you want to take on such a task? Independence. If you’re using the email address that came from your Internet service provider, you could end up in an awkward situation if you have to move and switch ISPs. Any address that ends in @comcast.net, @anything.rr.com, @verizon.net, @earthlink.net, or the like could be problematic. You also don’t want to rely entirely on a work email address—there’s no guarantee that your employer will forward email for you indefinitely if you take a different job.

Also, an email address says something about you, much as a postal address does—there’s a difference between an address on Central Park versus one in the Bronx. If you’re not happy with what your email address implies, you might want to switch.

What can an email address reveal? Those with a free Juno, Hotmail, or Yahoo account likely signed up years ago and don’t take email very seriously. People who use an @icloud.com, @me.com, or @mac.com address are clearly Apple users, and those with an address ending in @live.com, @msn.com, or @outlook.com are probably Windows users. .edu addresses identify students, teachers, and school employees—but if you’re not one anymore, your email looks like you’re wearing a varsity jacket in your 40s. The big kahuna of email is Gmail, which boasts about 1.5 billion users worldwide now—as a result, using a Gmail address is fairly generic.

The ultimate in independence comes when you register your own domain name, which usually costs less than $20 per year at sites like 1&1 Ionos, Domain.com, easyDNS, Directnic, and Register.com. Then your address can be anything you want at your new custom domain, and you never again have to worry about being tied to your ISP or associated with a free email host.

How to Change to a Custom Address

Step 1: Register a new domain name. The hard part here is thinking of a name that hasn’t already been taken. It’s best to stick with the traditional top-level domains like .com, .net, and .org—if you get into the new ones like .beer (yes, that’s available), your email is a bit more likely to be marked as spam. Most domain registrars will also host your email for you, and if you go this route, you can skip Step 2.

Step 2: If you’re already using Gmail or another independent email provider that isn’t tied to your ISP, log in to your account at your domain registrar and configure it to forward all email to your existing email address. In this case, you can skip Steps 3 and 4.

However, if you aren’t happy with your current email provider, you’ll need to set up an account with a new one. There are lots, but many people use a paid email provider like FastMail or easyMail that usually charges less than $50 per year and supports multiple mailboxes. When you set up the account, you’ll need to create one or more new email addresses at the provider and configure MX (mail exchange) records with your domain registrar—the service will provide instructions for this.

Step 3: If you’re changing email providers as part of this process, you’ll need to configure Mail—or whatever email client you’re using—to connect to your new email account with the login credentials you set up. That’s not hard, but being able to send email that comes from your custom address can require some effort with the free email providers. Gmail provides instructions, and others that support this feature will as well. Unfortunately, iCloud won’t let you send email using a custom address.

Step 4: If you’re moving to a new email provider, you’ll need to forward your mail from your old provider to your new custom address. Most email providers and ISPs have a screen somewhere in the account settings of their Web sites that lets you enter a forwarding address.

Step 5: Tell your family, friends, and colleagues about your new email address, and update mailing lists and accounts at sites like Amazon that send you email. The forwarding you set up in the previous step will ensure you don’t miss anything during the transition, but remember that if you cancel your old ISP account, that forwarding may end immediately, so it’s important to start the process well in advance.

The details will vary depending on your choice of domain registrar and email provider, so again, if you would like additional recommendations or assistance in setting all this up, just let us know.


Social Media: Setting up a custom email address with your own domain isn’t that hard or expensive, and it gives you independence from your ISP, employer, or the sketchy email provider you signed up with after college. Here’s how you can switch.

Getting Rid of an Old Mac? Follow These Steps to Prep It for Its Next Life

If a new Mac has recently arrived in your life, it may be time to hand your old Mac down to a friend or family member, pass it on to a coworker, or send it back to Apple for recycling. Here’s what to do.

Backup

Before anything else, make a backup, just in case. Do this even if you’ve already migrated your data to your new Mac, since it’s possible that data could have been corrupted during the transfer without you realizing. At minimum, update your old Mac’s Time Machine backup by clicking the Time Machine icon in the menu bar, and choosing Back Up Now. For extra safety, consider using an app like Carbon Copy Cloner or SuperDuper to make a bootable duplicate that will be easier to navigate if you need to recover a file.

Deauthorize iTunes and Other Apps

It’s uncommon for apps to have licensing schemes that are tied to your Mac’s hardware these days, but if you have any, such as those from Adobe, be sure to deauthorize or deactivate them.

However, there is one app that most people will need to deauthorize: iTunes. That’s because Apple allows you to play content purchased from iTunes only on up to five computers associated with your Apple ID, so be sure to deauthorize Macs that you won’t use again before passing them on.

To do this, open iTunes and choose Account > Authorizations > Deauthorize This Computer. Enter your Apple ID credentials when prompted.

If you’ve forgotten to do this, you can deauthorize all your computers once per year (and then add back those you still have). To do this in iTunes, choose Account > View My Account, and in the Apple ID Summary next to Computer Authorizations, click Deauthorize All.

Sign Out of iCloud

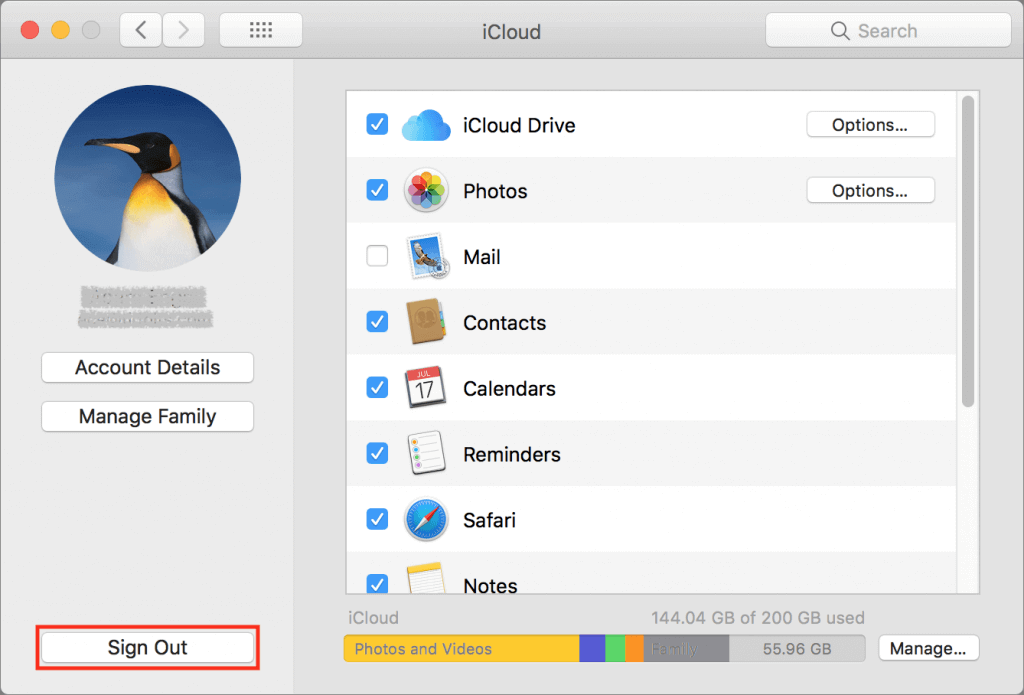
Next, you should sign out of iCloud to remove any connection between your iCloud account and the old Mac. Doing so disconnects the Mac from synchronization of your iCloud data.

To do this, open System Preferences > iCloud, and click the Sign Out button. If you’ve been syncing via iCloud Drive, Calendar, Contacts, Reminders, and so on, the Mac will ask if you want to keep the data on the Mac or delete it. Don’t bother deleting it since you’ll erase the Mac’s drive in a future step.

Sign Out of iMessage

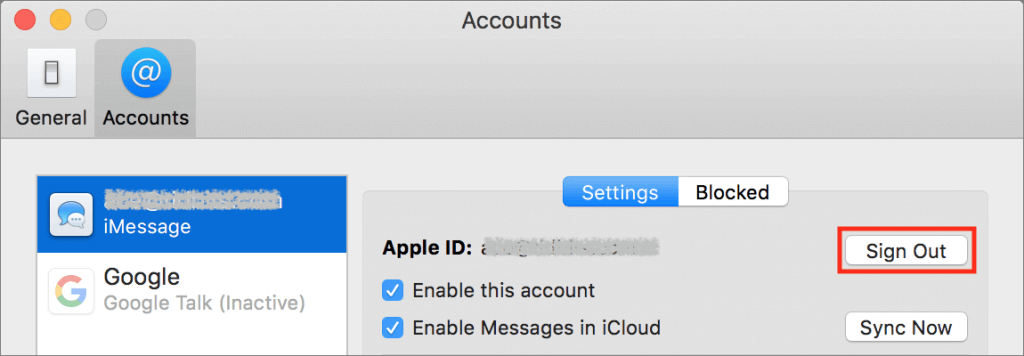
Much as with iCloud, you should sign out of your iMessage account, at least if your Mac is running OS X 10.8 Mountain Lion or later. To do this, open Messages and choose Messages > Preferences > Accounts. Select your iMessage account and click Sign Out. (In 10.14 Mojave, instead of clicking Accounts in the toolbar, click iMessage.)

Unpair Bluetooth Devices

If you’re giving your Mac to another user along with its Bluetooth devices, such as a wireless keyboard and trackpad, you don’t need to do anything with them. However, if you plan to hang on to your Bluetooth devices and use them with another Mac, you should unpair them. That’s especially true if someone else in your home or office will be using the old Mac, since the device might end up working on multiple Macs, which could cause confusion.

Before you unpair a wireless keyboard and mouse or trackpad, however, make sure you have a wired keyboard and pointing device available, since you won’t be able to erase the drive and reinstall macOS without them. If you lack wired alternatives, don’t unpair your keyboard and pointing device.

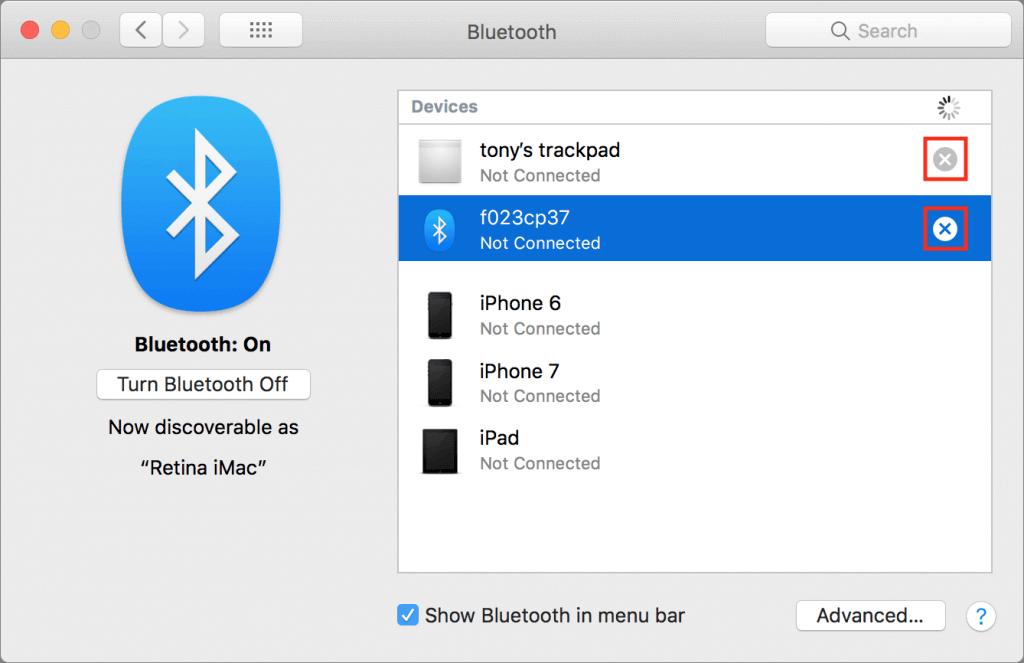
To unpair Bluetooth devices, open System Preferences > Bluetooth, and in the list of devices either hover over a device or select it. Then click the X button to the right. When prompted, click Remove.

Erase the Drive and Reinstall macOS

Here’s the most important step—erasing the Mac’s drive. After all, you don’t want the next user to be able to access all your photos, documents, email, and more. Luckily, this is easy to do.

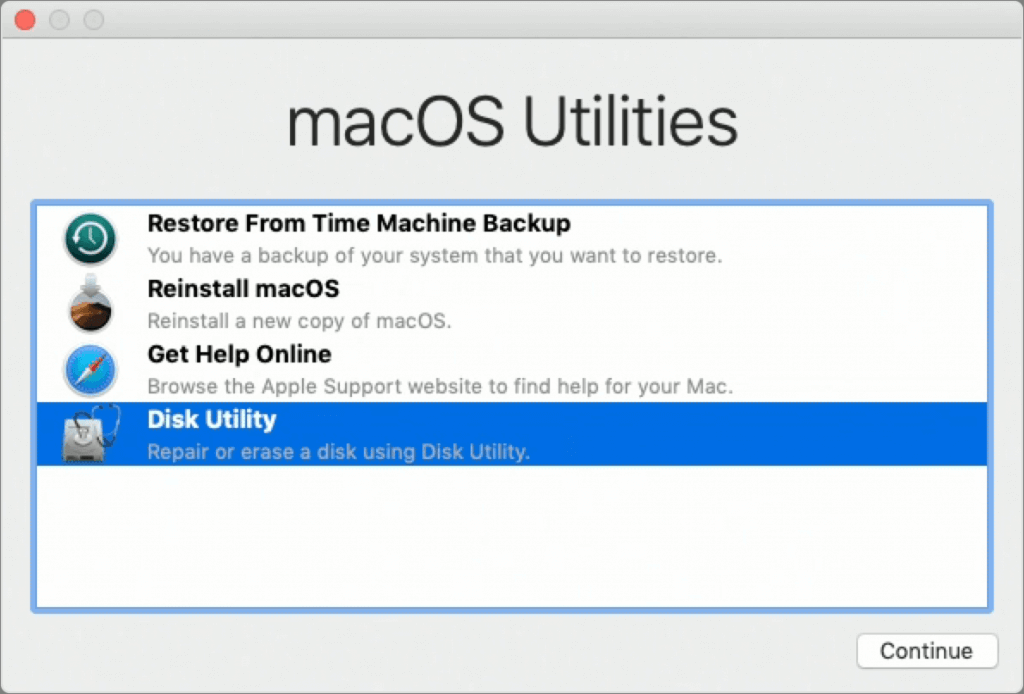
First, start up from macOS Recovery by holding down Command-R while the Mac boots. In the macOS Utilities window that appears, select Disk Utility and click Continue.

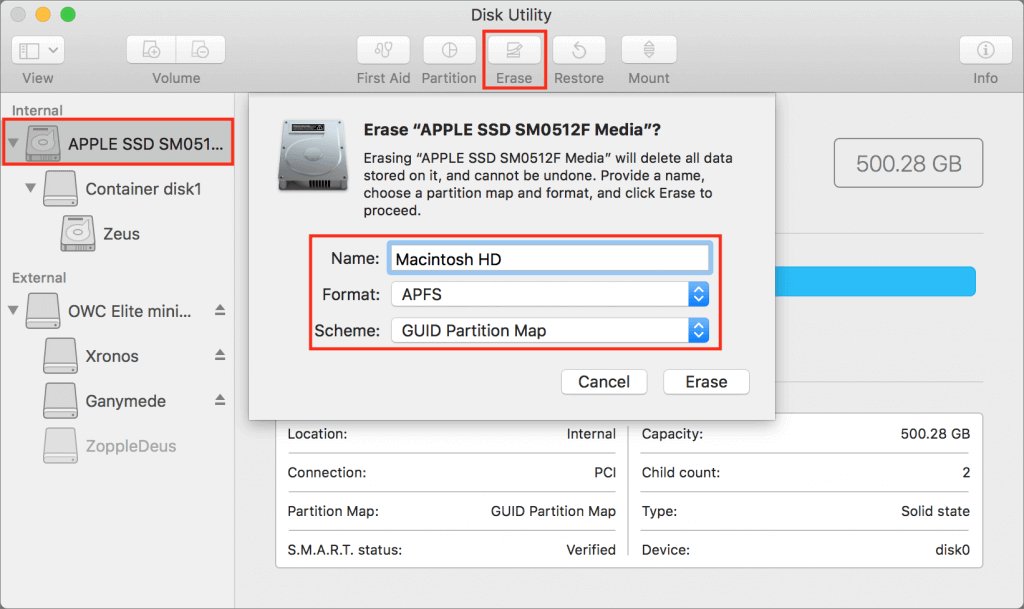
In Disk Utility, select the internal drive, click Erase in the toolbar, and in the dialog that appears, enter a new name, choose a format, and choose GUID Partition Map for the scheme. For the format, stick with the default, since the macOS installer will convert it later if necessary. Quit Disk Utility when you’re done.

Once the drive is erased, you’ll be returned to the macOS Utilities window, where you can select Reinstall macOS (or Reinstall OS X, if it’s an older Mac) and click Continue. Obviously, if you’re sending it back to Apple for recycling, there’s no reason to do this.

The installation process takes time, and when it’s done, the Mac will restart into the setup assistant. Press Command-Q at the Welcome screen to shut down. When the new user starts the Mac up again, they’ll be able to continue with the setup process. That’s it—now you’re ready to give the Mac to its next user.


Social Media: If you’re passing an old Mac on to a colleague, friend, or family member—or returning it to Apple for recycling—follow these steps to prepare it for its next stage in life and ensure that no one will be able to access your data.

What OS Version Are You Running? Here’s How to Find Out.

In Troubleshooting 101, one of the first questions is always, “What version of the operating system are you running?” There’s a big difference between Mac OS X 10.6 Snow Leopard and macOS 10.13 High Sierra, and the solution to any particular problem will likely revolve around knowing what operating system is in play.

The same is true of Apple’s other operating systems: iOS, watchOS, and tvOS. And, although they aren’t quite in the same category, Apple’s AirPods and HomePod both have system software that can be updated as well.

For the next time you’re experiencing a problem, here’s how to find the version of each of Apple’s operating systems.

macOS

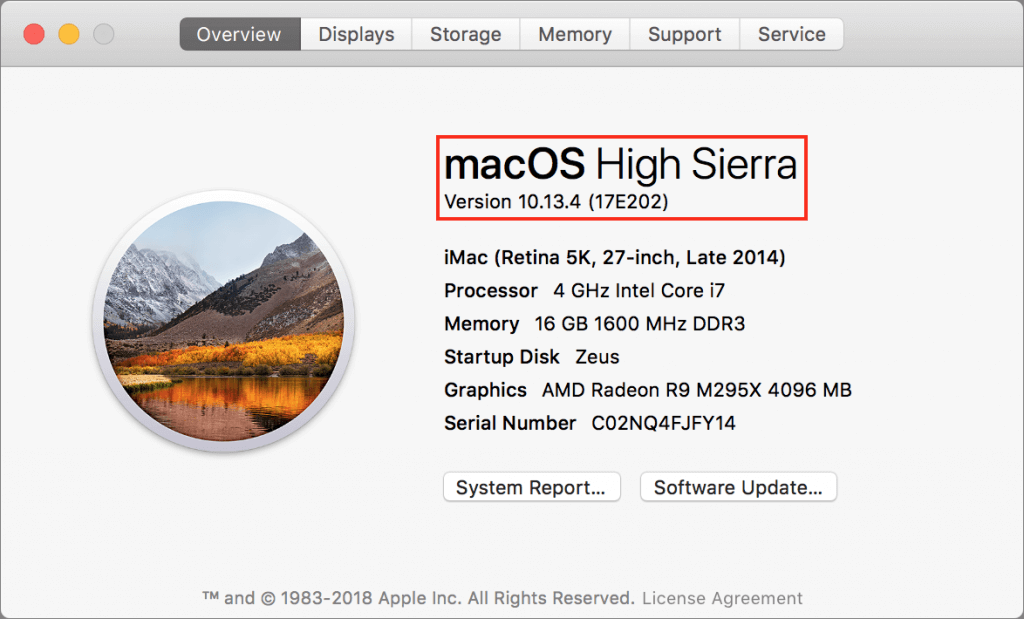
On the Mac, click the Apple menu in the upper-left corner of the screen and choose About This Mac. A window opens, displaying the name (macOS High Sierra shown here) and version (10.13.4) of the running version of macOS.

Every now and then, it can be important to learn the build number too—it’s one step more specific than the version number. A new Mac may have a different build number of the same version of macOS, for instance, or Apple may push out a silent security update that changes the build number. To find the build number, simply click the version number—the six-character build number (17E202) appears in parentheses, as above.

iOS

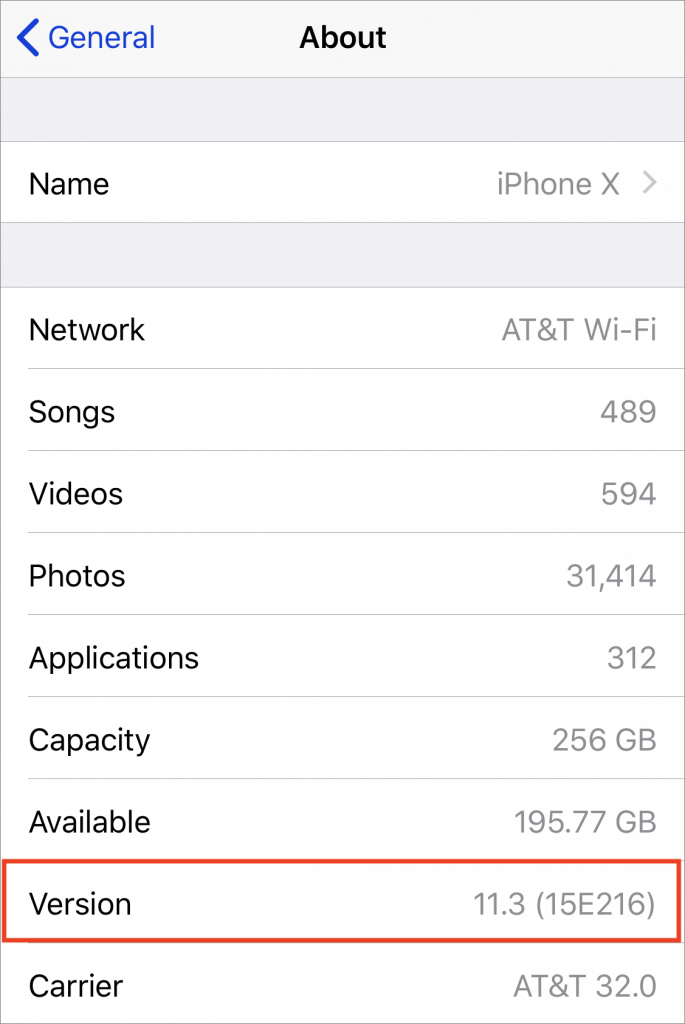
On an iPhone, iPad, or iPod touch, you find the version number in Settings > General > About. Scan down the screen until you see the Version line, which tells you both the version of iOS and the build number.

watchOS

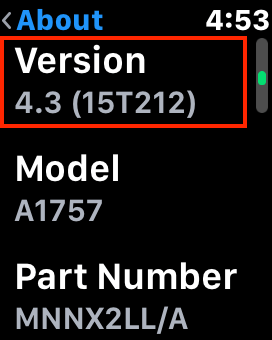
There are two ways to find the version of watchOS running on an Apple Watch:

  • On the watch, open the Settings app, scroll down to and tap General, tap About, and then scroll down until you see Version.
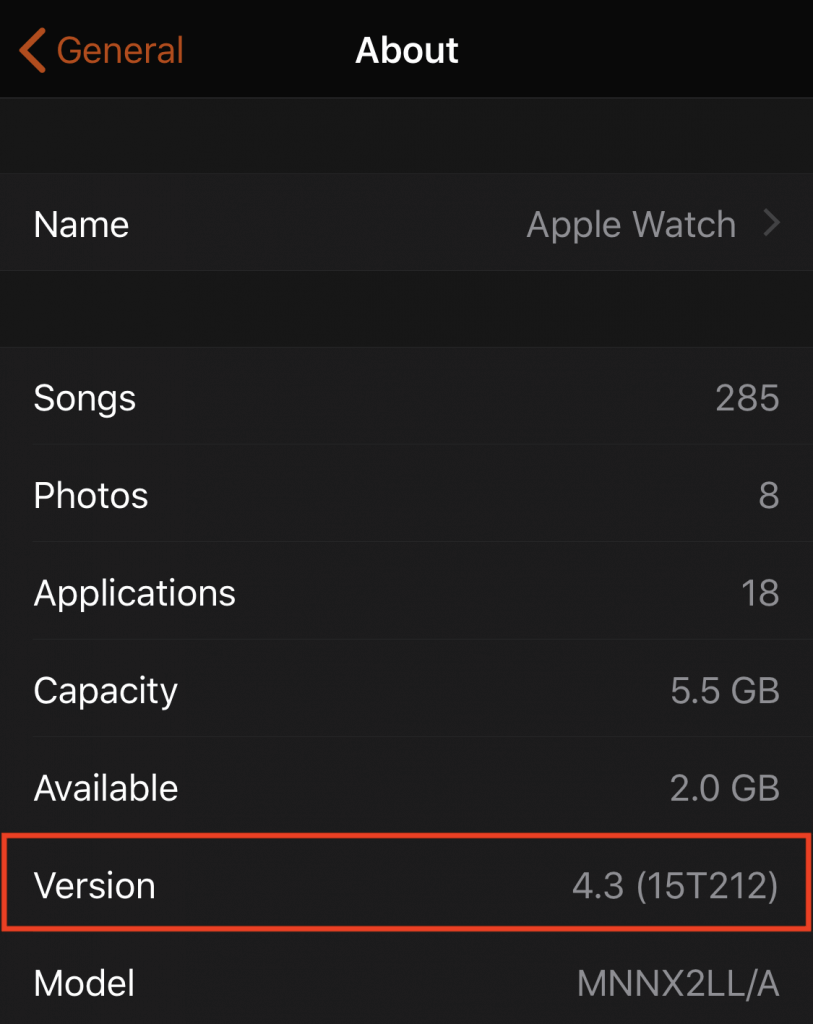
  • On your iPhone, open the Watch app and make sure My Watch is selected in the bottom button bar. Then go to General > About to see a screen that displays much the same information as the Settings app on the watch, including the version number.

tvOS

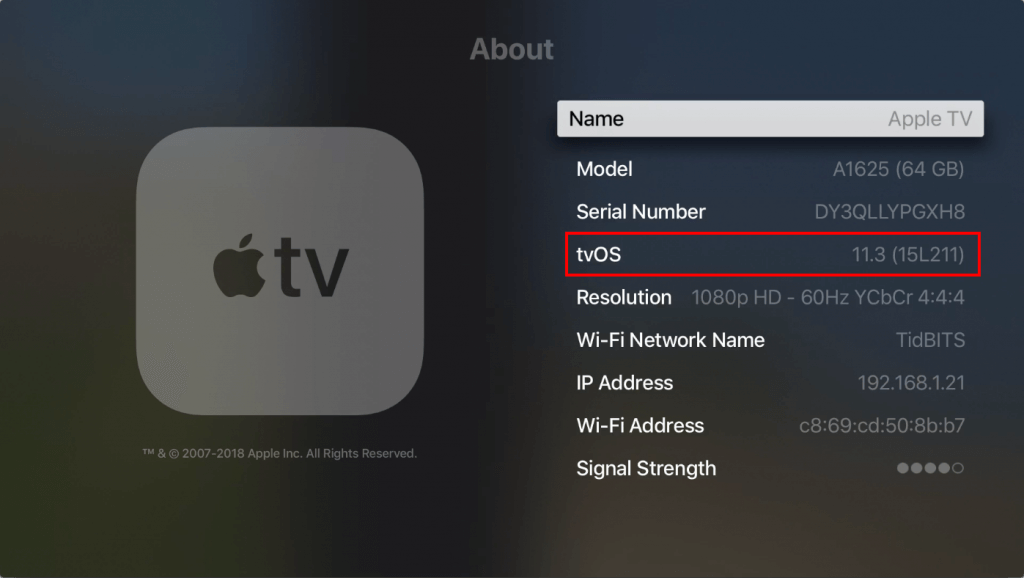
By now, you can probably guess that on an Apple TV you go to Settings > General > About to find the tvOS version. Apple is nicely consistent in this regard. That said, only the fourth-generation Apple TV and Apple TV 4K run tvOS. The obsolete second- and third-generation Apple TVs are instead based on a stripped-down version of iOS, and the first-generation Apple TV is an entirely different beast yet, with its large white case and internal hard drive.

AirPods

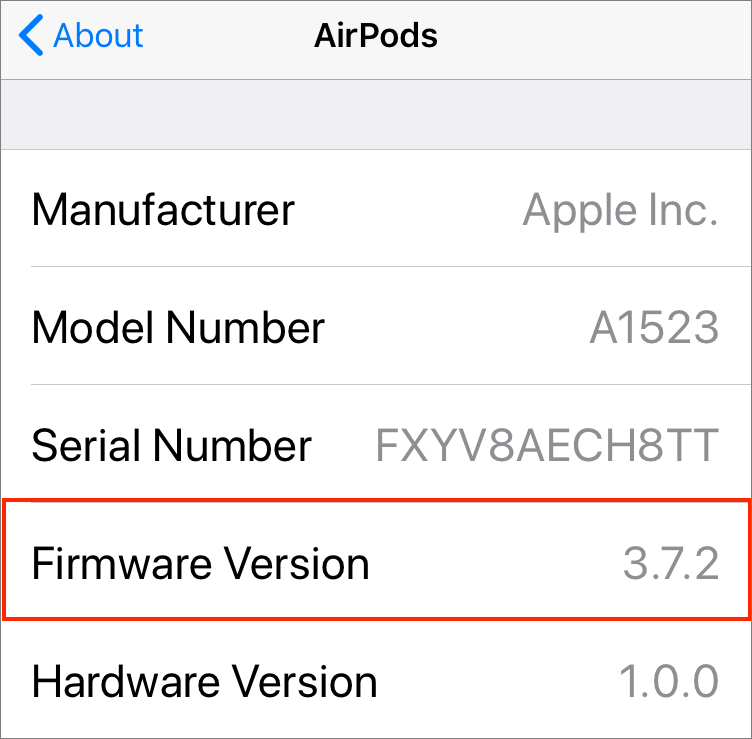
You’re unlikely to need to check the version of your AirPods, but if it ever comes up, make sure the AirPods are either connected to their host iOS device or in their case with the top open. Then, on the host iOS device, go to Settings > General > About > AirPods and look for the Firmware Version line.

HomePod

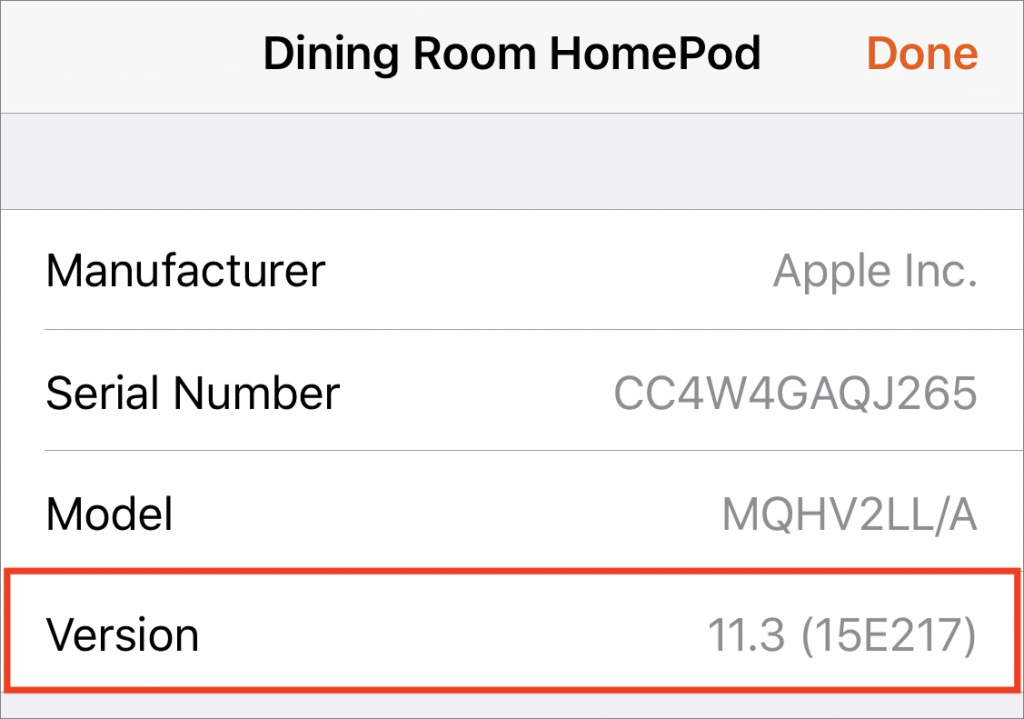
Although the HomePod shipped only recently, Apple has promised software updates that will allow two HomePods in a room to provide true stereo sound and support multi-room audio if you’ve sprinkled HomePods around your house. To check the version of the HomePod software, open Apple’s Home app, make sure Home is selected in the bottom toolbar, and then press and hold on the HomePod’s tile until it opens. Then tap the Details button in the lower right and scroll down until you see the Version line.


Social Media: Quick! Can you find the current operating system version for all your Apple devices? Learn how to carry out this essential troubleshooting task—it’s easy!