Posts

Sort Your Lists Differently in Reminders in iOS 14 and Big Sur

For many years, Apple’s Reminders app let you sort your lists, but in just one way that applied to all lists equally. That was a problem if you had a to-do list that you wanted to sort by Due Date and a list of foods in your freezer that you wanted to sort by Creation Date (to see which were older) or Title (for a simple alphabetical sort). Happily, in iOS 14 and macOS 11 Big Sur, Apple finally addressed this limitation, letting you sort each list independently. Your choices even sync across all your devices! So if you had given up on sorting, or given up on Reminders entirely because of this limitation, on the Mac, check out the View > Sort By menu, and in iOS and iPadOS, tap the ••• button and then Sort By.

(Featured image by iStock.com/fizkes)

Pin Your Chats in Messages for Faster Access

A new feature of Messages in both iOS 14 and macOS 11 Big Sur is the option to pin up to nine conversations at the top of the conversation list for easy access. No longer do you have to worry about them scrolling out of sight. On an iPhone or iPad, touch and hold a conversation and tap Pin in the menu that appears; on a Mac, Control-click the conversation and choose Pin. (Remove them by repeating the action and choosing Unpin.) Each of your devices can have different conversations pinned. If you are used to scanning the left side of Messages for blue new-message indicators, also be sure to look for those blue dots amongst your pinned icons at the top of the screen. Also, note that on the Mac, it can be a little too easy to see a notification banner about a new message, switch to Messages, and type in the currently selected (but wrong) conversation.

(Featured image by Polina Zimmerman from Pexels)

Looking for More iOS 14 Widgets? Be Sure to Launch Seldom-Used Apps

Home screen widgets are one of the coolest features of iOS 14. They enable apps to offer quick access to features or at-a-glance previews of changing information, such as the Weather app’s widget providing a quick look at upcoming weather. What you may not realize, however, is that an app’s widgets become available for adding to your Home screen only if you have launched the app since upgrading to iOS 14. (To see the list, press and hold on an empty part of the Home screen and then tap the + button in a top corner.) For instance, if you haven’t traveled since the pandemic started, you might not realize that the Kayak app has a handy price alert widget. Just launch the app once, and you’ll see its widgets the next time you look through the complete widget list.

(Featured image by Omid Armin on Unsplash)

What Is This “App Tracking Transparency” Apple Added to iOS 14.5?

You’ve likely seen mention of the dispute between Apple and Facebook. It revolves around App Tracking Transparency (ATT), a technology Apple released in iOS 14.5.

The goal of ATT is to give iPhone and iPad users more control over the extent to which app makers can track their data and activities across apps and websites owned by other companies. Before App Tracking Transparency, nothing prevented companies from sucking a vast amount of data about your everyday activities and connecting it to other data to build an insanely detailed picture of who you are and what you do. Apple has written A Day in the Life of Your Data white paper and released the Tracked TV ad to give you a sense of how apps track you. We like to think of app tracking as a fleet of tiny drones constantly hovering over your head, recording your every waking moment for their corporate masters.

Facebook is particularly perturbed by the introduction of App Tracking Transparency because the company makes billions of dollars every year by gleaning as much as it can about you and then selling advertising access to you to companies that want to target people like you. For instance, Facebook knows if you’re a New York City lawyer and divorced mother of two who loves dogs, donates to the Sierra Club, and has Crohn’s disease. Although App Tracking Transparency won’t prevent Facebook from tracking your behavior across its own apps, at least it won’t be able to track you across other companies’ apps and websites.

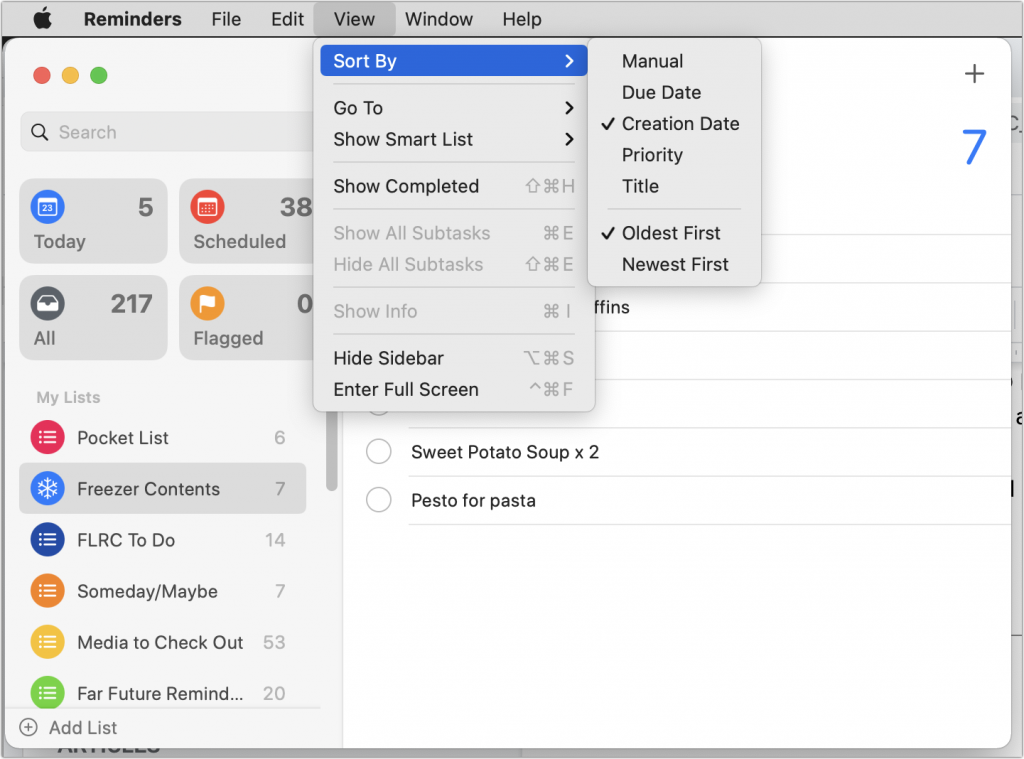
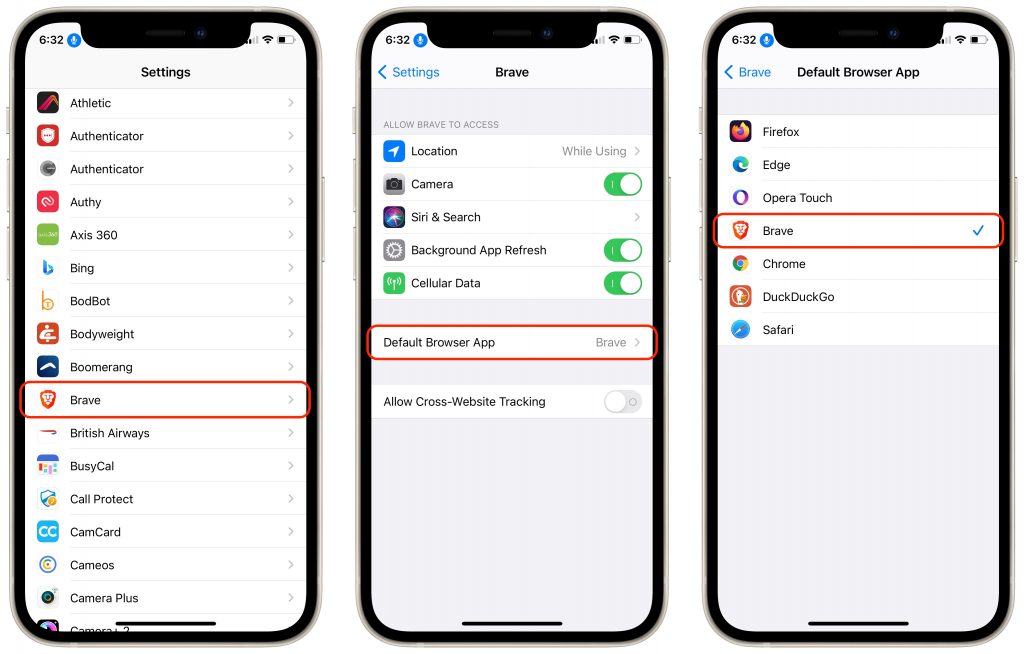
Once you upgrade to the latest version of iOS and iPadOS, App Tracking Transparency requires that apps ask for permission to track you. However, depending on your current privacy settings, you may never see those requests. In Settings > Privacy > Tracking, if Allow Apps to Request to Track is turned off, you won’t receive any permission requests, and apps won’t be able to track you. Turn that setting on, and you’ll start getting alerts that ask for permission.

Put bluntly, there is absolutely no reason to allow any app to track you. Apple explicitly says that apps may not withhold features from those who opt out of tracking. So if you turn on the Allow Apps to Request to Track setting, tap Ask App Not to Track whenever you’re prompted. If you accidentally tap Allow, you can always go back to Settings > Privacy > Tracking and turn off the switch to rescind permission.

You might want to enable Allow Apps to Request to Track to see which apps were likely violating your privacy before and are still willing to do so even after App Tracking Transparency has exposed their sleazy business practices. Frankly, we’d encourage you to think about whether you want to use apps from such companies—perhaps the best reason to allow the requests is to identify privacy-abusing apps that you’ll then delete.

Early statistics from analytics company Flurry suggest that 94%–96% of users in the United States have opted out of app tracking, either by tapping Ask App Not to Track or by disabling the Allow Apps to Request to Track. We’re surprised the number is so low.

(Featured image by Glen Carrie on Unsplash)


Social Media: New in iOS 14.5 is a privacy-protecting feature called App Tracking Transparency, which forces apps to ask you for permission to track your activities across other apps and websites. Learn more about why you should never allow tracking here:

Choose Your Preferred Default Web Browser and Email App in iOS and iPadOS 14

Since the earliest days of the iPhone, Apple’s Safari and Mail have been the default Web and email apps for iOS and, later, iPadOS. There was no way to choose alternatives that would be used whenever an app wanted to open a Web page or create an email message. That has now changed with iOS 14 and iPadOS 14. To switch to a different Web browser (such as Brave, DuckDuckGo Privacy Browser, Firefox, Google Chrome, Microsoft Edge, or Opera Touch) or a different email app (such as Boomerang, Chuck, Hey, Gmail, Outlook, Polymail, or Spark), follow these directions. In Settings, tap the name of the browser or email app you want to set as the default. Then tap Default Browser App or Default Mail App and select the desired app.

(Featured image based on an original by Sotiris Gkolias from Pexels)

What Are Those Orange and Green Dots in Your iPhone’s Status Bar?

In iOS 14 and iPadOS 14, Apple added two new status indicators to the right side of the status bar at the top of the screen. They’re designed to give you feedback about what an app is doing. An orange dot indicates that an app is using the microphone, and a green dot means that an app is using the camera (and possibly the microphone as well). They’re subtle and shouldn’t be distracting, but if you ever notice them when you don’t think the camera or microphone should be in use, look for apps that might be using them in the background.

(Featured image by Bruno Massao from Pexels)

Did You Know That Your iPhone Can “Name That Tune”?

Several years ago, Apple bought a company called Shazam, which made an app that identified songs by listening to the music playing nearby. Since then, Apple has built Shazam into Siri in iOS, iPadOS, macOS, and watchOS. Most recently, Apple added it to Control Center in iOS 14 and iPadOS 14 as well, so you can invoke it without speaking. To use Shazam, whenever you want to identify a song that’s playing nearby, just ask Siri, “What’s playing?” or tell it “Name that tune” or have some fun and say “Shazam!” To add Shazam to Control Center, navigate to Settings > Control Center, and tap the green + button next to Music Recognition. Then, from Control Center, tap the button to start it listening—you can return to whatever you were doing. When the song is identified, a notification appears with its name. Tap the notification to open the song in the Music app.

(Featured image by Karolina Grabowska from Pexels)

Pinch to Zoom in All Photos View in iOS 14

Photos in iOS 14 provides four views of your library: Years, Months, Days, and All Photos. For the first three, Photos picks representative images that may not include particular shots you’re looking for. The All Photos view shows everything, but it can be overwhelming. What’s not apparent is that you can navigate All Photos more easily by pinching in to shrink the thumbnails and then pinching out to make them larger again. At the largest size, a single photo takes up the entire width of the screen.

(Featured image by Adam Engst)