Posts

Two Tricks for Fixing a Mac That’s Restarting Unexpectedly

Although extremely uncommon, it’s not unheard of for a Mac, particularly an older model, to restart unexpectedly. If it happens once, chalk it up to cosmic rays and move on. But if it happens multiple times, try these two things right off. First, use compressed air to remove dust from cooling vents or the inside of the Mac, if you can open it up. Dust can cause heat buildup, which can in turn cause restarts. Second, try plugging the Mac into a different electric circuit or, ideally, into an uninterruptible power supply (UPS). Dirty power can provoke all sorts of undesirable behavior—including unexpected restarts—and shorten the lifespan of the Mac’s electronic components. Remember, clean air and clean power make for a happy Mac.

(Featured image by Adam Engst)

Learn How to Paste Text So Its Style Matches the Surrounding Text

When you copy text from a Web page, PDF, or word processing document, macOS usually includes the associated formatting, so the words you paste may end up in 68-point blue italic if that was what the source text looked like. That’s often undesirable. More commonly, you want the text to take on the styling of the text where you’ve pasted it. In most Mac apps, there’s a quick trick to achieve this goal. Look on the Edit menu for the Paste and Match Style command (sometimes called Paste and Match Formatting, Paste Text Only, or Paste without Formatting) to paste the text such that it matches the style of the surrounding words in the destination. Apple’s standard keyboard shortcut for this is Command-Shift-Option-V, though some apps use Command-Shift-V. If you regularly need this capability in an app that lacks native support for it, consider using a clipboard utility app, like Keyboard Maestro, to make your own universal Paste Text Only hotkey.

(Featured image based on an original from Pixabay)

Intuit Has Stopped Updating the QuickBooks Online Mac App; Switch to a Web Browser

If you’re using QuickBooks Online with the service’s Mac app to manage your business’s accounting, you may have seen a message like the one below announcing that Intuit has stopped updating the QuickBooks Online app. This doesn’t affect your QuickBooks Online account, which you can and should use via a Web browser at qbo.intuit.com now. Even if the QuickBooks Online Mac app continues to work, which it likely will for some time, we recommend that you delete it and switch entirely to a Web browser. It’s not safe to use an unsupported app for financial records because Intuit won’t be fixing any security vulnerabilities going forward.

(Featured image based on an original by RODNAE Productions from Pexels)

Four Ways to Reduce Zoom Fatigue

After a long day of video calls, you might feel like your brain has been wrung out like a wet washcloth—we certainly do. It’s exhausting to stare into a computer for hours every day while participating in meetings or classes. This condition is called Zoom fatigue, and it’s a recent affliction for most of us because the pandemic has dramatically increased the popularity of video calls. We don’t mean to beat on Zoom here—this condition plagues people who use Cisco WebEx, FaceTime, Google Hangouts, Google Meet, Microsoft Teams, Skype, and other videoconferencing software too.

But there are techniques you can employ to reduce Zoom fatigue. Researchers at Stanford University have identified four reasons why video calls are so tiring and offer suggestions on making them less so. They include:

  • Close-up eye contact is overwhelming. You usually sit about an arm’s length from your computer display, and if one person is on screen at a time, their head may be close to life-size. You’d never be that near someone’s face in real life unless they were a close family member, and even then, you wouldn’t hold that position for long. Shrink your window or switch to gallery view so you’re talking to postage stamps rather than feeling like someone is up in your face.
  • Looking at yourself is psychologically harmful. We all have mirrors, but can you imagine staring into one for hours every day? Only a pathological narcissist would do that. Worse, constantly seeing your own image can make you worry about your appearance and what others think of you. Once you’ve verified that you’re properly framed and don’t have salad in your teeth, hide your preview or switch to a view that doesn’t include you.
  • Sitting perfectly still is difficult. This is hardest on kids, but even adults have trouble staying sufficiently still to remain perfectly framed in a video window. When you’re on a standard phone call or in an in-person meeting, you might pace around the room or at least adjust your position in your chair. Try turning off your camera when possible—most calls work just as well without video—or position it so you can fidget or pace in person. Another solution is Apple’s Center Stage technology on the new M1-based iPad Pros, which automatically pans and zooms to keep you in the picture as you move around.
  • Video calls make you constantly think about call mechanics. There’s nothing natural about interacting with multiple people on a screen, so we’ve all come up with behaviors (some of which we just recommended!) to smooth over the cracks in the system. For instance, your brain has to expend extra effort to help you stay framed in the video window, worry about how you look, use exaggerated facial expressions so people know you’re paying attention, and use techniques like a thumbs-up to indicate approval without unmuting. The solution is to turn off your camera and hide the video window so your brain can take a break and focus on just the audio content of the call.

You’ll notice that most of the recommendations for reducing the mental strain of video calls come down to eliminating video. It shouldn’t be surprising because talking on the phone isn’t nearly as tiring, even when you’re on a conference call with a couple of people. There’s no question that video can help convey information that would be lost in a phone call, and it’s nice to see far-flung friends and family, but there’s no rule that video calls are the best form of communication for all situations.

We’ve started to put these recommendations into practice ourselves, and we encourage you to do so as well. And if you need support for why you’re turning off your camera or asking for audio-only calls, send people a link to this article.

(Featured image by Anna Shvets from Pexels)


Social Media: Why are video calls so exhausting when all you’re doing is sitting around and talking? Here’s the word from Stanford University researchers, along with advice on making those non-stop calls less tiring.

Don’t Store Confidential Files in Online File Sharing Services

Given their integration into the Mac’s Finder, it can be easy to forget that online file sharing services like Dropbox, Google Drive, iCloud Drive, and Microsoft OneDrive can be accessed using a Web browser by anyone with your username and password. Obviously, you should always have strong, unique passwords, but to be safe, it’s best not to use services designed for public file sharing to store unencrypted files containing sensitive information like credit card numbers, Social Security numbers, passport scans, privileged legal documents, financial data, and so on. Keep such data secure on your Mac—outside of any synced folders—where accessing it requires physical access to the machine.

(Featured image based on an original by Kenaz Nepomuceno from Pexels)

Not a Fan of Big Sur’s Translucent Menu Bar? Here’s How to Disable It

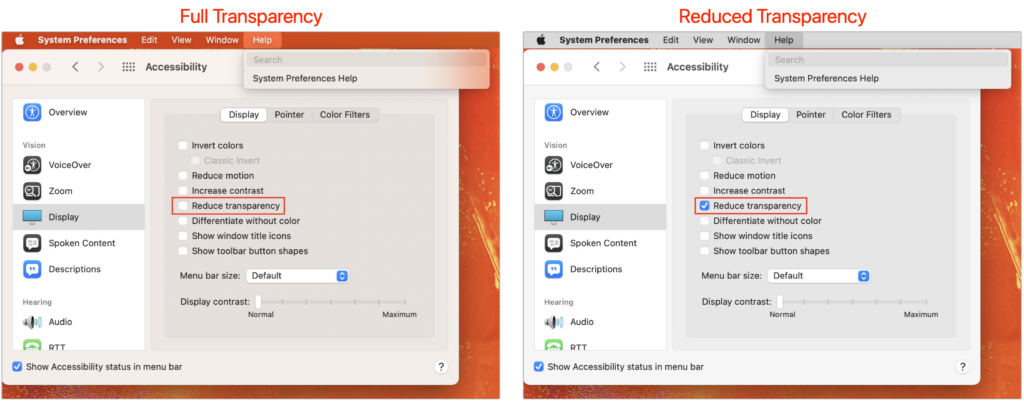
In macOS 11 Big Sur, Apple went back to a design direction from the earliest days of Mac OS X: a translucent menu bar. Since its color changes depending on the desktop picture, many people aren’t enamored of it (left, below). Luckily, reverting to the traditional opaque menu bar is simple. Open System Preferences > Accessibility > Display and select Reduce Transparency. That will turn the menu bar gray again and make other windows and menus opaque, too (right, below). Simple gray might not be as whizzy as fancy transparency, but it’s more predictable and easier to see.

(Featured image by aung nyi on Unsplash)

Apple Hid the Proxy Icon in Big Sur’s Finder. Here’s How to Reveal It

This is a twofer tip. You may not have known that every document window in macOS has long had a proxy icon in the title bar, next to the filename. The proxy icon is not just cosmetic. You can drag it to Mail to attach the document to a message, to a Web browser to upload it, or to any other location you can drag a document’s icon in the Finder (top screenshot, below, showing Preview in Catalina). You can also drag proxy icons from Finder windows to Open and Save dialogs to navigate to the location of the proxy icon and even pre-fill the filename when saving. Alas, in macOS 11 Big Sur, in at least the Finder and Preview, Apple chose to hide the proxy icon and the drop-down menu that lets you rename, tag, or move files using controls on the title bar (middle screenshot, below). Plus, the new title bar design tends to truncate file names. Happily, mousing over the filename expands the name and reveals both the proxy icon and the drop-down menu (bottom screenshot, below). Apple’s desire to reduce onscreen clutter makes usage more cumbersome than before, but all the functionality is still present.

(Featured image by Harrison Haines from Pexels)

Having Trouble Finding Files on Your Mac? Here’s How to Reset Spotlight

For the most part, Spotlight works well. Press Command-Space or use the Search field in a Finder window, and it finds everything that matches your search term. Sometimes, however, Spotlight fails to turn up a file that you know is present, likely due to index corruption. To fix the problem, you can force Spotlight to rebuild its index. (Don’t do this unless it’s necessary since reindexing can take a long time and may impact the performance of your Mac while it’s happening.) Open System Preferences > Spotlight > Privacy, and then drag your drive (or the drive on which Spotlight isn’t finding files) into the list of locations that Spotlight shouldn’t search. That deletes the old Spotlight index. Still working in the Spotlight Privacy list, select the drive and click the – button below the list. Spotlight now reindexes the contents of the drive and should find your files properly in the future.

(Featured image by cottonbro from Pexels)

It’s Time to Consider Upgrading to macOS 11 Big Sur

We’re cautious when it comes to recommending upgrades to new versions of macOS. Apple makes the upgrade process easy—though it can be time-consuming—but upgrading can create workflow interruptions, render favorite apps inoperable, and have other consequences. At the same time, it’s important to stay in sight of the cutting edge for security reasons and to take advantage of advances from Apple and other developers. Upgrading is not an if question; it’s a when question.

We’re not saying that everyone needs to upgrade to macOS 11 Big Sur now, but if you want to, it should be safe now that Apple has released several bug-fix updates. However, there are still a few caveats, and preparation is essential.

Reasons Not to Upgrade

Some people should continue to delay upgrades to Big Sur due to software incompatibilities. Most software under steady development will have been updated for Big Sur by now, but some workflows rely on older versions of apps where an upgrade isn’t practical or possible (ancient versions of Adobe Creative Suite, for instance), or on obsolete apps that will never be updated. You may be able to learn more at RoaringApps, but those who haven’t yet upgraded past 10.14 Mojave may have to upgrade or replace 32-bit apps that ceased working starting with 10.15 Catalina.

The other app category that continues to have trouble with Big Sur are backup apps that make bootable duplicates. Catalina moved macOS to its own read-only volume, and Big Sur goes a step further by applying cryptographic signatures that make it even harder for an attacker to compromise the operating system. Unfortunately, that also makes creating a bootable duplicate difficult. Carbon Copy Cloner and ChronoSync have developed workarounds; SuperDuper remains incompatible at this point, although an older version can create data-only backups. If you rely on one of these apps for critical backups, make sure you know what you’re getting into before upgrading or reassess your backup strategy.

Before You Upgrade

Once you’ve decided to upgrade to Big Sur, you have three main tasks:

  • Update apps: Make sure all your apps are as up-to-date as possible. If you regularly put off updates, now’s the time to let them complete so you have Big Sur-compatible versions.
  • Clear space: Big Sur needs a minimum of 35.5 GB to upgrade, and as of macOS 11.2.1, the installer won’t proceed unless there’s enough space. Don’t cut this close—you should always have at least 10–20% free space for virtual memory, cache files, and breathing room.
  • Make a backup: Never, ever install a major upgrade to macOS without ensuring that you have at least one current backup first. In an ideal world, you’d have an updated Time Machine backup, a bootable duplicate, and an Internet backup. That way, if something goes wrong as thousands of files are moved around on your drive, you can easily restore.

After those tasks are complete, make sure you don’t need your Mac for a few hours. There’s no telling exactly how long the upgrade will take, especially if it has to convert your drive to APFS, so never start an upgrade if you need the Mac soon.

Initiating the upgrade is just a matter of opening System Preferences > Software Update, clicking the Upgrade Now button, and following the instructions.

After You Upgrade

Part of the reason to set aside plenty of time for your Big Sur upgrade is that there are always clean-up tasks afterward. We can’t predict precisely what you’ll run into, but here are a few situations we’ve noticed:

  • macOS will probably need to update its authentication situation by asking for your Apple ID password, your Mac’s password, and if you have another Mac, its password too. Don’t worry that this is a security breach—it’s fine.
  • Some apps may have to ask for permission to access your contacts and calendar even though you previously granted permission. Again, that’s fine.
  • If you use your Apple Watch to unlock your Mac and apps (and you should, it’s great!), you’ll need to re-enable that in System Preferences > Security & Privacy > General.
  • If you use Gmail or Google Calendar or other Google services, you may need to log in to your Google account again.
  • Websites that usually remember your login state will likely require that you log in again. If you’re using a password manager like 1Password, that’s easy.
  • You may have to re-enable text-message forwarding to your Mac on your iPhone in Settings > Messages > Text Message Forwarding.
  • Those who use Backblaze for Internet backups will find their backups have been “safety frozen.” Follow these instructions for thawing your account.

Finally, Time Machine in Big Sur now supports and prefers APFS-formatted drives, and all of Apple’s development is going in that direction now. You can keep using your existing Time Machine backup in Big Sur, but after you’re confident that everything is working well—and you have another backup—it’s worth removing your Time Machine backup drive in System Preferences > Time Machine > Select Disk, reformatting the drive as APFS in Disk Utility, and restarting the backup in the Time Machine preference pane.

With all that housekeeping done, it’s time to check out all the new features in Big Sur!

(Featured image based on originals by Apple)


Social Media: Should you upgrade to macOS 11 Big Sur? There’s no need to do so yet, but it should be safe for most people, so if you’re excited about the new look and the new features, this is a good time to upgrade. Read on for our pre- and post-upgrade tasks.

Reclaim Local Storage Space by Removing iCloud Drive Downloads

With iCloud Drive, Apple provides an Optimize Mac Storage checkbox that, when checked, stores the full contents of iCloud Drive on the Mac only if there’s enough space. However, you may wish to recover local storage space without selecting that option—luckily, that’s easy to do. Open iCloud Drive in the Finder, Control-click a file, and choose Remove Download. The file remains in iCloud Drive, and if you need it locally, you can click the cloud icon next to its name to download it. If you’re not sure which files in the iCloud Drive window occupy the most space, choose View > As List, and then click the Size column so the largest files sort to the top (click again if they’re sorting to the bottom).

(Featured image based on originals by Denny Müller on Unsplash and Mahir Uysal on Unsplash)