
10 Reasons to Upgrade to Apple’s Version 27 Operating Systems This Fall
Please visit https://tcn.tidbits.com/10-reasons-to-upgrade-to-apples-version-27-operating-systems-this-fall/ to access this member content.
Please visit https://tcn.tidbits.com/10-reasons-to-upgrade-to-apples-version-27-operating-systems-this-fall/ to access this member content.

If your Mac starts typing unexpected characters—or rejects a password you know is correct—check to see if the Input Source menu appears in the upper-right corner of the screen, indicating that your Mac has more than one keyboard layout available for writing in other languages. Accidentally switching from the standard U.S. keyboard (or whatever you regularly use) to another layout—like the French ABC – AZERTY, which swaps the A and Q keys, among others—can cause keystrokes to produce different characters than expected. This key swapping is particularly confusing in password fields, where you can’t see what’s being typed. To fix it, click the Input Source menu and choose your default. To prevent this problem from recurring, go to System Settings > Keyboard, click Edit next to Input Sources, and delete any keyboard layouts you don’t use. You can also change what the Globe key does in System Settings > Keyboard—you can prevent accidental layout changes by switching it from Change Input Source to Show Emoji & Symbols, Start Dictation, or Do Nothing.

Estonia, Tallinn, July 11, 2020. Apple Macbook pro 15 Retina on table
(Featured image based on an original by iStock.com/Armastas)
Social Media: Is your Mac typing the wrong characters or rejecting your password? You may have accidentally switched keyboard layouts. Here’s how to check your input source and prevent it from happening again.

Apple offers several simple ways to share Wi-Fi network passwords. When someone nearby tries to connect to a Wi-Fi network with an iPhone, iPad, or Mac, and they are in your Contacts app, you will be automatically prompted to share the network password with them. Additionally, in the Passwords app, you can display a Wi-Fi network QR code that anyone can scan to join the network. However, sometimes you need to share a password via email or text. To look up a Wi-Fi password on an iPhone or iPad, open Passwords, tap Wi-Fi, select the desired network, and tap the obscured Password field. A Copy Password button makes it easy to copy. In the Mac version of Passwords, hover over the obscured password and click the revealed password to copy it.

(Featured image by iStock.com/jpkirakun)
Social Media: Apple makes it easy to share Wi-Fi passwords without requiring anyone to type them. We explain how you can do this nearly automatically, with a QR code, or by looking up the password and copying it so you can paste it into an email message or text.
One small way Apple’s Passwords app lagged behind top password managers like 1Password was in its lack of a password history. It’s sometimes helpful—such as when trying to figure out why a seemingly correct password isn’t being accepted—to see previous passwords for a site and when they were changed. In macOS 26 Tahoe, iOS 26, and iPadOS 26, the Passwords app adds that feature. Click or tap View History to review the history of a particular site’s passwords.

(Featured image by iStock.com/designer491)
Social Media: Apple’s Passwords app can now show your password history in macOS 26 Tahoe, iOS 26, and iPadOS 26, helping you track down why that “correct” password isn’t working.
Data breaches keep coming, and the latest one revealed by Cybernews involves 16 billion passwords. There’s no way to know for sure if your passwords are included, though it’s always worth checking Have I Been Pwned and paying attention to monitoring features in password managers. Some media reports claim that passwords from accounts at Apple, Facebook, and Google were leaked, but this is likely overblown. While some accounts at those companies were compromised by infostealers, there were no centralized breaches. Our advice remains the same: use a password manager to ensure that each of your accounts has a strong, unique password and turn on two-factor authentication whenever possible.
(Featured image by iStock.com/tsingha25)
Social Media: Another day, another breach—this time involving 16 billion passwords. Despite alarming headlines about Apple, Facebook, and Google accounts, there’s no need to panic. Our advice? Use unique passwords and enable 2FA.
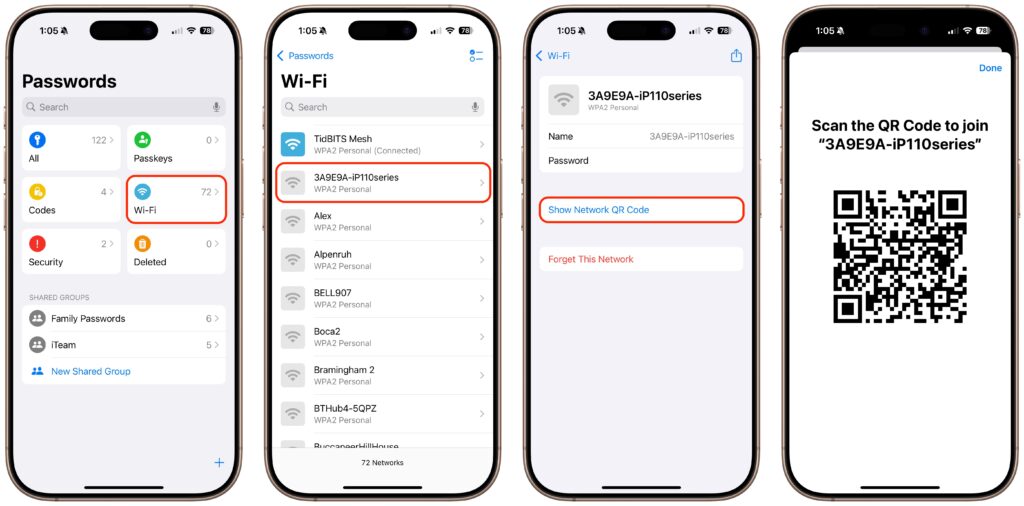
A neat feature built into iOS, iPadOS, and macOS is that when you are connected to a Wi-Fi network, your devices will offer to share the Wi-Fi password if others near you try to connect to the same network. However, for this feature to work, they must be in your Contacts, and at times, it doesn’t activate as quickly as you’d like. Apple’s new Passwords app on an iPhone, iPad, or Mac provides a manual alternative that may work better. Tap the Wi-Fi collection to see all your remembered networks, select the desired network, and tap Show Network QR Code. When others scan the QR code using their phones, they will instantly join the network.
(Featured image by iStock.com/PrathanChorruangsak)
Social Media: While Apple’s automatic sharing of Wi-Fi passwords feels like magic, it doesn’t work in every situation. For a more reliable manual approach, use the Show Network QR Code feature in the new Passwords app.
Although we’re still fans of 1Password, and there are plenty of other good password managers out there, like BitWarden and Dashlane, Apple has finally removed the last hurdle to using its built-in password management capabilities.
Starting in macOS 15 Sequoia, iOS 18, iPadOS 18, and visionOS 2, Passwords is now a real app rather than being trapped inside Safari, System Settings, and Settings. If you have resisted using a password manager or don’t wish to continue subscribing to an alternative, give Apple’s Passwords a try. It makes creating, maintaining, and entering passwords faster, easier, and more secure than doing it by hand. Those already using a password manager can export their accounts and import into Passwords.
We’ll focus on the Mac version here, but the other versions are nearly identical apart from their screen sizes.

The left-hand sidebar, reminiscent of Reminders, provides categories of accounts:
The middle pane lists the accounts in the selected category. You can sort the list using the menu with vertical arrows, search for a specific account, and manually add a new one with the + button. Otherwise, scroll through the list and click an account to view it in the right-hand pane.
At the top of the right-hand pane is an AirDrop button and an Edit button. Click AirDrop to share an account with someone nearby or Edit to make changes or set up a two-factor verification code. If you want to copy information, click the User Name, Password, Verification Code, or Website item to get a Copy menu. The password becomes visible when you mouse over it. Clicking Website also offers an Open Website option and lets you add more sites where the password should autofill.
Most people shouldn’t need to do anything to start using Passwords. However, if you have trouble, check the following items:


If you have additional questions, check Apple’s documentation for detailed instructions for all the platforms on which Passwords runs. But realistically, Passwords is easy to use, and although the app itself is new, the underlying password management features and syncing have been in place for years, so they’re stable and reliable.
(Featured image by iStock.com/designer491)
Social Media: Apple’s new Passwords app in macOS 15, iOS 18, iPadOS 18, and visionOS 2 makes the company’s longstanding password storage and syncing features more straightforward and easy to use. It’s password management for the rest of us!
Although paying attention to online security is of primary importance, don’t forget local security. You don’t want to go out for lunch and let someone wandering by your office poke through your email, messages, photos, and private files. To ensure this doesn’t happen, set your Mac to start the screen saver or sleep the display after a few minutes (on a laptop, just close the lid), and then set “Require password after screen saver begins or display is turned off” to a short duration. We recommend 1 or 5 minutes, though you can adjust to balance inconvenience against security. To eliminate the fuss almost entirely, use Touch ID or an Apple Watch to unlock your Mac without having to type your password.

(Featured image based on an original by iStock.com/Armastas)
Social Media: Don’t forget about local security on your Mac. Make sure to require a password shortly after the screen saver starts or the display sleeps to prevent people from riffling through your email, photos, messages, and more.
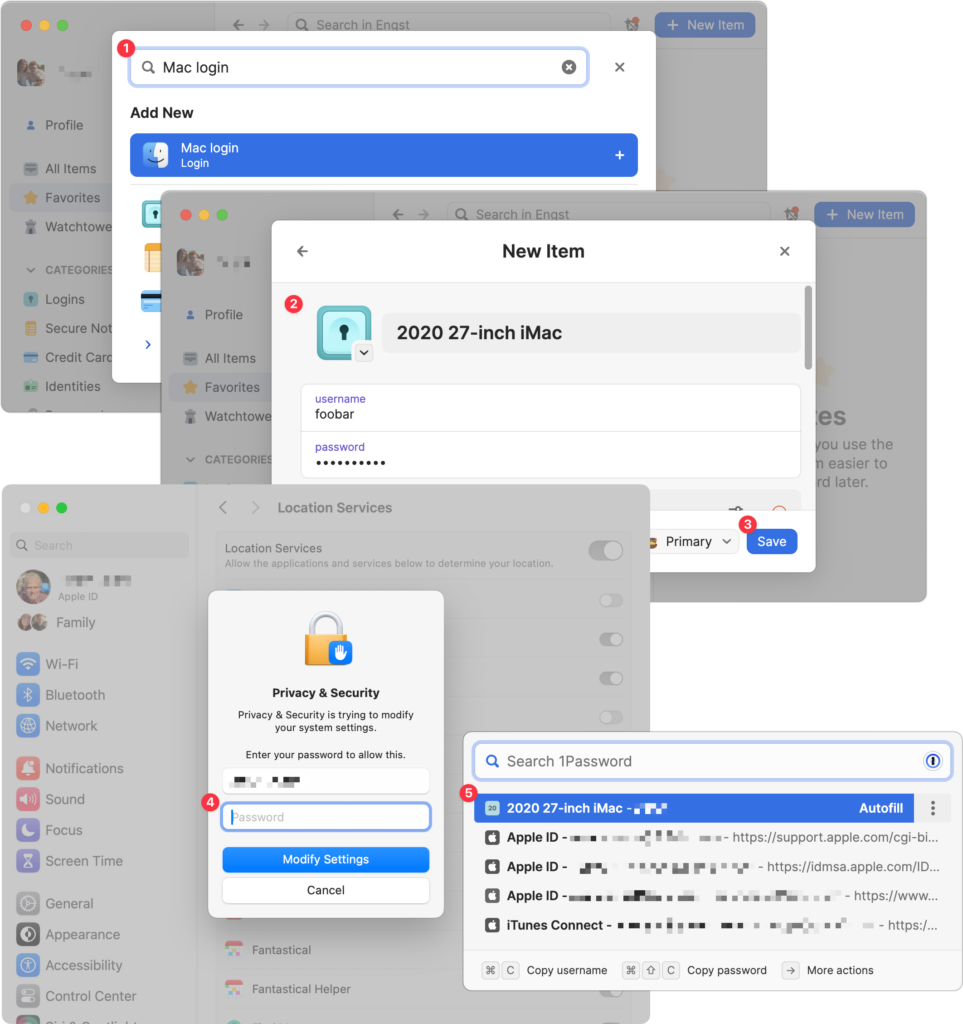
We think of 1Password as being helpful for entering passwords on websites and in iPhone and iPad apps. But its Universal Autofill feature has a hidden capability that lets 1Password enter your Mac login password when you have to provide it to change certain system settings, install apps, format drives in Disk Utility, and more. (But it won’t work to log in at startup before 1Password is running.) To turn this feature on, click the New Item button in 1Password, search for and select “Mac login” ➊, give it a name that will sort alphabetically to the top, like “2020 27-inch iMac” ➋, enter your password, and click Save ➌. From then on, whenever you’re prompted for your Mac login password ➍, press Command- (Backslash, located above the Return key), and then click the desired login or press Return to select the topmost item ➎.
(Featured image based on an original by iStock.com/ipuwadol)
Social Media: 1Password is tremendously helpful for entering website passwords, but a little-known feature also enables it to enter your Mac login password for changing system settings, installing apps, and more.
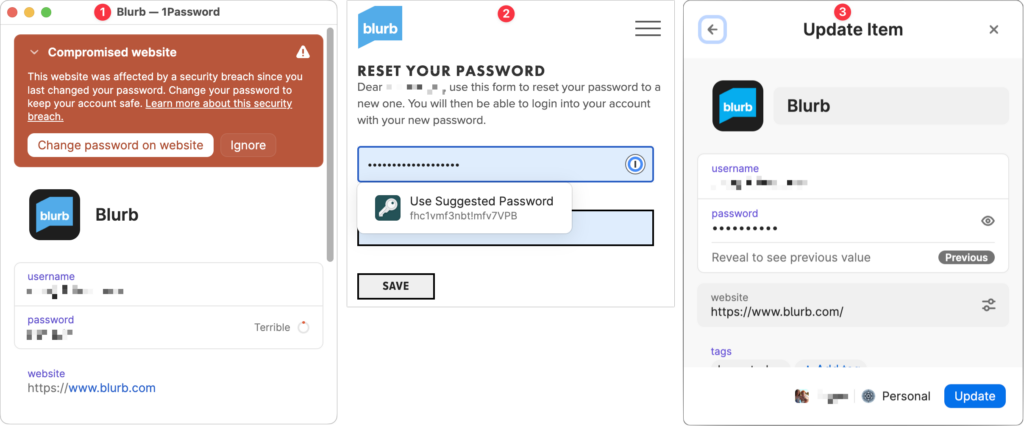
January’s big security news was the Mother of All Breaches, the release of a massive database containing 26 billion records built from previous breaches across numerous websites, including Adobe, Dropbox, LinkedIn, and Twitter. It’s unclear how much of the leaked data is new, but it’s a good reminder to update your passwords for accounts on compromised sites, especially those you reused on another site. Cybernews has a leak checker that reports which breached sites include your data. More generally, password managers often have a feature that checks your passwords against the Have I Been Pwned database of breaches and helps you change compromised passwords—1Password’s is called Watchtower, shown below. You can also search Have I Been Pwned directly. Don’t panic if your email address appears in numerous breaches because some of the theoretically compromised accounts may be defunct sites, trivial sites you used once 10 years ago, or duplicate password manager entries for a site whose password you already updated.
(Featured image by iStock.com/Prae_Studio)
Social Media: Worried about the “Mother of All Breaches” that has been making the rounds in security news? We share a leak checker that can tell you if your email address was involved and recommend that you update any compromised passwords.