Posts

Lift Objects from Photos on the iPhone

Have you ever wanted to extract an object from a photo for use in another context? Starting with iOS 16 on a relatively recent iPhone, you can do that with many photos. In the Photos app, touch and hold the object, and if Photos can extract it, you’ll see a highlight run around its edges. Raise your finger, and a popover lets you copy the object, look up information about it, turn it into a sticker (in iOS 17), or share it. Or you can start dragging the object, switch apps with your other hand, and drop it into another app, like Messages. With Universal Clipboard, you can even lift an object on an iPhone, copy it, switch to Preview on your Mac, and choose File > New from Clipboard. File this one under Arthur C. Clarke’s Third Law, which states, “Any sufficiently advanced technology is indistinguishable from magic.”

(Featured image by Adam Engst)


Social Media: Starting with iOS 16, Apple made it possible to extract objects from photos. You can drag objects to other apps, copy them, turn them into stickers, and more.

Open the Mac’s Control Center with This Obscure Keyboard Shortcut

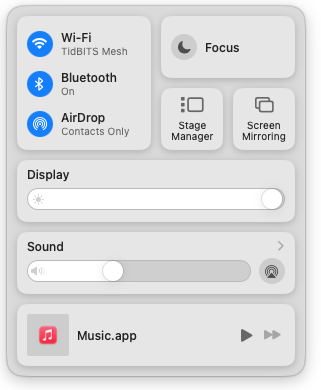
With macOS 13 Ventura, Apple brought Control Center from iOS to the Mac, providing a unified interface for features that users need to turn on and off regularly or that receive frequent adjustments, like screen brightness and audio volume. Clicking the Control Center icon in the menu bar brings it up, but it’s a small, hard-to-hit target. For faster and easier access to Control Center from within any app, press fn-C. (All current Apple keyboards have an fn key, but if you’re using a third-party keyboard that lacks one, you’re out of luck.)

(Featured image by Adam Engst)


Social Media: Control Center brings together controls for a collection of core macOS features, but its menu bar icon is small, making it hard for some to click. Luckily, there’s a hidden shortcut to bring it up quickly from the keyboard.

watchOS 10.1 Brings Double Tap to the Apple Watch Series 9 and Apple Watch Ultra 2

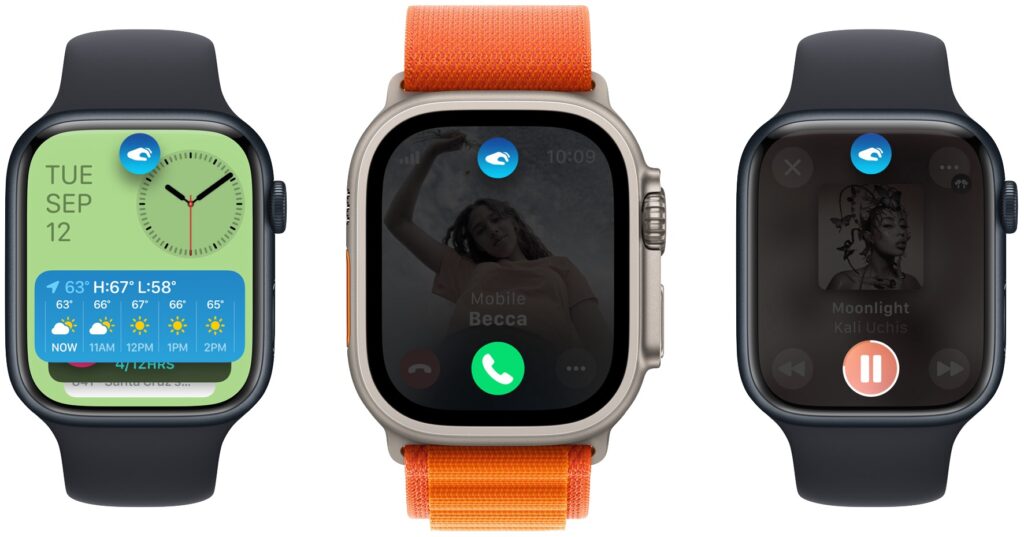
Apple recently released watchOS 10.1, with support for the much-ballyhooed double-tap gesture that selects the primary action in many apps without requiring that you touch the screen! It’s available only on the new Apple Watch Series 9 and Apple Watch Ultra 2, where you activate it by raising your wrist and tapping your thumb and index finger together twice. On the main Apple Watch screen, a double tap opens the Smart Stack of widgets you would otherwise get by turning the Digital Crown, and subsequent double taps advance through the widgets. A double tap also activates the primary action in many apps, such as answering and ending phone calls, playing and pausing media, viewing and scrolling through messages, ending timers, stopping and resuming the stopwatch, snoozing an alarm, responding to reminders from the Workout app, and performing the primary action from notifications. Whenever you double tap, you’ll see this icon at the top of the screen. If you have a supported Apple Watch model, give it a try!

(Featured image by Adam Engst, article image by Apple)


Social Media: Apple’s promised double-tap gesture is now available in watchOS 10.1 for those with an Apple Watch Series 9 or Apple Watch Ultra 2. Give it a try to perform the primary action in a watchOS app without touching the screen.

Erase Image Content in Preview with Copied Color Blocks

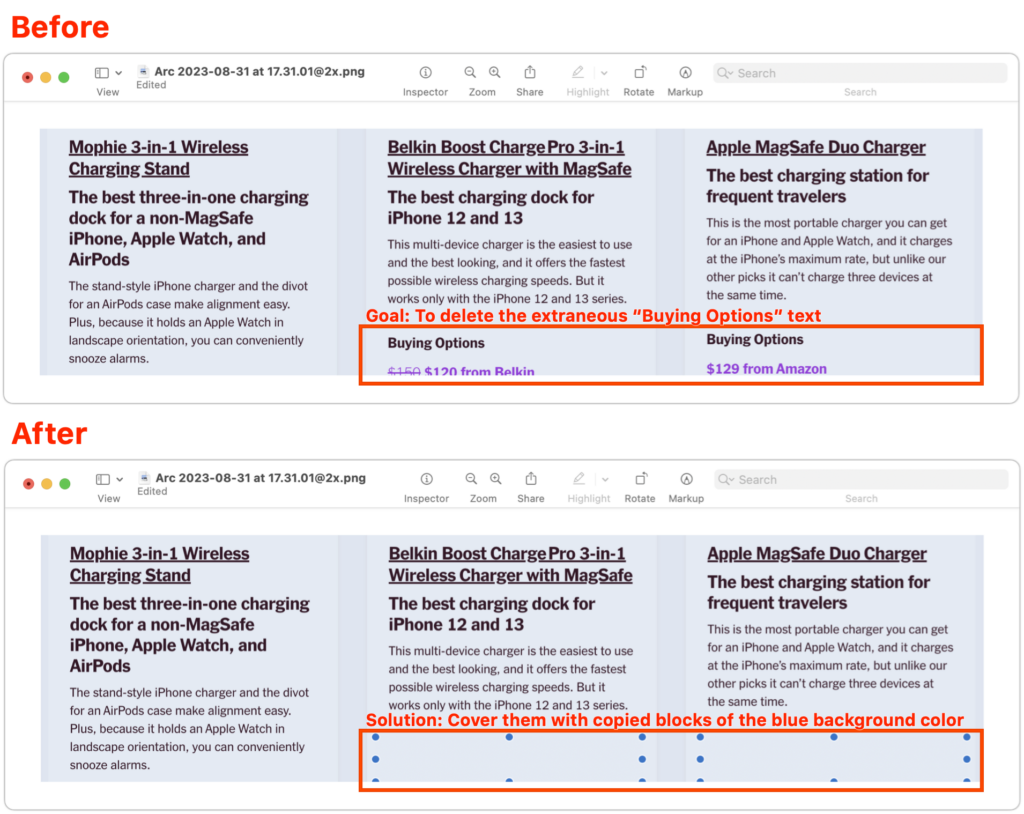
Apple’s Preview is a surprisingly capable graphics editor for making quick changes to screenshots and other illustrations, but it lacks a built-in way to delete content while leaving the background. Here’s the workaround—select a rectangle of the background color, copy it, paste it, and then move it over the undesirable content—as shown in the After screenshot below, where blue selection dots denote the pasted box. As you resize the box, press Shift to prevent it from resizing proportionally, which helps you make it the shape you want. If you need a second box of the same color, Option-drag the first box to copy it. When you save and close, your boxes will be merged into the image, permanently removing the content underneath, so make sure they’re in the right spot before moving on.

(Featured image based on an original by iStock.com/Seetwo)


Social Media: Have you ever needed to remove some content from a screenshot or other illustration? There’s no need for a fancy graphics app—you can do it quickly in Preview with this little-known trick.

Frustrated by System Settings? Use the View Menu or Search

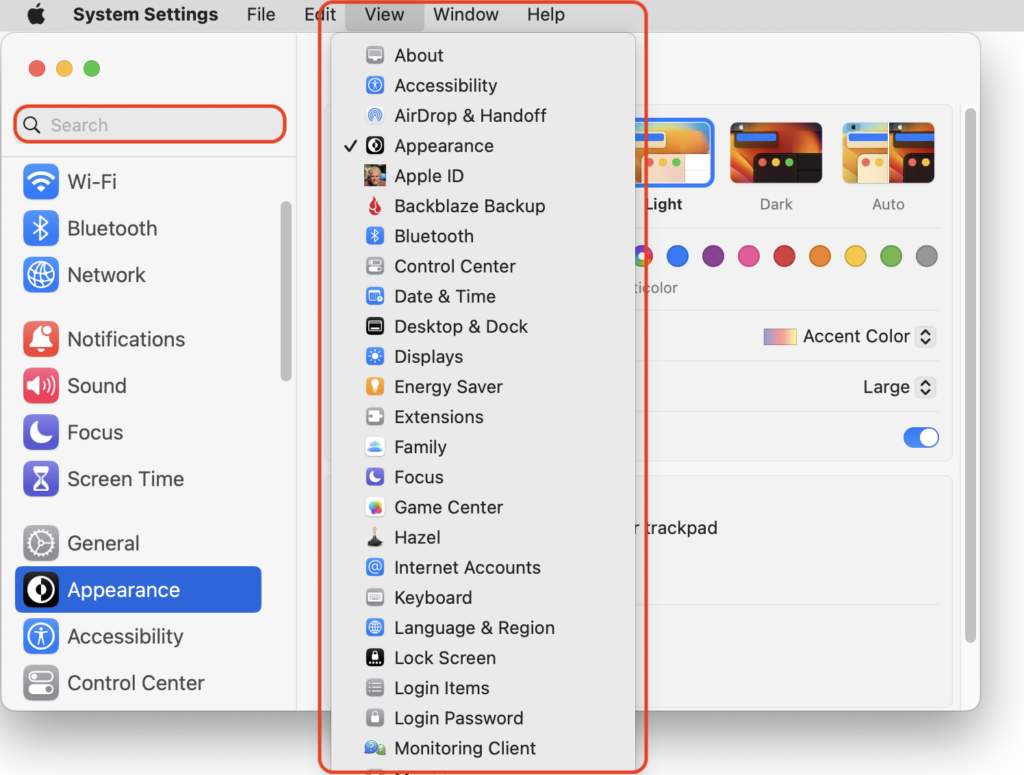
In macOS 13 Ventura, Apple replaced the creaky System Preferences with System Settings, which uses a more iOS-like interface. Many people find System Settings overwhelming, partly because they had memorized where to look in System Preferences (but System Settings has many other design flaws as well—it’s not your fault). We have two recommendations to make it more easily navigable. First, for an alphabetical approach, use the View menu, which lists the panes that way, along with the top-level items in the General settings pane. Second, make heavy use of the search field at the top of the System Settings sidebar—it’s the only way to find some deeply nested settings.

(Featured image based on an original by iStock.com/rootstocks)


Social Media: If you have trouble finding things in macOS Ventura’s System Settings app, you’re not alone. We have advice to help you navigate alphabetically or jump directly to a deeply nested setting.

Consider Moving Your Mac’s Dock to the Side of the Screen

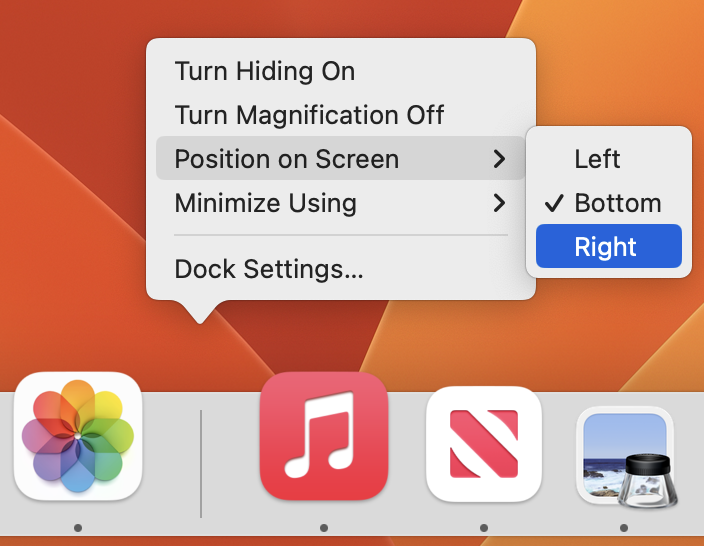
For most of us, our Mac’s screen is wider than it is tall, so longer Web pages and documents often benefit from more room from top to bottom. To maximize the amount of usable vertical space and reduce the need to scroll as much, you can set the Dock to hide automatically and appear only when you move your pointer to the bottom of the screen. A better approach is to position your Dock on the side of your screen where it’s less likely to use space you’d prefer to have available for content. Many people prefer the right side, but you can also try the left to see how it works for you. The easy way to move the Dock is to Control-click its separator bar and choose the desired side from the Position on Screen menu.

(Featured image based on an original by iStock.com/MikeLaptev)


Social Media: The default location of the Dock on the bottom of a Mac screen isn’t ideal because it takes valuable space that could contain content. Try hiding the Dock automatically or moving it to the side of the screen.

Convert Image Formats Directly in the Finder

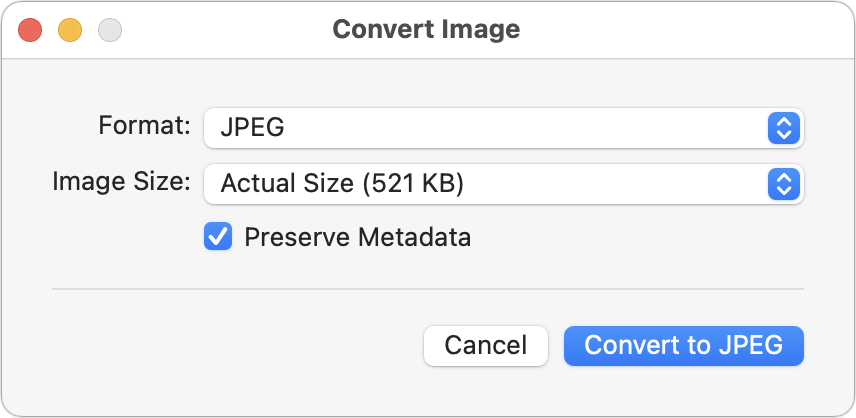
If you need to convert images to JPEG, PNG, or (unlikely) HEIF, try this hidden Finder feature: Control-click an image in one of those formats or other common image formats like TIFF, GIF, or PSD, and choose Quick Actions > Convert Image. A dialog lets you choose the destination format, the image size, and whether you want to preserve metadata. For straight conversions, stick with Actual Size, but if your goal is to shrink the file as well, you can choose a smaller image size. Leave Preserve Metadata selected unless you want to remove things like location metadata for privacy reasons. You can even select multiple files to convert them all at once.

(Featured image based on an original by iStock.com/marekuliasz)


Social Media: A hidden feature of the macOS Finder lets you quickly convert selected images from their original format to JPEG, PNG, or HEIF. If you regularly need to convert images between formats, it could save you some time.

Prevent Quick Screenshots from Cluttering Your Photos Library on the iPhone and iPad

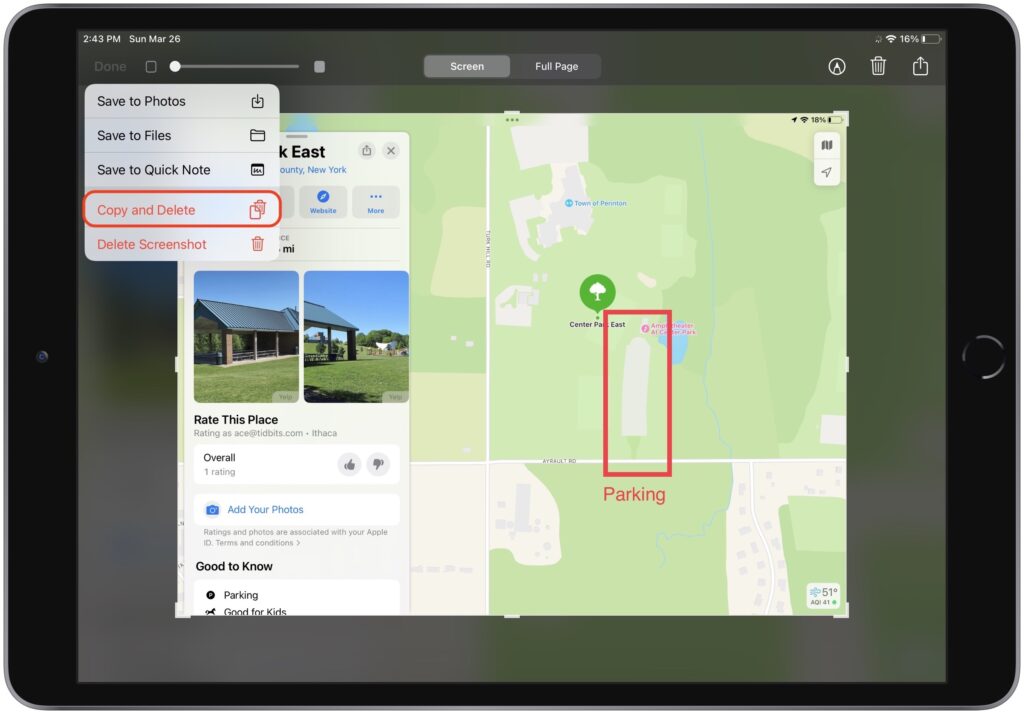
By default, when you take a screenshot (instructions for iPhone and iPad), it saves to Photos. But what if you don’t want something like a quick image of a map for a friend to clutter your Photos library? In iOS 16 and iPadOS 16, Apple has added new options. When you tap the screenshot thumbnail that appears briefly after pressing the capture buttons, you can crop and mark up your image. Or not. The key is that when you’re ready, tap Done to get an option to Copy and Delete, which is great when all you want to do is paste the screenshot into a Messages conversation or Mail message. You can also save to Photos, Files, or Notes, or just trash the screenshot if you’ve changed your mind.

(Featured image by iStock.com/simona flamigni)


Social Media: Do you take temporary screenshots on your iPhone or iPad so you can message what your screen looks like to a friend? If you don’t want these images saved in Photos, read on for a tip about how to move them to the clipboard for pasting instead.

iOS 16.4 Adds Voice Isolation Feature to Improve Cellular Calls

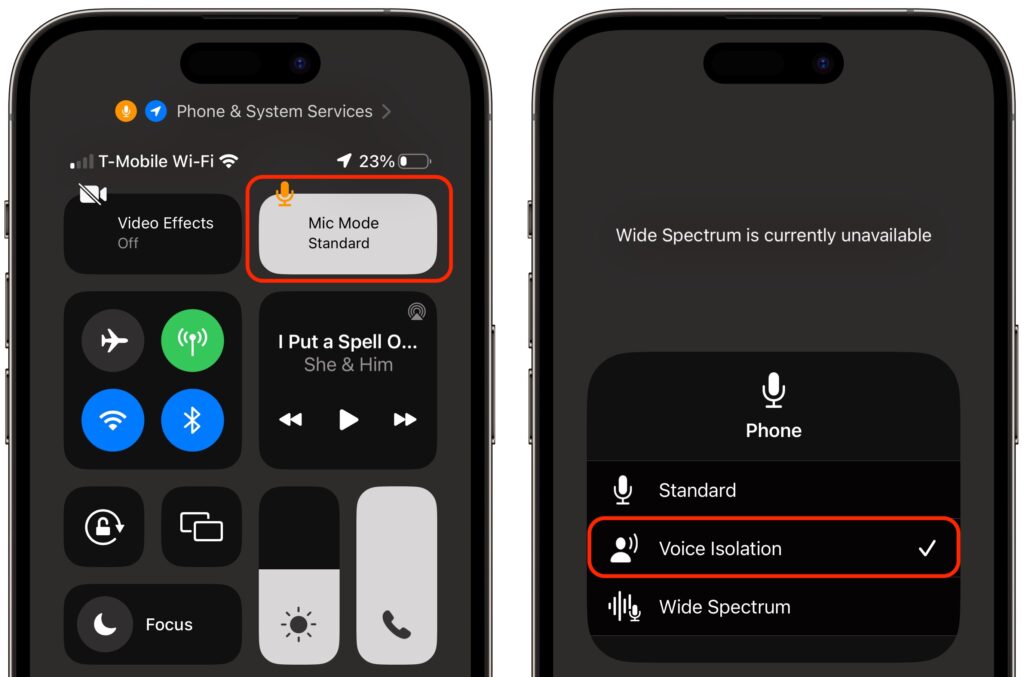
In iOS 15, Apple added the Voice Isolation feature to FaceTime calls to filter out noise around you while you’re talking, which is a boon if you’re making a call in a loud space or outside environment. With the recently released iOS 16.4, Apple has now brought that feature to cellular calls as well, but it’s not an option in Settings > Phone, as you might expect. Instead, during a call, open Control Center by swiping down from the top right of the screen (Face ID iPhones) or up from the bottom (Touch ID iPhones). Then tap the Mic Mode button and Voice Isolation. You won’t hear any difference, but the person on the other end should be able to hear you better. iOS remembers your setting, so switch back to Standard when you’re done—Voice Isolation may not sound as good as Standard in quiet spaces.

(Featured image by iStock.com/Jub Job)


Social Media: If you make phone calls in loud environments, you can now be heard more easily with iOS 16.4’s new Voice Isolation feature for cellular calls. The tricky part is enabling it in Control Center while talking.

Set Your Apple Watch Clock Ahead a Few Minutes to Avoid Being Late

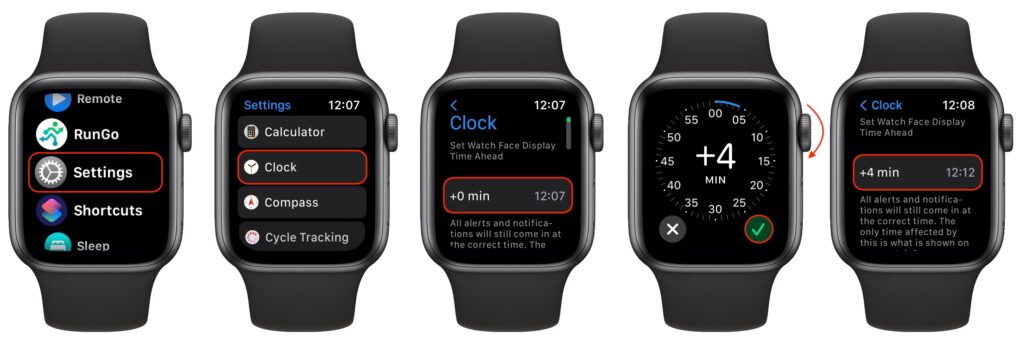
Those who tend to cut things tight have a time-honored tradition of setting their watches ahead by a few minutes. That way, when you glance at your watch and realize that you need to leave, you actually have a few more minutes. You can do this with your Apple Watch, but only on the watch itself. Press the Digital Crown to see your apps, tap Settings, scroll down to and tap Clock, tap the button for Set Watch Face Display Time Ahead, and use the Digital Crown to choose your desired time adjustment. Note that this setting affects only the time you see on the watch face. All alarms and notifications will come in at the correct times.

(Featured image by iStock.com/Bobex-73)


Social Media: Want to give yourself a few more minutes to get to meetings on time? Use this little-known option to set the time displayed on your Apple Watch ahead by a few minutes.