Posts

Read More Easily on the iPhone with Safari Reader

Do you sometimes find it difficult to read articles on your iPhone because of ads, banners, extraneous layout, social media icons, and too-small fonts? We certainly do, and there’s often a quick fix for the myriad ills of modern Web pages: Safari Reader. Whenever you see the Safari Reader icon to the left of the site’s domain name in the address bar, tap it to switch to a cleaner view that dispenses with all the unnecessary trimmings and presents the content in a larger, more readable font. Tap the font  icon at the right side of the address bar in Safari Reader to change the font, font size, and background color. Safari Reader isn’t always available, and it can occasionally fail to format an article properly, but it’s a big win when you can use it.

(Featured image by Atlas Green on Unsplash)

Catching up with Apple in May: New MacBook Pros, New iPod touch, OS Updates

Apple is well known for its splashy media events, now usually held in the Steve Jobs Theater at the company’s new Cupertino campus. But Apple reserves such events for major announcements. Smaller announcements, such as minor updates to particular product lines, operating system updates, or new repair programs, get only a press release, if that.

But just because a change doesn’t merit much fuss doesn’t mean it’s uninteresting—if you’ve been waiting for the right moment to buy a new Mac, for instance, an announcement of a small MacBook Pro revision might be exactly what you want to hear.

Here’s a roundup of Apple’s recent announcements in May 2019.

New MacBook Pro Models Feature Faster CPUs and New Butterfly Keyboards

Although Apple has a reputation for innovation, the company should also be lauded for its evolutionary changes, which are much more common. To wit, Apple quietly updated the 13-inch and 15-inch MacBook Pro models equipped with a Touch Bar with faster CPUs while keeping the prices the same.

You can now buy a 15-inch MacBook Pro with the latest 9th-generation 8-core Intel Core i9 processor, making it the fastest MacBook Pro ever—the previous model offered only a 6-core processor. The 15-inch models also offer faster graphics processors as options.

The 13-inch MacBook Pro models didn’t receive the same level of changes, but they gained slightly faster 8th-generation Intel processors that provide minor performance improvements.

Both models now come with the fourth generation of Apple’s controversial butterfly keyboard. We’ll have more on that issue soon.

Apple Launches MacBook Pro Repair Program for “Flexgate”

13-inch MacBook Pros from 2016 are susceptible to a display-related problem the press has dubbed “Flexgate.” According to Apple, affected Macs exhibit one or both of these symptoms:

  • The display backlight continuously or intermittently shows vertical bright areas along the entire bottom of the screen.
  • The display backlight stops working completely.

The problem is related to a flex cable connected to the display that’s too short and too fragile; some repair experts have suggested that failure is inevitable.

If your 13-inch Mac is showing either of these symptoms, you can now take advantage of Apple’s new 13-inch MacBook Pro Display Backlight Service Program to get a free repair. You can have your Mac fixed by Apple or an Apple Authorized Service Provider, and if you already paid for a repair, you can request a refund from Apple.

iOS 12.3 and tvOS 12.3 Add New TV App; iOS 12.3.1 Fixes Calling Bug; macOS Addresses ZombieLoad

As you’ve no doubt noticed in your Software Update notifications, Apple recently updated all its operating systems: iOS 12.3.1, macOS 10.14.5, watchOS 5.2.1, and tvOS 12.3. If you’re already running iOS 12 and macOS 10.14 Mojave, it’s fine to update.

iOS 12.3 and tvOS 12.3 are notable primarily because they include a new version of Apple’s TV app. This app now provides access to “channels,” by which Apple means subscription-based streaming video services like HBO and Showtime. Apart from letting you subscribe to such services inside the app and playing content from them in the app, the new app looks and works much like the previous version. The new app will also support Apple’s original content on the Apple TV+ service later this year.

Shortly after iOS 12.3 shipped, Apple released iOS 12.3.1, which fixes a critical bug that could prevent your iPhone from making or receiving phone calls. So if you upgraded to iOS 12.3, be sure to update to iOS 12.3.1 right away.

Similarly, it’s worth updating to macOS 10.14.5 to protect against a security vulnerability called ZombieLoad, and if you’re still running 10.12 Sierra or 10.13 High Sierra, be sure to install Security Update 2019-003 for the same protection.

New iPod touch Gains the A10 Chip and a 256 GB Configuration

Finally, Apple showed a little love to the littlest iOS device, the diminutive iPod touch. In the new model, Apple swapped the old A8 chip for a faster A10 chip that promises up to twice the performance. That added performance enables the new iPod touch to support Group FaceTime calls and enhanced augmented reality (AR) games.

The only other change in the iPod touch is that Apple now sells a 256 GB configuration for $399, joining the 32 GB configuration at $199 and the 128 GB configuration for $299.

(All images courtesy of Apple)


Social Media: If you haven’t been paying close attention, you might have missed Apple’s new MacBook Pros, new iPod touch, support for other streaming services in the TV app in iOS 12.3 and tvOS 12.3, and a repair program for “Flexgate.” Read on for details:

Can’t Remember When Your Warranty Expires? iOS 12.2 Lays It Out

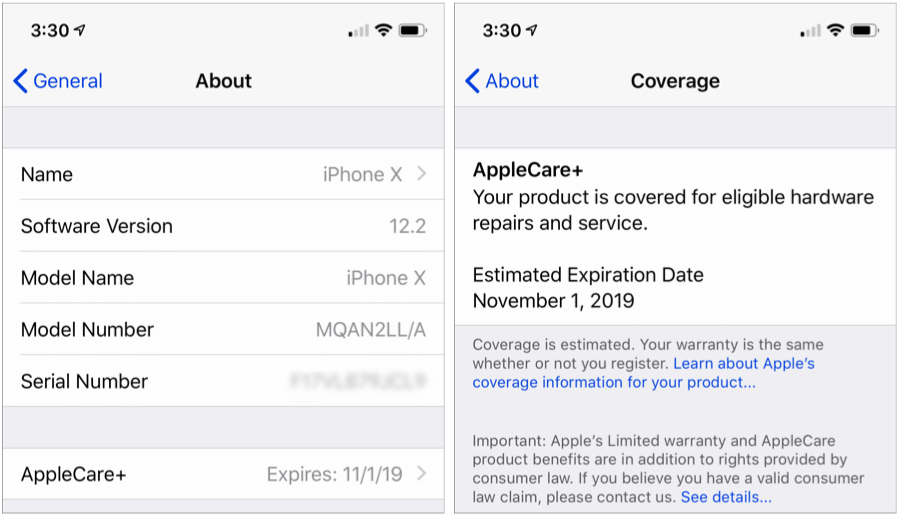
With luck, you should never need to check your iPhone’s or iPad’s warranty status. But bad things do happen to good devices. In iOS 12.2, Apple has just made it easier to figure out if your device is still under warranty or covered by AppleCare+. Go to Settings > General > About, where you’ll find a new entry that’s either called Limited Warranty (the basic Apple warranty) or AppleCare+ (the extended warranty you can buy). The entry shows the expiration date, and tapping it provides more details on the Coverage screen. If your iPhone or iPad doesn’t have AppleCare+ but is eligible for it, you can even buy it from this screen. You won’t see anything if your device is out of warranty and no longer eligible for AppleCare+.

Beware Microsoft Office 365 Phishing Attacks!

We’re seeing an uptick in email phishing attacks purporting to come from Microsoft about Office 365. They’re quite convincing messages that tell users that their credit card payment has failed, that an account needs renewing, or that a password needs to be confirmed. Needless to say, they’re all complete scams, and clicking a link in them takes you to a malicious Web page that will try to steal your password or credit card details. As we noted in “Gone Phishing: Five Signs That Identify Scam Email Messages,” large companies never send email asking you to click a link in order to log in to your account, update your credit card information, or the like. Hover over links to see where they go before clicking anything, and stay safe out there!

Clean Up Old Tabs in Safari in iOS with This Quick Trick

Every time you tap a link to open a Web page in Safari on your iPhone or iPad, it automatically opens a new tab. That’s fine until you realize that you have oodles of old tabs open, making it difficult to find any particular tab. To close all your old tabs in one fell swoop, press and hold on the tab button, then tap Close All X Tabs in the popover that appears.

Is Your Apple Watch Out to Lunch? Check These Settings

Is your Apple Watch failing to turn on its screen when you raise it, display notifications from your iPhone, or even update the time zone? watchOS has four modes accessible from Control Center (swipe up from the bottom of the screen) that are useful but can cause confusion if you forget to turn them off:

  • Silent Mode: In Silent mode, your Apple Watch won’t make any sounds, but will provide haptic feedback you can feel on your wrist.
  • Theater Mode: When in Theater mode, your Apple Watch not only turns on Silent mode, it also keeps the screen dark unless you tap the screen or press a button.
  • Do Not Disturb: As with Theater mode, enabling Do Not Disturb turns on Silent mode and prevents notifications from lighting up the screen.
  • Airplane Mode: Invoking Airplane mode turns off the Apple Watch’s Wi-Fi and Bluetooth radios, and the cellular radio if your watch supports that. Without Wi-Fi and Bluetooth, the watch can’t communicate with your iPhone and will thus miss notifications and time zone changes.

Need to Merge Photos Libraries? Here Are Your Options

Photos makes it easy to create and switch between libraries. That’s good when photos need to be kept completely separate. For instance, a real estate agent might want to keep personal photos separate from house photos taken for work. But too much separation is annoying—you have to keep switching between libraries, and it’s easy to import new photos into the wrong one.

If you struggle with multiple Photos libraries, never fear—you can merge them. Unfortunately, the process is slow, can require a lot of disk space, and may result in the loss of some metadata. You have three options: merging through iCloud Photos, using the PowerPhotos utility, and merging by exporting and importing. Each has pros and cons.

Merge through iCloud Photos

Apple’s iCloud Photos service offers the best solution for merging libraries. The trick is that whenever you designate a library as your System Photo Library, Photos automatically uploads all images that aren’t already present, adding them to the photos already in iCloud Photos. It also retains all the metadata surrounding your photos—titles, keywords, albums, facial recognition, projects, and more.

On the downside, using iCloud Photos almost certainly won’t be free unless you have so few photos that the combined library will fit within the free 5 GB of iCloud space Apple gives everyone. Almost everyone will have to pay for additional storage space ($0.99 per month for 50 GB, $2.99 for 200 GB, or $9.99 for 2 TB) for at least the month in which you’re doing the merge. iCloud Photos is a good service, so it’s likely worth paying for anyway.

More problematic is that the iCloud Photos way of merging will be very slow. If you haven’t already started using it, it could take a week or more to upload many thousands of photos. Plus, it will probably download the entire cloud-based collection of photos to each library whose photos you want to merge, so you may need a lot of local disk space too.

If you haven’t previously used iCloud Photos, go to System Preferences > iCloud and click the Options button next to Photo. In the dialog, select iCloud Photos.
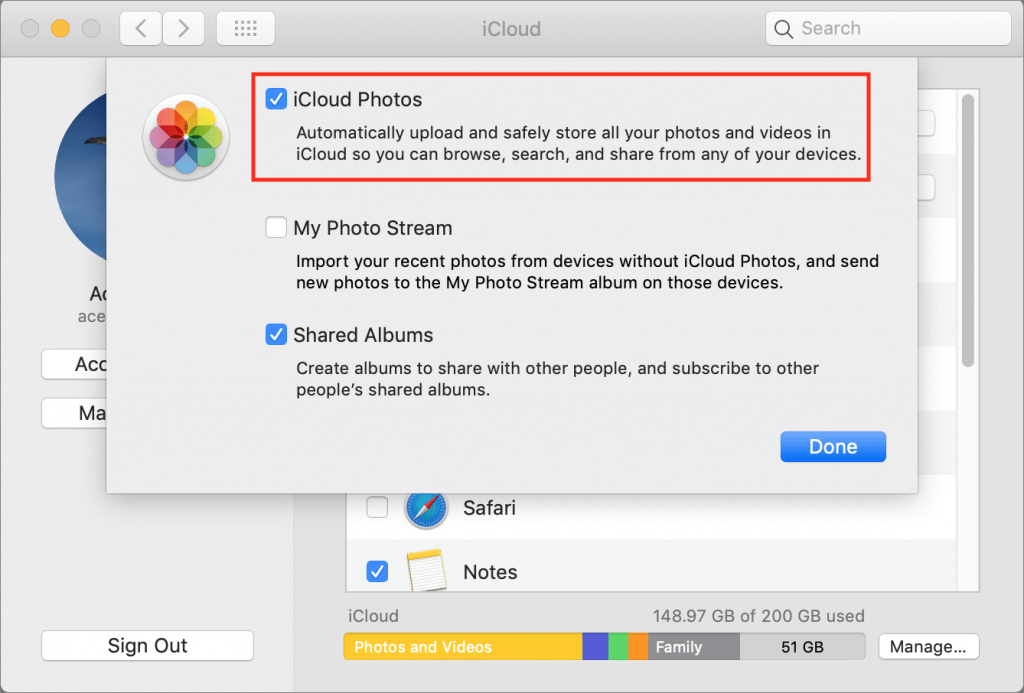
Now, starting with the smallest Photos library and working up in size, follow these steps for each library you want to merge:

  1. Double-click the Photos library to open it.
  2. In Photos > Preferences > General, click Use as System Photo Library. (If it’s dimmed out, that library is already set as the System Photo Library.)
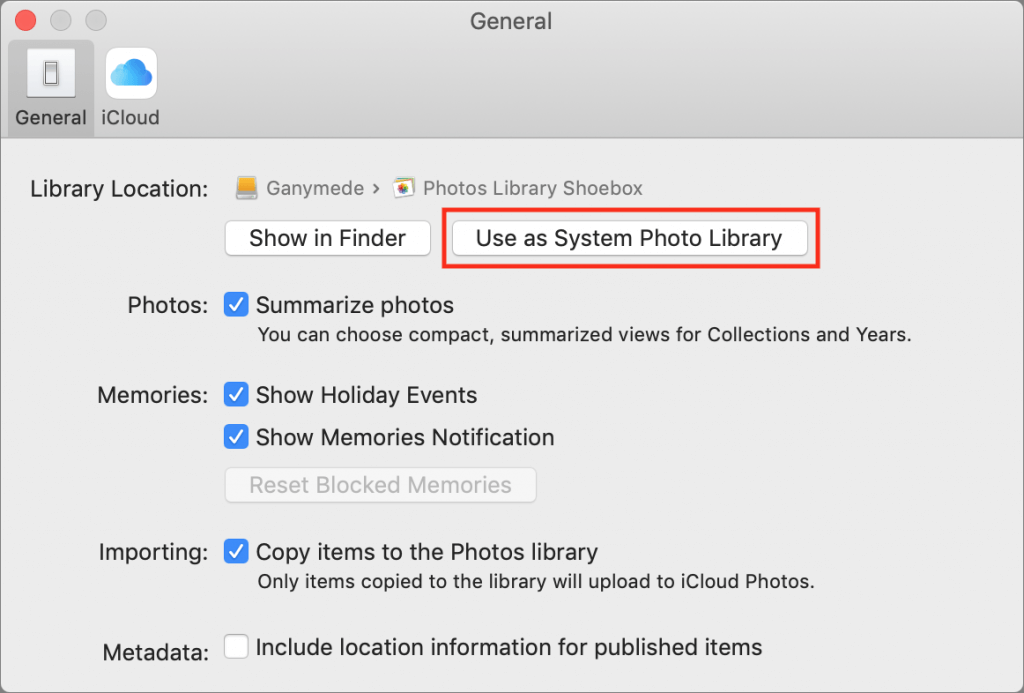
  3. Wait for photos to upload. Scroll to the bottom of the Photos view to see the progress. A Pause link will appear there during uploading—click it if you need to keep Photos from overwhelming your Internet connection. Once the photos have all uploaded, go back to Step 1 with your next Photos library.

When you’re done, the last Photos library becomes the one you’ll keep, and you can delete the others. Needless to say, make sure you have good backups first!

Merge with PowerPhotos

The $30 PowerPhotos from Fat Cat Software provides a variety of extra capabilities when working with Photos. It helps you to create and manage multiple libraries, copy photos between libraries, find duplicates, and—most important for this topic—merge libraries.

Because PowerPhotos is working entirely on your Mac’s drive, it’s fast and it doesn’t require huge amounts of extra disk space. Unfortunately, unlike the iCloud Photos approach, which brings in both originals and any edits to those photos, PowerPhotos can import only your original photos or the versions that you’ve edited, not both. Plus, it can’t merge facial recognition data, smart albums, or print projects.

PowerPhotos provides an actual interface for merging too—choose Library > Merge Libraries to start.

In the window that appears, you have four tasks:

  1. Choose source libraries. You aren’t limited to merging just two libraries; you can pick multiple sources.
  2. Choose the destination library. This is the library you want to receive all the photos. If you want, you can create a new one.
  3. Configure duplicate handling. PowerPhotos can import just one of several copies of duplicate photos, or you can bring in all the duplicates if that’s important.
  4. Choose options. PowerPhotos can merge album contents, create an album from each source library, and create a backup before merging. Most important, though, is the choice of whether to merge your original photos or the edited versions.

Merge by Exporting and Importing

This final option is conceptually simple. You export all the photos from one library and then import them into another. It’s even what Apple recommends. The main thing it has going for it is that it’s free, and it will be faster than the iCloud Photos approach. It could also be useful if you want to copy a subset of photos between libraries, rather than merging all photos.

However, as with PowerPhotos, you have to choose between original and edited photos, and you’ll need a lot of extra disk space. Even worse, you’ll lose even more metadata, including albums, faces, and print projects. And if you export as JPEG, your photos may also suffer a slight quality drop as they’re recompressed.

For those who want to use this approach, Apple provides detailed instructions. In essence, you’ll click Photos in the sidebar to see everything, and then choose Edit > Select All. Then you’ll choose File > Export and either Export X Photos (to get the edited versions of images) or Export Unmodified Original for X Photos (to get the original images). Once everything has exported, you’ll switch libraries in Photos and then drag the folder of exported images back into Photos to import it.

Our nod goes to the iCloud Photos technique, but PowerPhotos is a fine utility for those who aren’t perturbed by its limitations. Of course, don’t start any merging without making backups first, and if you need help, don’t hesitate to call us.


Social Media: If you want to merge Photos libraries to avoid having to switch back and forth, there are several approaches you can take, but each comes with pros and cons. See them all at:

Photos Not Syncing between Devices Properly via iCloud Photos?

iCloud Photos (which Apple previously called iCloud Photo Library) is wonderful when it’s working. Take some photos on your iPhone, and they appear on your Mac and iPad a minute later. Delete unnecessary shots and edit the others on your Mac, and your iPhone and iPad reflect those changes almost immediately. But what if changes aren’t syncing? Photos in iOS and macOS can pause syncing for a variety of reasons, and sometimes it doesn’t restart when it should. To see if this is happening, go to the very bottom of the Photos view in Photos, where it lists the number of photos and videos you have stored. Below that number is the sync status. If it has a reason and a Resume link, click or tap Resume to start it again.

Look before You Leap with Safari’s Link Preview

When you follow a link in Safari, you generally don’t know where you’re going to end up. That’s fine most of the time, but what if you’re concerned that a site might be trying to trick you into going somewhere malicious? Safari provides an easy way to look at the URL under a link. On the Mac, choose View > Show Status Bar, hover your pointer over the link, and look at the bottom of the window. In iOS, touch and hold a link (don’t press for 3D Touch) until a popover appears, showing the link and giving you options for opening it. The most important thing to look at is the domain—us.norton.com in the screenshots. It should match where you think you’re going, or at least look reasonable. If the URL is dubious, don’t follow the link.

Use Emergency Bypass and You’ll Never Miss a Call or Text from Important People

There’s little worse than missing an important call or text because your iPhone was in Do Not Disturb mode or because the Mute switch was engaged. If there are certain people—a spouse, parent, or child—whose calls and texts you always want to break through the cone of silence, iOS has a solution: Emergency Bypass. When enabled for a particular contact’s ringtone or text tone, Emergency Bypass ensures the sound and vibration will happen regardless of Do Not Disturb or the Mute switch position. To set up Emergency Bypass, edit the person’s contact card in the Phone or Contacts app, tap Ringtone, and enable Emergency Bypass. You can turn on Emergency Bypass separately for calls in the Ringtone settings and for texts in the Text Tone settings. And remember, you can always set someone’s tone to None and enable a vibration instead to ensure Emergency Bypass doesn’t allow a call to interrupt a movie, play, or concert.