Posts

Not All Your Mac’s USB-C Ports Are the Same

We recently helped a client set up an external boot drive on a Mac mini for testing, but the installation kept failing near the end with vague errors. We tried different cables, swapped drives, and more, to no avail. On a hunch, we moved the SSD to a different USB-C port, and the installation completed on the next attempt. But the port wasn’t bad—it was just the wrong port. Here’s what we mean.

All the USB-C ports on a Mac look identical, but they don’t all behave the same way. On Macs with Apple silicon and Intel-based Macs with the T2 chip, Apple designates one port as the DFU (device firmware update) port. Most of the time, this distinction doesn’t matter—you can plug a device into any port, and it’ll work normally. But for certain tasks, using the wrong port can cause mysterious failures that waste hours of troubleshooting time.

Note that we say “USB-C” here, even though in most cases, these are Thunderbolt ports. However, Thunderbolt uses the USB-C connector, and Apple refers to the ports as USB-C ports, so we’re following Apple’s lead.

When It Matters Which Port You Use

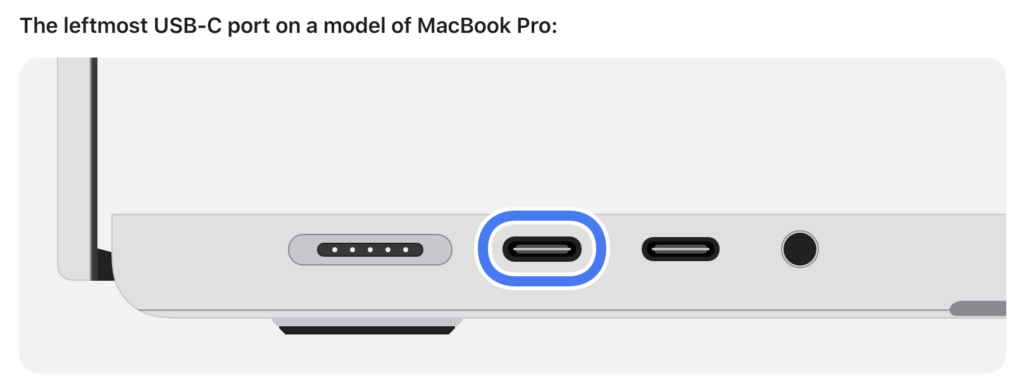
The DFU port exists for one specific purpose: reviving or restoring your Mac’s firmware using another Mac and the Apple Configurator app. This recovery procedure requires connecting a USB-C cable (not a Thunderbolt cable!) to the DFU port. It’s extremely uncommon to need to revive a Mac in this way, but it might be necessary if the Mac starts up to an exclamation point in a circle, starts up to a blank screen, shows the status indicator light pattern for firmware recovery mode, or has problems installing macOS.

For most everyday tasks, the DFU port should work like any other USB-C port. However, Apple has documented one notable exception on Macs with Apple silicon: when installing or updating macOS on an external drive, avoid using the DFU port. If your external drive is connected to it during installation, the process may fail partway through, often without a useful error message and certainly without a clear “Connect your drive to a different port” message. You might see vague notifications like “Some updates could not be installed” or cryptic errors like “com.apple.OSInstallerSetup.error 702.” After installation or updating completes, you can connect your external drive to any port, including the DFU port.

We’ve also heard of situations where seemingly inexplicable problems, such as errors from an Apple SuperDrive attached to a Thunderbolt dock, were resolved by switching to a different port. It wasn’t always clear which port was responsible, but it’s always worth trying a different one if you have trouble.

Finding Your Mac’s DFU Port

How do you figure out which USB-C port is the DFU port? Apple maintains a support document describing the DFU port locations for each Mac model. The location varies by model and, within the same model, sometimes by generation. Apple does not explain why a particular port is designated as the DFU port or provide another way to identify it. All you can do is refer to Apple’s documentation.

Unfortunately, users have found errors on that page in the past, so if you’re experiencing unexplained installation failures or other errors, try a different port even if you believe you’re using the correct one.

DFU Port Takeaways

For everyday use—connecting displays, drives, docks, and other peripherals—you shouldn’t need to think about which port you’re using. The only time you must use the DFU port is when reviving or restoring a very unhappy Mac.

However, if you’re setting up an external boot drive or updating macOS on an external drive, take a moment to identify your Mac’s DFU port and plug your drive into a different one. And if a peripheral, even if it’s connected through a dock, behaves inexplicably, treat the port itself as a variable. Before troubleshooting cables, drives, or software, move the connection to another USB-C port. This simple step can save you from frustrating troubleshooting sessions where everything appears to work but ultimately fails.

(Featured image by iStock.com/Milosz Deptula)


Social Media: Your Mac’s USB-C ports look identical, but one is special—and using it can cause macOS installations or updates on external drives to fail, or trigger other errors with Thunderbolt docks. Learn which USB-C port isn’t like the others.

Apple Silicon Macs Can’t Boot from the DFU Port

Booting from an external SSD (hard disks are too slow) provides a convenient way to test specific versions of macOS or troubleshoot problems with your Mac’s internal storage. However, a little-known gotcha has caused untold hair loss among those trying to boot from an external drive. Macs with Apple silicon cannot start up from external drives connected to their DFU (device firmware update) USB-C port. The only way to determine which port this is on a given Mac is to look it up on Apple’s website. If your Mac won’t boot from an external drive, connect it to a different USB-C port.

(Featured image by iStock.com/ardasavasciogullari)


Social Media: If your Apple silicon Mac won’t boot from an external drive, the issue may be related to which USB-C port you’re using—the special DFU port cannot be used for booting from external drives. Learn how to identify that port on your Mac.

Apple Releases New iPad, iPad Pro, and Apple TV

In a series of press releases—no big video event this time—Apple has announced upgrades to the iPad, iPad Pro, and Apple TV. The new models are largely evolutionary, with changes that are welcome but unlikely to change your iPad or Apple TV experience. All are available to order now, with the new iPads arriving on October 26th and the new Apple TV hitting stores on November 4th.

One other note. iPadOS 16 and macOS 13 Ventura ship on October 24th. iPadOS 16 is probably safe to install soon, given the extent to which it’s similar to iOS 16, though the Stage Manager window management feature still has rough edges. Do not upgrade to Ventura until we’ve had a chance to evaluate its stability and compatibility.

New Tenth-Generation iPad Has iPad Air-like Design, Higher Price

The product receiving the most significant changes is the iPad, now in its tenth generation. Apple redesigned it to look and work more like the iPad Air, with squared-off sides, an all-screen design, a 10.9-inch display, USB-C instead of Lightning, and Touch ID in the top button. Also like the iPad Air, the iPad now has a 12-megapixel rear-facing camera and features Wi-Fi 6 plus 5G support in the cellular models for faster connectivity. Perhaps most interestingly, Apple finally repositioned the front-facing 12-megapixel camera along the landscape (long) edge of the iPad so you’ll be looking into the camera for video calls. Oddly, the new iPad Pro models didn’t also receive this improvement.

Despite the similarities, the iPad Air retains its technical superiority (and justifies its higher price) in two big ways. First, the tenth-generation iPad relies on the A14 Bionic chip that’s faster than the ninth-generation iPad’s older A13 Bionic but slower than the iPad Air’s higher-performance M1 chip. Second, the tenth-generation iPad remains compatible only with the first-generation Apple Pencil, presumably because Apple left the wireless charging hardware out to cut costs. Since the new iPad switches from Lightning to USB-C, you’ll need a $9 USB-C to Lightning adapter to pair and charge the Lightning-based Apple Pencil—that’s awkward.

Apple also introduced a new keyboard exclusively for the tenth-generation iPad, the Magic Keyboard Folio. It features full-size keys, a large trackpad, and a 14-key function row. The two-piece design separates the keyboard from the back cover, so you can fold the keyboard behind the iPad or detach it entirely when you’re not using it. The back cover has an adjustable stand for positioning the iPad at several angles. It’s available only in white.

The only problem is that all these changes come at a cost. Historically, the iPad has been Apple’s best value, with the ninth-generation iPad’s price starting at just $329. The new tenth-generation iPad now starts at $449 for the 64 GB Wi-Fi model. Add $150 if you prefer 256 GB of storage, and another $150 if you want cellular capabilities too. You can choose from blue, pink, yellow, and silver finishes.

So now, when pondering a full-size iPad, you have three options. The ninth-generation iPad remains available at $329 for those looking to pay the least. The tenth-generation iPad is now the middle choice at $449. And for those who want a better Apple Pencil experience, faster performance, and slightly better specs, the iPad Air starts at $599.

New iPad Pro Offers M2 Chip, Faster Wi-Fi, and Apple Pencil Hover

Apple has also updated the iPad Pro, but with fewer changes. Foremost among them is Apple’s M2 chip, which provides the iPad Pro with the ultimate in performance. The M2 enables users to capture ProRes video for the first time and to transcode ProRes video up to three times faster than before.

That said, only those already pushing the limits on the previous iPad Pro models should consider upgrading from the previous M1 models since the difference isn’t likely to be that noticeable for less demanding workflows. Similarly rarified is the move to Wi-Fi 6E, which supports wireless networking at up to 2.4 Gbps, or twice as fast as the previous generation. Apple also expanded the 5G networking for the cellular-capable models to support more 5G networks around the world.

The new iPad Pro can also detect when the second-generation Apple Pencil is hovering up to 12 millimeters above the screen, displaying a circle that helps you position the tip of the Apple Pencil more precisely.

The new iPad Pro retains the same pricing, with the 11-inch model starting at $799 and the 12.9-inch model starting at $1099.

Increasingly, Apple is targeting the iPad Pro at video, audio, and graphics professionals interested in iPad-focused workflows. If that’s you, the new iPad Pro is worthwhile; those just looking for a high-performance iPad would be more economically served by the M1 iPad Air, which is $200 less expensive.

Third-generation Apple TV 4K Boasts Better Specs for Lower Prices

Along with the new iPads, Apple also refreshed its Apple TV lineup, introducing the third-generation Apple TV 4K and dropping the old Apple TV HD. The design remains essentially the same, with the big change being an upgrade from the previous model’s A12 Bionic chip to the faster A15 Bionic for faster performance and more fluid gameplay. Apple also doubled the storage and added support for HDR10+ to provide the best possible video quality across more TVs. Finally, the Siri Remote now charges via USB-C instead of Lightning.

The new Apple TV 4K comes in two models, much like previous generations, but this time there are differences beyond storage, which is important only for apps and games. The $129 Apple TV 4K (Wi-Fi) provides 64 GB of storage and supports only wireless networking, whereas the $149 Apple TV 4K (Wi-Fi + Ethernet) comes with 128 GB of storage, includes a Gigabit Ethernet port for faster wired connectivity, and supports the Thread mesh networking protocol for smart home accessories.

Those prices are $50 lower than the previous generation’s. For those who aren’t interested in Apple TV games, home automation, and wired networking, the $129 Apple TV 4K (Wi-Fi) is significantly more compelling than last year’s more expensive model.

(Featured image by Apple)


Social Media: Apple has released a redesigned tenth-generation iPad with the new Magic Keyboard Folio, new M2 iPad Pro models, and a lower-cost Apple TV 4K with a faster processor and twice the storage. Read on for details: