Last year, Apple started to transition Macs away from Intel processors to its custom M1 system-on-a-chip. The M1’s performance is stellar, but Apple has used it only in low-end models so far: the MacBook Air, 13-inch MacBook Pro, Mac mini, and new 24-inch iMac. For professionals looking for more power, Apple unveiled the future of high-end Macs at its October 18th Unleashed event.
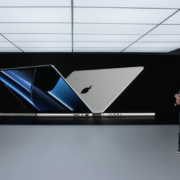
Two new chips—the M1 Pro and M1 Max—increase performance significantly beyond the M1, and Apple built them into new 14-inch and 16-inch MacBook Pro models along with features that respond to criticisms of previous models. Welcome as these new MacBook Pros are, many people were also hoping to see an Apple silicon refresh of the popular 27-inch iMac. That didn’t happen, but Apple released several other music-related products and services at the event.
AirPods, HomePod mini, Apple Music, and Monterey Announcements
In a quick set of announcements at the start of its event, Apple revealed an update to the popular AirPods, new colors of the HomePod mini, and a budget pricing tier for Apple Music. Plus, press releases revealed the ship date for macOS 12 Monterey.
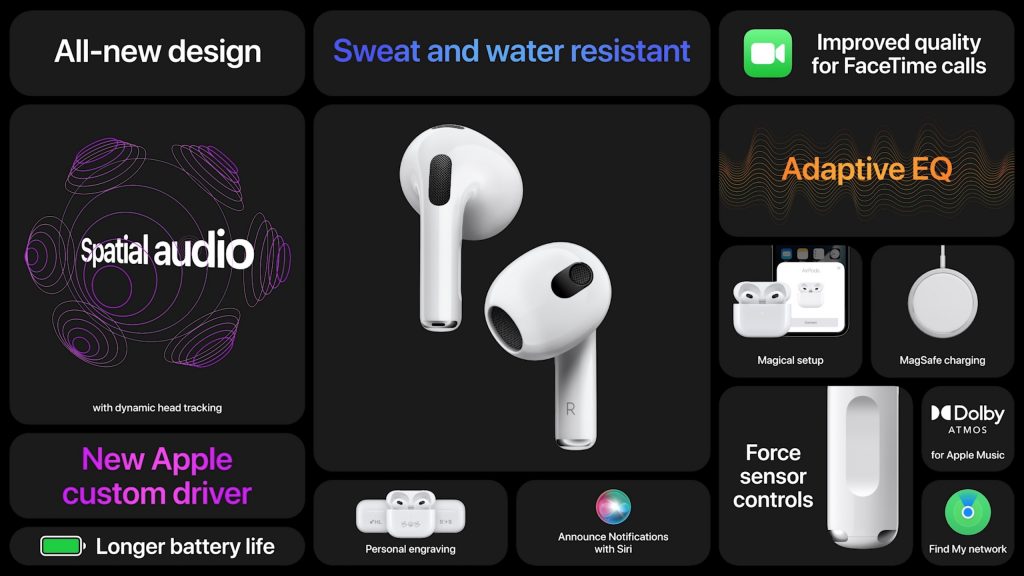
- Third-generation AirPods: Building on the success of the classic AirPods and AirPods Pro, Apple redesigned the third-generation AirPods to have shorter mic stalks, force sensor controls, support for spatial audio, Adaptive EQ, longer battery life, wireless case charging, and sweat and water resistance. They cost $179; the second-generation AirPods remain available for $129.

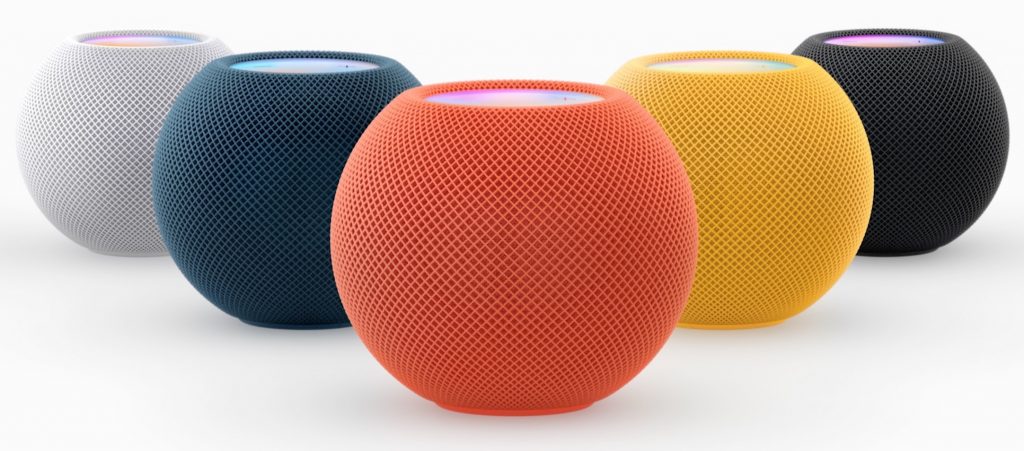
- New HomePod mini colors: Looking to coordinate your electronics with your decor? In November, the $99 HomePod mini will be available in blue, orange, and yellow, as well as the traditional black and white.
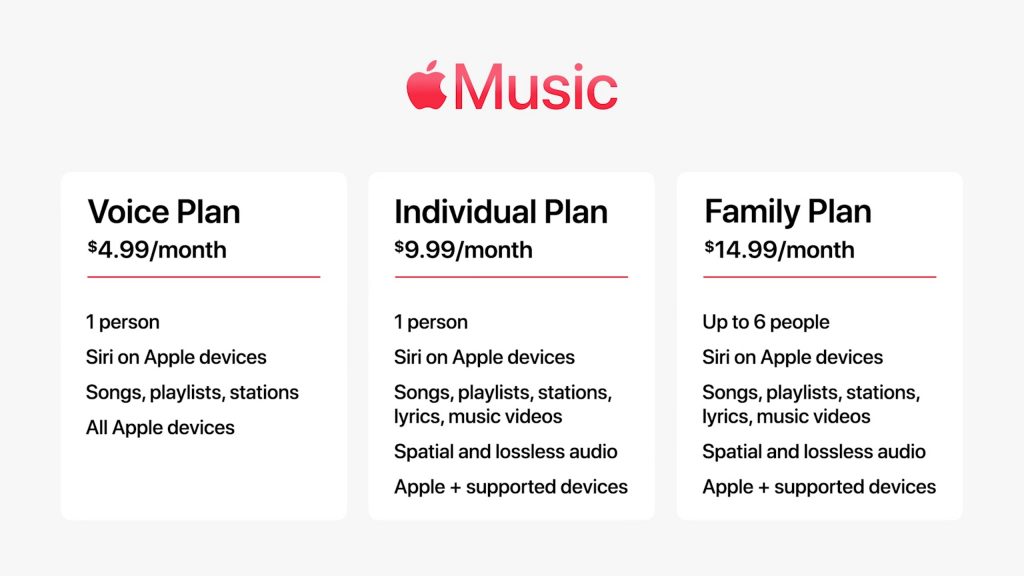
- Apple Music Voice Plan: A new $4.99-per-month Apple Music Voice Plan reduces the cost of Apple Music for those who interact with the streaming service largely through Siri, but it lacks lyrics, music videos, spatial and lossless audio, and support for non-Apple devices.
- macOS 12 Monterey release date: Hidden in the fine print in Apple’s press releases was the fact that macOS 12 Monterey—along with iOS 15.1, iPadOS 15.1, watchOS 8.1, and tvOS 15.1—will become available on October 25th. We strongly recommend that you do not upgrade to Monterey until we give the go-ahead. If you’ve already upgraded to the other new operating systems, it should be safe to install those updates a week or two after release.
New 14-inch and 16-inch MacBook Pros Answer Customer Desires
Apple’s professional MacBook Pro has been a workhorse of the Mac lineup for years, offering high-end performance in a portable package. Since 2016, however, customers have expressed irritation at Apple’s removal of ports other than Thunderbolt 3, the loss of MagSafe magnetic charging, and the Touch Bar replacing traditional F-keys. Here’s how the new MacBook Pros respond to those concerns.
- Ports: Previously, the MacBook Pro had just four Thunderbolt 3 ports, forcing users to carry dongles to connect to legacy devices. The new models still lack USB-A ports but supplement three Thunderbolt 4 ports with an HDMI port for video, an SDXC card slot for camera media, and a headphone jack.
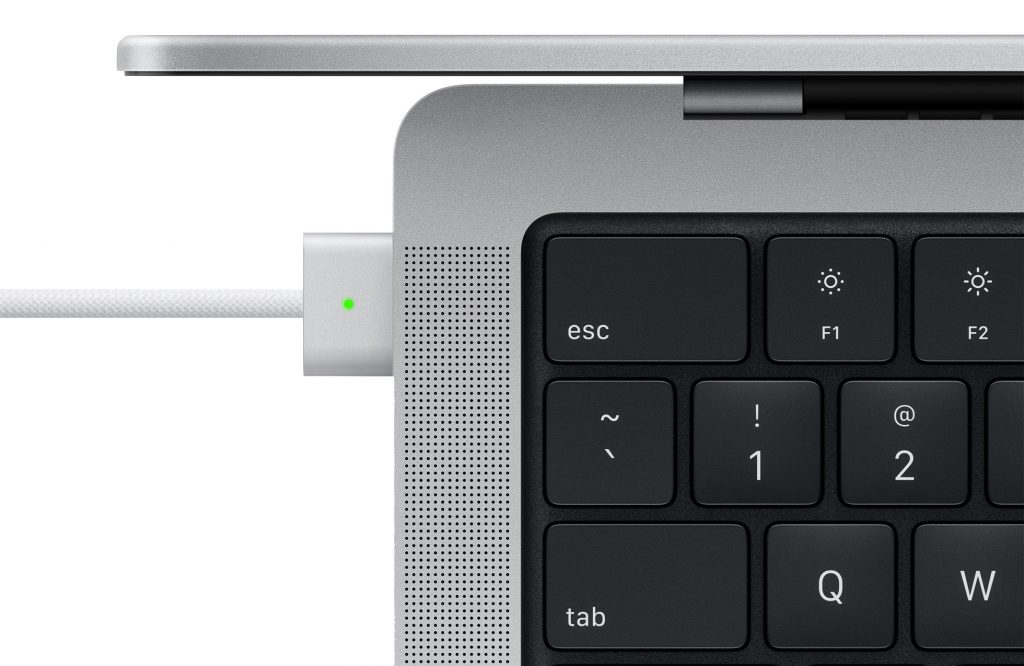
- MagSafe: Although you can charge using the Thunderbolt 4 ports, most people will rely on the dedicated MagSafe 3 charging port. The MacBook Pros (apart from the low-end 14-inch model) include powerful chargers and a USB-C to MagSafe 3 charging cable capable of fast-charging the devices. They should also provide longer battery life than previous models.
- F-keys with Touch ID: The Touch Bar hasn’t been a success, never migrating to any other Mac models and eliciting tepid support from developers. With these new MacBook Pros, Apple has reversed course, replacing the Touch Bar with traditional F-keys. A Touch ID sensor remains available for authentication at the top-right corner of the keyboard.
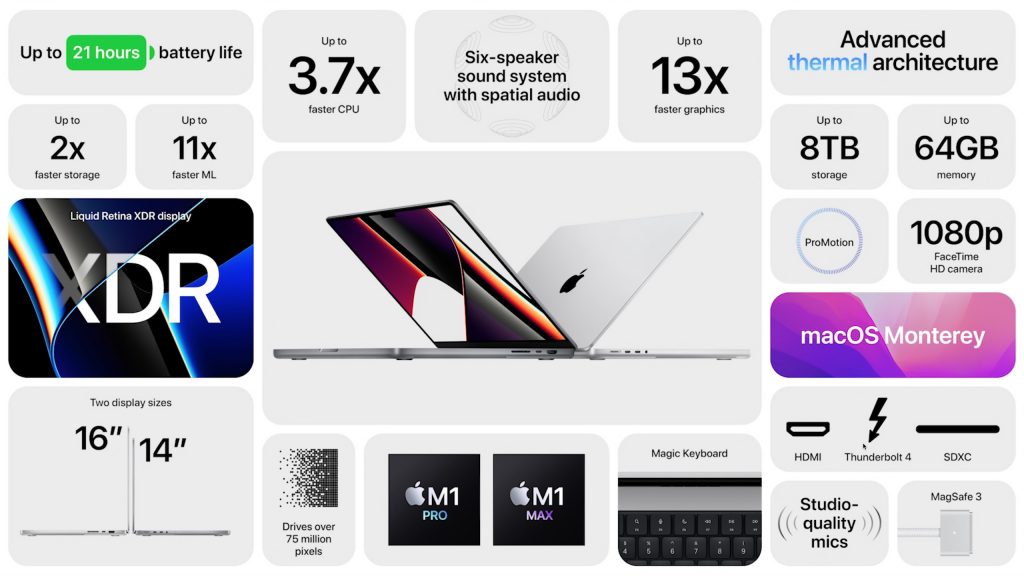
Although Apple did equip the 13-inch MacBook Pro with an M1 chip in November 2020, it wasn’t notably faster than the cheaper but largely comparable M1-based MacBook Air. We suspect no one will be complaining about the performance of the new 14-inch and 16-inch models thanks to the addition of Apple’s just-released M1 Pro and M1 Max chips.
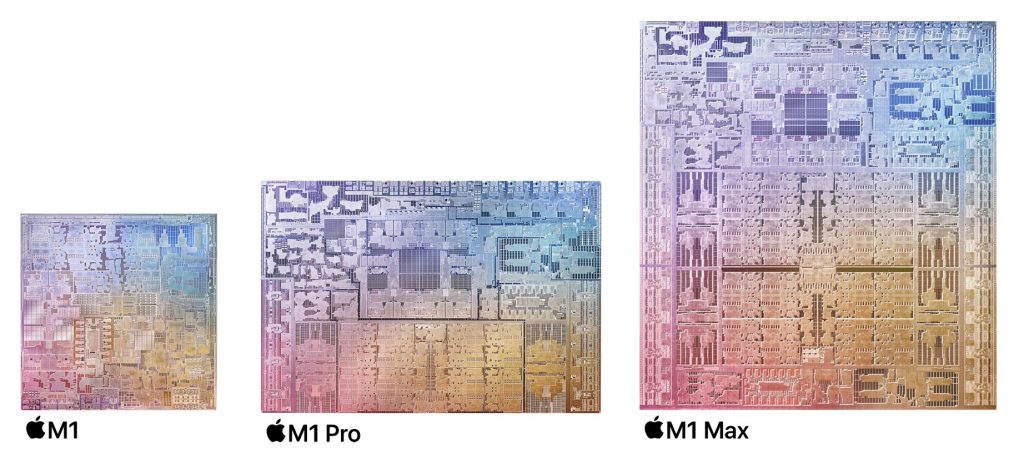
- M1: For reference, last year’s M1 chip—widely acclaimed for providing excellent performance—offers an 8-core CPU with four performance and four efficiency cores, a 7-core or 8-core GPU, and either 8 GB or 16 GB of unified memory.
- M1 Pro: The M1 Pro offers up to 1.7 times the performance of the M1 thanks to a 10-core CPU that has eight performance and two efficiency cores. Plus, its 16-core GPU is up to twice as fast as the M1. The M1 Pro provides either 16 GB or 32 GB of unified memory, and it increases the memory bandwidth by nearly three times, up to 200 gigabytes per second (GBps). To provide lower price points for 14-inch MacBook Pro configurations, Apple offers versions of the M1 Pro with an 8-core CPU (six performance and two efficiency cores) or a 14-core GPU.
- M1 Max: The M1 Max has the same 10-core CPU as the M1 Pro but provides a massive 32-core GPU with up to four times the performance of the M1. The largest chip Apple has ever made, the M1 Max offers either 32 GB or 64 GB of memory, and it doubles the M1 Pro’s memory bandwidth to 400 GBps, nearly six times faster than the M1. A lower-cost M1 Max configuration has a 24-core GPU.
Both the M1 Pro and M1 Max feature an Apple-designed media engine that accelerates video processing while maximizing battery life. Both also have dedicated acceleration for the ProRes professional video codec for working with 4K and 8K video. The M1 Max doubles the M1 Pro’s performance for video encoding and provides two ProRes accelerators. In other words, if you’re working with video, these new Macs are going to scream, particularly with an M1 Max.
Apple didn’t stop after radically improving performance and bringing back beloved features. The new MacBook Pros feature new Liquid Retina XDR displays based on technology used in the latest iPad Pro models.
Most notably, for those who need more screen space than the 13-inch MacBook Pro can provide, the new MacBook Pro models have higher resolution displays. The 14-inch screen has a 3024-by-1964 native resolution that’s slightly larger than the previous 16-inch MacBook Pro (3072‑by‑1920), and the new 16-inch model offers even more pixels with a 3456-by-2234 resolution. The new displays are more than twice as bright as the previous models, and they support ProMotion, which adjusts the screen refresh rate (and thus power consumption) to match the needs of the onscreen content.
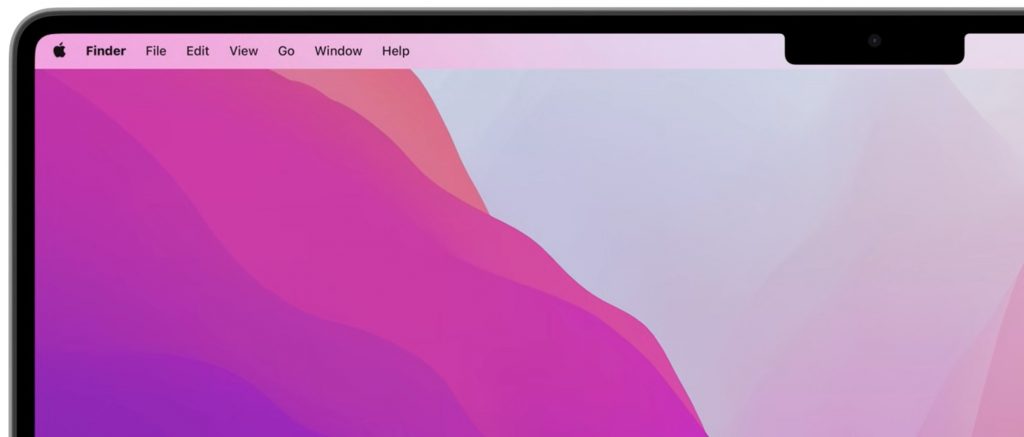
On the downside, Apple brought the new displays so close to the case edges that the new 1080p FaceTime HD camera (better videoconferencing quality but no Center Stage support) lives in an iPhone-like notch that cuts the Mac menu bar in half. Full-screen apps can avoid the notch. Although the notch isn’t ideal, iPhone users seldom notice it after a short while, and we expect the same will be true here.
The only other negative for the new 14-inch and 16-inch MacBook Pro models is weight. They’re both about 0.4 pounds (0.18 kg) heavier than the models they replace, at 3.5 pounds (1.6 kg) for the 14-inch model and 4.7 or 4.8 pounds (2.1 or 2.2 kg) for the 16-inch model—the M1 Max configurations are a bit heavier.
Despite the notch and the weight, these are impressive new entries in the Mac lineup, and we anticipate they’ll be well-received by users who are happy to pay more for top-of-the-line machines. The 14-inch MacBook Pro starts at $1999 and the 16-inch model at $2499. Numerous options are available, so you can choose an M1 Pro or M1 Max for either size, and pick from 16 GB, 32 GB, and 64 GB unified memory configurations. When it comes to storage (which Apple says is also more than twice as fast as previous SSDs), your choices are 512 GB, 1 TB, 2 TB, 4 TB, and 8 TB. Beware that the 8 TB SSD will cost you $2400.
We can’t make informed recommendations about what options you should choose until users start testing their real-world workflows against the M1 Pro and M1 Max and see how much memory is really necessary. For now, let your budget be your guide, and aim for an M1 Max if you work with video. You can place orders with Apple now, but be warned that global supply chain issues may mean waiting for some configurations.
(Featured image by Apple)
Social Media: At its October 18th Unleashed event, Apple unveiled the new 14-inch and 16-inch MacBook Pro models, powered by the impressive new M1 Pro and M1 Max chips. Read on for details: