On April 20th, Apple took to the Internet to stream its “Spring Loaded” event. Pundits had been unable to figure out a theme based on the name, but Apple was being blunt: the event was taking place in the spring, and it was loaded with announcements.
With Apple CEO Tim Cook bookending the presentation—and doing a cameo as a master thief at 37:26 into the presentation—the company announced an M1-based 24-inch iMac, M1-based iPad Pro models, the long-rumored AirTag item tracker, and an enhanced Apple TV 4K with a redesigned Siri Remote. All these items can be ordered on Friday, April 30th, but some won’t ship until the second half of May.
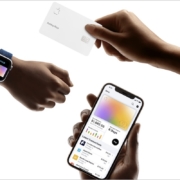
More on these shortly, but briefly, Apple also unveiled the new Apple Card Family program, which allows two people to co-own an Apple Card and share it with their children, complete with spending limits. And for those still looking for a colorful iPhone 12 or iPhone 12 mini, it now comes in purple.

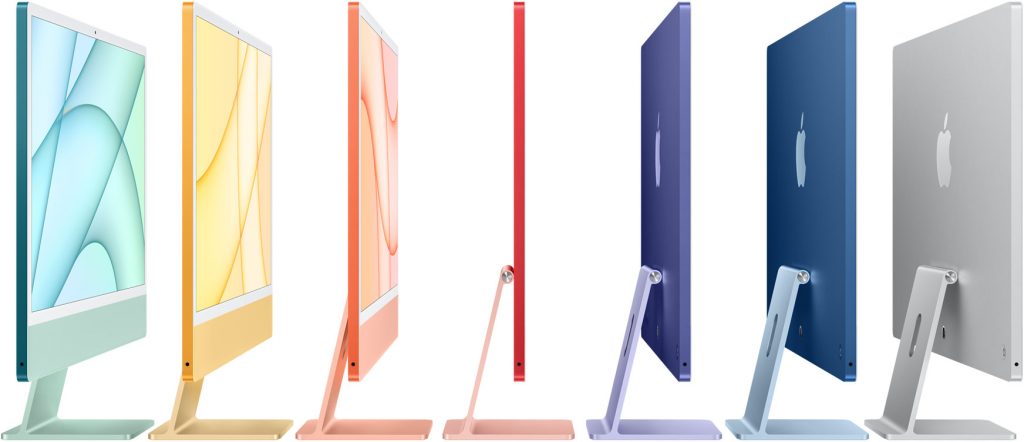
M1-Based 24-inch iMac Comes in Spring Colors
Apple has continued replacing Macs at the lower end of the product line with new models featuring the company’s homegrown M1 chip. While the first Macs to get the M1—the MacBook Air, 13-inch MacBook Pro, and Mac mini—didn’t receive any design changes, Apple radically overhauled things for the new M1-based 24-inch iMac.
At 11.5 mm thick, the 24-inch iMac is thinner than the original iPhone. It comes in seven colors: green, yellow, orange, pink, purple, blue, and silver. The back of the iMac—which is often visible, such as on a receptionist’s desk—is a bold, vibrant color, whereas the front uses a muted version of the color and a light gray bezel. It looks like a 24-inch iPad clipped to an aluminum stand. It’s so thin that there’s no room for a standard power jack, so it comes with an external power adapter that includes an optional Ethernet jack.
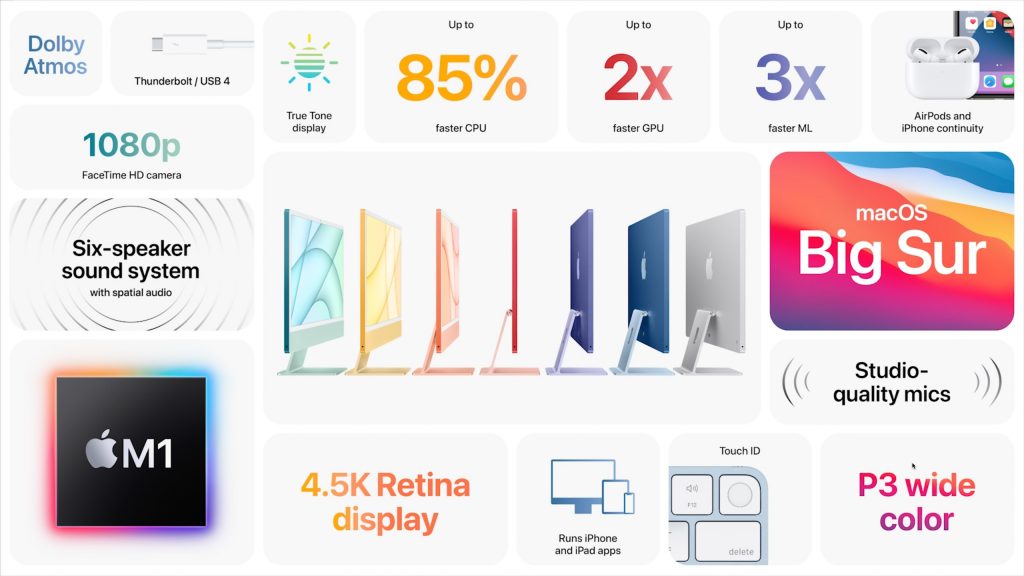
Behind the iMac’s “chin” is the guts of the computer, most notably the same M1 chip as in other M1-based Macs. Overall performance will be stellar thanks to the M1’s 8-core CPU and 8-core GPU, but you can tweak the price/performance curve slightly by choosing a 7-core GPU instead and by picking either 8 GB or 16 GB of unified memory.
The screen, which actually measures 23.5 inches diagonally, offers 4480-by-2520 resolution, making it a 4.5K Retina display, between the 4K display on the now-discontinued 21.5-inch iMac and the 5K display on the 27-inch iMac. It’s topped by a 1080p FaceTime HD camera that, with help from the M1 chip’s image signal processor—and advanced microphones and speakers—should offer excellent out-of-the-box videoconferencing quality.
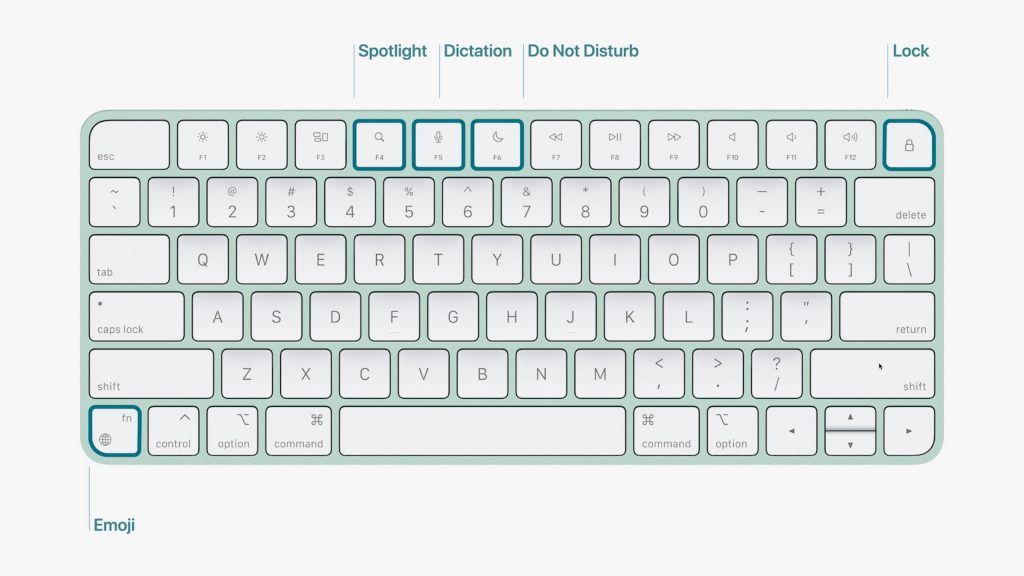
Apple introduced three new color-matched versions of the Magic Keyboard as well. One adds dedicated keys for Spotlight, Dictation, Do Not Disturb, Lock, and Emoji; the second trades the Lock key for the first Touch ID sensor on a standalone keyboard; and the third includes both Touch ID and a numeric keypad. They come with color-matched models of the Magic Mouse, or you can upgrade to a color-matched Magic Trackpad instead.
Two models of the 24-inch iMac are available:
- $1299 gets you that 7-core GPU, two Thunderbolt ports, 256 GB of storage that’s upgradable to 1 TB, optional Gigabit Ethernet, and a standard Magic Keyboard. It’s available in only blue, green, pink, and silver.
- $1499 gets you the 8-core GPU, 256 GB of storage upgradeable to 2 TB, two Thunderbolt ports and two USB 3 ports, standard Gigabit Ethernet, and a Magic Keyboard with Touch ID. And you can pick from all seven colors.
Our take is that the new 24-inch iMac is a fabulous Mac for a family, student, or front-office worker where everyone will appreciate its striking color and design. It may not offer everything a pro wants, but the Intel-based 27-inch iMac remains available, and Apple will be releasing even more powerful Macs based on Apple silicon for professionals, likely later this year.
M1-based iPad Pro Gains Thunderbolt and Liquid Retina XDR Display
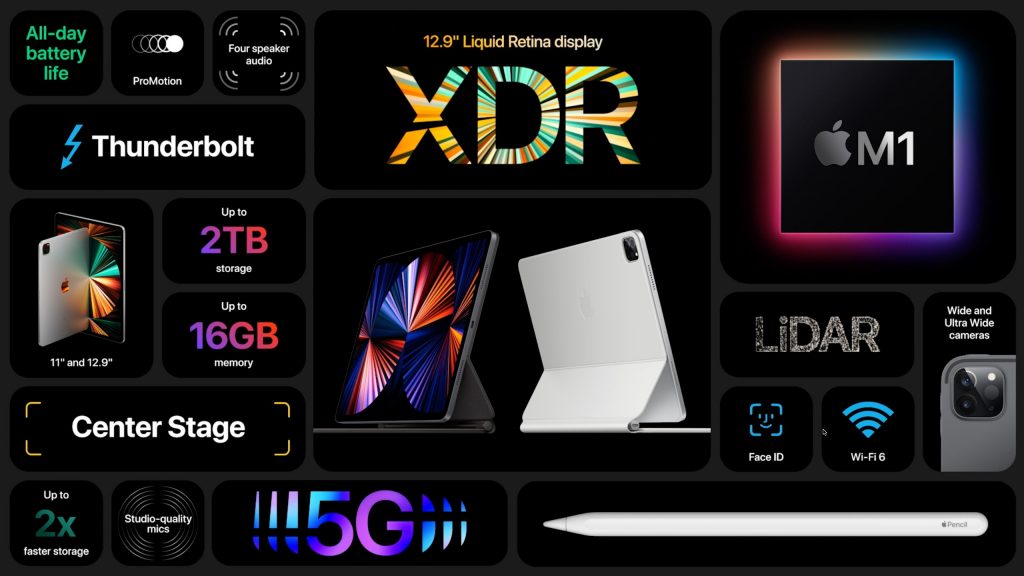
Unlike the 24-inch iMac, there are no major industrial design changes in either iPad Pro model, but Apple has made significant upgrades under the hood, most notably switching from the previous A12Z Bionic chip to the M1 chip that now powers an increasing number of Macs. The M1 chip offers roughly 50% greater performance, significantly differentiating the 11-inch iPad Pro from the highly capable fourth-generation iPad Air introduced late last year.
Apple also updated the iPad Pro’s port from USB-C to Thunderbolt/USB 4, allowing users to take advantage of higher-performance hardware, such as external storage devices and high-resolution external displays. You can even connect Apple’s Pro Display XDR at its full 6K resolution. As welcome as Thunderbolt is, iPadOS could use enhancements to enable users to take full advantage of it.
For those who need constant connectivity while out and about, the cellular models of the iPad Pro now support 5G wireless networking, including the millimeter-wave version that offers the greatest throughput. Although 5G coverage is still extremely spotty, it’s only getting better, and supporting it will help future-proof these iPad Pro models.
Both iPad Pro models also receive a new 12-megapixel Ultra Wide TrueDepth camera on the front. Along with help from the M1 chip’s machine-learning capabilities, it enables a new feature called Center Stage that recognizes you in video calls and pans and zooms to keep you in the frame as you move around. It will work with FaceTime, of course, and Apple says third-party services will also be able to support it.
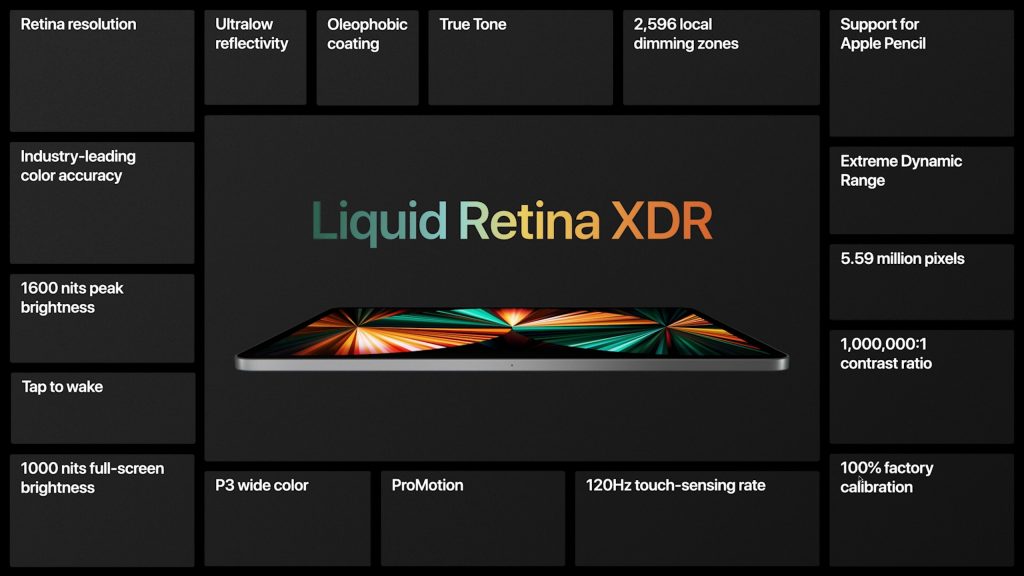
Last but far from least is a new display for just the 12.9-inch iPad Pro. Based on the technology behind Apple’s $5000 Pro Display XDR, the 12.9-inch iPad Pro’s Liquid Retina Display XDR is lit by more than 10,000 miniature LEDs, combined into nearly 2600 dimming zones. (The previous model’s screen had 72 LEDs.) The result is a display that’s brighter and offers more contrast than before, making it ideal for photo or video editing. If you think screen quality is the deciding factor between the 11-inch and 12.9-inch iPad Pros, we encourage you to compare them in person with the same images or videos.
Pricing has changed a little for the iPad Pros. The 11-inch model continues to start at $799 with 128 GB of storage. However, the 12.9-inch model is $100 more expensive than previously, thanks to the Liquid Retina XDR display, starting at $1099 for 128 GB. Both are upgradeable to 256 GB ($100), 512 GB ($300), 1 TB ($700), or 2 TB ($1100), and note that the models with 512 GB and less come with 8 GB of unified memory, whereas the 1 TB and 2 TB models have 16 GB of memory. Adding 5G cellular now costs $200, up $50, although special deals with AT&T, T-Mobile, and Verizon may reduce or erase that cost.
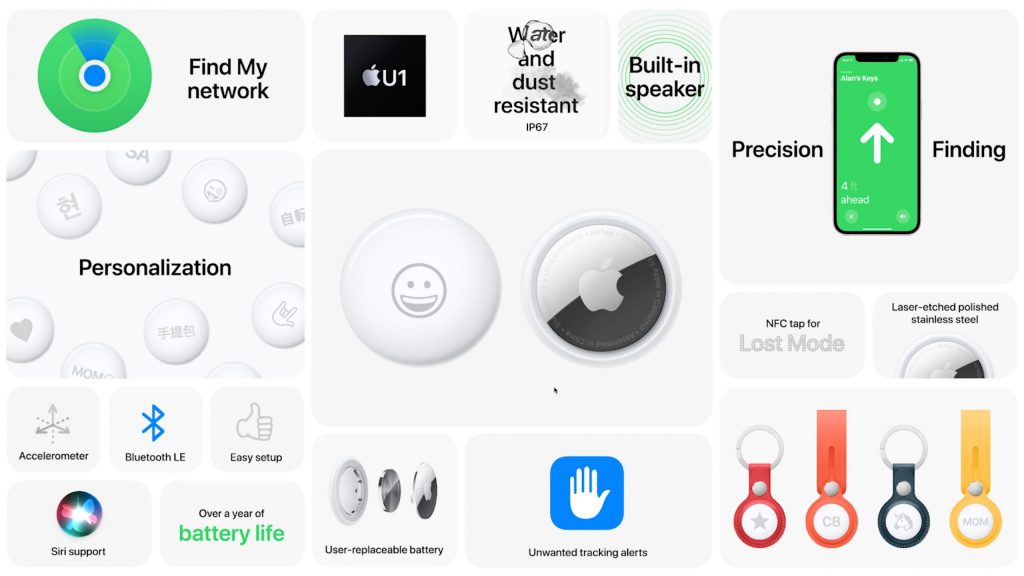
Find Your Keys, Purse, or Backpack with an AirTag
The long-rumored AirTag has finally appeared, promising to help us all stop misplacing our keys, purses, backpacks, and more. An AirTag is a small disc that you put inside or attach to something you might need help finding. Should that item go missing, you use the Find My app on your Mac, iPhone, or iPad, or in iCloud to locate the associated AirTag, just as you can use Find My to locate missing Apple devices or find family members. The Find My network leverages nearly 1 billion Apple devices to relay the location of lost items back to you, all without compromising anyone’s privacy. Plus, Apple has built in alerts if someone tries to track you with an AirTag.
AirTags are 1.26 inches in diameter and .31 inches high—roughly the size of four half-dollar coins—and run on a standard user-replaceable CR2032 battery. They communicate with nearby Apple devices via Bluetooth and Ultra Wideband, the latter of which works with an iPhone 11 or iPhone 12 to provide Precision Finding that directs you to the exact location of the AirTag. (“You’re getting warmer…”)
To make it easier to attach an AirTag to your keys or backpack, Apple offers a variety of key rings and loops, including some pricey Hermès versions. We anticipate third-party manufacturers will offer numerous alternatives.
A single AirTag costs $29, or you can buy a four-pack for $99. Apple offers free engraving, although the company limits the emoji available to prevent pictographic rudeness. We’re looking forward to giving an AirTag a try, assuming we can still find our keys when it ships on April 30th.
Apple TV 4K Offers Enhanced Video and Redesigned Siri Remote
After four years, Apple has finally updated the hardware inside the Apple TV 4K, giving its second-generation model a faster A12 Bionic processor, HDMI 2.1, and 802.11ax Wi-Fi 6 wireless networking. The speedier processor enables playback of HDR and Dolby Vision video at 60 frames per second, and the other hardware changes could enable new capabilities in the future, like 4K video at 120 fps.
In software, Apple added a new color calibration feature that lets you use any Face ID-enabled iPhone running iOS 14.5 or later to calibrate the colors on your TV; it will also be available to the Apple TV HD and first-generation Apple TV 4K. Also new is support for Thread, a cross-platform mesh networking protocol for home automation devices, which could play a role in the future of HomeKit.
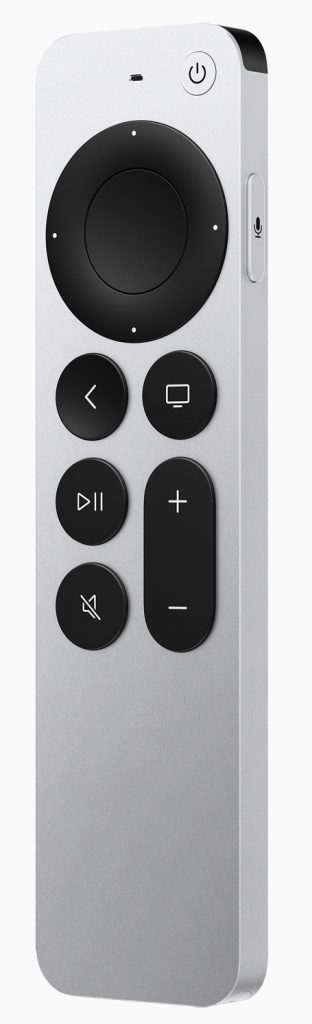
But the big news is that Apple redesigned the much-reviled Siri Remote, adding more buttons and reducing the emphasis on the touchpad surface. The new Siri Remote features a circular clickpad controller with five-way navigation, a touch-sensitive surface for swiping in the middle, and a touch-sensitive outer ring that works as a jog control for navigating within a video. It also features dedicated power and mute—at last!—buttons for your TV. Finally, there’s a new side button for invoking Siri so you don’t accidentally press it in the dark. It has a rechargeable battery that should last for months. The only thing lacking? The necessary hardware so you can use the Find My app to ferret it out from inside the couch.
Apple is bundling the new Siri Remote with the new Apple TV 4K ($179 for 32 GB or $199 for 64 GB) and the old Apple TV HD ($149), and if you already have an Apple TV HD or 4K, you can buy the new Siri Remote by itself for $59.
(Featured image by Apple)
Social Media: Apple’s “Spring Loaded” event was indeed loaded with announcements, including the M1-based 24-inch iMac, M1-based iPad Pro, AirTag item tracker, updated Apple TV 4K with redesigned Siri Remote, and more. Details at:


 After four years, Apple has finally updated the hardware inside the