Make More Space for Documents by Putting Your Dock on the Side of Your Mac’s Screen

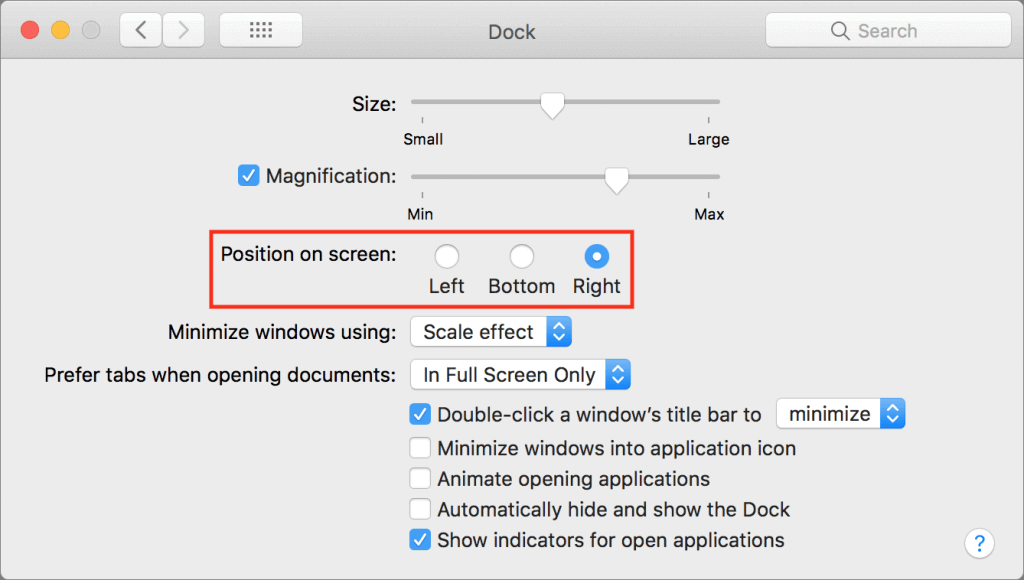
By default, Apple locates the Dock at the bottom of the Mac’s screen. If that location interferes with you seeing as much of your document windows as you’d like, you can set it to appear only when you move the pointer to the bottom edge of the screen. But there’s a better way: put the Dock on the side of the screen where there’s plenty of horizontal room and it won’t get in the way of most document windows. Open System Preferences > Dock, and select Right or Left from the Position on Screen radio buttons.


When Should You Upgrade to macOS 10.14 Mojave, iOS 12, watchOS 5, and tvOS 12?

It’s that time of year again, when an Apple user’s thoughts drift to new versions of macOS, iOS, watchOS, and tvOS. Apple announced the new versions in June, and public betas have been available since. But once Apple makes macOS 10.14 Mojave, iOS 12, watchOS 5, and tvOS 12 available for free download, you’ll need to decide when to install each.

(Note that we say when and not if. There’s no harm in delaying major operating system upgrades until Apple has had a chance to squash early bugs. But waiting too long puts you at risk from security vulnerabilities and prevents you from taking advantage of new features. Plus, should you have to replace an Apple device unexpectedly, you will likely have to use the current operating system, which could be awkward if you weren’t ready.)

The hardest upgrade decision comes with macOS 10.14 Mojave. Whereas the last version of macOS—High Sierra—was a refinement upgrade that added few new features, Mojave introduces lots. Some people’s eyes will appreciate Dark mode, and the Dynamic Desktop changes subtly throughout the day. More practically, Stacks help organize files on cluttered Desktops, the Finder’s new Gallery view makes browsing images easier, and Quick Actions in the Finder’s Preview pane and in Quick Look let you work on files without even opening them. Apple significantly enhanced macOS’s screenshot and screen recording capabilities as well. And apps like Home, News, Stocks, and Voice Memos make the jump from iOS.

However, these features are bound to come with quirks and bugs, and Mojave’s new privacy and security controls may cause problems for older software. So we recommend waiting until at least version 10.14.1 or even 10.14.2 before upgrading. That gives you time to make sure your key apps are compatible with Mojave and for Apple to resolve any unanticipated problems.

iOS 12 is a different story, particularly if you have an older iPhone or iPad. That’s because Apple has focused on improving performance for such devices. If your device is bogging down, iOS 12 may give it a new lease on life. Also compelling is Screen Time, which helps you track your usage and set limits if you’re unhappy about how much time you spend giving Facebook your personal data. Screen Time even works for your entire family, so it could make dinner less device-intensive. A beefed-up Do Not Disturb lets you keep your iPhone from nagging you so much, and new features let you tamp down excessive notifications more easily. Finally, if you do the same things repeatedly, Siri Shortcuts can help you create your own Siri voice commands.

Our take is that iOS 12 is a good upgrade. Don’t pull the trigger instantly, since Apple may discover important bugs in the first week or two, but after that, upgrade when you have time to play with the new features.

watchOS 5 is linked to iOS 12, so you can’t upgrade your Apple Watch until your iPhone is running the latest. Most of the changes revolve around the Workouts app, with automatic detection of running workouts, a new Yoga workout, activity competitions, and more. Other new features include a Walkie-Talkie app, the arrival of Apple’s Podcasts app, a smarter Siri watch face, and improved notifications. There’s no downside to watchOS 5, so as soon as iOS 12 lands on your iPhone, set your Apple Watch to upgrade that night.

tvOS 12 is the easiest to agree to install. It’s a minor upgrade, with just a few new features. The most noticeable is a new aerial screensaver of Earth from low orbit, made by the crew of the International Space Station. You can also tap the touchpad of the Siri Remote while an aerial screensaver is playing to see where it was taken. When you start trying to type a password on the Apple TV, a notification on your iPhone lets you autofill that password. And finally, the Apple TV 4K gains support for Dolby Atmos soundscapes. So yeah, install tvOS 12 when it comes out, or let your Apple TV do it automatically.

As much as change can be hard, we’re excited about Apple’s new operating systems. Like you, we probably won’t end up using all the new features, but some will enhance the experience of being an Apple user.


Social Media: Apple is about to release four major operating system upgrades—macOS 10.14 Mojave, iOS 12, watchOS 5, and tvOS 12. When should you take the leap and install them? Short answer: it depends. Long answer: read on!

The Secret Keyboard Shortcut for Comparing Before/After Edits in Photos on the Mac

Photos on the Mac provides so many editing tools that it’s easy to lose track of how an edited image compares to the original. You can always use the Revert to Original command and then undo it, but that’s fussy. Instead, Photos provides a Show Original  button in the upper-left corner, between the window controls and the Revert to Original button. Click and hold it to see your original image; let up to see the edited version again. Even easier, press the M key on your keyboard. The only thing either of those techniques won’t do is show the effect of cropping; to see the uncropped original, press Control-M. And if you just want to see how a particular set of adjustment controls affected the image, click its blue checkmark  to turn it off and back on.

The post The Secret Keyboard Shortcut for Comparing Before/After Edits in Photos on the Mac appeared first on TidBITS Content Network.

Here’s How to Load the Desktop Version of a Web Site on an iPhone or iPad

Some Web sites have separate desktop and mobile versions, each theoretically providing the best browsing experience for its platform. Unfortunately, mobile Web sites sometimes leave out necessary features or hide content. That’s especially annoying if you’re browsing on an iPad, where the desktop site would work fine. If you run across such a site while browsing in Safari on the iPhone or iPad, you can ask for its desktop version. Press and hold the Reload button at the right side of the address bar, and then tap Request Desktop Site. If the site allows such a request, as do Wikipedia and the New York Times, the desktop version loads (to read the small text, you may need to pinch out to zoom the page).

The post Here’s How to Load the Desktop Version of a Web Site on an iPhone or iPad appeared first on TidBITS Content Network.

A Simple Technique for Decluttering Your Reminders List

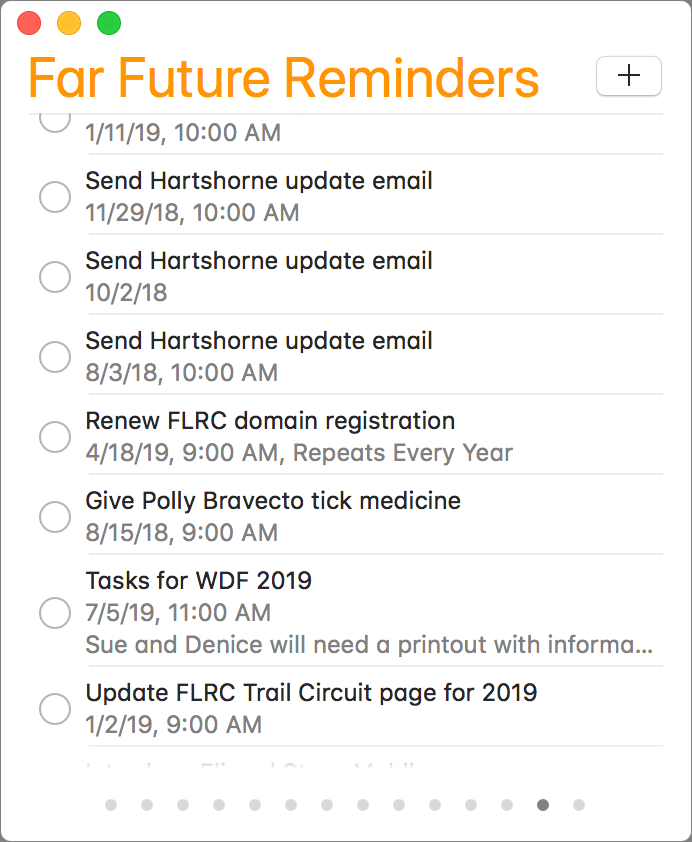
Productivity experts recommend offloading things you have to remember to a task-management app like Apple’s Reminders, which syncs your to-dos among your Mac, iPhone, iPad, and Apple Watch. That’s particularly helpful for tasks you want to be reminded of in a few months or next year, but then those far-in-the-future tasks—especially repeating ones!—clutter your main Reminders list. The solution? Create a Far Future Reminders list, and move reminders to it that aren’t relevant within the next month or so. Just make sure everything in Far Future Reminders is set to alert you on the appropriate day.

The post A Simple Technique for Decluttering Your Reminders List appeared first on TidBITS Content Network.

Did You Know This Hidden Trick for Opening System Preferences Panes Directly?

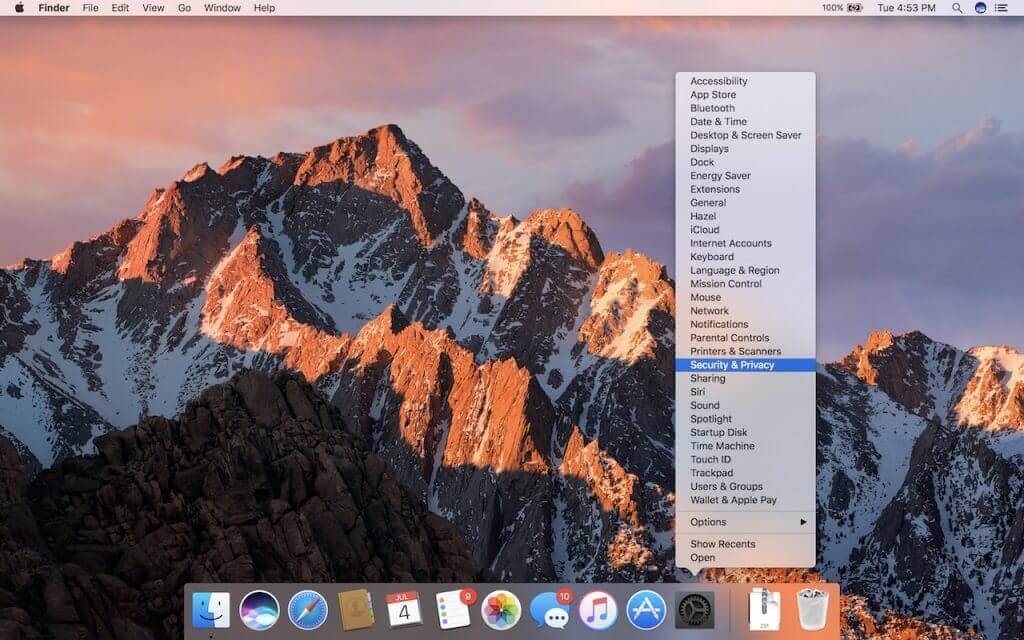
The System Preferences app on the Mac contains about 30 icons, each leading to additional settings panes. Rather than opening System Preferences, scanning the collection of icons, and clicking the one you want, you can jump directly to the desired pane. Just click and hold on the System Preferences icon in the Dock, and choose a pane from the pop-up menu.

The post Did You Know This Hidden Trick for Opening System Preferences Panes Directly? appeared first on TidBITS Content Network.

Being an Apple User Means You’re Not the Product

There’s an Internet saying: “If you’re not the customer, you’re the product.” The point is that, if you’re getting a service for free, the company providing it sees you not as a customer, but as a product to sell, generally to advertisers.

This is how Google, Facebook, and Twitter operate. They provide services for free, collect data about you, and make money by showing you ads. In theory, the more that advertisers know about you, the better they can target ads to you, and the more likely you’ll be to buy. Personalized advertising can seem creepy (or clueless, when it fails), but it isn’t inherently evil, and we’re not suggesting that you stop using ad-supported services.

This ad-driven approach stands in stark contrast to how Apple does business. Apple makes most of its money by selling hardware—iPhones, Macs, and iPads, primarily. Another big chunk of Apple’s revenue comes from App Store and iTunes Store sales, iCloud subscriptions, and Apple Pay fees. Knowing more about you, what Web pages you visit, what you buy, and who you’re friends with doesn’t help Apple’s business, and on its Privacy page, Apple says bluntly, “We believe privacy is a fundamental human right.”

Of course, once your data is out there, it can be lost or stolen—in June 2018, a security researcher discovered that the online data broker Exactis was exposing a database containing 340 million records of data on hundreds of millions of American adults. Ouch!

Let’s look at a few of the ways that Apple protects your privacy.

Siri and Dictation
The longer you use Siri and Dictation, the better they work, thanks to your devices transmitting data back to Apple for analysis. However, Apple creates a random identifier for your data rather than associating the information with your Apple ID, and if you reset Siri by turning it off and back on, you’ll get a new random identifier. Whenever possible, Apple keeps Siri functionality on your device, so if you search for a photo by location or get suggestions after a search, those results come from local data only.

Touch ID and Face ID
When you register your fingerprints with Touch ID or train Face ID to recognize your face, it’s reasonable to worry about that information being stored where attackers—or some government agency—could access it and use it for nefarious purposes. Apple was concerned about that too, so these systems don’t store images of your fingerprints or face, but instead mathematical signatures based on them. Those signatures are kept only locally, in the Secure Enclave security coprocessor that’s part of the CPU of the iPhone and iPad—and on Touch ID-equipped laptops—in such a way that the images can’t be reverse engineered from the signatures.

And, of course, a major goal of Touch ID and Face ID is to prevent someone from violating your privacy by accessing your device directly.

Health and Fitness

People with medical conditions can be concerned about health information impacting health insurance bills or a potential employer’s hiring decision. To assuage that worry, Apple lets you choose what information ends up in Health app, and once it’s there, encrypts it whenever your iPhone is locked. Plus, any Health data that’s backed up to iCloud is encrypted both in transit and when it’s stored on Apple’s servers.

App Store Guidelines

A linchpin in Apple’s approach to privacy is its control over the App Store. Since developers must submit apps to Apple for approval, Apple can enforce stringent guidelines that specify how apps can ask for access to your data (location, photos, contacts, etc.). This isn’t a blanket protection—for instance, if you allow a social media app Facebook to access your contacts and location, the company behind that app will get lots of data on your whereabouts and can even cross-reference that with the locations of everyone in your contact list who also uses the service.

In the end, only you can decide how much information you want to share with the likes of Google, Facebook, and Twitter, and only you can determine if or when their use of your details feels like an invasion of privacy. But by using Apple products and services, you can be certain that the company that could know more about you than any other is actively trying to protect your privacy.


Social Media: Many of the big Internet companies make their money by assembling a dossier of information about you and then selling advertisers targeted access to you. Luckily, that’s not true of Apple—here are a few of the ways Apple protects your privacy.

The post Being an Apple User Means You’re Not the Product appeared first on TidBITS Content Network.
New MacBook Pros Provide More Speed and RAM, plus a Quieter Keyboard and Hey Siri

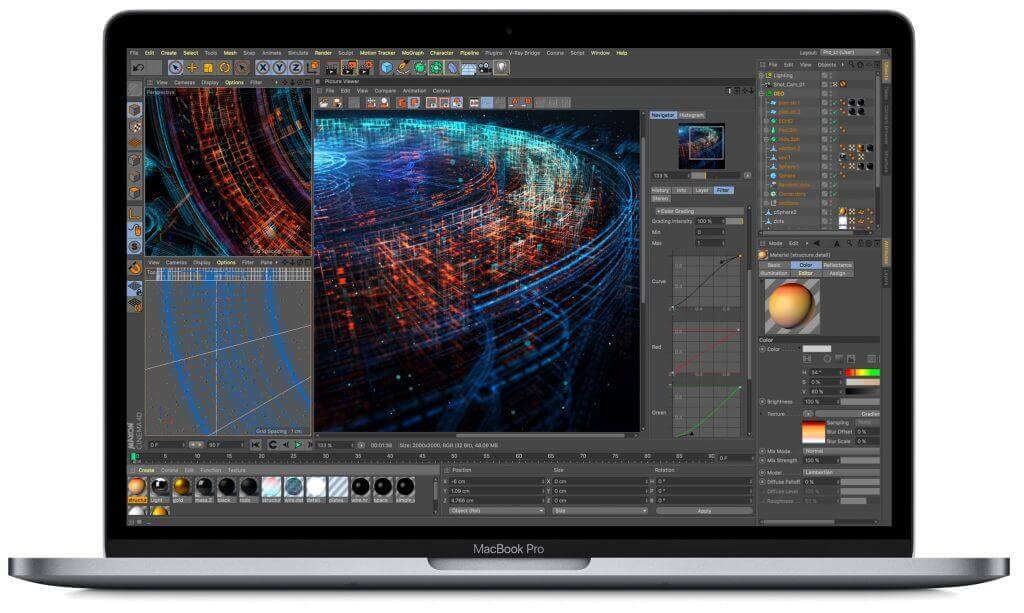
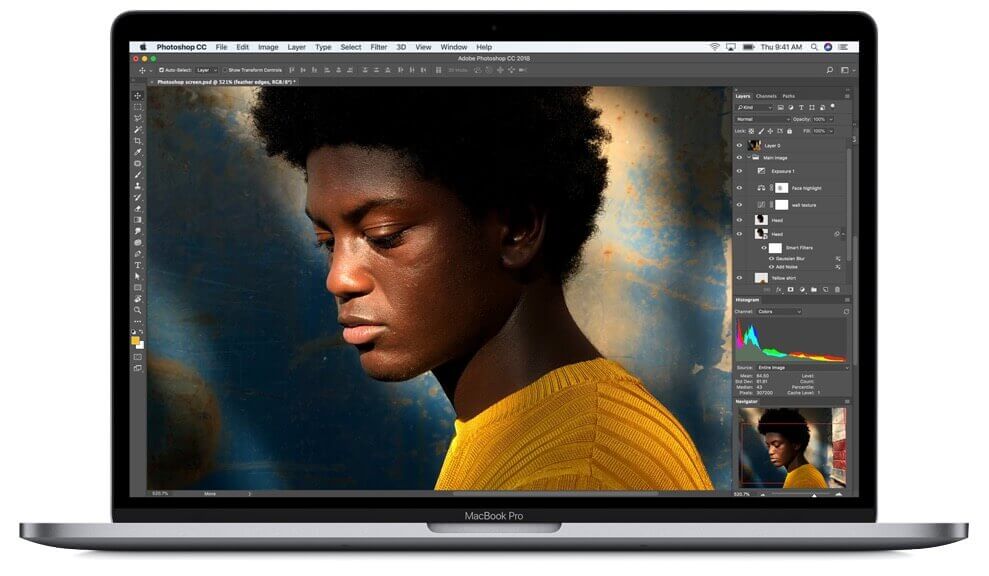
As students prepare to head off to college, Apple has updated the Touch Bar-equipped MacBook Pro line to provide even more powerful options for students and professionals alike. The changes are primarily under the hood, focusing on faster performance, more RAM, and larger SSD-based storage, but there are a few modest physical changes too, including a quieter keyboard and a True Tone display.

Despite these improvements, pricing remains the same as for last year’s models.

The 13-inch MacBook Pro that has function keys instead of a Touch Bar remains the same, as do the 12-inch MacBook and 13-inch MacBook Air.

Performance Boosts

The new MacBook Pros move to Intel’s 8th-generation Core i7 and Core i9 processors. Previously, the 13-inch MacBook Pro used dual-core CPUs, but they now get quad-core chips. And the 15-inch models jump from quad-core chips to processors sporting 6 cores. More cores are better because more tasks can be split up between them, preventing one processor-intensive task from bogging down others.

Processing power is just one aspect of overall performance. If your Mac doesn’t have enough RAM for the apps you’re using, it has to fall back on much slower virtual memory. For those who use memory-intensive apps, the new 15-inch MacBook can now take up to 32 GB of RAM, up from a maximum of 16 GB. RAM in the 15-inch models is also DDR4, which is faster and uses less power than the DDR3 RAM used before.

Finally, if you don’t have enough fast SSD storage in a MacBook Pro, you may be forced to store large items like your Photos library and Parallels Desktop virtual machines on a slow external hard disk. The new MacBook Pros can have a lot more built-in SSD storage, but it’s pricey. The 13-inch models max out at 2 TB, which will add $1400 to your bill, and the 15-inch models can go to 4 TB, assuming you have $3400 to spare. The 512 GB ($200) and 1 TB ($600) upgrades are more reasonably priced.

Physical Changes

Apple continues to tweak the controversial butterfly-switch keyboard. Some people haven’t liked the shallow key travel and how much noise it makes, and its keys have a tendency to stick. The new MacBook Pros feature a keyboard that’s quieter and hopefully more reliable.

You’ll also notice the new Retina displays with True Tone. First introduced with the iPad Pro and added to the iPhone in 2017, True Tone adjusts the white balance of the screen based on ambient light to make the screen more comfortable to view. It should be particularly appreciated by students working late into the night.

Other Improvements

You know how you can issue commands to Apple’s virtual assistant on your iPhone or iPad by saying “Hey Siri”? That’s possible in the new MacBook Pros also, thanks to the inclusion of Apple’s new T2 chip. The T2 also manages the Touch Bar, facilitates a secure boot feature, and encrypts files on the fly to increase security.

These MacBook Pros are the first to support Bluetooth 5.0, which is backward compatible with Bluetooth 4.2. As Bluetooth 5.0 peripherals become more widespread, they’ll be able to communicate with the MacBook Pro at higher data rates and longer ranges—think of Bluetooth working across your entire house, rather than being limited to a single room.

Price and Availability

The entry-level 13-inch MacBook Pro starts at $1799, and the 15-inch model at $2399. With both models, you can choose between silver and space gray, and they’re available now.

Our take is that, like most of Apple’s speed-bump upgrades, these new MacBook Pros are simply better than the previous models—who turns down better performance for the same price? The True Tone display is also welcome, as is the quieter keyboard. And it’s nice that we can finally talk to Siri without having to hold down a key or click a button.


Social Media: Apple has released updated versions of the Touch Bar-equipped 13-inch and 15-inch MacBook Pro. Read on to learn about their improved performance, quieter keyboards, support for Hey Siri, and more.

Tired of Skewed Lines in Your Photos? Use the Camera App’s Hidden Level.

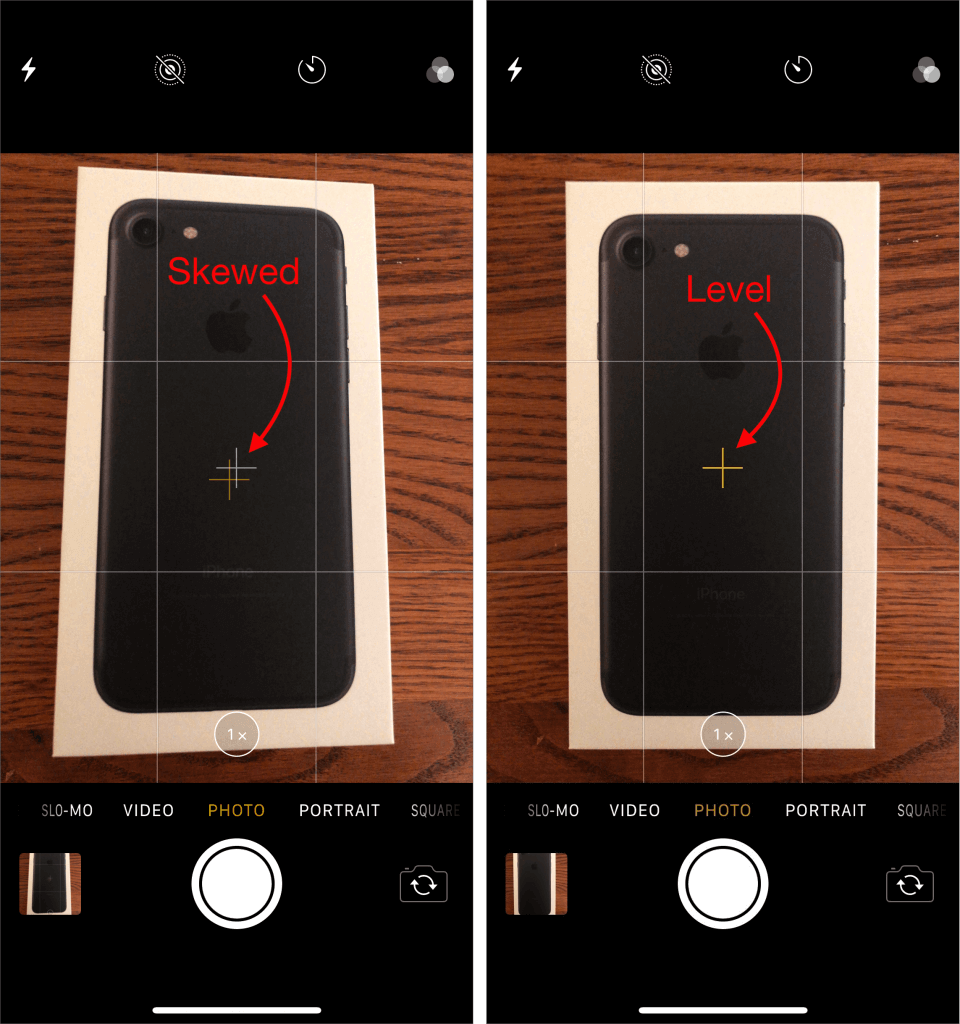
If you’ve ever photographed a sheet of paper or some other rectangular object, the image may have come out skewed because you inadvertently tilted the camera. The iOS 11 Camera app has a level feature to help you avoid this problem, but it’s so subtle that you may not have noticed it. To use it, first go to Settings > Camera and turn on the Grid switch so thin white lines divide the viewfinder image into a grid of nine rectangles. Then, to access the level, hold the iPhone or iPad flat, so the camera points straight down toward the floor (or straight up toward the sky, if you’re photographing a ceiling). Notice that two crosshairs appear in the middle of the viewfinder, a yellow one that marks the position where the camera will be level and a white one that shows the camera’s current angle. Tilt the camera until the crosshairs merge into a single yellow image, and tap the Shutter button.

Did You Know You Can Customize the Columns in a Finder Window’s List View?

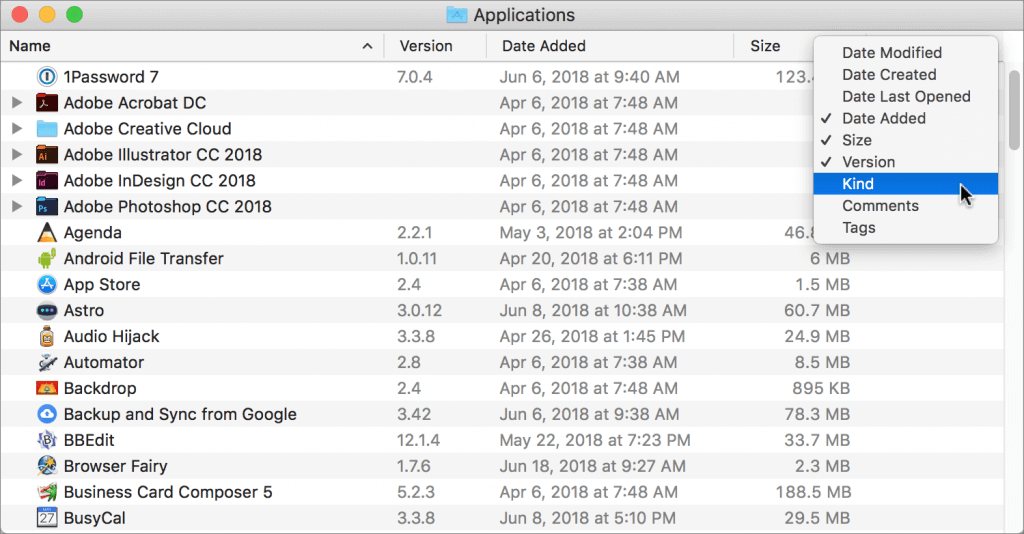
When a Mac folder contains a lot of files, the Finder’s List view often works best, since it lets you focus on a single folder and easily sort the contents by clicking the different columns: Name, Date Modified, Size, and Kind. But did you know that you can resize columns, rearrange them, and even add and remove columns? To resize a column, drag the vertical separator line to the right of its name. To move a column, click and hold on its name, and then drag it to the desired position. And to add or remove a column, Control- or right-click any column header and select or deselect the desired column. Choose from Date Modified, Date Created, Date Last Opened, Date Added, Size, Version, Kind, Comments, and Tags.