With a handful of press releases buttressed by a 19-minute video, Apple pulled back the curtains on its new M2 Pro and M2 Max chips and announced updated Mac mini and MacBook Pro models that rely on the new chips. There are no significant design or feature changes with these updated models, just faster performance, enhanced external display support, and support for the latest wireless connectivity standards. The new Mac mini and MacBook Pro models are available to order now, with units in stores and orders starting to arrive on January 24th.
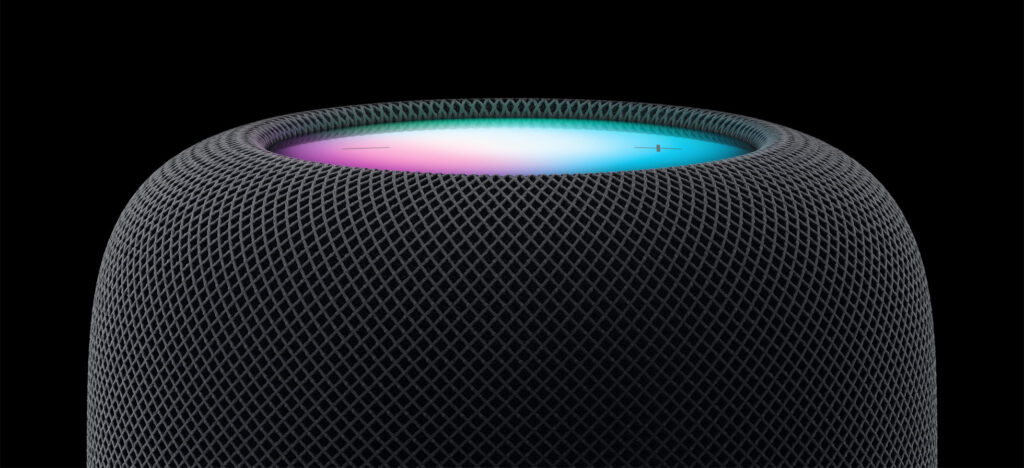
Then, in another surprise announcement, Apple announced the second-generation HomePod, which updates the full-size smart speaker with a few new features and likely makes it more cost-effective to produce.
New M2 Mac mini and M2 Pro Mac Broaden the Appeal
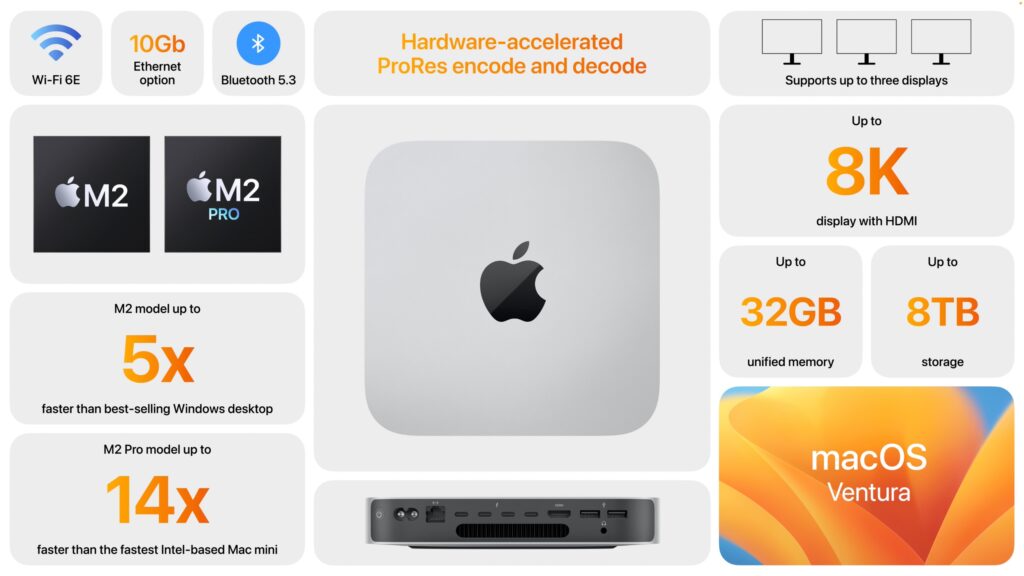
For many years, the Mac mini has been popular for its small size, low price, and decent performance, bolstered in 2020 by a move from Intel CPUs to Apple’s M1 chip. Apple has now increased the Mac mini’s power even more by letting users choose between the M2 and the new M2 Pro. How much more? It depends greatly on what you’re doing, and Apple offers some comparisons. The improvements will likely be noticeable with the M2 and obvious with the M2 Pro.

The M2 Mac mini starts at $599—$100 less than the starting price for the M1 Mac mini—and provides an 8-core CPU and 10-core GPU with unified memory configurations of 8 GB, 16 GB (add $200), or 24 GB ($400). In terms of storage, the base level is 256 GB, but you can increase that to 512 GB ($200), 1 TB ($400), or 2 TB ($800). It provides only two Thunderbolt 4 ports.
The M2 Pro Mac mini starts at $1299 for a 10-core CPU and 16-core GPU, but you can bump that up to an M2 Pro with a 12-core CPU and 19-core GPU for $300. You also get 16 GB of unified memory and 512 GB of storage for that base price. 32 GB of memory costs $400 more, and storage upgrades are 1 TB ($200), 2 TB ($600), 4 TB ($1200), and 8 TB ($2400). It offers more connectivity with four Thunderbolt 4 ports. Note that as you configure a powerful M2 Mac mini, you’ll be straying into Mac Studio territory in terms of both price and performance.
Both Mac mini models boast enhanced external display support. Read the tech specs for full details, but in essence, along with multiple monitor support over Thunderbolt, the HDMI port on an M2 Pro Mac mini supports either an 8K display or a 4K display running at a faster refresh rate, which might be a boon in video-focused fields. Other improvements that may be welcome in specific setups include the option to add 10 Gigabit Ethernet for $100, support for Wi-Fi 6E (which can improve throughput over short distances with a new router), and Bluetooth 5.3.
The updated Mac mini replaces both the M1 Mac mini and the Intel-based Mac mini that Apple had left in the lineup until now.
It probably won’t be long before Apple releases an M2 24-inch iMac, too. We know that some are pining for a 27-inch iMac with Apple silicon, and we’ll just have to wait to see if Apple returns to that form factor with either an iMac or iMac Pro. We can also expect M2 versions of the Mac Studio at some point, but we’ll have to wait for Apple to come out with an M2 Ultra chip if it’s to maintain the same lineup as today’s M1 family.
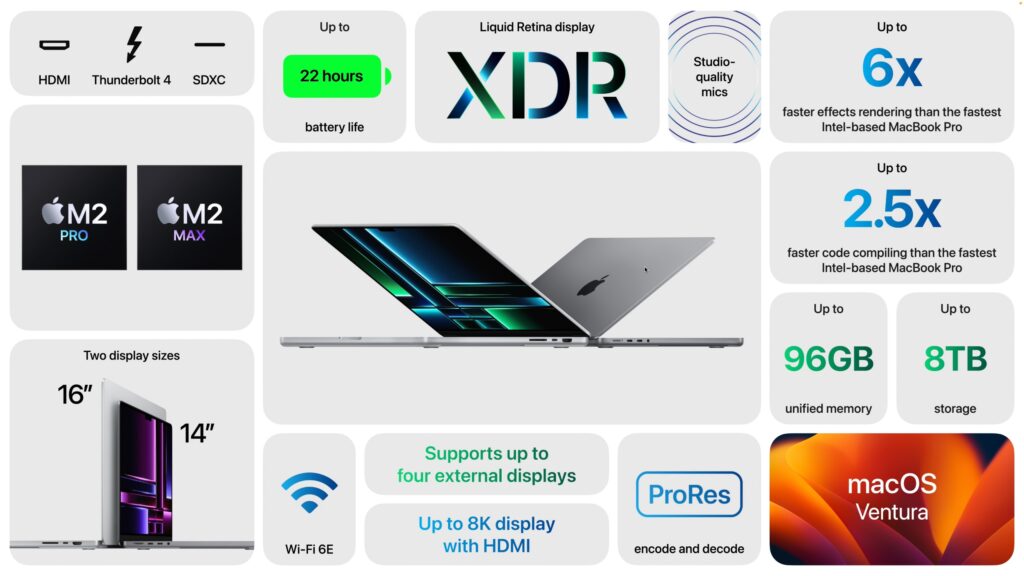
M2 Pro and M2 Max Speed Up 14-inch and 16-inch MacBook Pro
Since their October 2021 release, Apple’s professional laptops, the 14-inch MacBook Pro and 16-inch MacBook Pro, have provided impressive processing power thanks to their M1 Pro and M1 Max chips. Apple has now switched to the new M2 Pro and M2 Max chips, and the company says that both offer 20% more CPU performance, 30% more GPU performance, and 40% more Neural Engine performance than their predecessors. As with the Mac mini, the updated MacBook Pro models also feature enhanced external display support (see the tech specs for full details), Wi-Fi 6E, and Bluetooth 5.3. Finally, Apple estimates they’ll have an hour more battery life.
The 14-inch MacBook Pro starts at $1999 for an M2 Pro with a 10-core CPU and 16-core GPU, 16 GB of memory, and 512 GB of storage. Chip upgrades include the 12/19-core (CPU/GPU) M2 Pro ($300), the 12/30 M2 Max ($500), and the 12/38 M2 Max ($700). With memory, the M2 Pro configurations can upgrade to 32 GB ($400), whereas the M2 Max configurations start at 32 GB and let you go to 64 GB ($400) or 96 GB ($800, with the 12/38 M2 Max only).
The 16-inch MacBook Pro costs $2499 for an M2 Pro with a 12-core CPU and 19-core GPU, 16 GB of memory, and 512 GB of storage. Chip upgrades include the 12/30 M2 Max ($200) and the 12/38 M2 Max ($400). Memory is the same as with the 14-inch MacBook Pro, so the M2 Pro configuration can upgrade to 32 GB ($400), and the M2 Max configurations start at 32 GB and let you go to 64 GB ($400) or 96 GB ($800, with the 12/38 M2 Max only).
Given that these new MacBook Pro models provide more performance and battery life for the same prices as before, their release is entirely positive. If you were waiting for an M2 Pro or M2 Max laptop, now’s the time to place an order.
Apple Brings Back the Full-Size HomePod
Apple released the original HomePod in 2018, but even after dropping the price from $349 to $299, sales weren’t strong enough thanks to competition from much cheaper smart speakers from Amazon and Google. Apple discontinued the HomePod in 2021 and focused on the $99 HomePod mini. Now Apple has brought the full-size HomePod back, introducing a second-generation HomePod with a few extra features and the same $299 price. You can order it now in white or midnight, which replaces space gray, and it ships on February 3rd.
The new HomePod supports spatial audio with Dolby Atmos for music and video, which should enhance the listening experience. For those getting into home automation, it includes a sensor for temperature and humidity, and you’ll be able to use the Home app to create automations to control blinds, fans, and thermostats. It also supports the new Matter home automation standard. Finally, Apple says that a software update in a few months will add Sound Recognition, which will let the HomePod alert you if it hears smoke or carbon monoxide alarms. Wouldn’t you like to know if an alarm is going off while you’re away from home?
One note. You can use two HomePods to create a stereo pair, but both HomePods must be the same model. So you can’t pair an original HomePod with a second-generation HomePod or mix an HomePod mini with either one.
The main question, which we won’t be able to answer until the second-generation HomePod ships, is if it sounds as good as the original HomePod and hears Siri commands as well. That’s a question because Apple redesigned the HomePod’s audio hardware to use fewer tweeters and microphones. Plus, it relies on the S7 chip that powers the Apple Watch Series 7, as opposed to the A8 that first appeared in the iPhone 6. In short, it seems that Apple has worked to cut costs to enable the necessary profit margins. Given that Amazon’s hardware division reportedly lost $10 billion in 2022 by selling Echo smart speakers at cost, Apple’s move seems sensible, at least as long as it doesn’t hurt the HomePod user experience.
(Featured image by Apple)
Social Media: Apple has unveiled the M2 Pro and M2 Max chips and announced the M2 Mac mini and M2 Pro Mac mini, plus the M2 Pro and M2 Max models of the 14-inch and 16-inch MacBook Pro. Oh, and a new HomePod! Read all about it at: