Posts

How to Sync Your Text Messages across All Your Apple Devices

Although many of us think of Messages as an iPhone app, Apple’s platform integration lets you read and reply to conversations in Messages on other Apple devices, including the Mac and iPad. All your devices must have the correct settings to make this work reliably. We regularly hear from users who don’t see all their messages on all their devices. If that’s you, check these settings:

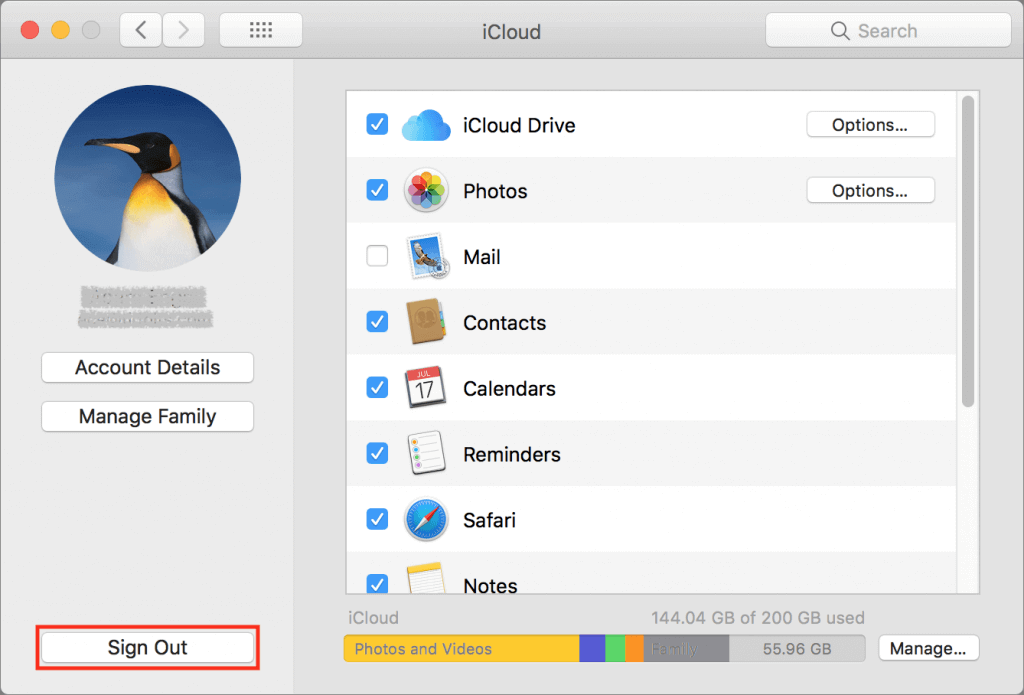
  • Same Apple ID: Your devices all know they’re yours when they’re logged in to the same Apple ID. That’s not a problem for most people, but couples who share an Apple ID, for instance, can run into trouble here. To verify this, open Settings > Your Name in iOS and iPadOS, or System Settings > Your Name in macOS. The email address under your picture at the top of each of those screens should match. If it doesn’t, scroll to the bottom, tap or click Sign Out, and sign in again with the correct Apple ID.
  • Two-factor authentication: As with so many Apple services now, your Apple ID must be set up for two-factor authentication, which causes certain logins to be queried a second time on another device. Most people have two-factor authentication set up by now, but if not, turn it on using Apple’s instructions.
  • iCloud Keychain: Your devices must have iCloud Keychain turned on to share your Messages account information. It’s probably already on, but you can enable it if not. Turn it on for an iPhone or iPad in Settings > Your Name > iCloud > Passwords and Keychain > Sync this iPhone. On a Mac, the switch is in System Settings > Your Name > iCloud > Passwords & Keychain > Sync this Mac.
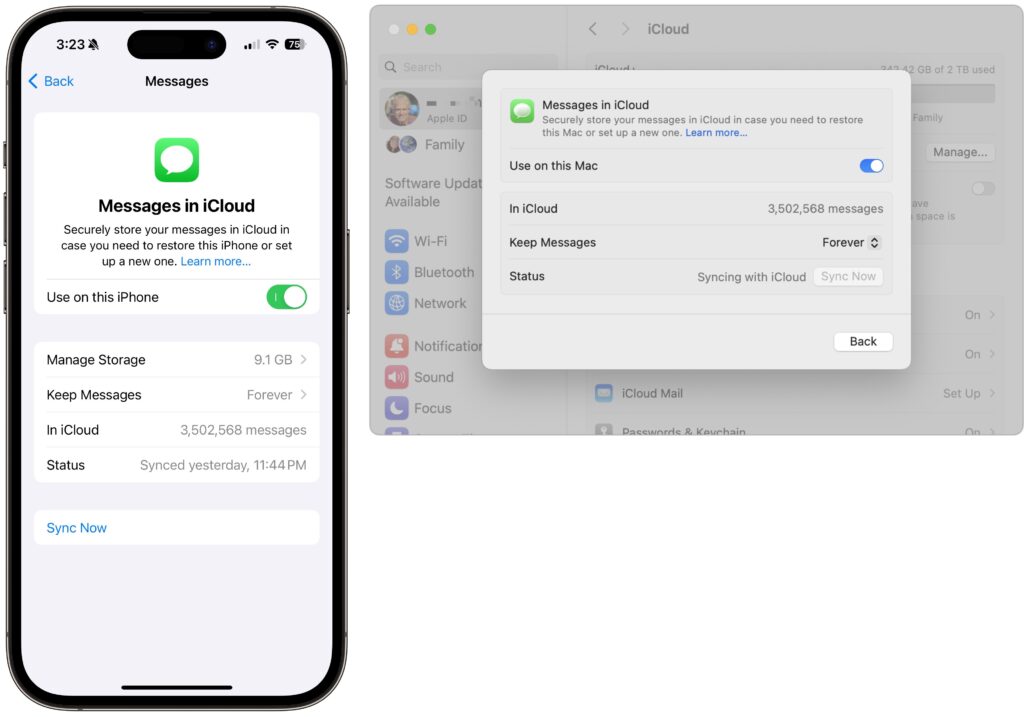
  • Messages in iCloud: This is the key setting—the previous three are just foundational requirements. Enable it for an iPhone or iPad in Settings > Your Name > iCloud > Show All > Messages in iCloud > Use on this iPhone. On the Mac, look in System Settings > Your Name > iCloud > Show More Apps > Messages in iCloud > Use on this Mac.
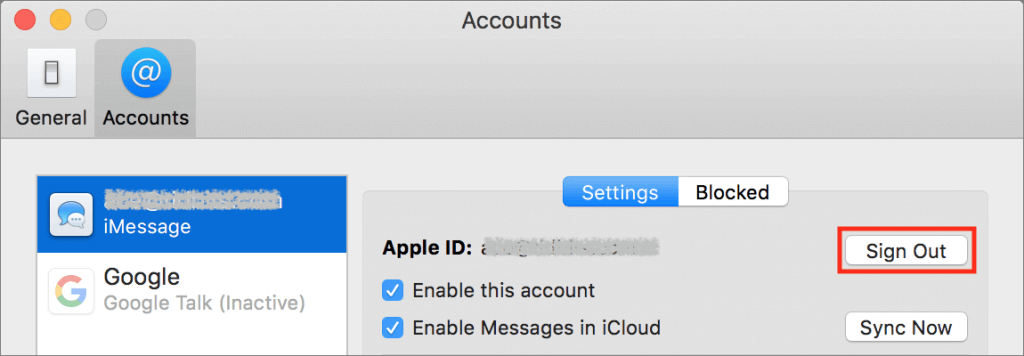
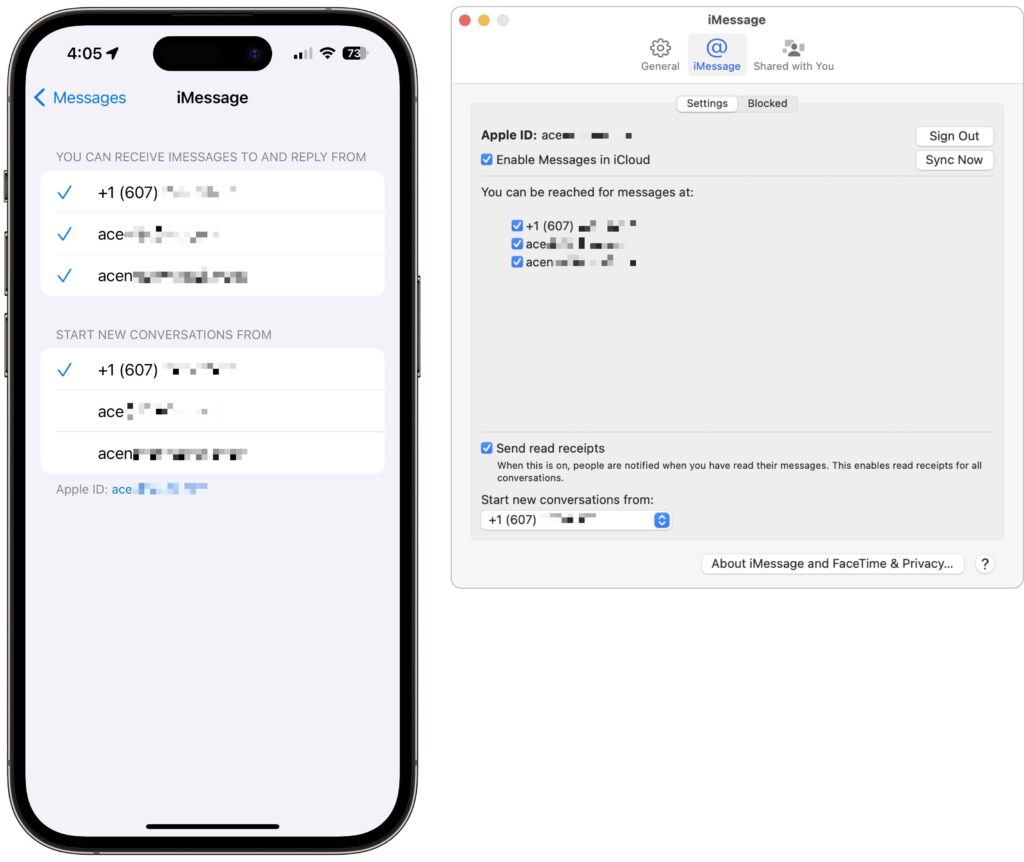
  • iMessage account: You’ve checked that you’re using the same Apple ID everywhere, but there’s a similar setting that’s also important. On your iPhone or iPad, go to Settings > Messages > Send & Receive and make sure you’re signed into iMessage with the same Apple ID—look at the bottom of the screen. Also, ensure you’re set to send and receive from your phone number and appropriate email addresses. It’s safest to send and receive from all the possibilities and start new messages from your phone number. On the Mac, verify that you have the same settings in Messages > Settings > iCloud.
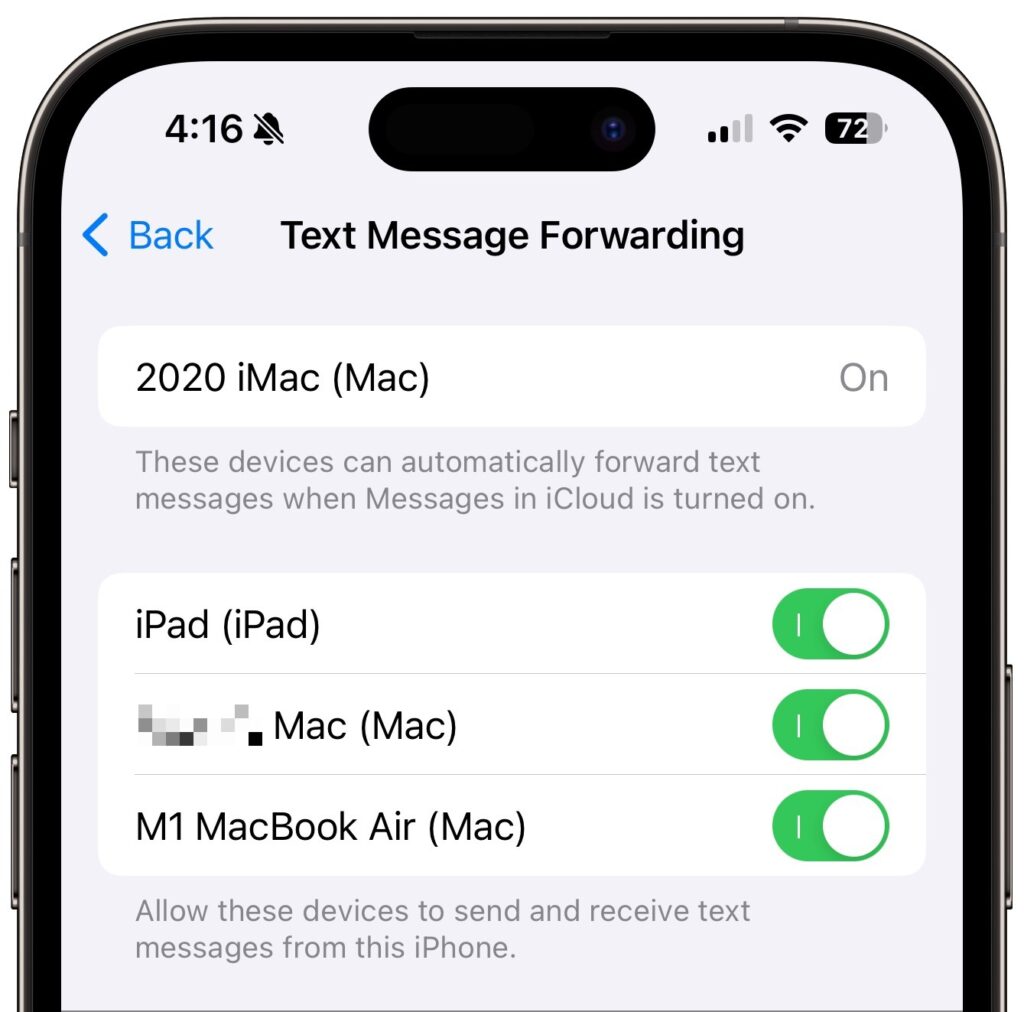
  • Text Message Forwarding: Turning on Messages in iCloud should keep message history synced across all your devices, including green bubble SMS/MMS text messages. However, it’s worth verifying that SMS/MMS messages are being sent to all your devices. On your iPhone, in Settings > Messages > Text Message Forwarding, select all the devices you want to receive text messages.

Although all the above settings may seem like a lot, most should already be set up correctly. We listed them all because when people have trouble with their messages syncing across all their devices, one or more of these are usually set wrong.

Even with everything configured correctly, there can be hiccups—nothing’s perfect. If messages fail to sync consistently, try these troubleshooting steps:

  • Use the Sync Now button in the Messages in iCloud settings on any device that hasn’t caught up. That likely won’t help instantly, but syncing should eventually catch up.
  • Restart the device—it’s always worth trying. On an iPhone or iPad, choose Settings > General > Shut Down (at the bottom), slide to power off, and then press and hold the side (iPhone) or top (iPad) button to turn the device back on. On a Mac, just choose Restart from the Apple menu.

When Messages in iCloud is working properly, though, you can carry on text message conversations using any of your devices at any time. It’s especially nice to switch to the Mac for easier typing when you’re in an involved conversation.

(Featured image by iStock.com/anyaberkut)


Social Media: One of the best parts of Apple’s tight platform integration is that you can view your text messages on all your devices. Or at least you can if you get everything set correctly.

Use Emergency Bypass and You’ll Never Miss a Call or Text from Important People

There’s little worse than missing an important call or text because your iPhone was in Do Not Disturb mode or because the Mute switch was engaged. If there are certain people—a spouse, parent, or child—whose calls and texts you always want to break through the cone of silence, iOS has a solution: Emergency Bypass. When enabled for a particular contact’s ringtone or text tone, Emergency Bypass ensures the sound and vibration will happen regardless of Do Not Disturb or the Mute switch position. To set up Emergency Bypass, edit the person’s contact card in the Phone or Contacts app, tap Ringtone, and enable Emergency Bypass. You can turn on Emergency Bypass separately for calls in the Ringtone settings and for texts in the Text Tone settings. And remember, you can always set someone’s tone to None and enable a vibration instead to ensure Emergency Bypass doesn’t allow a call to interrupt a movie, play, or concert.

Getting Rid of an Old Mac? Follow These Steps to Prep It for Its Next Life

If a new Mac has recently arrived in your life, it may be time to hand your old Mac down to a friend or family member, pass it on to a coworker, or send it back to Apple for recycling. Here’s what to do.

Backup

Before anything else, make a backup, just in case. Do this even if you’ve already migrated your data to your new Mac, since it’s possible that data could have been corrupted during the transfer without you realizing. At minimum, update your old Mac’s Time Machine backup by clicking the Time Machine icon in the menu bar, and choosing Back Up Now. For extra safety, consider using an app like Carbon Copy Cloner or SuperDuper to make a bootable duplicate that will be easier to navigate if you need to recover a file.

Deauthorize iTunes and Other Apps

It’s uncommon for apps to have licensing schemes that are tied to your Mac’s hardware these days, but if you have any, such as those from Adobe, be sure to deauthorize or deactivate them.

However, there is one app that most people will need to deauthorize: iTunes. That’s because Apple allows you to play content purchased from iTunes only on up to five computers associated with your Apple ID, so be sure to deauthorize Macs that you won’t use again before passing them on.

To do this, open iTunes and choose Account > Authorizations > Deauthorize This Computer. Enter your Apple ID credentials when prompted.

If you’ve forgotten to do this, you can deauthorize all your computers once per year (and then add back those you still have). To do this in iTunes, choose Account > View My Account, and in the Apple ID Summary next to Computer Authorizations, click Deauthorize All.

Sign Out of iCloud

Next, you should sign out of iCloud to remove any connection between your iCloud account and the old Mac. Doing so disconnects the Mac from synchronization of your iCloud data.

To do this, open System Preferences > iCloud, and click the Sign Out button. If you’ve been syncing via iCloud Drive, Calendar, Contacts, Reminders, and so on, the Mac will ask if you want to keep the data on the Mac or delete it. Don’t bother deleting it since you’ll erase the Mac’s drive in a future step.

Sign Out of iMessage

Much as with iCloud, you should sign out of your iMessage account, at least if your Mac is running OS X 10.8 Mountain Lion or later. To do this, open Messages and choose Messages > Preferences > Accounts. Select your iMessage account and click Sign Out. (In 10.14 Mojave, instead of clicking Accounts in the toolbar, click iMessage.)

Unpair Bluetooth Devices

If you’re giving your Mac to another user along with its Bluetooth devices, such as a wireless keyboard and trackpad, you don’t need to do anything with them. However, if you plan to hang on to your Bluetooth devices and use them with another Mac, you should unpair them. That’s especially true if someone else in your home or office will be using the old Mac, since the device might end up working on multiple Macs, which could cause confusion.

Before you unpair a wireless keyboard and mouse or trackpad, however, make sure you have a wired keyboard and pointing device available, since you won’t be able to erase the drive and reinstall macOS without them. If you lack wired alternatives, don’t unpair your keyboard and pointing device.

To unpair Bluetooth devices, open System Preferences > Bluetooth, and in the list of devices either hover over a device or select it. Then click the X button to the right. When prompted, click Remove.

Erase the Drive and Reinstall macOS

Here’s the most important step—erasing the Mac’s drive. After all, you don’t want the next user to be able to access all your photos, documents, email, and more. Luckily, this is easy to do.

First, start up from macOS Recovery by holding down Command-R while the Mac boots. In the macOS Utilities window that appears, select Disk Utility and click Continue.

In Disk Utility, select the internal drive, click Erase in the toolbar, and in the dialog that appears, enter a new name, choose a format, and choose GUID Partition Map for the scheme. For the format, stick with the default, since the macOS installer will convert it later if necessary. Quit Disk Utility when you’re done.

Once the drive is erased, you’ll be returned to the macOS Utilities window, where you can select Reinstall macOS (or Reinstall OS X, if it’s an older Mac) and click Continue. Obviously, if you’re sending it back to Apple for recycling, there’s no reason to do this.

The installation process takes time, and when it’s done, the Mac will restart into the setup assistant. Press Command-Q at the Welcome screen to shut down. When the new user starts the Mac up again, they’ll be able to continue with the setup process. That’s it—now you’re ready to give the Mac to its next user.


Social Media: If you’re passing an old Mac on to a colleague, friend, or family member—or returning it to Apple for recycling—follow these steps to prepare it for its next stage in life and ensure that no one will be able to access your data.