Posts

Use Guided Access to Let Kids and Others Use Your iPhone Temporarily

Let’s get one thing straight. You know that you should never, ever share your iPhone or iPad passcode with anyone you don’t trust implicitly, like a spouse or adult child, right? That’s because, with your iOS passcode, someone could change your Apple ID password, and if you use iCloud for email, completely steal or otherwise abuse your online identity. (Scared? Good. If you’ve given anyone your passcode, go change it right now. We’ll wait.)

So if sharing your passcode is such a terrible idea, how do you let someone else use your iPhone or iPad temporarily? Perhaps you want to let your kid play a game in the car while you focus on tricky winter driving. Or maybe you time running races with an iPhone app and want someone to do the timing without giving them full access to your iPhone. Whatever the reason you want to give someone limited access to a single app in iOS 13, the solution is Guided Access.

Enabling and Configuring Guided Access

To turn Guided Access on, navigate to Settings > Accessibility > Guided Access (it’s near the bottom), and flick the switch. While you’re here, check out the remaining settings:

  • Passcode Settings: Create a passcode for getting out of Guided Access here (it can be different than your normal one), and choose whether you can use Touch ID or Face ID to exit as well.
  • Time Limits: You don’t set time limits here, but you can set audio and spoken warnings before the time runs out.
  • Accessibility Shortcut: Enable this if you also use triple-click for another Accessibility Shortcut like Magnifier.
  • Display Auto-Lock: Choose how long the device can be inactive before the screen turns off. If the Guided Access user wakes up the device, they’ll still be in Guided Access.

With those settings configured, switch to the desired app and triple-click the side or Home button, and if necessary, tap Guided Access in the Accessibility Shortcut list. You can do five things:

  • Set session-specific options: Tap Options in the lower-right corner to access various switches. If they’re disabled:
    • Side Button or Sleep/Wake Button: The user can’t put the device to sleep.
    • Volume Buttons: The user can’t change the volume.
    • Motion: The screen doesn’t change from the orientation (portrait or landscape) it was in when you started Guided Access.
    • Touch: The user can’t do anything with the screen at all—probably most appropriate for letting a young child watch a video.
    • Dictionary Lookup: Prevents word lookups in some apps.
  • Set time limits: At the bottom of the Options list, tap Time Limit and set an amount of time after which the device can’t be used until you enter the Guided Access passcode.
  • Disable specific areas on the screen: Draw circles around parts of the screen you want to make off-limits to the user. After making a circle, you can move it by dragging it, resize it by dragging any of its handles, or remove it by tapping its X button.
  • Start/Resume Guided Access: In the upper-right corner, tap Start. If you haven’t yet set a passcode, you’ll be prompted to do that.
  • Exit the setup screen: In the upper-left corner, tap End.

Using Guided Access

Once you tap Start, iOS tells you it’s entering Guided Access and lets you use the current app with the restrictions you’ve applied. If you decide that the restrictions aren’t right, triple-click the side or Home button to return to the setup screen. When you’re done, tap Resume in the upper-right corner.

To leave Guided Access, triple-click the side or Home button, enter the passcode, and in the setup screen, tap End in the upper-left corner.

That’s it! Once you understand the various limitations of Guided Access, you’ll be able to turn it on and off quickly whenever you need to let someone use your iPhone or iPad for a while.

(Featured image by mohamed Abdelgaffar from Pexels)


Social Media: Never, ever share your iPhone or iPad passcode with anyone who you don’t trust implicitly. Instead, you can give people limited access to a single app with Guided Access. Learn more here:

Want to Use Your Friends’ Nicknames in iOS? Here’s How

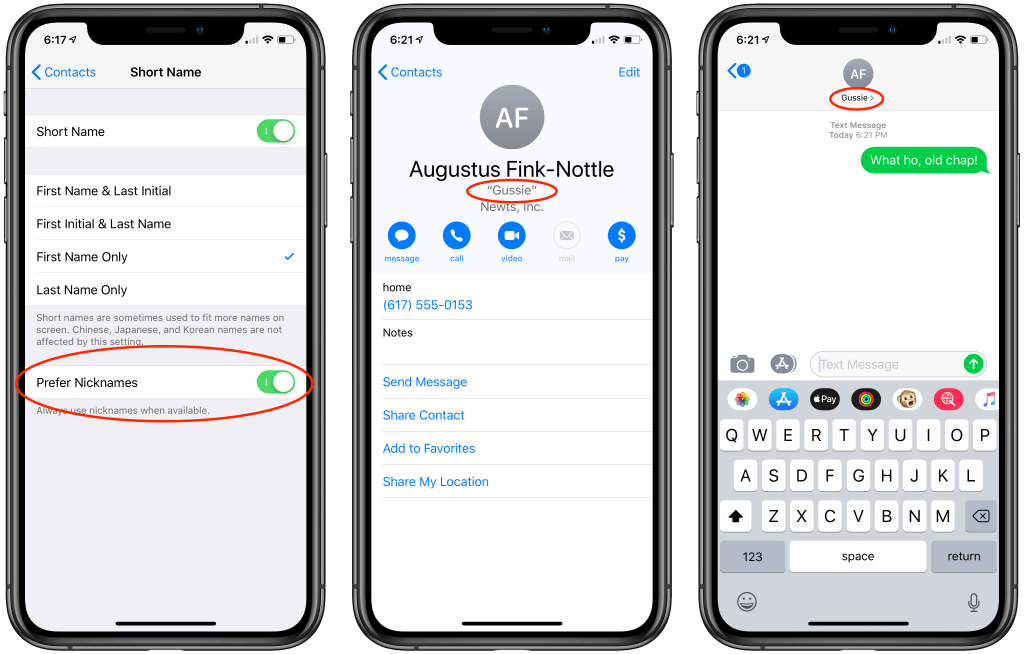
If you have a friend whom you refer to only by his nickname, it can be annoying to feel like you should use his proper first name when adding him to Contacts. Worse, then he shows up in Messages with a name you don’t recognize as easily. Here’s how to convince iOS to use his nickname instead. Open his card in Contacts, tap Edit, scroll to the bottom, tap Add Field, and tap Nickname. That puts a Nickname field at the top, under his proper name, for you to fill in. To get iOS to use it, go to Settings > Contacts > Short Name and enable Prefer Nicknames. From then on, you can enter your friend’s nickname instead of his proper name in apps like Messages and Mail, and iOS will also display it instead of his name everywhere.

(Featured image by Yuri Manei from Pexels)

How to Get Custom Alerts for Email from Your VIPs

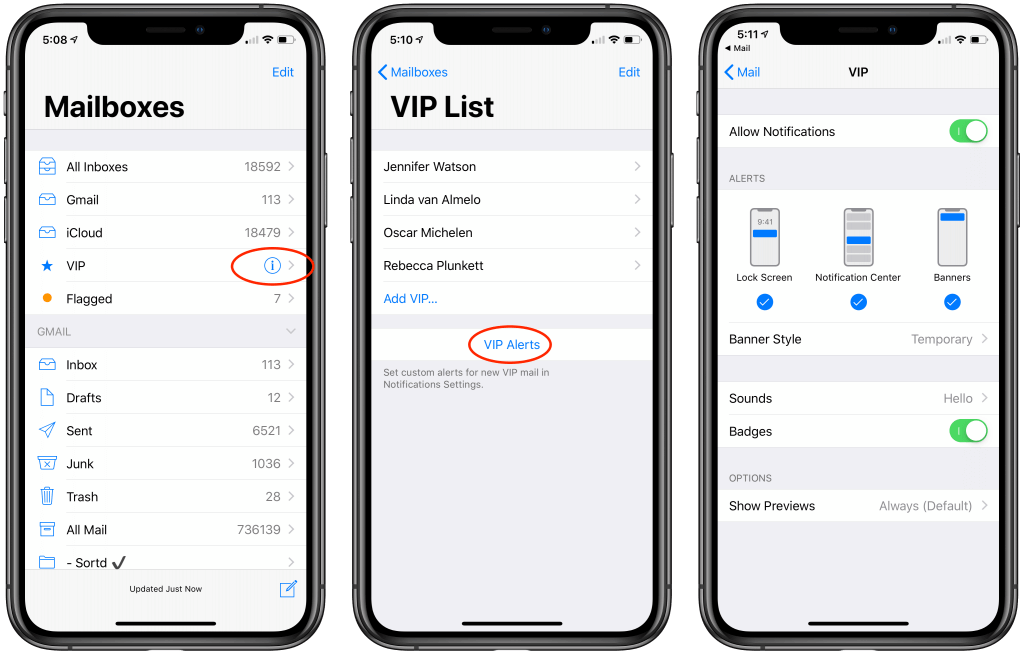
Few people get so little email that they want an iPhone notification for every message that rolls in. But many of us have just a couple of people—our personal VIPs—whose messages are important enough to warrant an alert. If that’s true for you, and you want to know right away when your boss or your spouse or your child sends you a message, set up VIP Alerts. In Mail in iOS, in your Mailboxes list, tap the i button next to the VIP mailbox. If necessary, use the Add VIP link to pick your VIPs from your contacts, and then tap VIP Alerts to jump to the screen of Settings > Notifications > Mail > VIP. Once there, you can choose a banner style, alert sound, and other notification-related settings.

(Featured image by Noelle Otto from Pexels)

Use AirPods to Improve Your Hearing

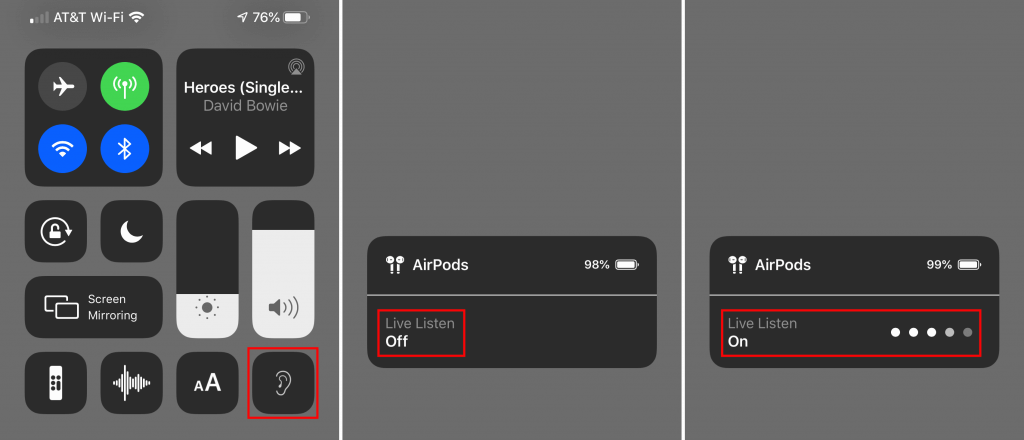
An ever-increasing number of people have hearing loss due to exposure to loud noise and age. If you’re in that group, but don’t yet need hearing aids, try using your AirPods to help you hear better in certain situations. iOS’s Live Listen feature uses your iPhone’s mic to pick up specific sounds and then sends that audio directly to your AirPods, helping you focus on what you want to hear. To enable Live Listen, go to Settings > Control Center > Customize Controls and tap the green + button next to Hearing. Then put your AirPods in, open Control Center, tap the Hearing button, and tap to turn on Live Listen. Fine-tune what you’re hearing by moving the iPhone closer to what you want to hear and pointing the mic at the source of the sound—pay attention to the sound level meter dots—and by adjusting the iPhone’s volume controls. To stop listening, tap Live Listen again or just remove your AirPods.

(Featured image by kyle smith on Unsplash)

A Quick Way to Check Battery Levels on Your iPhone, Apple Watch, and AirPods

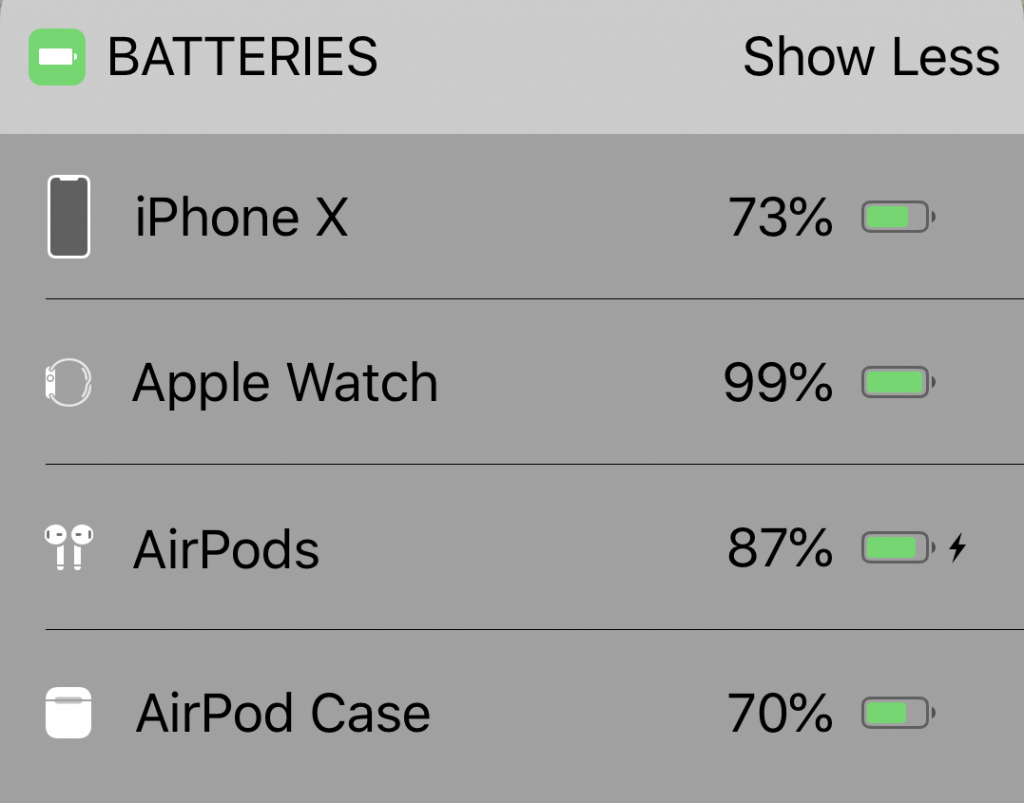
Apple’s Batteries widget is a little known but highly useful tool for quickly assessing which of your small Apple devices is lowest on power—something you may wish to do when traveling with only one charging cable. To access it, switch to Today view on the iPhone, accessible by swiping right on the Home screen or Lock screen. If the Batteries widget isn’t already there, scroll to the bottom, tap Edit, and tap the green + button to the left of Batteries in the list. Of course, if you just want to check the battery status on one device, that’s possible too. It’s easy to figure out how much power remains in your iPhone’s battery because of the indicator at the top right of the screen (swipe down on it to invoke Control Center and see the percentage on the iPhone X and later). On the Apple Watch, swipe up on the screen to see its battery percentage in Control Center. For AirPods, open the case and wait for the pop-up to appear on your iPhone’s screen.

(Featured image by Adam Engst)

Read More Easily on the iPhone with Safari Reader

Do you sometimes find it difficult to read articles on your iPhone because of ads, banners, extraneous layout, social media icons, and too-small fonts? We certainly do, and there’s often a quick fix for the myriad ills of modern Web pages: Safari Reader. Whenever you see the Safari Reader icon to the left of the site’s domain name in the address bar, tap it to switch to a cleaner view that dispenses with all the unnecessary trimmings and presents the content in a larger, more readable font. Tap the font  icon at the right side of the address bar in Safari Reader to change the font, font size, and background color. Safari Reader isn’t always available, and it can occasionally fail to format an article properly, but it’s a big win when you can use it.

(Featured image by Atlas Green on Unsplash)

Clean Up Old Tabs in Safari in iOS with This Quick Trick

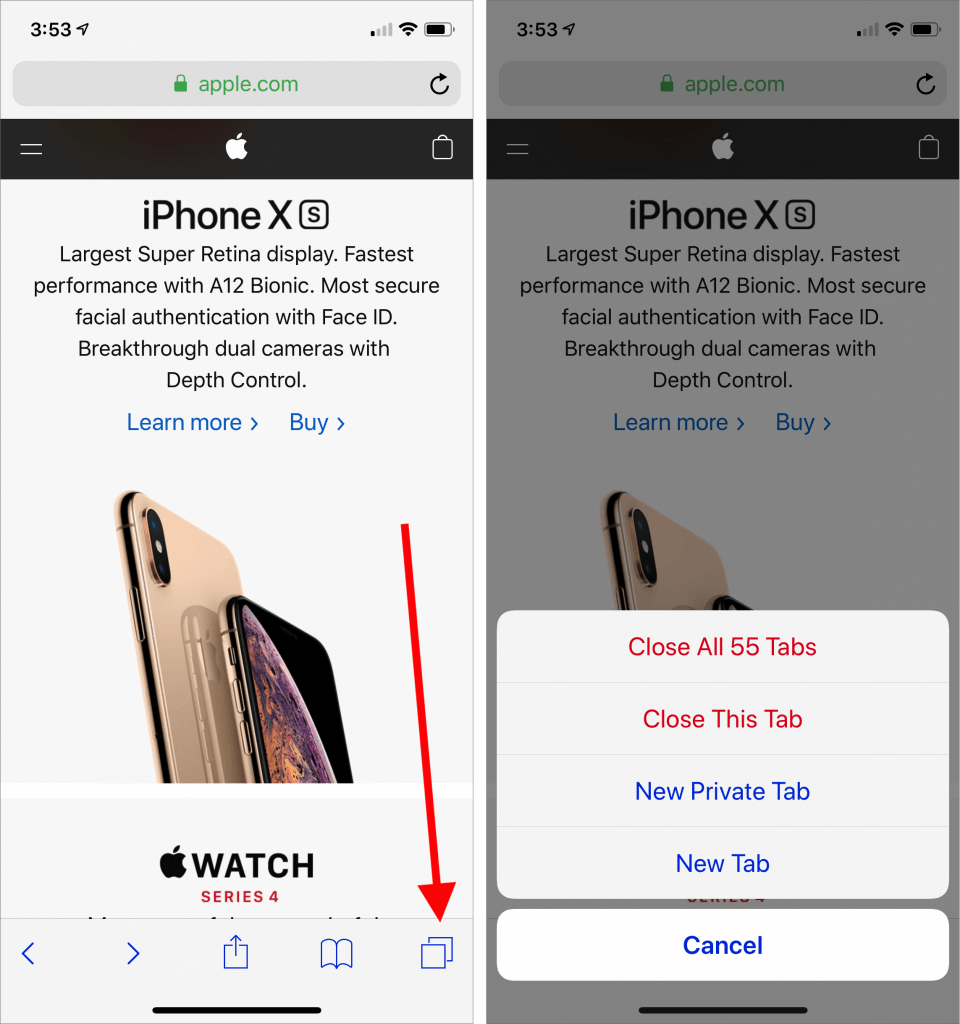
Every time you tap a link to open a Web page in Safari on your iPhone or iPad, it automatically opens a new tab. That’s fine until you realize that you have oodles of old tabs open, making it difficult to find any particular tab. To close all your old tabs in one fell swoop, press and hold on the tab button, then tap Close All X Tabs in the popover that appears.

Photos Not Syncing between Devices Properly via iCloud Photos?

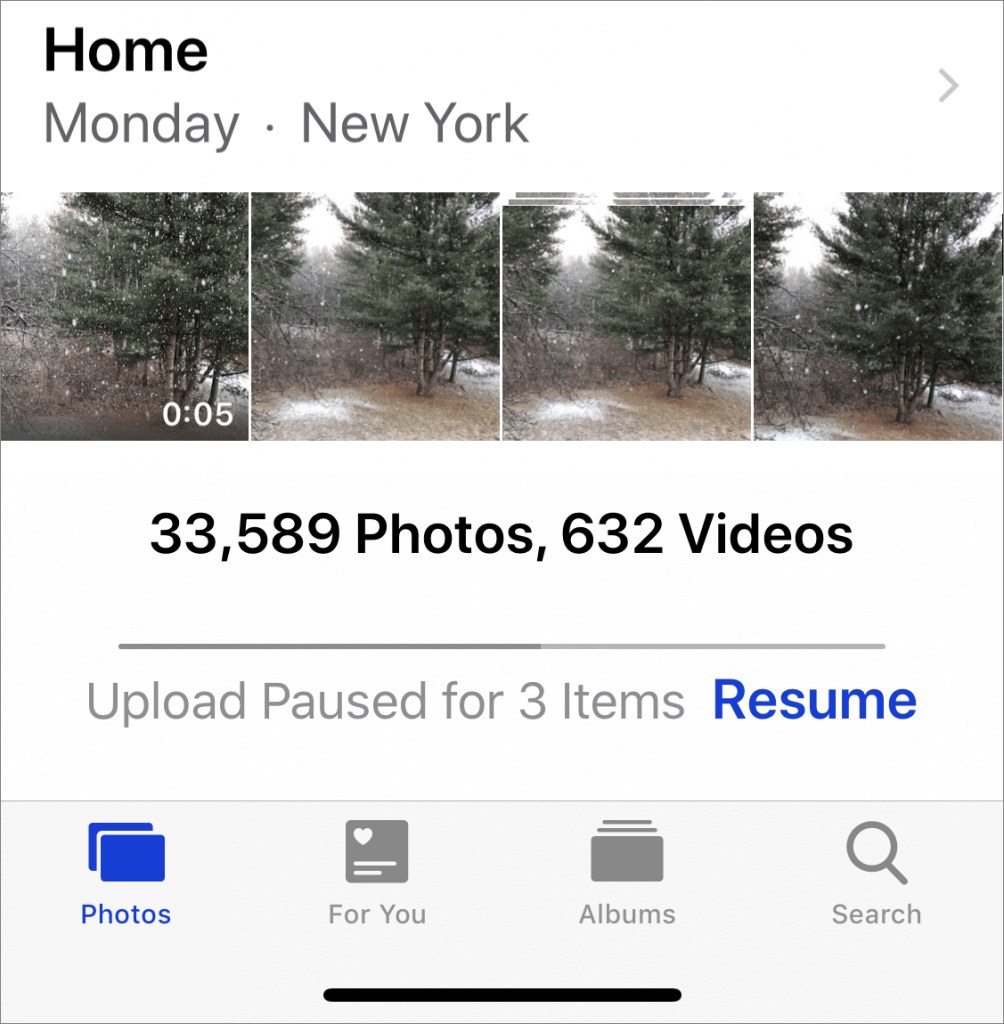
iCloud Photos (which Apple previously called iCloud Photo Library) is wonderful when it’s working. Take some photos on your iPhone, and they appear on your Mac and iPad a minute later. Delete unnecessary shots and edit the others on your Mac, and your iPhone and iPad reflect those changes almost immediately. But what if changes aren’t syncing? Photos in iOS and macOS can pause syncing for a variety of reasons, and sometimes it doesn’t restart when it should. To see if this is happening, go to the very bottom of the Photos view in Photos, where it lists the number of photos and videos you have stored. Below that number is the sync status. If it has a reason and a Resume link, click or tap Resume to start it again.

Look before You Leap with Safari’s Link Preview

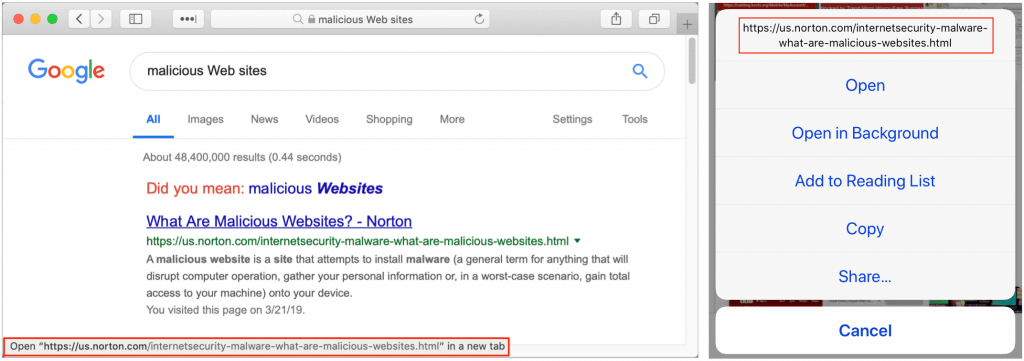
When you follow a link in Safari, you generally don’t know where you’re going to end up. That’s fine most of the time, but what if you’re concerned that a site might be trying to trick you into going somewhere malicious? Safari provides an easy way to look at the URL under a link. On the Mac, choose View > Show Status Bar, hover your pointer over the link, and look at the bottom of the window. In iOS, touch and hold a link (don’t press for 3D Touch) until a popover appears, showing the link and giving you options for opening it. The most important thing to look at is the domain—us.norton.com in the screenshots. It should match where you think you’re going, or at least look reasonable. If the URL is dubious, don’t follow the link.

Use Emergency Bypass and You’ll Never Miss a Call or Text from Important People

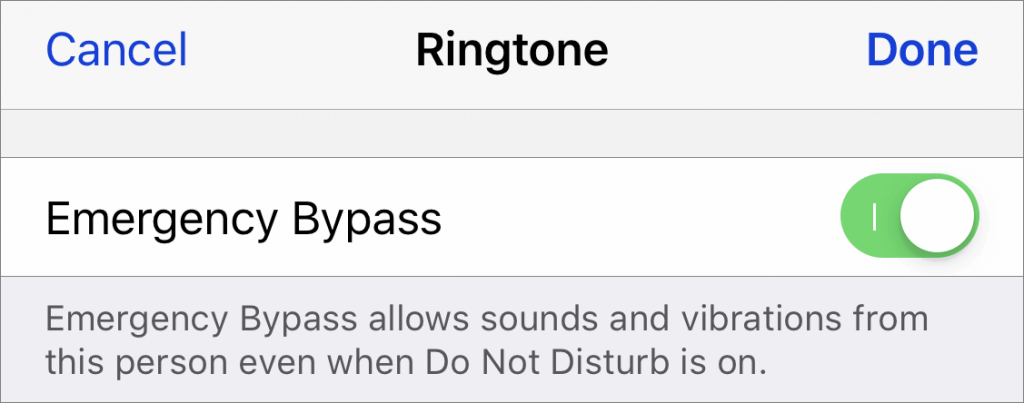
There’s little worse than missing an important call or text because your iPhone was in Do Not Disturb mode or because the Mute switch was engaged. If there are certain people—a spouse, parent, or child—whose calls and texts you always want to break through the cone of silence, iOS has a solution: Emergency Bypass. When enabled for a particular contact’s ringtone or text tone, Emergency Bypass ensures the sound and vibration will happen regardless of Do Not Disturb or the Mute switch position. To set up Emergency Bypass, edit the person’s contact card in the Phone or Contacts app, tap Ringtone, and enable Emergency Bypass. You can turn on Emergency Bypass separately for calls in the Ringtone settings and for texts in the Text Tone settings. And remember, you can always set someone’s tone to None and enable a vibration instead to ensure Emergency Bypass doesn’t allow a call to interrupt a movie, play, or concert.