Posts

Strategies for Moving from Mojave to Catalina

For some Mac users, macOS 10.15 Catalina is no longer a choice. That’s because the new 16-inch MacBook Pro and the 2019 Mac Pro that Apple released late last year ship with Catalina installed and can’t run any previous version of macOS.

But for most people, it’s time to consider an upgrade to Catalina. Most backup software now works with Catalina’s bifurcated drive approach that puts the system on a separate, read-only volume from your data and apps. We’ve all had several months to come to terms with the fact that old 32-bit apps won’t even launch in Catalina. And Apple has shipped several updates that bring Catalina to version 10.15.3, addressing most of the complaints users had with the initial release.

If you are ready to try Catalina but still want to use 10.14 Mojave, we have some advice for how to make that happen. This could be the case for someone who has purchased a new Mac that does support Mojave but came with Catalina installed, for someone who wants to test Catalina while still using Mojave, or for someone who wants to move on to Catalina but has a 32-bit app that they aren’t ready to say good-bye to.

Downgrade from Catalina to Mojave on Some New Macs

Apple has started installing Catalina on new Macs other than the 16-inch MacBook Pro and 2019 Mac Pro, but since these older Macs can still run Mojave, it’s possible—if a bit tricky—to downgrade them to Mojave.

System engineer Armin Briegel has worked out a way of downgrading new Macs to Mojave. First, you create a Mojave Installer USB drive. To use that drive to boot a Mac with a T2 security chip, you must allow external booting from the Security Utility on the Recovery partition. Once you’ve booted from your Mojave Installer drive, use Disk Utility to erase the entire internal drive. Then install Mojave.

Use Virtualization to Keep 32-bit Apps Running

For some people, what’s keeping them on Mojave is a single 32-bit app that will never be updated in an appropriate fashion. Quicken 2007 falls into this category, as does the ScanSnap Manager app for the ScanSnap S1300, S1500, and S1500M scanners. Sure, you can get a current version of Quicken, but it may not do precisely what you want, and Fujitsu would be happy to sell you a new ScanSnap scanner that does come with 64-bit software, but then you’ll have to figure out what to do with your old scanner.

So if you’re ready to upgrade to Catalina in general but need to maintain access to one or two apps, one solution is virtualization software: either Parallels Desktop or VMware Fusion. Both apps let you run nearly any operating system—including older versions of macOS like Mojave—in a virtual machine. In essence, they fool the guest operating system, whether it’s Mojave or Windows, into thinking it’s running normally on a computer, when it’s actually running in a virtual environment.

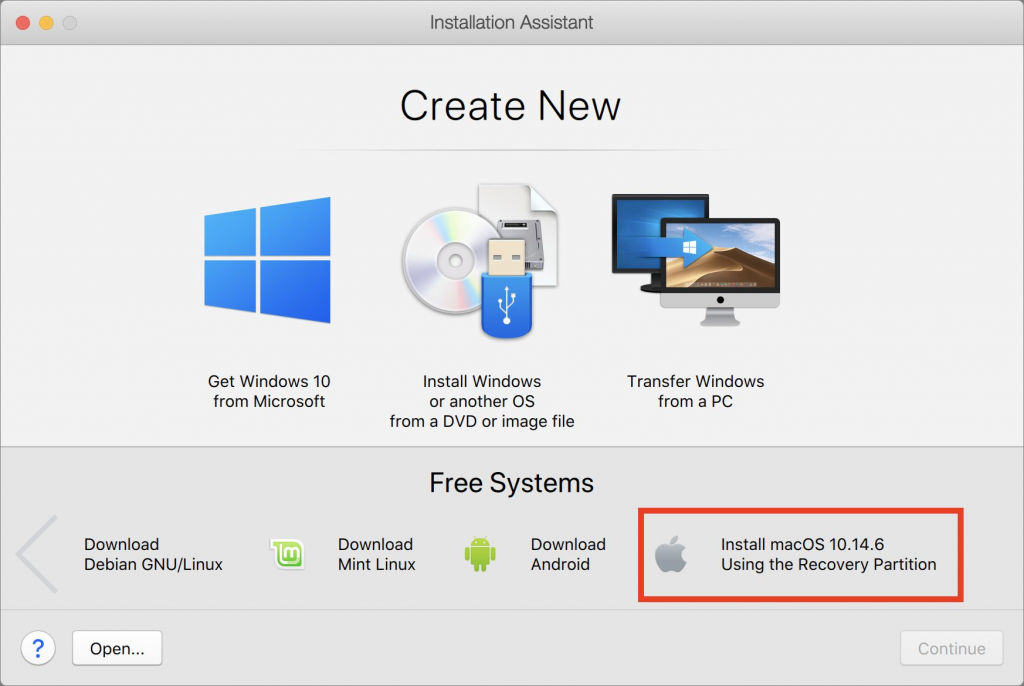
These apps cost about $80, and while there’s a bit of work in setting them up (the screenshot below shows the option for installing Mojave in Parallels Desktop during setup), once you have them configured, it’s easy to run older apps alongside newer ones with little or no performance hit. This approach is also perfect for a 16-inch MacBook Pro or Mac Pro that can’t run Mojave in any other way.
Install Catalina and Mojave on Separate APFS Volumes and Switch Boot

Finally, there’s one other option that lets you switch back and forth between Mojave and Catalina, assuming your Mac supports Mojave. You can create an APFS volume on your internal drive and install another version of macOS on that. It’s easy, and Apple provides full instructions. The only problem with this approach is that you’ll have to restart to switch operating systems, whereas both are available simultaneously with the virtualization solution.

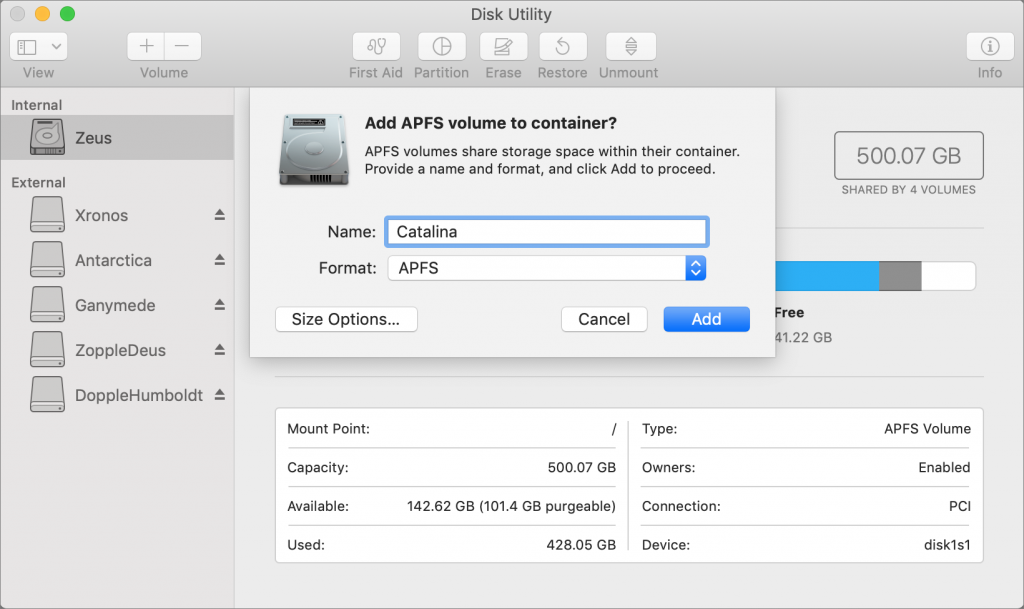
First, make sure you have at least one current backup of your Mac, since it’s foolhardy to adjust your drive structure without one. Next, in Disk Utility, select your internal drive, choose Edit > Add APFS Volume, and click Add. We recommend naming the drive such that it will be clear what’s on it.
Then boot into macOS Recovery and install the desired version of macOS on your new volume. The keys you hold down to get into Recovery determine which version of macOS you’ll get:

  • Command-R reinstalls the latest version of macOS that was installed on your Mac.
  • Command-Option-R upgrades to the latest version of macOS that’s compatible with your Mac.
  • Command-Shift-Option-R reinstalls the version of macOS that came with your Mac, or the closest version still available.

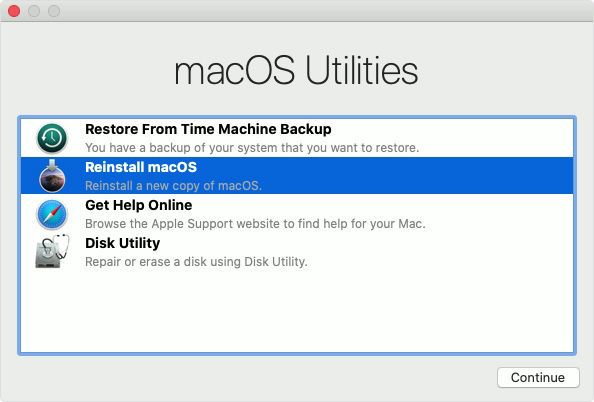
Choose Reinstall macOS from the macOS Utilities window and proceed from there.
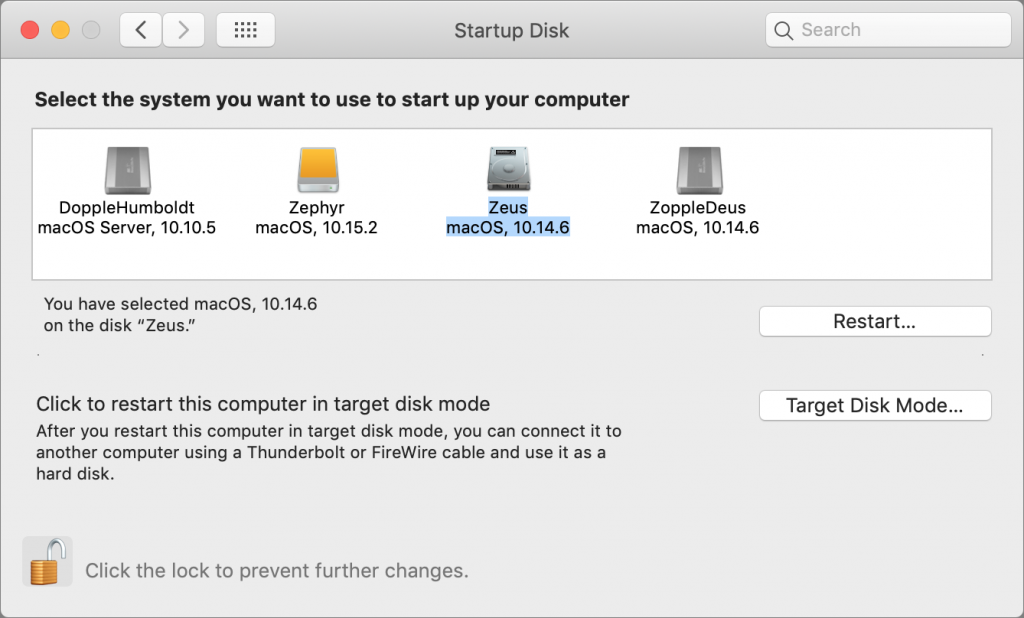
Once the installation is complete, to switch from one version of macOS to another, open System Preferences > Startup Disk, choose the desired volume to boot from, and then click Restart. Or, press Option at startup and select the desired volume from the Startup Manager screen.
Needless to say, the decision about when and how to upgrade to Catalina isn’t a trivial one, so feel free to contact us to discuss your particular situation or to get help with any of the procedures that we’ve described in this article.

(Featured image by Apple)


Social Media: Considering upgrading to Catalina? Or maybe you have a new Mac that came with it already installed? Read on for strategies for downgrading to Mojave or running both Catalina and Mojave.


Catching up with Apple in May: New MacBook Pros, New iPod touch, OS Updates

Apple is well known for its splashy media events, now usually held in the Steve Jobs Theater at the company’s new Cupertino campus. But Apple reserves such events for major announcements. Smaller announcements, such as minor updates to particular product lines, operating system updates, or new repair programs, get only a press release, if that.

But just because a change doesn’t merit much fuss doesn’t mean it’s uninteresting—if you’ve been waiting for the right moment to buy a new Mac, for instance, an announcement of a small MacBook Pro revision might be exactly what you want to hear.

Here’s a roundup of Apple’s recent announcements in May 2019.

New MacBook Pro Models Feature Faster CPUs and New Butterfly Keyboards

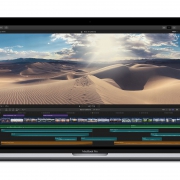
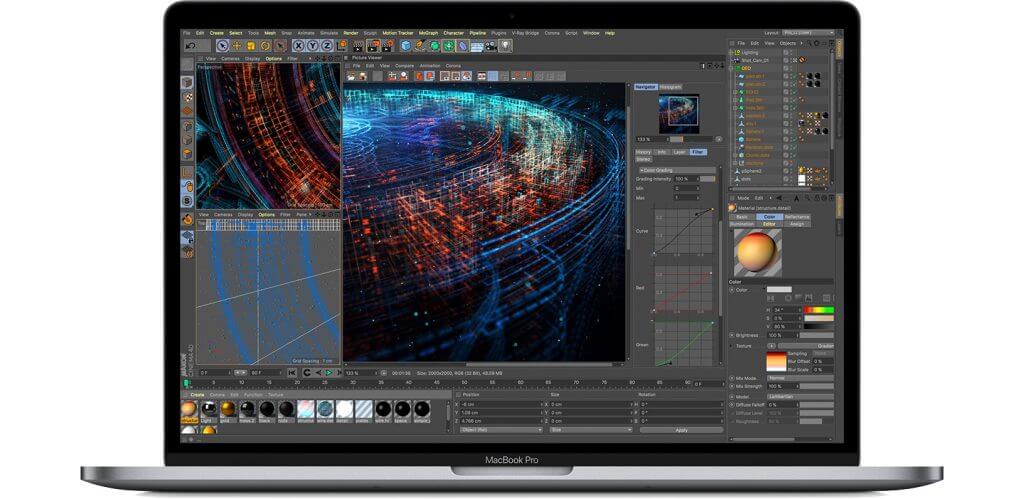
Although Apple has a reputation for innovation, the company should also be lauded for its evolutionary changes, which are much more common. To wit, Apple quietly updated the 13-inch and 15-inch MacBook Pro models equipped with a Touch Bar with faster CPUs while keeping the prices the same.

You can now buy a 15-inch MacBook Pro with the latest 9th-generation 8-core Intel Core i9 processor, making it the fastest MacBook Pro ever—the previous model offered only a 6-core processor. The 15-inch models also offer faster graphics processors as options.

The 13-inch MacBook Pro models didn’t receive the same level of changes, but they gained slightly faster 8th-generation Intel processors that provide minor performance improvements.

Both models now come with the fourth generation of Apple’s controversial butterfly keyboard. We’ll have more on that issue soon.

Apple Launches MacBook Pro Repair Program for “Flexgate”

13-inch MacBook Pros from 2016 are susceptible to a display-related problem the press has dubbed “Flexgate.” According to Apple, affected Macs exhibit one or both of these symptoms:

  • The display backlight continuously or intermittently shows vertical bright areas along the entire bottom of the screen.
  • The display backlight stops working completely.

The problem is related to a flex cable connected to the display that’s too short and too fragile; some repair experts have suggested that failure is inevitable.

If your 13-inch Mac is showing either of these symptoms, you can now take advantage of Apple’s new 13-inch MacBook Pro Display Backlight Service Program to get a free repair. You can have your Mac fixed by Apple or an Apple Authorized Service Provider, and if you already paid for a repair, you can request a refund from Apple.

iOS 12.3 and tvOS 12.3 Add New TV App; iOS 12.3.1 Fixes Calling Bug; macOS Addresses ZombieLoad

As you’ve no doubt noticed in your Software Update notifications, Apple recently updated all its operating systems: iOS 12.3.1, macOS 10.14.5, watchOS 5.2.1, and tvOS 12.3. If you’re already running iOS 12 and macOS 10.14 Mojave, it’s fine to update.

iOS 12.3 and tvOS 12.3 are notable primarily because they include a new version of Apple’s TV app. This app now provides access to “channels,” by which Apple means subscription-based streaming video services like HBO and Showtime. Apart from letting you subscribe to such services inside the app and playing content from them in the app, the new app looks and works much like the previous version. The new app will also support Apple’s original content on the Apple TV+ service later this year.

Shortly after iOS 12.3 shipped, Apple released iOS 12.3.1, which fixes a critical bug that could prevent your iPhone from making or receiving phone calls. So if you upgraded to iOS 12.3, be sure to update to iOS 12.3.1 right away.

Similarly, it’s worth updating to macOS 10.14.5 to protect against a security vulnerability called ZombieLoad, and if you’re still running 10.12 Sierra or 10.13 High Sierra, be sure to install Security Update 2019-003 for the same protection.

New iPod touch Gains the A10 Chip and a 256 GB Configuration

Finally, Apple showed a little love to the littlest iOS device, the diminutive iPod touch. In the new model, Apple swapped the old A8 chip for a faster A10 chip that promises up to twice the performance. That added performance enables the new iPod touch to support Group FaceTime calls and enhanced augmented reality (AR) games.

The only other change in the iPod touch is that Apple now sells a 256 GB configuration for $399, joining the 32 GB configuration at $199 and the 128 GB configuration for $299.

(All images courtesy of Apple)


Social Media: If you haven’t been paying close attention, you might have missed Apple’s new MacBook Pros, new iPod touch, support for other streaming services in the TV app in iOS 12.3 and tvOS 12.3, and a repair program for “Flexgate.” Read on for details:

What’s with All These Dialogs Saying, “SomeApp is not optimized for your Mac”?

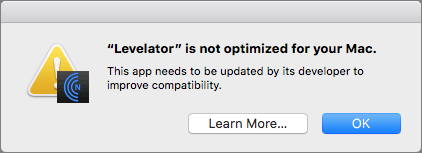
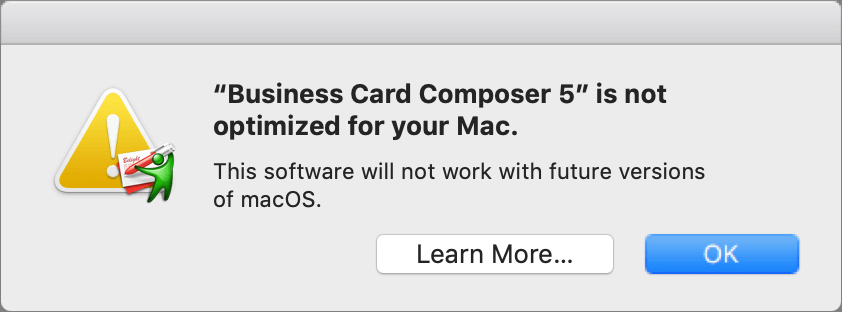
If you’re running macOS 10.13.4 High Sierra or macOS 10.14 Mojave, you may have seen a dialog that says an app isn’t optimized for your Mac. The message differs slightly between High Sierra and Mojave, with the High Sierra version telling you the developer needs to update the app to improve compatibility whereas Mojave saying bluntly that the app won’t work with future versions of macOS.

What’s going on here, what should you do, and when should you do it?

What’s Going On: 32-bit and 64-bit Apps

Over a decade ago, Apple started to transition all the chips used in Macs, along with macOS itself, from a 32-bit architecture to a 64-bit architecture. Without getting into technical details, 64-bit systems and apps can access dramatically more memory and enjoy significantly faster performance.

Apple knew it would take years before most people were running 64-bit hardware and 64-bit-savvy versions of macOS, so it allowed macOS to continue running older 32-bit apps. However, maintaining that backward compatibility has a cost, in terms of both performance and testing, so at its Worldwide Developer Conference in 2017, Apple warned developers that High Sierra would be the last version of macOS to support 32-bit apps “without compromise.” At the next WWDC in June 2018, Apple announced that macOS 10.14 Mojave would be the last version of macOS to run 32-bit apps.

Happily, the only “compromise” for 32-bit apps in Mojave is the warning dialog, which appears every 30 days when you launch an older app. But the writing is on the wall: 32-bits apps will cease working in macOS 10.15.

How Do You Identify 32-bit Apps?

Apple provides a tool to help you find 32-bit apps. Follow these steps:

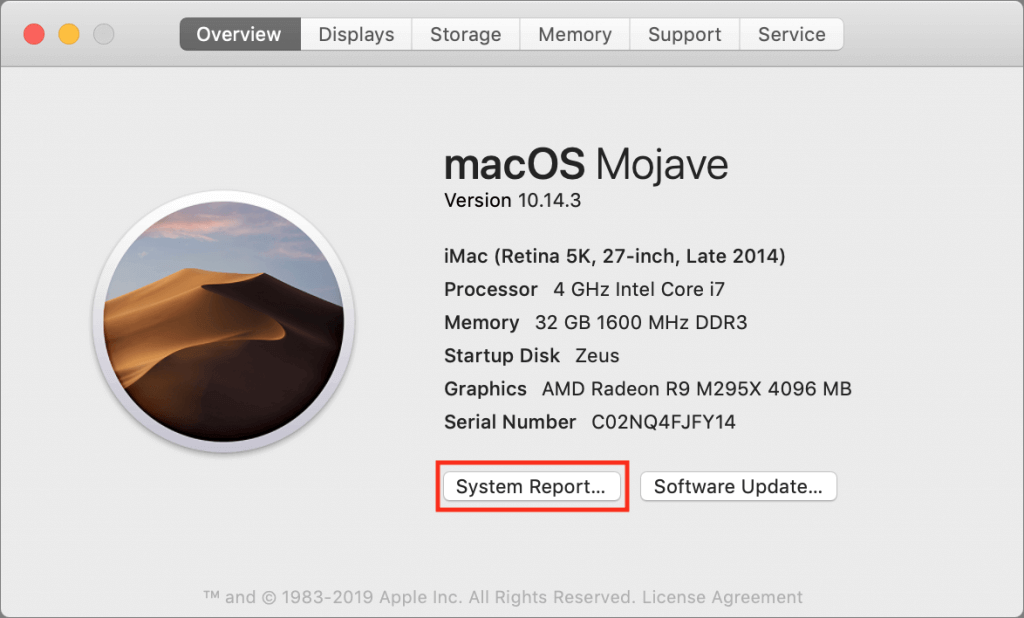
  1. From the Apple menu, choose About This Mac and then click the System Report button.
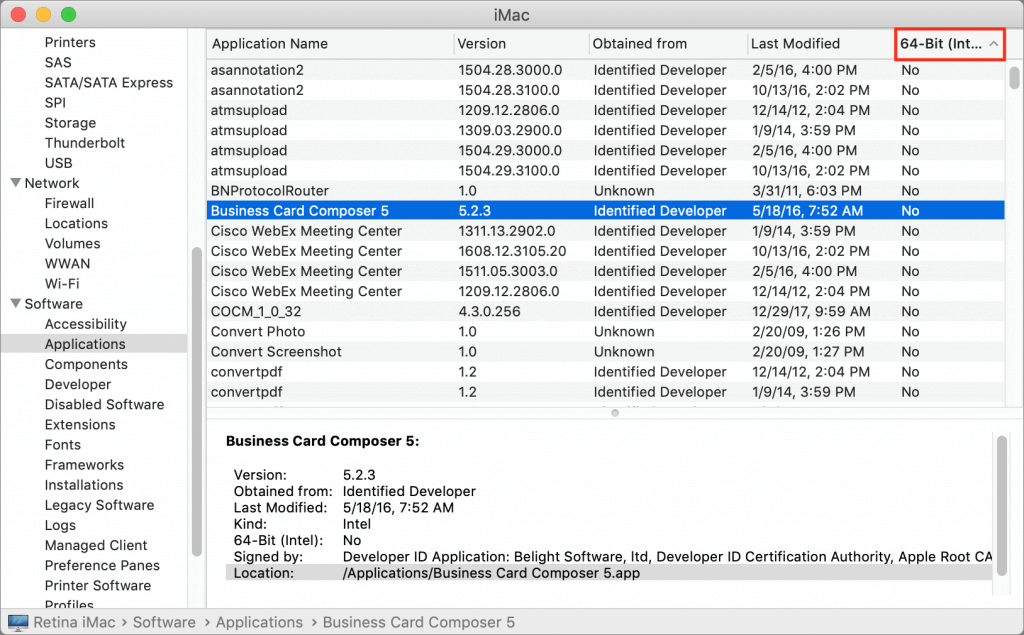
  2. In the System Information utility that opens, scroll down to Software in the sidebar and select Applications. It may take a few minutes to build the list of every app on all mounted drives.
  3. When it finishes, click the 64-bit column header (No means 32-bit; Yes means 64-bit) to sort the list, and select an app to see its details in the bottom pane.

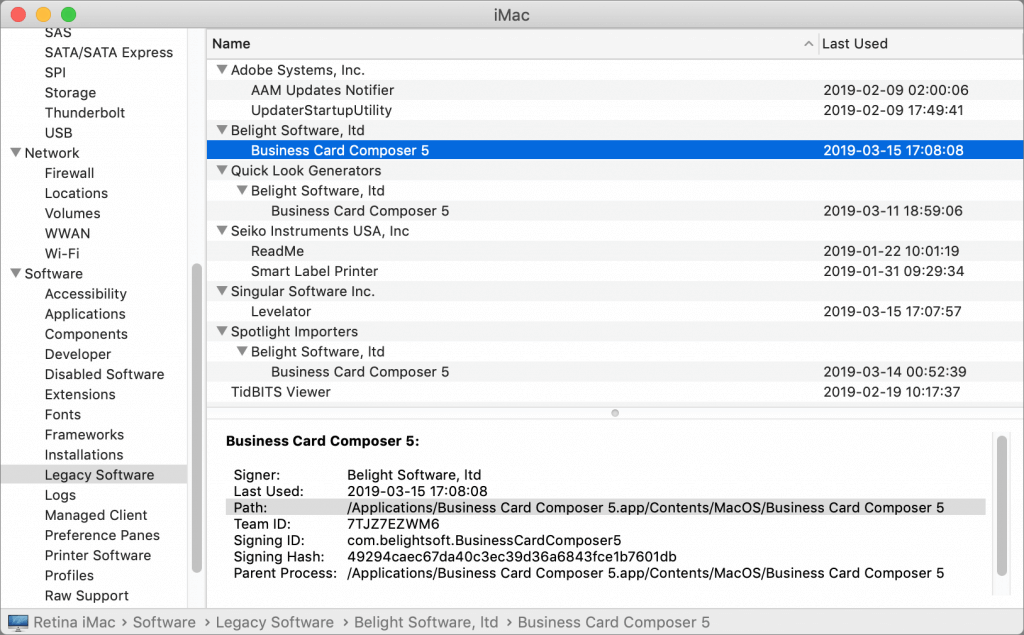
This technique works in both High Sierra and Mojave, but in Mojave, System Information includes a better-formatted section, called Legacy Software, that also provides a list of 32-bit apps. However, this list may be smaller because it includes only those apps that you’ve launched. Since it’s likely that you open old 32-bit apps only occasionally, you can’t trust the Legacy Software list to be complete.

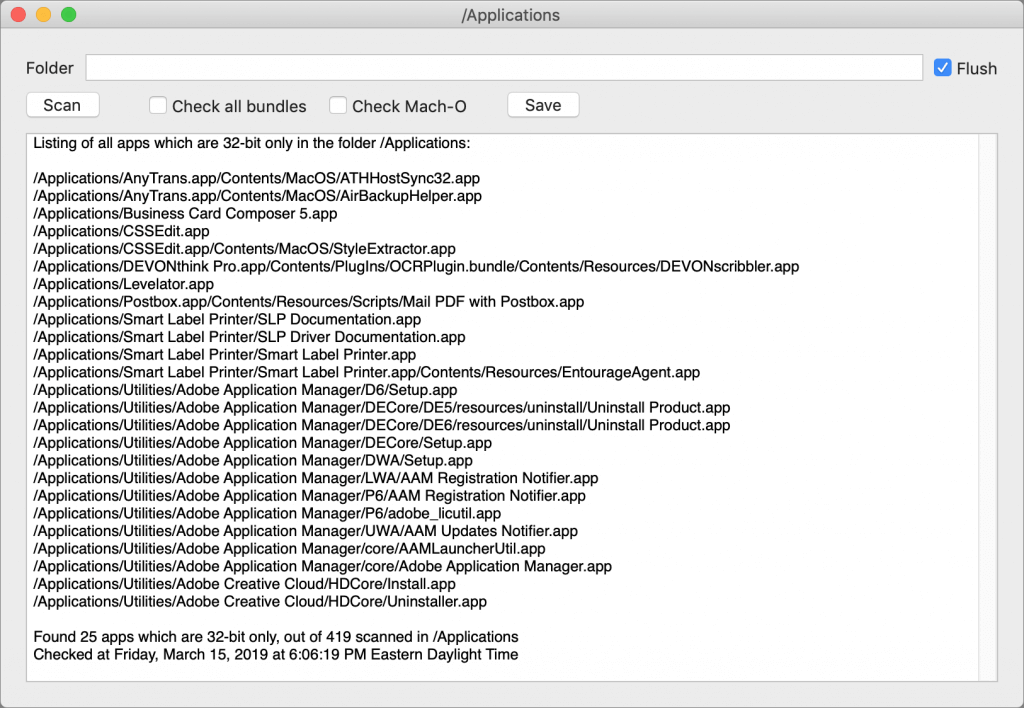
If you find System Information’s Applications list overwhelming, check out the free 32-bitCheck utility from Howard Oakley. It performs exactly the same task but lets you focus on a particular folder and save the results to a text file for later reference.

What’s Your Next Step?

Once you know which apps won’t work in macOS 10.15, you can ponder your options. Luckily, you have some time. We expect Apple to release macOS 10.15 in September 2019, but you don’t need to upgrade right away—in fact, we recommend that you wait a few months after that to allow Apple time to fix bugs.

That said, we do encourage upgrading eventually, and if you buy a new Mac after September 2019, it will come with macOS 10.15. So you need to establish a plan—it’s better to know what you’re going to do than to be forced into action if you have to replace your Mac on short notice. For each 32-bit app on your Mac, you have three options:

  • Delete it: It’s not uncommon to have old apps that you haven’t used in years and won’t miss. There’s no need to waste drive space on them in macOS 10.15.
  • Upgrade it: Apps in active development will likely have a new version available. The main questions are how much the upgrade will cost and if there are compatibility issues associated with upgrading. You can upgrade at any time, although it’s likely worth waiting until you’re ready to move to macOS 10.15 to minimize costs. The apps that cause the most irritation here are things like the Adobe Creative Suite—Photoshop, Illustrator, and InDesign—that require switching to a monthly subscription.
  • Replace it: If no upgrade is available, the cost of upgrading is too high, or upgrading comes with other negatives, it’s time to look for an alternative. This can take some time, so it’s worth starting soon to ensure that the replacement will provide the features you need before macOS 10.15 forces the decision.

Needless to say, if you’d like recommendations about how to proceed with any particular app or workflow, get in touch with us!


Social Media: Have you seen dialogs warning that an app isn’t optimized for your Mac? Here’s what’s going on, what you should do, and when you should do it:

Siri in Mojave Now Supports HomeKit and Find My iPhone

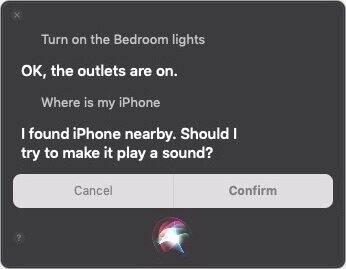
Siri on the Mac hasn’t been as useful as on iOS devices, but with macOS 10.14 Mojave, Apple enhanced the Mac version of Siri in a variety of ways. Apple says that Siri now knows about food, celebrities, and motorsports, but more interesting is how you can ask Siri to control your HomeKit devices (“Turn on the bedroom lights.”) and locate your iOS devices or AirPods via Find My iPhone (“Where is my iPhone?”).

File Messages Faster in Mail in Mojave

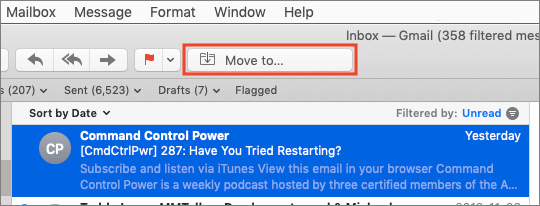
In macOS 10.14 Mojave, Apple exposed a feature of Mail that was useful, but hard to find and use. For several versions of Mail, you’ve been able to select a message and choose Message > Move To Predicted Mailbox to file the email in the suggested mailbox. (If the Move To command is disabled, Mail hasn’t yet learned how to move messages like the selected one. Once it sees you move messages from your mother into your Family mailbox, for instance, it will suggest that destination in the future.) In Mojave’s Mail, there’s also now a Move To toolbar button. If it can predict where the message will go, just click it; if not, click and hold to bring up a menu of all your mailboxes.

To Update macOS 10.14 Mojave, Use This New System Preferences Pane

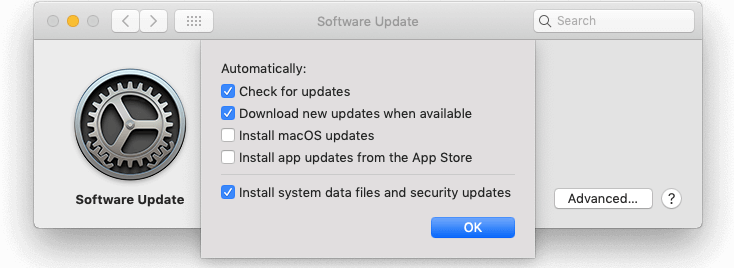
For years, you’ve used the App Store app to install operating system and app updates on your Mac. That’s still true for apps, but with macOS 10.14 Mojave, Apple moved operating system updates to the new Software Update preference pane, which replaces the old App Store preference pane. Open System Preferences > Software Update to check your version of macOS and access available updates—there will be an Update Now button to click. You should also visit this pane to tell your Mac how to best handle system and app updates: Don’t select “Automatically keep my Mac up to date” because updates might come at an inconvenient time for you. Instead, click Advanced and then select “Check for updates” and “Install system data files and security updates”—they’re important. Unless you’re low on drive space, selecting “Download new updates when available” is fine, since that will make updating faster. However, keep “Install macOS updates” and “Install app updates from the App Store” off so you can choose when to update.

What Are All These New Privacy Request Dialogs in Mojave?

With macOS 10.14 Mojave, Apple has beefed up the Mac’s privacy so it more closely resembles privacy in iOS. You’ve noticed that when you launch a new app on your iPhone or iPad, it often prompts for access to your photos or contacts, the camera or microphone, and more. The idea behind those prompts is that you should always be aware of how a particular app can access your personal data or features of your device. You might not want to let some new game thumb through your photos or record your voice.

macOS has been heading in this direction, but Mojave makes apps play this “Mother, May I?” game in more ways. As a result, particularly after you first upgrade, you may be bombarded with dialogs asking for various permissions. For instance, when you first make a video call with Skype, it’s going to ask for access to the camera and the microphone. Grant permission and Skype won’t have to ask again.

Skype’s requests are entirely reasonable—it wouldn’t be able to do its job without such access. That applies more generally, too. In most cases, apps will ask for access for a good reason, and if you want the app to function properly, you should give it access.

However, be wary if a permission dialog appears when:

  • You haven’t just launched a new app
  • You aren’t doing anything related to the request
  • You don’t recognize the app making the request

There’s no harm in denying access; the worst that can happen is that the app won’t work. (And if it’s malicious, you don’t want it to work!) You can always grant permission later.

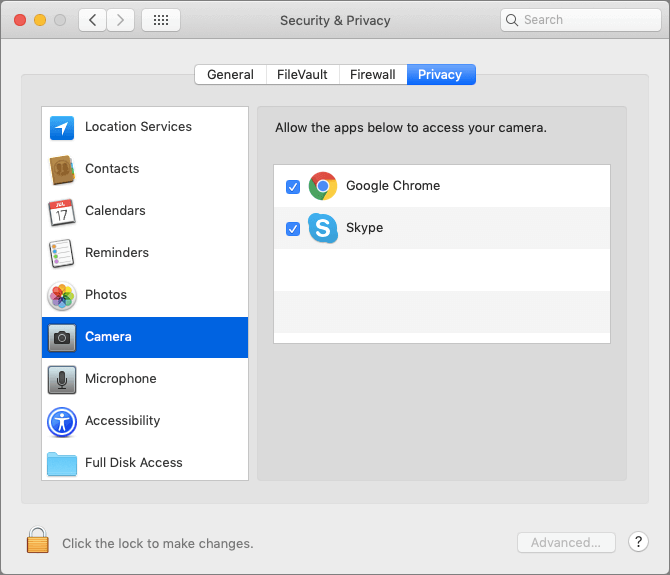
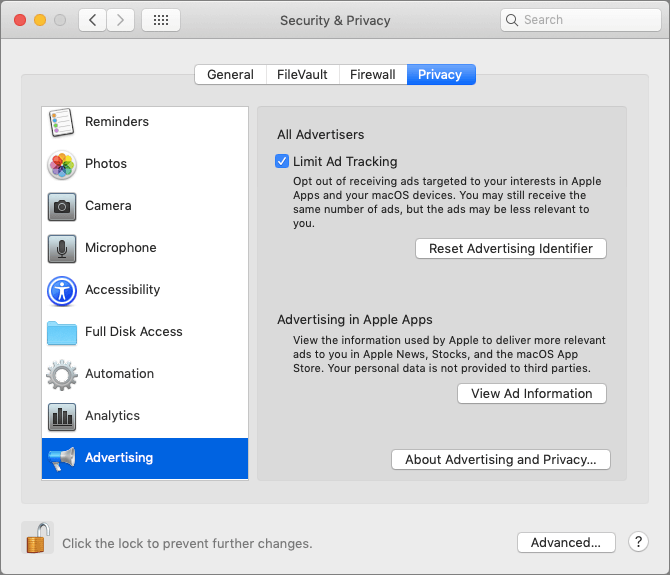
To see which permissions you’ve granted or denied, open System Preferences > Security & Privacy > Privacy. A list of categories appears on the left; click one to see which apps have requested access. If you’ve granted access, the checkbox next to the app will be selected; otherwise it will be empty.

You’ll notice that the lock in the lower-left corner is closed. To make changes, click it and sign in as an administrator when prompted.

Most of these categories are self-explanatory, but it might not always be obvious why an app wants permission. In the screenshot above, for instance, Google Chrome has been granted access to the Mac’s camera. Why? So Google Hangouts and other Web-based video-conferencing services can work.

There are five categories (including three not showing above) that could use additional explanation:

  • Accessibility: Apps that request accessibility access want to control your Mac. In essence, they want to be able to pretend to click the mouse, type on the keyboard, and generally act like a user. Utility and automation software often needs such access.
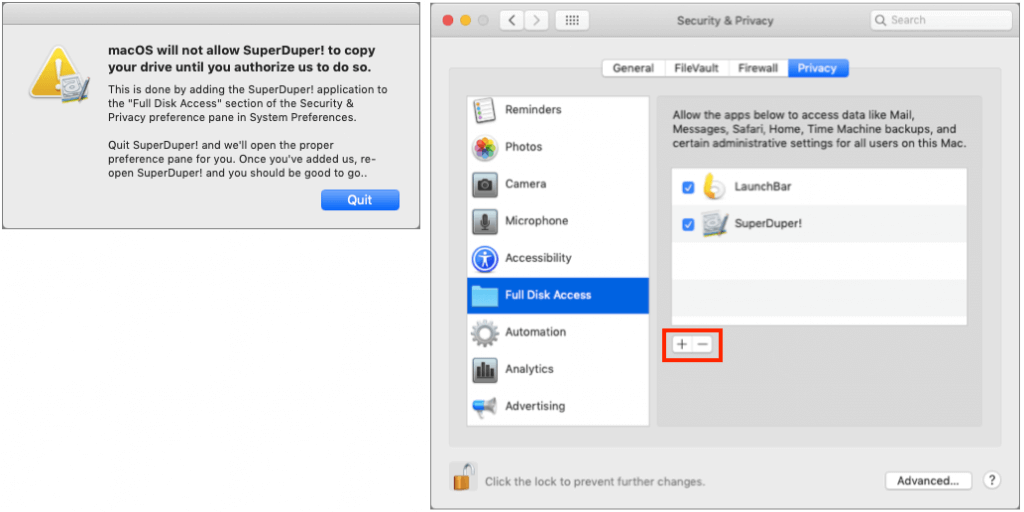
  • Full Disk Access: This category is a catch-all for access to areas on your drive that aren’t normally available to apps, such as data in Mail, Messages, Safari, Home, and more, including Time Machine backups and some admin settings. Backup and synchronization utilities may need full disk access, in particular. An app can’t request full disk access in the normal way; you must add it manually by clicking the + button under the list and navigating to the app in the Applications folder.
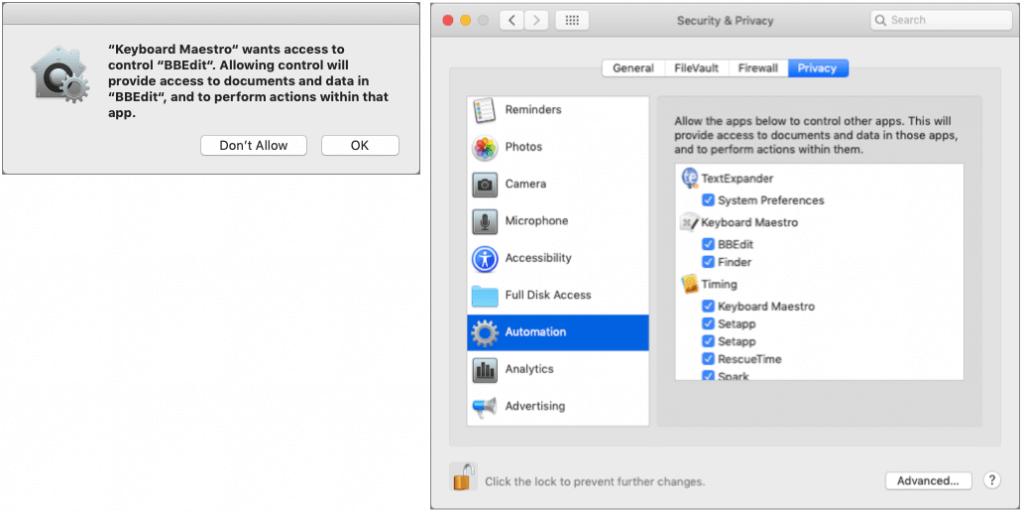
  • Automation: The Mac has long had a way for apps to communicate with and control one another: Apple events. An app could theoretically steal information from another via Apple events, so Mojave added the Automation category to give you control over which apps can control which other apps. You’ll see normal permission requests, but they’ll explain both sides of the communication.
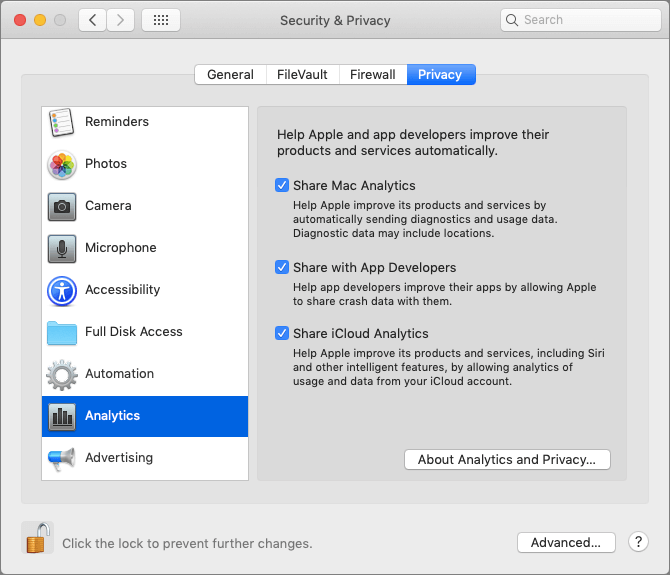
  • Analytics: The Analytics privacy settings are completely different—they let you specify whether or not you want to share information about how you use apps with Apple and the developers of the apps you use. For most people, it’s fine to allow this sharing.
  • Advertising: Finally, the Advertising options give you some control over the ads that you may see in Apple apps. In general, we recommend selecting Limit Ad Tracking, and if you click Reset Advertising Identifier, any future connection between you and the ads you’ve seen will be severed from past data. There’s no harm in doing it. It’s worth clicking the View Ad Information and About Advertising and Privacy buttons to learn more about what Apple does with ads.

So if you’ve been seeing repeated requests for permission after you upgraded to Mojave, now you know why these dialogs keep popping up. They’re a bit annoying at first, but the added privacy is worthwhile, and once you’ve granted permission to an app, you shouldn’t hear from it again.


Social Media: macOS 10.14 Mojave changes how privacy works on the Mac by making apps ask for permission to use the camera, microphone, and quite a bit more. Here’s how this works and what you should do when prompted.

Make Safari Tabs Easier to Identify by Adding Icons

Do you end up with so many tabs in Safari that it becomes impossible to read the truncated tab titles? There’s no shame in that, and Safari 12—which comes with macOS 10.14 Mojave and is a free update for 10.12 Sierra and 10.13 High Sierra—now offers an option to add an icon representing the Web site to each open tab. Called a favicon, this tiny image is usually carefully designed to identify its site and makes it easier to pick out the tab. To enable the feature, open Safari > Preferences > Tabs and select “Show website icons in tabs.” Unlike other Web browsers, Safari never shrinks a regular tab to just the icon, so you’ll always see the icon and some text.

Have You Noticed That Mojave’s Dock Shows Recent Applications?

The Mac’s Dock gives you quick access to frequently used apps, documents, and folders, and makes it easy to switch to a running app. In macOS 10.14 Mojave, the Dock has another feature: a list of apps you’ve used recently that aren’t on your default Dock. Icons for these apps appear between your Dock’s default apps and any documents or folders that you’ve added—look closely and you’ll notice subtle lines in the Dock that delineate this area. It always holds at least three apps, but expands to hold as many launched apps (note the subtle dot under the icon) as necessary; as you quit apps, their icons disappear until you’re back down to three. If you don’t like this change, turn off “Show recent applications in Dock” in System Preferences > Dock.

Understanding Dark Mode in macOS 10.14 Mojave

The feature Apple is promoting most heavily with macOS 10.14 Mojave is Dark mode, which the company advertises as “a dramatic new look that helps you focus on your work… as toolbars and menus recede into the background.” Let’s look at what Apple has done with Dark mode, after which you’ll have a better idea of what to think about while trying it.

Enable Dark Mode

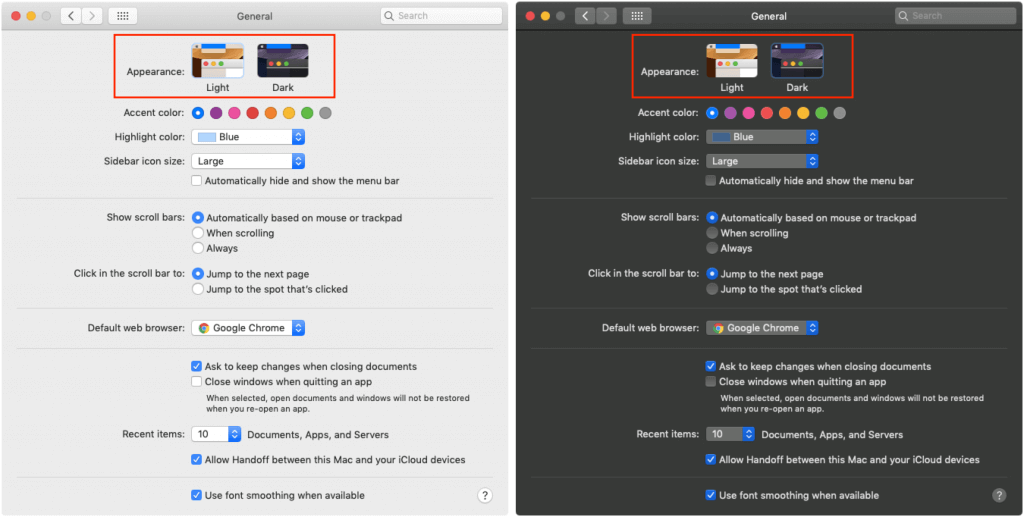
First, to turn Dark mode on, go to System Preferences > General and click the Dark thumbnail to the right of Appearance. Mojave immediately switches to Dark mode, turning light backgrounds dark and swapping the text color from dark to light.

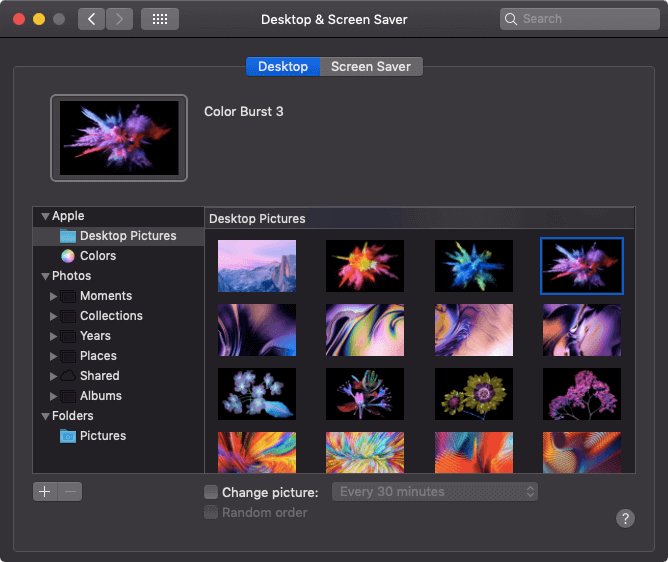
While you’re in System Preferences, click over to the Desktop & Screen Saver preference pane. If you scroll down in the Desktop Pictures list, you’ll discover a bunch of new wallpapers that blend well with Dark mode.

Dark Mode Support and Controls

You’ll notice that the color change takes place instantly not just in the Finder, but also in any apps that support Dark mode. Most of Apple’s apps support Dark mode and third-party developers are rapidly adding support to their apps as well. However, Dark mode requires explicit support from apps, so older apps that aren’t being updated will maintain their standard dark-on-light color schemes.

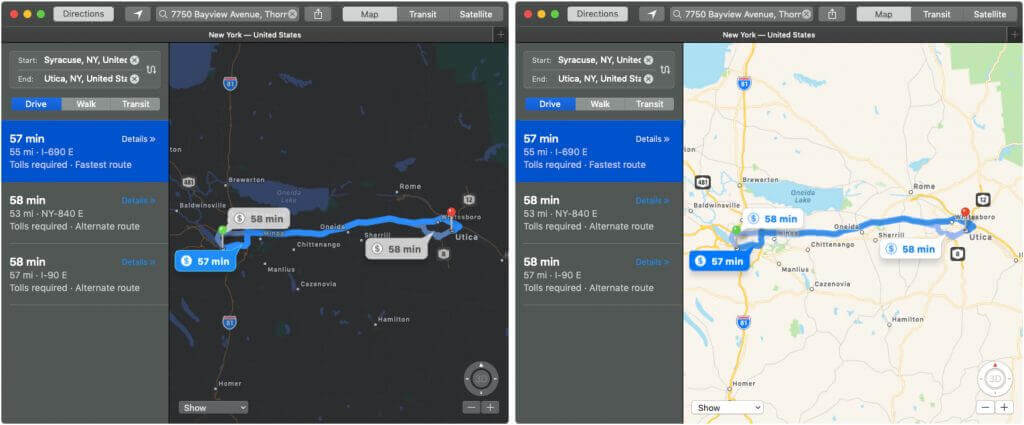
Some apps, such as Maps and Mail, give you additional options that change just how dark they get. In Maps, choose View > Use Dark Map to toggle between a dark map style and the familiar map style that mimics a paper map. Similarly, in Mail, go to Mail > Preferences > Viewing and deselect “Use dark backgrounds for messages” to return to a white background.

If you generally like Dark mode but have trouble reading light text on a dark background due to the reduced contrast, you may be able to choose a different font or style in the app’s preferences that makes the text more readable. Apps like Mail give you a fair amount of that sort of control.

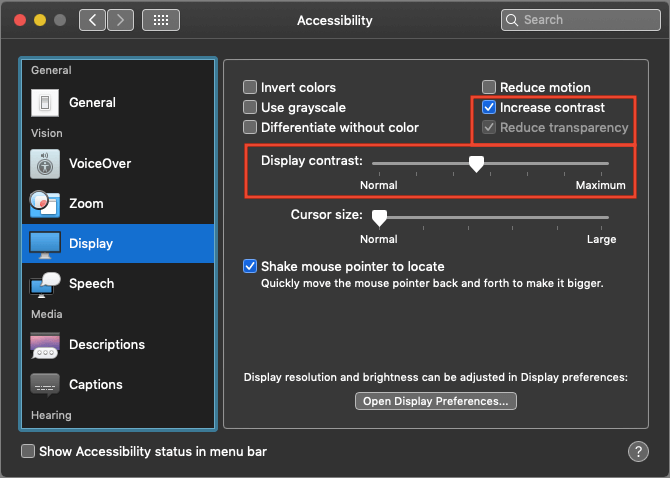
For even more control over contrast, open System Preferences > Accessibility > Display. There you’ll find a Display Contrast slider that lets you make text lighter and backgrounds darker. You can also select Reduce Transparency to make it so items like the Dock and menu bar are solid colors, rather than allowing the background to bleed through. To separate dark and light further, select Increase Contrast, which increases the brightness of divider lines as well.

The Dark Side of Dark Mode

Contrast is necessary for pulling out fine details, but too much contrast can be uncomfortable or even painful—think about how you feel when someone turns on a bright light in a previously dark room. For visual comfort, it’s usually best to match your screen with the lighting of your surroundings. That’s why people who often work at night or with the window blinds down like dark modes—a bright screen seems brighter in a dimly lit room. That’s the theory behind the traditional dark text on a light background too, since the room will be quite light during the day.

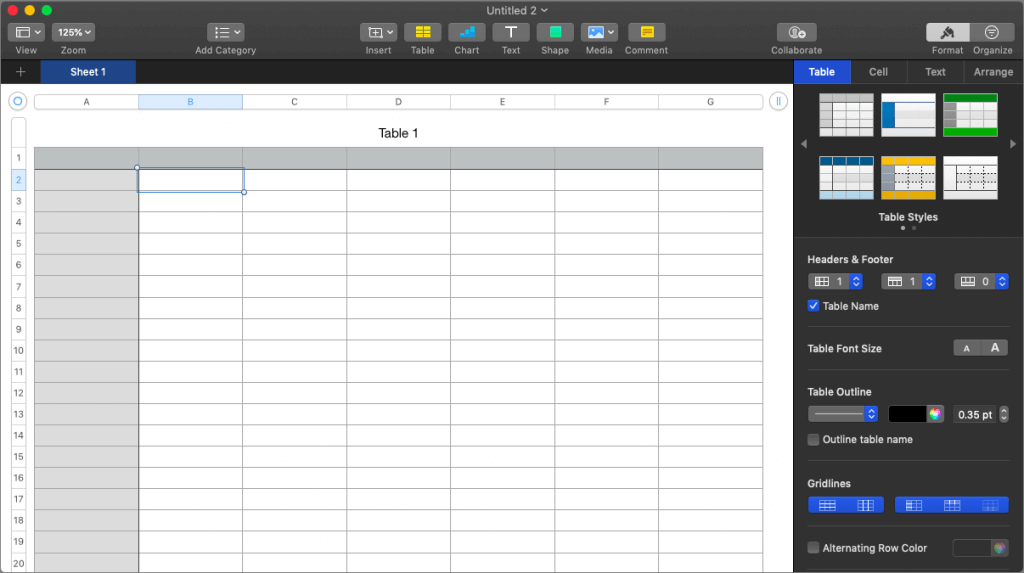
So Dark mode can run into two problems. First is that using it during the day or in a brightly lit room may create an uncomfortable contrast between the screen and its surroundings. Controlling your room lighting can eliminate this as an issue. Second and more troubling, even apps that support Dark mode may have large content areas that are bright white, creating a strong contrast between the content area and the rest of the app. Many Web sites in Safari have this effect, as do documents in apps like Pages and Numbers. There’s no way around this scenario.

Even if Dark mode isn’t perfect, it’s worth a try if you have trouble looking at bright screens. Regardless, if it goes too far for you, one of the new dark wallpapers may be easier on your eyes. While most people aren’t overly light sensitive, a non-trivial percentage of the population is, particularly those who suffer from migraines or who have endured concussions, and those with a variety of ocular conditions. And if you’re on the other end of the spectrum—if Dark mode looks dirty and is hard to read—just stick with the traditional Light mode.


Social Media: Apple is promoting macOS 10.14 Mojave’s new Dark mode heavily. Read on to learn if it might be for you, how you can tweak its contrast settings, and what problems you might encounter.