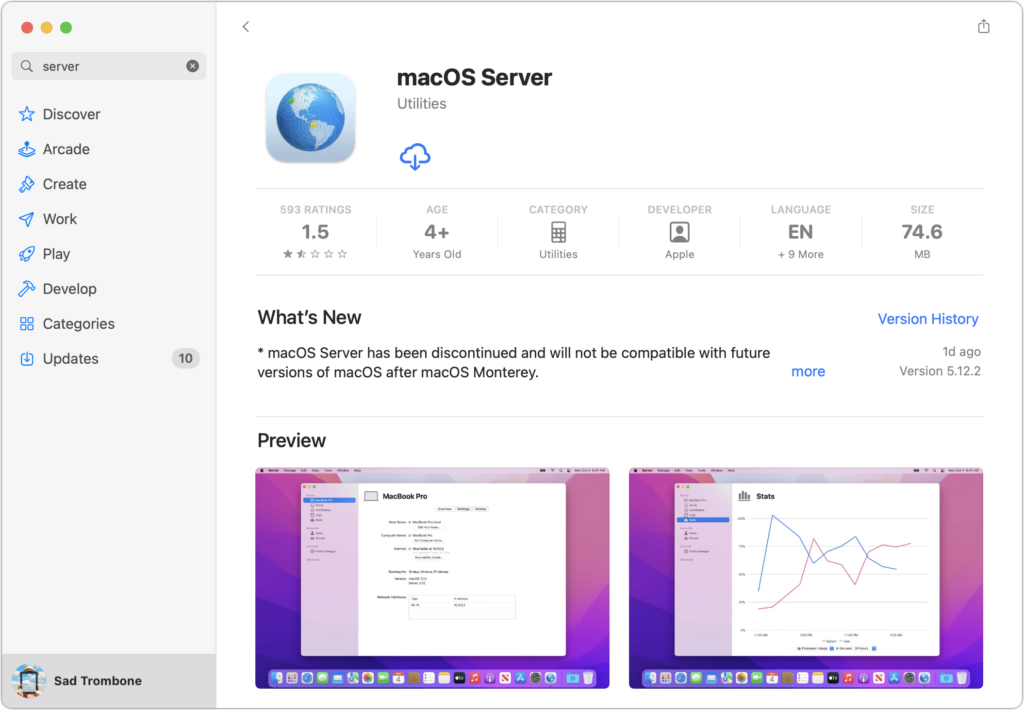
Posts

Did You Know That Your iPhone Can “Name That Tune”?

Several years ago, Apple bought a company called Shazam, which made an app that identified songs by listening to the music playing nearby. Since then, Apple has built Shazam into Siri in iOS, iPadOS, macOS, and watchOS. Most recently, Apple added it to Control Center in iOS 14 and iPadOS 14 as well, so you can invoke it without speaking. To use Shazam, whenever you want to identify a song that’s playing nearby, just ask Siri, “What’s playing?” or tell it “Name that tune” or have some fun and say “Shazam!” To add Shazam to Control Center, navigate to Settings > Control Center, and tap the green + button next to Music Recognition. Then, from Control Center, tap the button to start it listening—you can return to whatever you were doing. When the song is identified, a notification appears with its name. Tap the notification to open the song in the Music app.

(Featured image by Karolina Grabowska from Pexels)

Pinch to Zoom in All Photos View in iOS 14

Photos in iOS 14 provides four views of your library: Years, Months, Days, and All Photos. For the first three, Photos picks representative images that may not include particular shots you’re looking for. The All Photos view shows everything, but it can be overwhelming. What’s not apparent is that you can navigate All Photos more easily by pinching in to shrink the thumbnails and then pinching out to make them larger again. At the largest size, a single photo takes up the entire width of the screen.

(Featured image by Adam Engst)

A Quick Shortcut to Create an Instant Slideshow from a Folder of Images

You probably know that you can select an image in the Finder and press the Space bar to preview it in a Quick Look window. And you may know that you can use the arrow keys to preview other files in the same folder without closing and reopening the Quick Look window. But did you know that if you select multiple images in the Finder and hold down the Option key when pressing the Space bar, the Finder will run a full-screen slideshow with a 5-second interval between images? Move the cursor to display slideshow controls, including a button to bring up an index sheet. This feature isn’t something most people need every day, but it can be a lifesaver when you need to run a quick slideshow at a party or presentation.

(Featured image by 祝 鹤槐 from Pexels)

Did You Know You Can Close a Mac Laptop When It Has an External Display?

We wanted to make sure that those of you who work on a Mac laptop with an external display know that you can close your laptop’s screen and keep working. Apple calls this closed-clamshell or closed-display mode. Of course, it requires that you connect an external keyboard and mouse or trackpad, via either USB or Bluetooth, and the laptop should be connected to power as well. Apple also recommends putting the Mac to sleep before disconnecting the external display. Why would you want to use closed-display mode? Mostly to conserve desk space when you have another preferred keyboard and pointing device, although it might also help graphics performance by allowing the Mac to focus on driving only the external display. There are lots of stands that hold a MacBook in a vertical orientation so it takes up less desk space.

(Featured image by Bundo Kim on Unsplash)

Apple Releases COVID-19 Screening Tool App and Web Site

In partnership with the US Centers for Disease Control, Apple has released a free COVID-19 Screening Tool iOS app and nearly identical Web site. The interactive screening tool poses a series of questions about symptoms, risk factors, and recent exposure. Then it offers customized CDC recommendations, including guidance on social distancing and self-isolating, how to monitor symptoms, whether or not a test is recommended, and when to contact a medical provider. In addition, the app and Web site provide useful information about COVID-19, advice about how to keep yourself safe, and details on what to expect from testing. There’s nothing here that the CDC and other health agencies haven’t published elsewhere, but the screening tool can provide some peace of mind and reduce unnecessary load on overworked healthcare providers.

(Featured image by Apple)

You Can Now Export and Download Apple Card Statements

Apple’s credit card, the Apple Card, offers a nice mix of integration with Apple Pay, daily cash back, and an elegant interface in the Wallet app on your iPhone. Until recently, however, it was impossible to get your transaction data out of Wallet except in PDF form. Apple has now added exports in either CSV or OFX format. CSV is appropriate for importing into a spreadsheet, whereas many financial apps can import OFX files. To export your data from Wallet, tap your Apple Card and then tap Card Balance. Under Statements, tap the statement you want to export, tap Export Transactions at the bottom, and choose a format. For CSV, tap the Share icon in the file preview, and for OFX, Wallet automatically opens a share sheet. Use AirDrop, Messages, or Mail to send the file to your Mac, where you can work with it in whatever you use to track your finances.

(Featured image by MARK S. on Unsplash)

Try Using a Magic Trackpad 2 with Your iPad Running iPadOS 13.4

When Apple released iPadOS 13.4 recently, it came with an unexpected feature: trackpad and mouse support. Apple plans to release a Magic Keyboard for iPad Pro that has a built-in trackpad in May as well, but in the meantime, you can control an iPad entirely via a Magic Trackpad 2 (the wedge-like one that recharges via a Lightning port). Pair it in Settings > Bluetooth, and look for settings in Settings > General > Trackpad. Apple did an impressive job with integrating a cursor into the iPadOS experience: the small, circular cursor shifts colors subtly depending on the background, becomes a highlighted selection rectangle when over objects, expands icons on the Home screen, and morphs into a thin insertion point when in text. Plus, Apple built in oodles of two- and three-finger gestures to mimic what you can do directly on the iPad screen—see the full list at TidBITS.

(Featured image by Adam Engst)

Unsubscribe from Marketing Email to Lighten Your Inbox Load

Are you overwhelmed by email? Is your Inbox filled with promotions, special offers, and the like? These messages aren’t spam—you almost always bought something from the company or have some sort of relationship with the sender—but that doesn’t mean you want to hear from them repeatedly. Luckily, it’s easy to get off the lists of legitimate senders. Just scroll to the bottom of each message and look for an unsubscribe link. Often it will be the word “Unsubscribe” or an instruction to “click here to remove yourself.” Click the link and, if necessary, click an Unsubscribe button on the resulting Web page. Then delete the message and move on to the next one. After a week or so of doing this regularly, you should start to notice a marked decrease in unwanted messages.

(Featured image by Sharon McCutcheon on Unsplash)

Invoke Split View More Easily in Catalina

Split View on the Mac helps you focus on your work in one app—perhaps a word processor—while providing access to one other app, like a Web browser. (Make sure “Displays have separate Spaces” is selected in System Preferences > Mission Control.) Before macOS 10.15 Catalina, you had to click and hold on the green full-screen button in the upper-left corner of any window, drag that window to one side of the screen, and click a window on the other side to put them side by side. Catalina makes this easier to discover: hover over the green full-screen button briefly and then choose Tile Window to Left of Screen or Tile Window to Right of Screen before selecting a window on the other side of the screen. If you don’t want a 50-50 split, drag the black divider bar between the windows to adjust the proportions. To leave Split View, move your pointer to the top of the screen to reveal the menu bar and then click the green full-screen button.

(Featured image by Adam Engst)

Set Your Preferred Name and Photo for Messages in iOS 13

In your list of conversations in Messages, you probably have lots of people who have generic icons next to their names or numbers. You likely look like that to other people as well, but a new feature in iOS 13 lets you share your preferred name and avatar picture with other iMessage users (blue-bubble friends). In Messages, first tap the ••• button and then Edit Name and Photo. Then, in the activity view that appears, tap Edit under your photo to select a new photo and set your name as you want it. Make sure Name and Photo Sharing is enabled before tapping Done. From now on, for any iMessage conversations, you’ll see a little banner at the top that asks if you want to share your name and photo. Do so and your recipient will get a prompt to replace whatever they’re seeing for you. (And if, as a recipient, you don’t want to accept the new photo, tap the X button at the right of the prompt.)

(Featured image by Daniel Frese from Pexels)