Invoke Split View More Easily in Catalina
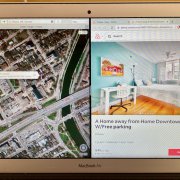
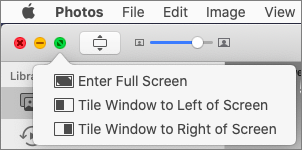
Split View on the Mac helps you focus on your work in one app—perhaps a word processor—while providing access to one other app, like a Web browser. (Make sure “Displays have separate Spaces” is selected in System Preferences > Mission Control.) Before macOS 10.15 Catalina, you had to click and hold on the green full-screen button in the upper-left corner of any window, drag that window to one side of the screen, and click a window on the other side to put them side by side. Catalina makes this easier to discover: hover over the green full-screen button briefly and then choose Tile Window to Left of Screen or Tile Window to Right of Screen before selecting a window on the other side of the screen. If you don’t want a 50-50 split, drag the black divider bar between the windows to adjust the proportions. To leave Split View, move your pointer to the top of the screen to reveal the menu bar and then click the green full-screen button.
(Featured image by Adam Engst)