Posts

Display an Album of Photos on Your iPhone or iPad Lock Screen

A popular feature of iOS 16 was the Photo Shuffle option for customizing the iPhone Lock Screen. It used machine learning to select photos in four categories—People, Pets, Nature, and Cities—and rotated through them when you tapped, on lock, hourly, or daily. If you didn’t like the automatic selection, you could pick photos manually, but it was clumsy. In iOS 17 (and iPadOS 17, which also added customizable Lock Screens), you can now point the Lock Screen’s Photo Shuffle wallpaper at an album. Touch and hold the Lock Screen, tap Customize, tap the blue ⨁ button to create a new wallpaper, select Photo Shuffle, select Album, choose the desired album from the pop-up menu, set a frequency, tap Use Album, and tap the Add button at the top. Then tap Set as Wallpaper Pair or Customize Home Screen to choose a different image for the Home Screen wallpaper.

(Featured image by Adam Engst)


Social Media: If you like how the Lock Screen’s Photo Shuffle wallpaper rotates through photos but would prefer that it worked from an album you specified, you’re in luck! That’s now possible in iOS 17 and iPadOS 17.

Apple Podcasts Adds Transcripts

In iOS 17.4, iPadOS 17.4, and macOS 14.4 Sonoma, Apple enhanced its Podcasts app to include transcripts of all podcasts in the Apple Podcasts catalog as long as they’re in English, French, German, or Spanish. (It doesn’t translate from one language to another.) Much like song lyrics in the Music app—open it by tapping the dialog button in the player—the transcript scrolls in sync with the podcast’s audio, and you can tap anywhere in the transcript to play the audio from that spot. Tap the Search button that appears when you view the transcript to look for any text contained within. Recent podcasts should all have transcripts now, and Apple is working to catch up on older podcasts. The AI that generates the transcripts sometimes makes mistakes and doesn’t distinguish between different speakers, but overall, the transcripts provide a good sense of what’s being said.

(Featured image by iStock.com/microgen)


Social Media: Did you know Apple’s Podcasts app now includes written transcripts? Our tip helps you view the text while you listen, use it to navigate within the audio, search for specific bits, and more.

Send Photos in Messages Faster with This Hidden Shortcut

On the iPhone and iPad, to send a photo to a Messages chat, tap the ⊕ button and then tap Photos in the list that appears to reveal the photo picker. That’s not difficult, but it requires an extra step you can avoid with this tip. If you’re running iOS 17 or iPadOS 17, instead of tapping the ⊕ button, touch and hold it for a second to bring up the photo picker immediately.

(Featured image based on an original by iStock.com/oatawa)


Social Media: It’s not hard to add a photo to a conversation in Messages, but with this tip, it’s even faster and easier!

Annoyed by Inline Predictive Text Suggestions? Here’s How to Turn Them Off

In a slight nod to the hype surrounding generative AI, Apple added inline text prediction capabilities to the iPhone, iPad, and Mac. They can be helpful, particularly on the iPhone and iPad, where it’s often much easier to tap the Space bar than to finish typing a word or sentence. But that’s less true on the Mac, where a fast typist can be slowed down or derailed by the suggestions, and some people dislike having an AI finish their thoughts. The feature is easily turned off. On the iPhone and iPad running at least iOS/iPadOS 17.2, go to Settings > General > Keyboard and switch off Show Predictions Inline. (Leave Predictive Text on to continue to get suggestions above the keyboard.) On the Mac running macOS 14.2 Sonoma or later, open System Settings > Keyboard, click Edit under the Text Input header, turn off “Show inline predictive text,” and click Done.

(Featured image based on an original by iStock.com/Armastas)


Social Media: If you’re not a fan of the new inline text predictions on your iPhone, iPad, or Mac, you can easily turn them off and get back to typing only the words you want to appear.

Use iOS 17.3’s Stolen Device Protection to Reduce Harm from iPhone Passcode Thefts

Last year, a series of articles by Wall Street Journal reporters Joanna Stern and Nicole Nguyen highlighted a troubling form of crime targeting iPhone users. A thief would discover the victim’s iPhone passcode, swipe the iPhone, and run. With just the passcode, the thief could quickly change the victim’s Apple ID password, lock them out of their iCloud account, and use apps and data on the iPhone to steal money, buy things, and wreak digital havoc.

In essence, Apple allowed the passcode, which could be determined by shoulder surfing, surreptitious filming, or social engineering, to be too powerful, and criminals took advantage of the vulnerability. It’s best to use Face ID or Touch ID, especially in public, but some people continue to rely solely on the passcode.

Apple has now addressed the problem for iPhone users with the new Stolen Device Protection feature in iOS 17.3. It protects critical security and financial actions by requiring biometric authentication—Face ID or Touch ID—when you’re not in a familiar location like home or work. The most critical actions also trigger an hour-long security delay before a second biometric authentication. We recommend everyone who uses Face ID and Touch ID turn on Stolen Device Protection. The feature is not available for the iPad or Mac, but neither is as likely to be used in places like the crowded bars where many iPhones have been snatched.

How Stolen Device Protection Works

The location aspect of Stolen Device Protection is key. When you’re in a “significant location,” a place your iPhone has determined you frequent, you can do everything related to security and financial details just as you have been able to in the past, including using the passcode as an alternative or fallback.

However, when you’re in an unfamiliar location, as you would likely be if you were out in public where someone might steal your iPhone, Stolen Device Protection requires biometric authentication to:

  • Use passwords or passkeys saved in Keychain
  • Use payment methods saved in Safari (autofill)
  • Turn off Lost Mode
  • Erase all content and settings
  • Apply for a new Apple Card
  • View an Apple Card virtual card number
  • Take certain Apple Cash and Savings actions in Wallet (for example, Apple Cash or Savings transfers)
  • Use your iPhone to set up a new device (for example, Quick Start)

Some actions have even more serious consequences, so for them, Stolen Device Protection requires biometric authentication, an hour security delay—shown with a countdown timer—and then a second biometric authentication. The delay reduces the chances of an attacker forcing you to authenticate with the threat of violence. You’ll need to go through the double authentication plus delay when you want to:

  • Change your Apple ID password (Apple notes this may prevent the location of your devices from appearing on iCloud.com for a while)
  • Sign out of your Apple ID
  • Update Apple ID account security settings (such as adding or removing a trusted device, Recovery Key, or Recovery Contact)
  • Add or remove Face ID or Touch ID
  • Change your iPhone passcode
  • Reset All Settings
  • Turn off Find My
  • Turn off Stolen Device Protection

There are a few caveats to keep in mind:

  • The iPhone passcode still works for purchases made with Apple Pay, so a thief could steal your passcode and iPhone and buy things.
  • Although Apple says it’s required, you can turn off Significant Locations to require the extra biometric authentication and security delay everywhere. That would eliminate the worry about a thief using Significant Locations to go to your most recent familiar spot in an attempt to sidestep the extra authentication.
  • If you plan to sell, give away, or trade in your iPhone, make sure to turn off Stolen Device Protection first. Once it’s out of your physical control, no one else will be able to reset it.

Turn On Stolen Device Protection

Before you get started, note that Apple says you must be using two-factor authentication for your Apple ID (everyone should be anyway), have a passcode set up for your iPhone (ditto), turn on Face ID or Touch ID, enable Find My, and turn on Significant Locations (Settings > Privacy & Security > Location Services > System Services > Significant Locations), although this last one doesn’t actually seem to be required.

Then, go to Settings > Face ID/Touch ID & Passcode, enter your passcode, and tap Turn On Protection. (If it’s enabled, tap Turn Off Protection to remove its additional safeguards.)

Once Stolen Device Protection is on and you’re in an unfamiliar location, the actions listed above will require either biometric authentication or two biometric authentications separated by the hour-long security delay.

There is one group of people who should not turn on Stolen Device Protection: those for whom Face ID or Touch ID don’t work. Most people have no trouble with Apple’s biometric technologies, but some people have worn off their fingerprints or have other physical features that confuse Touch ID or, less commonly, Face ID.

If that’s you, stick with our general recommendation for discouraging possible iPhone thefts: Never enter your iPhone passcode in public where it could be observed.

(Featured image by iStock.com/AntonioGuillem)


Social Media: In iOS 17.3, Apple has introduced Stolen Device Protection to discourage iPhone thefts enabled by a revealed passcode. It requires additional biometric authentication, and we recommend that everyone who uses Face ID or Touch ID enable it.

Use StandBy to Make Your iPhone into a Clock, Photo Frame, and More

iOS 17 brings a new mode for the iPhone: StandBy. All you have to do is connect your iPhone to a charger wirelessly or with a cable, position it on its side in landscape orientation, and press the side button to lock the screen. Standby works best with a MagSafe charging stand. Swipe left or right to switch between three screens: widgets, photos, and clocks. Swipe up and down to move between widgets, photo collections, and clock styles. On the widget screen, touch and hold to add and remove widgets, and on the photo screen, to choose which collections and albums to display. You can choose how long the display stays active in Settings > StandBy > Display. By default, it will stay on all the time on iPhone models with an Always-On display; a tap or nudge will wake it on other iPhone models. Finally, StandBy remembers your preferred view in different locations, so it can be a clock in the bedroom, a photo frame in the kitchen, and a clock at the office.

(Featured image by Apple)


Social Media: The new Standby mode turns your iPhone into a digital picture frame, clock, or customizable widget display—and it remembers which approach you prefer in different locations.

The “Hey” Part of “Hey Siri” Is Now Optional

If you use Siri, particularly on a HomePod, you’re probably accustomed to saying “Hey Siri” as the trigger phrase before your requests. In Apple’s new operating systems for 2023, you can now choose to invoke Siri using the traditional “Hey Siri” or just “Siri” (at least in Australia, Canada, the UK, and the US). You might appreciate being able to stop saying “Hey” every time, or you might find that using just “Siri” generates incorrect activations. (And if someone in your family’s name sounds like Siri, you may want to turn the feature off entirely!) There are four places to look:

  • iOS 17 and iPadOS 17: Settings > Siri & Search > Listen For
  • macOS 14 Sonoma: System Settings > Siri & Spotlight > Listen For
  • watchOS 10: Watch app > My Watch > Siri > Listen For
  • HomePod Software 17: Home app > long-press HomePod > Accessory Settings > Listen For “Siri” or “Hey Siri”

(Featured image based on an original by Apple)


Social Media: In Apple’s new operating systems for 2023, you can choose to invoke Siri with just “Siri” or the old “Hey Siri”—or turn the feature off entirely. We explain where to find the feature for each of your Apple devices.

Use iOS 17’s Check In Feature to Reduce Worry

We’ve all had a friend or family member say, “Text me when you get home,” because they want the peace of mind from knowing you arrived safely. But what if something goes wrong—or you forget—so they never receive that text? They’ll be worried and won’t know where you are, if you’re OK, and so on.

In iOS 17, Apple has introduced the Check In feature to provide peace of mind—or in the worst case, to help emergency services. It’s conceptually simple. Before you leave to go somewhere, you create a Check In with someone—call them a safety partner—in Messages. You specify where you’re going and whether you’re driving, taking transit, or walking. Then, when you arrive, the Check In automatically ends, alerting your safety partner that you arrived. If you’re delayed en route, Check In takes that into account and extends the expected arrival time appropriately. If you fail to arrive, Check In shares your location and route with your safety partner. Also, if you make an Emergency SOS call or your iPhone or Apple Watch calls emergency services automatically during the Check In, it notifies your safety partner.

Not all situations revolve around following a specific route to a location, so Check In also supports timers. Perhaps a college student is going for an hour-long trail run and wants a friend to check on her if she’s not back as expected. She can use Check In to set a timer for 1 hour, share it with her friend, and when the timer ends, either tap the End button if she’s back or add more time if the run is going fine but taking longer than expected.

Although Check In may seem targeted at friends and family, it could have business uses as well. For instance, a destination Check In might work well for keeping tabs on a colleague traveling to a make-or-break pitch presentation.

Before you start using Check In with someone—in either direction—explain Check In to them and discuss an appropriate response if you or they fail to end Check In successfully. Responses should probably start with a quick text, followed by a phone call. If initial efforts to reach out are met with silence, contacting other people—friends, family members, neighbors, etc.—may be appropriate. At some point, depending on various factors, it will be time to call law enforcement. Of course, if the other person triggers an Emergency SOS during the Check In, call law enforcement immediately. At least in the US, if the person isn’t in your area, don’t call 911. Instead, find the law enforcement website for where the person is and call that organization’s 10-digit number. And here’s hoping it never comes to that!

Create a Check In

To get started with Check In, follow these steps:

  1. In Messages, open a conversation with the person you want to be your safety partner (Check In doesn’t currently work with group conversations).
  2. Tap the ⊕ button to the left of the message field, tap More at the bottom, and tap Check In.
  3. The first time you invoke Check In, Messages walks you through a series of explanatory screens, one of which is important—the privacy level of the data shared with your safety partner if you don’t arrive. Select Full—we can see almost no reason why you wouldn’t want that person to be able to share your exact location and route with emergency services if something has gone wrong. (If necessary, tweak this setting later in Settings > Messages > Data.)
  4. On subsequent uses of Check In, an unsent card appears in the Messages conversation, usually set for an hour in the future. The card isn’t sent automatically so you can customize it before sending it.
  5. Tap the Edit button to adjust the timer or destination.
  6. To change the timer duration, use the time picker and tap Done. Skip to the last step in this list.
  7. To set a destination instead of a timer, tap “When I arrive” at the top of the screen.
  8. Tap the Change button, and in the map, either search for a location or find one manually by pinching and zooming—touch and hold the map to drop a destination pin. At the bottom of the screen, select Small, Medium, or Large to set the size of the area in which you’ll arrive.
  9. Tap Done to close the map and then select Driving, Transit, or Walking so Check In can estimate your arrival time based on your method of transportation.
  10. If you want additional buffer time, tap Add Time and give yourself 15, 30, or 60 minutes beyond when Check In thinks you’ll arrive. This shouldn’t usually be necessary.
  11. Tap Done.
  12. Once you’re back to the Check In card in the Messages conversation, tap the Send button to start the Check In.

Note that safety partners can’t reject Check In cards.

End a Check In

Once you trigger a Check In, it can end in a few ways. First, you can cancel it before the timer completes or you arrive at your destination. Second, it can end successfully when you tap End when the timer finishes or when you arrive at your specified location. Third and finally, there’s the core purpose of the Check In, which is to alert your safety partner if you fail to respond to a timer or arrive where and when you said you would.

  • Cancel: To cancel a Check In, tap the Details button on the Check In card in Messages, tap Cancel Check In, and agree that you don’t want your safety partner notified. Timer and destination Check Ins look slightly different but act the same way. Your safety partner will only see that the Check In card in Messages says it has ended.
  • End successfully: For a timer Check In to end successfully, you must respond when the iPhone prompts you (below left). All your safety partner sees when that happens is a note in the Check In card that the timer ended (below right). You don’t need to interact with your iPhone for a destination Check In to end successfully—just arrive at the specified location. The safety partner’s Check In card updates to say that you arrived.
  • Check In fails to end (initiator): If you don’t arrive at your destination or fail to tap End when prompted, Check In gives you the option of adding time (below left) but after 15 minutes, tells you that it has alerted your safety partner (below center and right).
  • Check In fails to end (safety partner): More interesting is what your safety partner sees if you fail to complete a Check In. They’ll be alerted and can tap Details to see your location, when your devices were last unlocked, and more. They then have to figure out the best way to respond given your setup conversation.

It can take some practice to become fluid with Check In, so it’s worth testing it in everyday situations before using it when it might really matter. Once you use it a few times, you may notice Siri Suggestions offering to start it for you, making it even easier to initiate regularly. We hope you find that it provides some peace of mind and, in the worst-case scenario, helps someone in need of emergency services.

(Featured image by iStock.com/PeopleImages)


Social Media: The new Check In feature of iOS 17 can provide peace of mind by letting you specify a safety partner who will automatically be notified if you fail to arrive at your destination or complete a timer.

Forget Your Just-Changed Passcode? iOS 17’s Passcode Reset Has Your Back

The hardest time to remember your iPhone or iPad passcode is right after you’ve changed it. Generally speaking, there’s no reason to change your passcode, but if you inadvertently or intentionally shared it with someone with whom you wouldn’t trust your bank account information, changing it to something new is a good idea. We could also imagine a child who knows your passcode changing it on you as a prank. For whatever reason, if you can’t enter your new passcode, a new iOS 17 feature called Passcode Reset lets you use your old one for 72 hours. Once you’ve tried the wrong passcode five times, tap Forgot Passcode , enter your old passcode , and create a new one . If you’re certain you know the new one, you can expire the old one sooner in Settings > Face ID/Touch ID & Passcode.

(Featured image by iStock.com/NazariyKarkhut)


Social Media: If you change your passcode and can’t remember it (or it was changed for you by a prankster), iOS 17 lets you use your old passcode for 72 hours. It’s a helpful backstop for the results of a memory lapse or mischievous child.

The Hardware You’ll Need to Run Apple’s 2023 Operating Systems

At Apple’s Worldwide Developer Conference in June, the company unveiled the upcoming versions of its operating systems: macOS 14 Sonoma, iOS 17, iPadOS 17, watchOS 10, and tvOS 17. They won’t be available until September or October of 2023, and even once they ship, we recommend waiting a few weeks before upgrading your smaller Apple devices and holding off on macOS upgrades for a couple of months.

Regardless, it’s worth considering how these operating systems might impact your plans to buy new hardware in the next six months. Any Apple device you purchase now—or have bought in the last five years—can run the new operating systems. But some devices that can run the current macOS 13 Ventura, iOS 16, and iPadOS 16 won’t be upgradable to their replacements later this year. More importantly, some older devices that can be upgraded won’t support all the new features.

Here’s what you’ll need and compatibility gotchas to keep in mind.

macOS 14 Sonoma

For macOS 14 Sonoma, Apple has dropped support for Mac models released before 2018. That works out to five models across the iMac, MacBook Pro, and MacBook product lines. If you rely on one of those Macs and want to run Sonoma, think about when it would make sense to buy a new Mac, perhaps in early 2024. By then, all new Macs will likely ship with Sonoma. These Macs can run Sonoma:

  • iMac: 2018 and later
  • iMac Pro: 2017
  • MacBook: None
  • MacBook Air: 2018 and later
  • MacBook Pro: 2018 and later
  • Mac mini: 2018 and later
  • Mac Pro: 2019 and later
  • Mac Studio: 2022 and later

The specific 2017 Mac models that are stuck at Ventura are:

  • iMac: 21.5-inch and 27-inch
  • MacBook Pro: 13-inch and 15-inch
  • MacBook: 12-inch

Unsurprisingly, some new features in Sonoma require sufficient processing power that they work only on Macs with Apple silicon—one of the M1 or M2 chips.

  • Game Mode: This special mode automatically gives games top priority on the CPU and GPU, lowering usage for background tasks. It also reduces latency for wireless accessories, like game controllers and AirPods, for improved responsiveness.
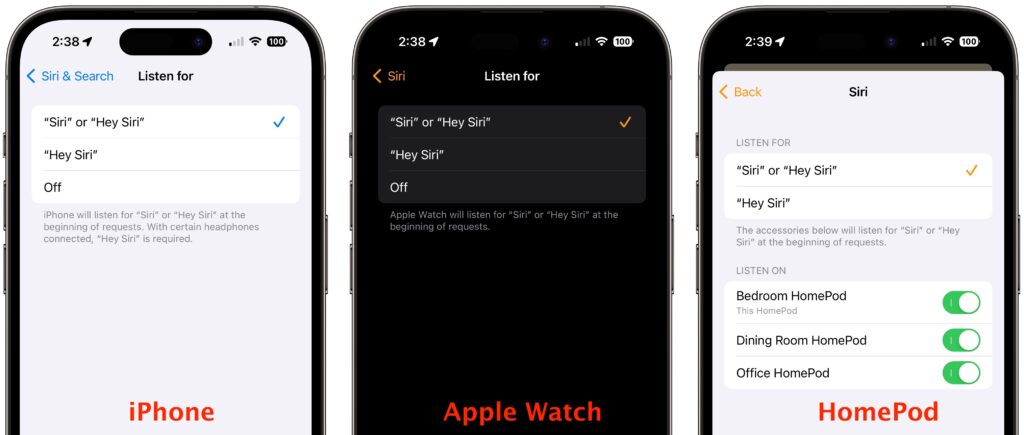
  • Just “Siri”: Although dropping “Hey” from the “Hey Siri” trigger phrase works on all iPhones with iOS 17 and iPads with iPadOS 17, it requires a Mac with Apple silicon or when using the AirPods Pro (2nd generation).
  • Made for iPhone hearing aids: Apple-compatible hearing aids can now be paired directly with Macs, but only those with an M1 Pro, M1 Max, M1 Ultra, or M2. That works out to the MacBook Pro (14-inch, 2021), MacBook Pro (16-inch, 2021), Mac Studio (2022), and all Macs with the M2.
  • Presenter Overlay: You can keep your image visible while sharing your screen on a video call, either in front of the shared screen or in a small movable bubble.
  • React with your hands: During video calls, 3D augmented-reality reaction effects like hearts, confetti, and fireworks can be triggered with hand gestures, but only on Macs with Apple silicon or when using Continuity Camera with an iPhone 12 or later.
  • Screen Sharing performance improvements: Apple has radically improved the performance of the Screen Sharing app over high-bandwidth connections, but it requires the advanced media engine in Apple silicon.

If you’re unsure which Mac you have, choose About This Mac from the Apple menu.

iOS 17

With iOS 17, Apple has maintained the same cutoff date as Sonoma, supporting all iPhone models released in 2018 and later. That means you’ll be able to run iOS 17 on these iPhones:

  • iPhone 14/Plus/Pro/Pro Max
  • iPhone 13/mini/Pro/Pro Max
  • iPhone 12/mini/Pro/Pro Max
  • iPhone 11/Pro/Pro Max
  • iPhone SE (2nd generation or later)
  • iPhone XR/XS/XS Max

Practically speaking, these iOS 16-compatible devices won’t be able to upgrade to iOS 17:

  • iPhone X
  • iPhone 8/8 Plus

Several new iOS 17 features have more restrictive system requirements.

  • Enhanced autocorrect: iOS 17 enhances autocorrect so it works better (and yes, it will let you use curse words), and it temporarily underlines autocorrected words so you can see which ones were changed. It requires an iPhone 12 or later.
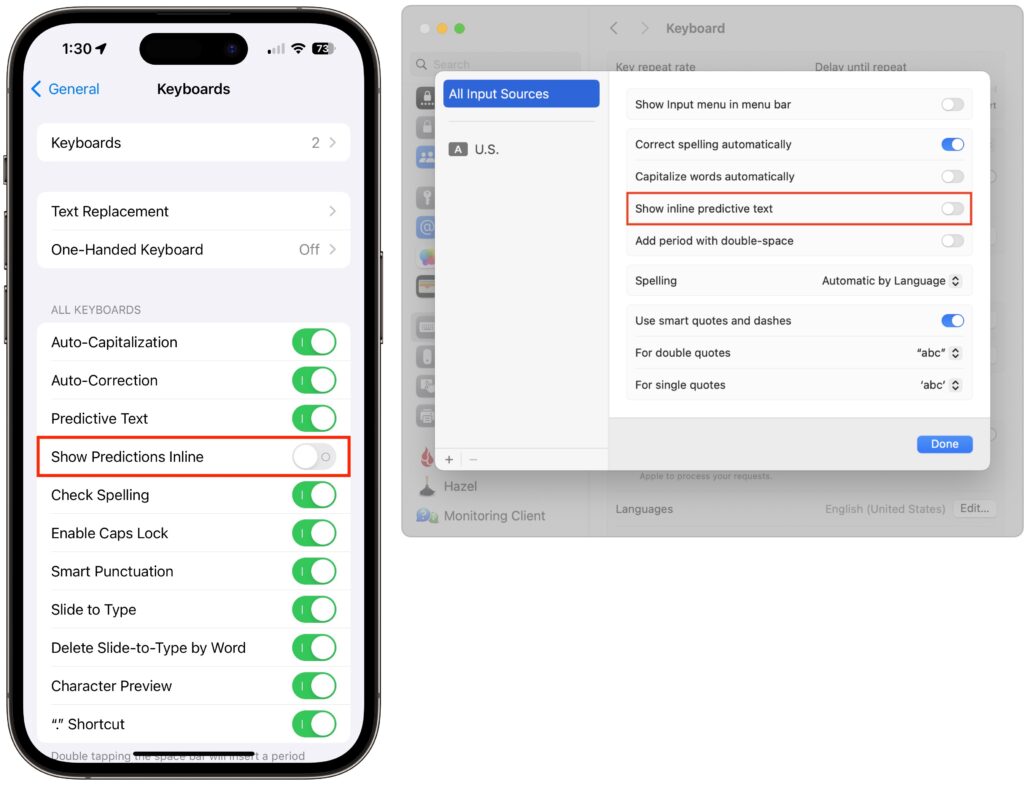
  • Inline predictions: Similarly, inline predictions of what you’re going to type—so you can just accept the suggestion rather than tapping out all those letters—require an iPhone 12 or later.
  • Point and Speak: Those with vision disabilities might appreciate the Point and Speak feature that makes it easier to interact with physical objects that have text labels, but it works only on the Pro models of the iPhone 12, iPhone 13, and iPhone 14.
  • React with your hands: The hand-triggered video call reactions require an iPhone 12 or later.

If you can’t remember which iPhone model you have, go to Settings > General > About and look next to Model Name. This works for the iPad, too.

iPadOS 17

It’s more involved to determine whether your iPad can upgrade to iPadOS 17 because there are four different iPad model types with varying capabilities. These models can run iPadOS 17:

  • iPad Pro 12.9-inch (2nd–6th generation)
  • iPad Pro 11-inch (1st–3rd generation)
  • iPad Pro 10.5-inch
  • iPad Air (3rd–5th generation)
  • iPad (6th–10th generation)
  • iPad mini (5th & 6th generation)

While that list encompasses a lot of iPads, a simpler way to look at it is that only three iPad models that can run iOS 16 won’t be able to upgrade to iOS 17:

  • iPad Pro 12.9-inch (1st generation)
  • iPad Pro 9.7-inch
  • iPad (5th generation)

Because Apple extended overall iPadOS 17 compatibility somewhat further back than it did with iOS 17 and macOS Sonoma, quite a few iPadOS 17 features work only on select models:

  • Back-to-back Siri requests: Although all iPhones will let you issue multiple requests to Siri without reactivating it, on the iPad, the feature works only on an iPad Pro 12.9-inch (3rd generation and later), iPad Pro 11-inch (1st generation and later), iPad Air (3rd generation and later), iPad mini (5th generation and later), or iPad (8th generation and later).
  • Enhanced autocorrect: This improvement to typing requires an iPad Pro 12.9-inch (5th generation and later), iPad Pro 11-inch (3rd generation and later), iPad (10th generation), iPad Air (4th generation and later), or iPad mini (6th generation).
  • External display cameras: If you want to take advantage of an external display’s camera while it’s attached to the iPad, you’ll need an iPad Pro 12.9-inch (3rd generation and later), iPad Pro 11-inch (1st generation and later), iPad (10th generation), iPad Air (4th generation and later), or iPad mini (6th generation).
  • FaceTime with Apple TV: Using an iPad’s mic and camera for FaceTime on an Apple TV 4K (2nd generation) requires an iPad Pro 12.9-inch (3rd generation and later), iPad Pro 11-inch (1st generation and later), iPad (8th generation and later), iPad Air (3rd generation and later), or iPad mini (5th generation and later).
  • Inline predictions: Getting suggestions about what to type next on the iPad requires an iPad Pro 12.9-inch (5th generation and later), iPad Pro 11-inch (3rd generation and later), iPad (10th generation), iPad Air (4th generation and later), or iPad mini (6th generation).
  • PDF AutoFill: iPadOS 17 will use machine learning to analyze PDFs, and if it detects a form, you can fill it out automatically using your contact information. But only if you’re using an iPad Pro 12.9-inch (3rd generation and later), iPad Pro 11-inch (1st generation and later), iPad Air (3rd generation and later), iPad mini (5th generation and later), or iPad (8th generation and later).
  • React with your hands: As with the iPhone and Mac, only some models let you trigger reactions with gestures: the iPad Pro 12.9-inch (5th generation and later), iPad Pro 11-inch (3rd generation and later), iPad (10th generation), iPad Air (4th generation and later), and iPad mini (6th generation).
  • Screen Distance: This health-related feature is supposed to encourage kids to hold the iPad farther away to reduce the likelihood of developing myopia. But how many kids read on an iPad Pro 12.9-inch (3rd generation and later) or iPad Pro 11-inch (3rd generation and later)?

watchOS 10

The Apple Watch has a simple upgrade story: every model compatible with watchOS 9 can also run watchOS 10. That means everything from the Apple Watch Series 4 up through the Apple Watch Ultra, including the Apple Watch SE. (Look in the Watch app on your iPhone if you can’t remember which model you have.)

Two of the new features promised for watchOS 10 work only on specific models:

  • The NameDrop feature that lets you transfer contact information wirelessly with just proximity works with all iOS 17-compatible iPhones, but it can communicate only with an Apple Watch SE, Apple Watch Series 6 or later, or Apple Watch Ultra.
  • The Time in Daylight feature that helps parents track whether their kids are spending the recommended 80–120 minutes per day outside requires an Apple Watch SE (2nd generation), Apple Watch Series 6 or later, or Apple Watch Ultra.

tvOS 17

As with the Apple Watch, the Apple TV upgrade situation is easy to understand: tvOS 17 will run on the Apple TV HD and Apple TV 4K (1st and 2nd generation), just as with tvOS 16.

However, note that the promised option to let you use the mic and camera from an iPhone or iPad for FaceTime calls on the Apple TV works only if you have an Apple TV 4K (2nd generation). That might be the first real reason to upgrade from an older Apple TV.

(Featured image by Apple)


Social Media: Later this year, Apple will release macOS 14 Sonoma, iOS 17, iPadOS 17, watchOS 10, and tvOS 17. Here’s the hardware you’ll need to run these operating systems—and to support some of the whizzier features.