In November, Apple unveiled its new M1 chip and three new Macs that use it: the MacBook Air, 13-inch MacBook Pro, and Mac mini. The M1-based MacBook Air replaces the previous Intel-based MacBook Air, but with the 13-inch MacBook Pro and the Mac mini, Apple continues to sell some Intel-based models with beefier specs—most notably a higher memory ceiling.
Even though Apple makes impressive performance claims for the new Macs, the community was still somewhat skeptical. Were these new Macs as fast as Apple said? Would they be limited in some other way? And the biggest question of all, should we be buying untested M1-based Macs or tried-and-true Intel-based models? Now that these new Macs are shipping and people have had a chance to try them, let’s address these and other questions so you can plan your future Mac purchases appropriately.
Are these new Macs fast?
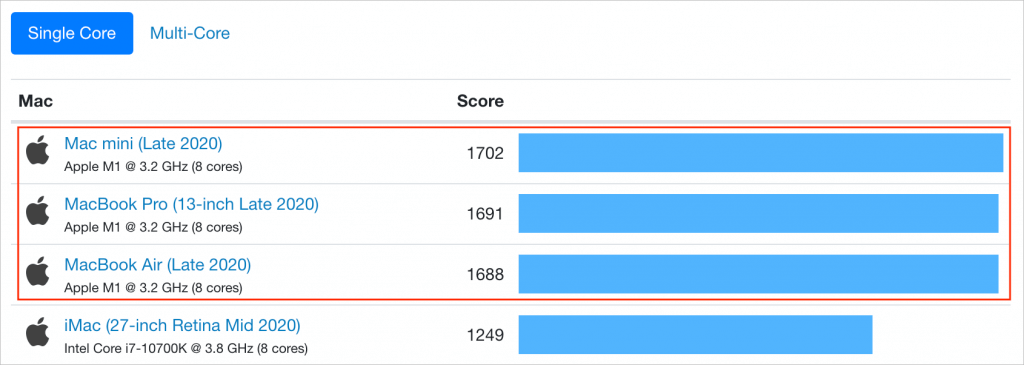
It’s hard to overstate just how astonishing the performance benchmarks for these new Macs are. In single-core GeekBench 5 tests, the M1-based Macs beat every existing Mac by a lot: the most recent 27-inch iMac clocked in at a benchmark score of 1250, whereas the M1 Macs hovered around 1700. (The Mac Pro and iMac Pro are tweaked for faster multi-core performance instead, so they fare even worse on the GeekBench 5 single-core benchmarks.) For many everyday apps, single-core performance is what you’ll notice.

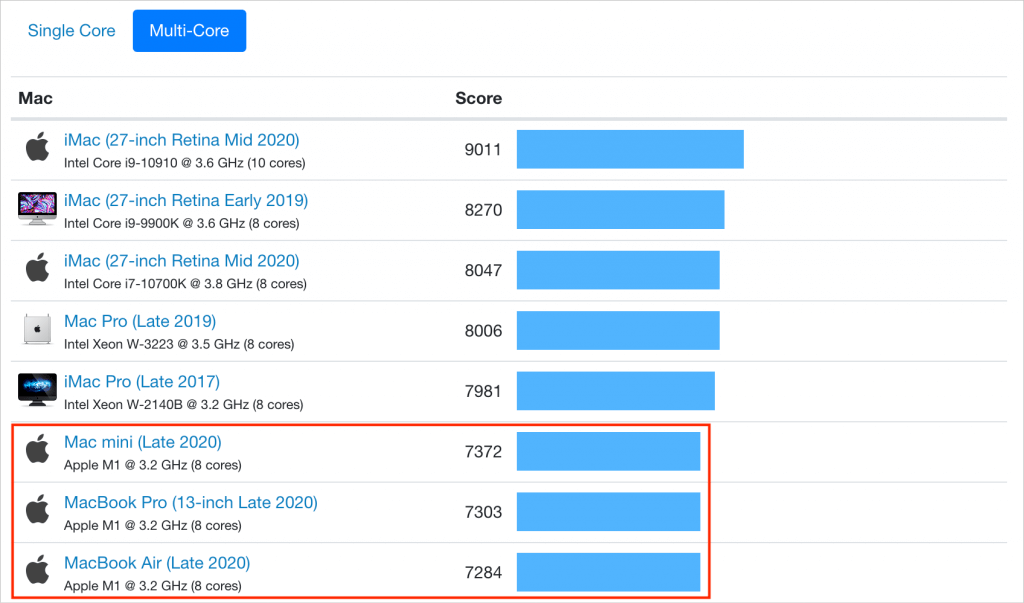
Of course, the top-of-the-line 28-core Mac Pro and its siblings outperform the 8-core M1-based Macs in the GeekBench 5 multi-core benchmarks, but if you focus on the new M1 Macs in the multi-core rankings below, you can see that they’re just behind the fastest 27-inch iMacs and low-end Pro models. That’s doubly impressive when you remember that the Mac Pro in the screenshot below costs $6000, compared to $700 for the Mac mini.
Benchmarks don’t lie, but they also don’t tell the whole story. These new Macs feel fast. Apps launch with only a bounce or two of the icon on the Dock. The MacBook Air and MacBook Pro wake from sleep and unlock with an Apple Watch so quickly that they’re ready to use by the time you’ve finished opening the screen. We can’t promise you’ll never see the spinning beachball wait cursor, but we haven’t so far. In some ways, using these new Macs feels more like using a fast iPad or iPhone, where everything happens nearly instantly.
Finally, note that only apps that have been rewritten to support the M1 chip receive the full speed boost. Older apps must be “translated” by Apple’s Rosetta 2, which converts apps from Intel instructions to the Arm instructions needed by the M1. That happens at launch, after which macOS launches the translated app. The first launch might be slow, but subsequent launches are faster. Although emulation environments are generally quite slow, early tests show apps translated by Rosetta 2 as running at about 80% of native speed. The upshot of that is that even translated apps might run faster than the equivalent app running on an Intel-based Mac.
What’s the deal with the new M1-based Macs having only 8 GB or 16 GB of RAM?
With the new M1-based Macs, you can choose between 8 GB and 16 GB of RAM, and that’s it. In contrast, the current Intel-based 13-inch MacBook Pro lets you go up to 32 GB, and the Intel-based Mac mini can take up to 64 GB.
Although 16 GB of RAM sounds limiting, that doesn’t seem to be nearly as concerning as one might think. The reason is that the M1 chips use what Apple calls “unified memory,” which is built onto the M1 chip itself and shared by the CPU, GPU, and Neural Engine. A significant performance bottleneck in modern computers is moving data around in memory. Benchmarks suggest that the memory bandwidth on the M1 chip is about 3x faster than on a 16-inch MacBook Pro. The faster that data can be moved around in memory and shared between the processing cores, the less memory is needed.
The speed of their SSDs also lets the M1-based Macs get away with less memory. When macOS uses all its physical RAM, it falls back on virtual memory, which effectively involves moving data on and off the SSD as needed. When Macs used hard drives, swapping memory to and from disk was very slow, but modern SSDs are fast enough to hide swapping delays.
To be fair, there are still memory-intensive tasks that will run better on Macs with lots of physical RAM. That’s a big reason Apple kept the Intel versions of the 13-inch MacBook Pro and Mac mini for sale. On the very high end, you can put a whopping 1.5 TB of RAM in a Mac Pro, and if you need that kind of RAM for your work, you’ll need to stick with Intel-based Macs for now.
How will the M1-based Macs fit into a workflow?
Here’s where things get tricky. If you have an office full of Macs, there are some good reasons why you might want to stick with Intel-based Macs for a while.
- Big Sur: The M1-based Macs require macOS 11 Big Sur. In general, we recommend that people hold off on upgrading to Big Sur until Apple has released maintenance updates to solidify stability and compatibility. Plus, mixing versions of operating systems and apps can lead to interoperability problems.
- Apps: Although Rosetta 2 appears to do a good job translating older apps, there may still be quirks or performance hits, particularly for complex apps.
- Memory: As mentioned above, there are some tasks where lots of physical RAM is essential, and there’s currently no way to go above 16 GB on an M1-based Mac.
But here’s the thing. Apple very intentionally focused its initial M1-based Mac models on the low end of the Mac product line. These Macs are ideal for students and individuals, or as auxiliary or traveling Macs for office workers, particularly given the startlingly good battery life in the laptops. They won’t be replacing a Mac Pro or even a 27-inch iMac right now, but no one would have replaced such a machine with a MacBook Air, 13-inch MacBook Pro, or Mac mini before either.
In the end, we’re bullish on these new M1-based Macs. They’ve redefined what the most inexpensive Macs can do, making them compelling for those who don’t require more than 16 GB of physical RAM or need to slot them into highly specific workflows.
(Featured image by Apple)
Social Media: Apple’s new M1-based Macs are getting rave reviews for their stunning performance and battery life. Should you buy one for your next Mac or stick with a tried-and-true Intel-based Mac? We look into that question in this piece.