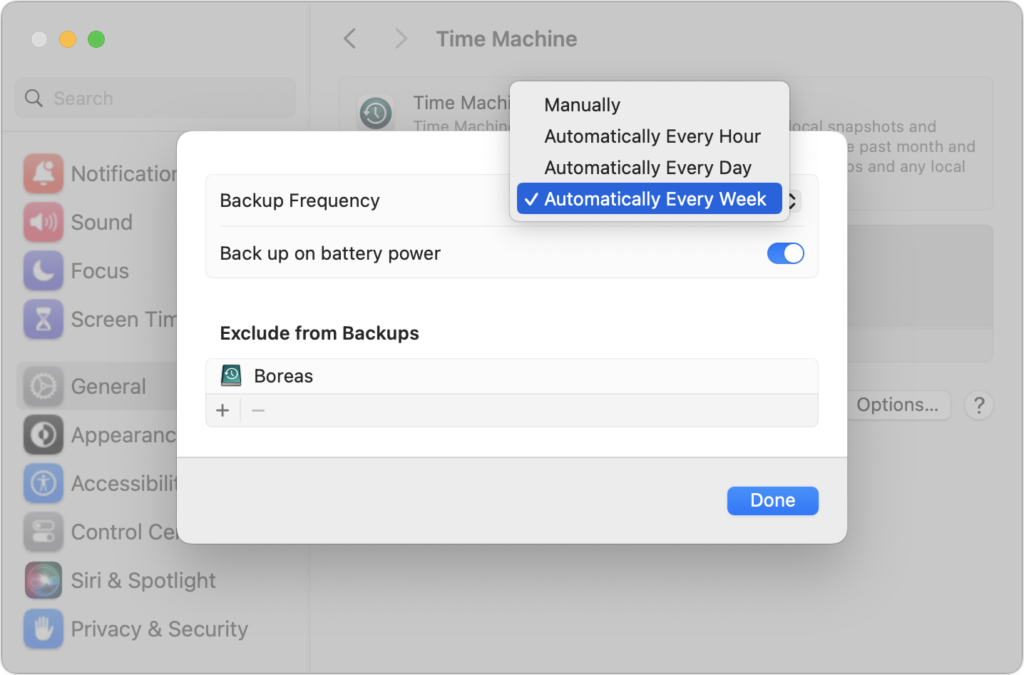
Posts

Did You Know That Siri on a HomePod Can Control Alarms on Other Devices?

Siri has plenty of tricks up its sleeve, and we’ve just discovered a new one. Let’s say you set iPhone alarms to wake up and remind you to take medication throughout the day. However, if you don’t have your iPhone handy when those alarms go off, it can be annoying (for both you and others) to find your phone and stop or snooze the alarm. If you have a HomePod, it turns out that you (or someone else) can say, “Hey Siri, snooze the alarm” or “Hey Siri, stop the alarm.” Siri usually asks for confirmation—just reply with “Yes”—and sometimes tells you to continue on the iPhone, but it can be easier than finding the iPhone and stopping the alarm. (And yes, if you’re wearing an Apple Watch, you can stop the alarm from it as well. It’s also possible to set alarms on a HomePod directly, though they’re useful only if you’re guaranteed to be home when they go off.)

(Featured image by iStock.com/Antonio_Diaz)

Giving Away a Mac Running macOS 12 Monterey? Try Erase All Content and Settings

Before macOS 12 Monterey, if you wanted to sell, trade in, or give away your Mac, you had to boot into Recovery, erase the internal drive with Disk Utility, and reinstall macOS to ensure that the new owner would get a fresh start and couldn’t see any of your data. In Monterey, Apple has made the process much easier for newer Macs that use Apple silicon or that are Intel-based with a T2 security chip. Open System Preferences, and from the System Preferences menu (yes, it has menus), choose Erase All Content and Settings. You’ll have to enter an administrator username and password to enter the Erase Assistant. It suggests you back up to Time Machine before erasing, and if you’ve already done that or don’t want to, click Continue. Verify everything that will be erased on the next screen and click Continue. Finally, log out of your Apple ID when prompted to complete the erasure.

(Featured image by iStock.com/wildpixel)

Pay Attention to the iPhone’s Emergency SOS Auto Call Feature

Did you know that pressing and holding the side button and one of the volume buttons on an iPhone 8 or later brings up a screen that lets you power your iPhone off, show your medical ID, and invoke Emergency SOS? (On earlier iPhones, press the side or top button five times.) Slide Emergency SOS, and your iPhone will immediately call emergency services, which could be lifesaving in a real emergency. Even without touching​​ that slider, if you continue to hold the side button and volume button, after a 5-second countdown, the iPhone automatically calls emergency services, which may not be what you want. At least in the US, even if you hang up, that will likely cause the 911 dispatcher to send police to your location. To ensure that you can’t accidentally trigger Emergency SOS to call automatically, go to Settings > Emergency SOS and turn off Auto Call. We won’t say how we know this can happen.

(Featured image by iStock.com/LightFieldStudios)

Keep the Menu Bar Showing in Full Screen in macOS 12 Monterey

Do you like using full-screen mode on your new M1-based MacBook Pro but hate having the menu bar disappear unless you move the pointer to the top of the screen? Happily, in macOS 12 Monterey, Apple has at long last added a setting to keep the menu bar visible at all times. Open System Preferences > Dock & Menu Bar and uncheck “Automatically hide and show the menu bar in full screen.” The change won’t affect apps currently in full-screen mode until you toggle their window state again or quit and relaunch. Unfortunately, some apps, including Apple’s Photos, need to be updated to show toolbars or other controls at the top of the window without forcing you to mouse up there to reveal them.

(Featured image by Adam Engst)

Avoid Inclement Weather by Enabling Notifications in iOS 15’s Weather App

Thanks to Apple’s 2020 acquisition of weather company Dark Sky, the iPhone’s Weather app has learned some new tricks in iOS 15. (It still isn’t available on the iPad, oddly.) Most obvious is its addition of weather maps that can show precipitation, temperature, and air quality. More subtle are the notifications that can alert you to incoming precipitation at your precise location. To turn them on in Weather, tap the location button in the lower-right corner of the screen, tap Turn On Notifications, and agree to the necessary location and notification permissions when prompted. (You can also do this later in Settings > Weather > Location and Settings > Weather > Notifications.) From then on, whenever Weather thinks precipitation is about to start or stop at any of your preset locations, you’ll get an alert. Some people find that Weather’s notifications aren’t as frequent or accurate as those from other weather apps like CARROT Weather, but Apple will likely be improving the system.

(Featured image by iStock.com/trendobjects)

Shrink Apps to Prevent the MacBook Pro Notch from Obscuring App Controls

The new 14-inch and 16-inch MacBook Pro models feature a camera housing built into the screen, resulting in a notch like that on the iPhone. Most developers are updating their apps to ensure that no controls or menu bar items appear blocked or hidden by the notch, but if you use an older app that doesn’t play nicely with the notch, there’s a fix. Quit the app if it’s running, select it in the Finder’s Applications folder, and choose File > Get Info. In the Info window that opens, select “Scale to fit below built-in camera.” The active area of the display resizes so everything appears below the notch, slightly reducing the overall screen space. This checkbox won’t appear once the app has been updated to avoid the notch.

(Featured image by Apple)

Use Visual Look Up in Photos in iOS 15 to Identify Plants, Pets, and More

Have you ever wanted to identify a plant, flower, or pet breed, or find out what that famous painting is called? Us too. In iOS 15 and iPadOS 15, Apple added a new AI-driven feature called Visual Look Up that provides more information about photos of plants, flowers, pets, books, artworks, and landmarks. When you’re viewing a photo, swipe up or tap the sparkle-badged info button ➊ to see metadata about the image (camera model, image details, location, and more) and then tap Look Up to learn more ➋. Depending on the item recognized, it will suggest Wikipedia articles, similar images from the Web, websites, bookstores, map locations, and more. Tap a suggestion to switch to Safari or another app for details. (If the info button doesn’t have the sparkle badge, Visual Look Up hasn’t identified anything in the photo.)

(Featured image by iStock.com/Hakase_)

With Apple Watch Faces, Too Much Choice Can Be Confusing

The Apple Watch has a lot to offer older people, including heart rate monitoring, atrial fibrillation detection, fall detection, and electrocardiogram recording. But if you are—or are helping someone who is—of the generation where watches once did nothing beyond telling the time, too many options can be overwhelming. Adding to the confusion is how easy it is to create and accidentally swipe between multiple watch faces, making it so the Apple Watch suddenly looks and works completely differently. If that’s an issue, use the Watch app to delete all but the preferred watch face. In Watch > My Watch, tap Edit to the right of My Faces ➊, tap the red delete button next to a face ➋, and then tap Remove ➌.

(Featured image by Adam Engst)

Safari 15.1 Reverses Course, Reverts to Old Tab Interface

With the betas of Safari 15 on the Mac and iPad, Apple experimented with a variety of interface tweaks related to tabs. By the time Safari 15 shipped, however, Apple had pulled back on the more radical changes from the betas, offering the new Compact Tab Bar layout and colorized tab bar as options. Even with the more traditional Separate Tab Bar layout, however, tabs appeared as buttons above your favorites, a switch from earlier versions of Safari. With Safari 15.1 in macOS and iPadOS 15.1, Apple has reverted the Separate Tab Bar layout even further, making the tabs look like, well, tabs, moving them below the favorites, and eliminating the colorized tab bar (it remains an option in iOS 15.1). The Compact Tab Bar option remains available for those who prefer it, but if you’ve been feeling the sand shifting under your feet, it’s not your imagination—tabs really did change in Safari 15.1.

(Featured image by iStock.com/ESOlex)

When It Comes to Wi-Fi Networks, Sometimes It’s Better to Forget

It’s easy, particularly when traveling, to end up connecting to a Wi-Fi network that doesn’t provide Internet access, requires credentials you don’t have, or lacks access to the network’s printer. Unfortunately, once your iPhone, iPad, or Mac has connected to such a network, it may reconnect to it later, causing consternation when things don’t work. The solution? Whenever you realize a Wi-Fi network is worthless, forget it. (The network, that is.) On the Mac, open System Preferences > Network > Wi-Fi > Advanced > Wi-Fi, select the network in the list (you don’t have to be connected to it), click the – button, and click Remove. On an iPhone or iPad, when you’re connected to the offending network, go to Settings > Wi-Fi, tap the i button to the right of the current network, and tap Forget This Network on the next screen.

(Featured image based on images by iStock.com/fizkes and Elena Pimukova)