Posts

Can’t Rotate the Screen on an iPad or iPhone? Fix the Problem in Control Center

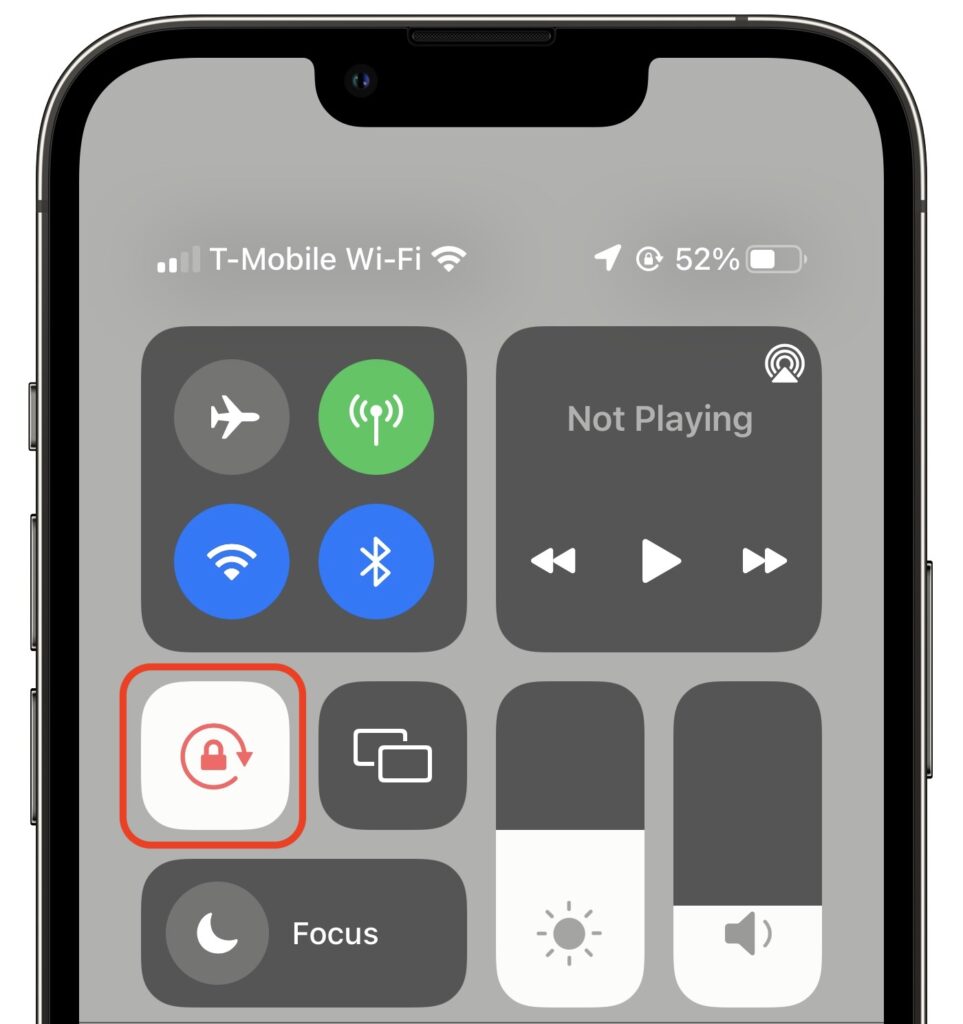
Normally, when you rotate an iPad, the screen happily flips from portrait (vertical) to landscape (horizontal) orientation as appropriate. Rotating an iPhone has the same effect in some apps, though many are written to work only in one orientation. If you ever end up in a situation where your device’s screen doesn’t rotate when you think it should, the reason is likely that Rotation Lock has been turned on in Control Center. Swipe down from the top-right corner of your screen (or up from the bottom of the screen on a Touch ID iPhone) and disable the Rotation Lock button. You can turn it on again later if you ever want to prevent the screen from rotating temporarily.
(Featured image by iStock.com/Jacephoto)

Extend Your Battery Life in macOS 12 Monterey with Low Power Mode

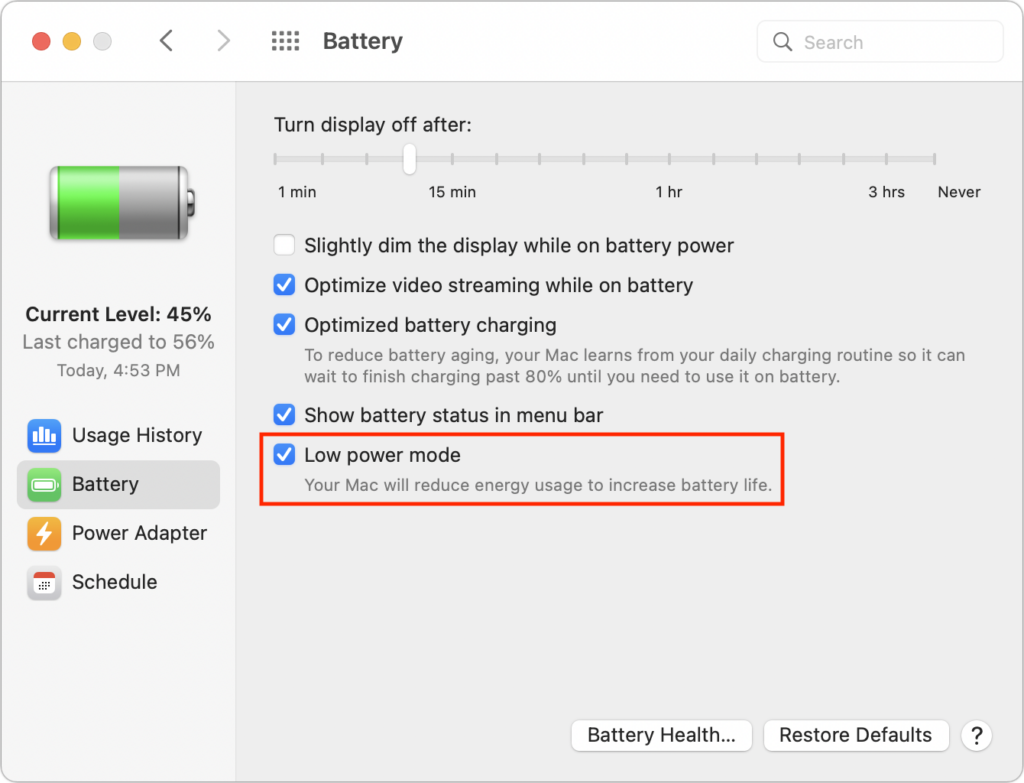
We’ve become accustomed to our iPhones and iPads switching into Low Power Mode to preserve battery life, and you can enable it manually if you want to reduce power usage for a day. New in macOS 12 Monterey for the MacBook Air and MacBook Pro is a similar feature, though you must enable it manually. Open System Preferences > Battery, click Battery in the sidebar, and select Low Power Mode. It reduces the screen brightness automatically and may decrease CPU performance. Make sure to turn it off once you don’t need it anymore.

(Featured image by iStock.com/Pascal Kiszon)

Delete or Position iOS Apps from Search

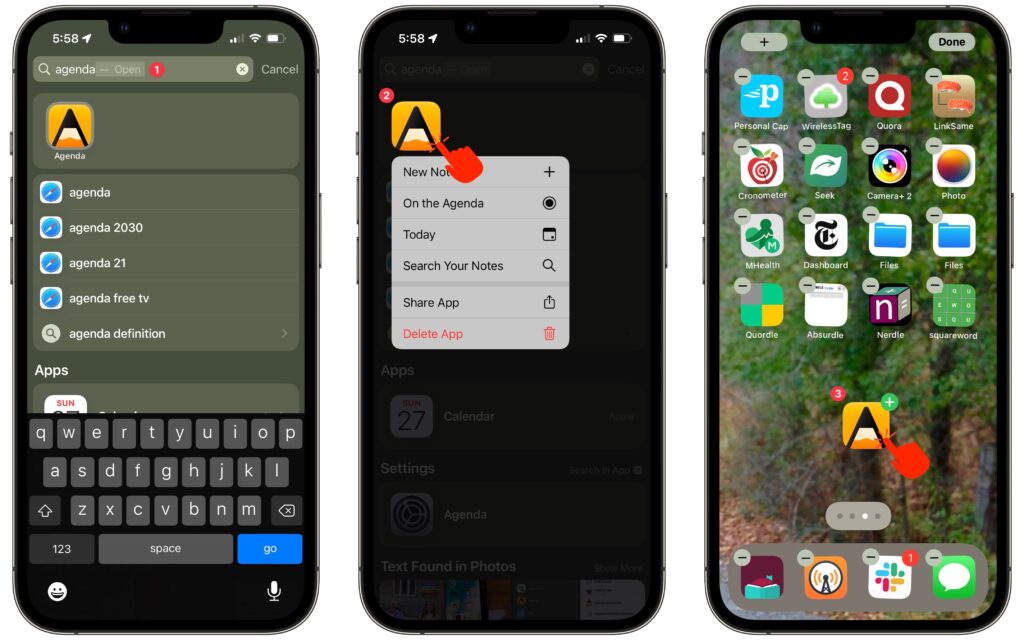
In iOS 15 and iPadOS 15, Apple added a feature that would have been even more welcome before the advent of the App Library: the capability to manage apps from Search. But it’s still handy as a way to delete or position an app you can’t find on a Home screen page. Swipe down from the middle of the Home screen to enter Search, after which you can work with any app you see in Siri Suggestions or find with a search ➊. Touch and hold an app to display its contextual menu ➋, including a Delete App option. Or touch and hold it and start dragging to move it to a Home screen page ➌. Bonus: you can even drag an app out multiple times to put it on multiple Home screen pages or in multiple folders!

(Featured image by iStock.com/B4LLS)

Use Reduce Transparency for a Consistently Colored macOS Interface

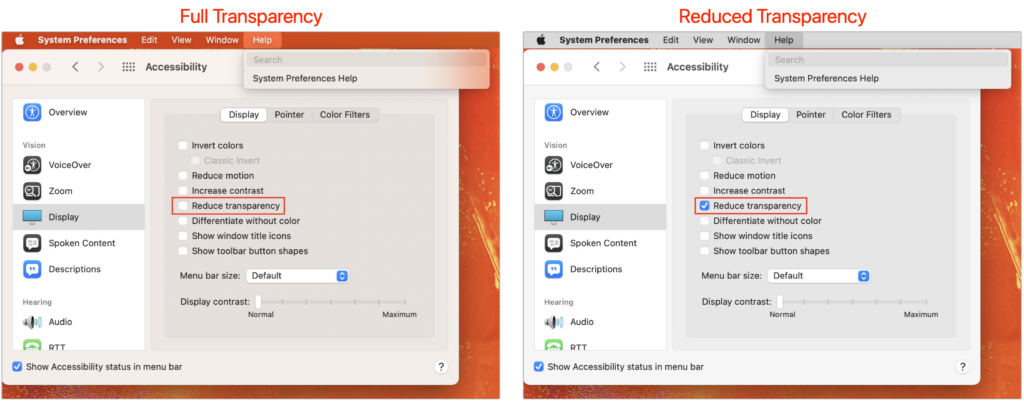
For years now, Apple has made transparency a part of the macOS interface, which has the effect of blending the menu bar into the background and making menus and some windows take on the background hue, as you can see on the left side of the illustration below. For many people, transparency blurs the interface, making it harder to differentiate interface elements from the wallpaper. It also causes problems for screenshots meant for publication because the images end up with unrepresentative color levels. To prevent that from happening, open System Preferences > Accessibility > Display and select Reduce Transparency. It can be a significant difference, as you can see on the right side of the illustration below.

(Featured image by Adam Engst)

iOS 15 Allows Rearranging and Deletion of Home Screen Pages

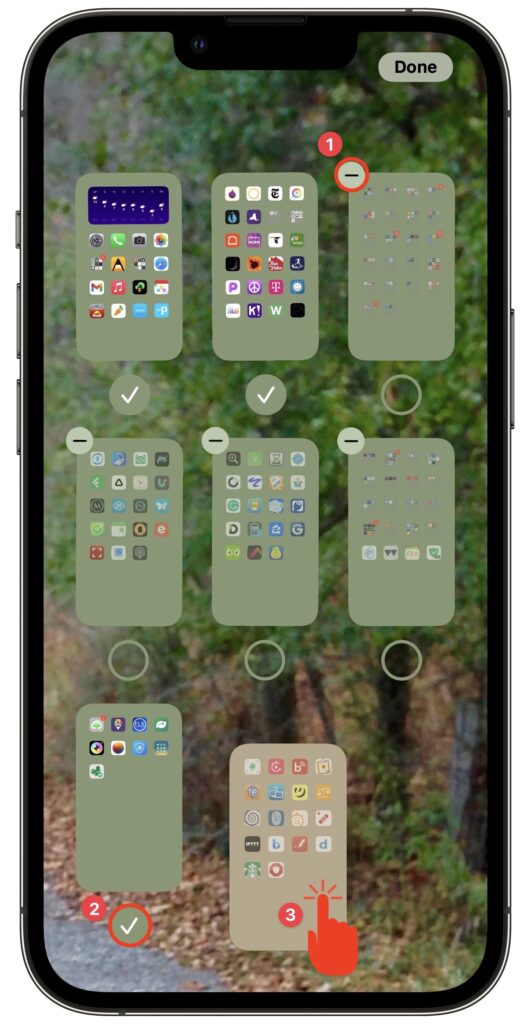
Back in iOS 14, Apple added the App Library, which collects all the apps on your iPhone. With everything available in the App Library, iOS 14 was also able to provide the option of hiding Home screen pages, a boon for those of us with too many disorganized pages. In iOS 15, Apple has taken the next step. You can still hide Home screen pages, but if you never want to see them again, you can delete them (apps remain in the App Library). Or, if they’re not in the order you want, you can rearrange them. Touch and hold any empty spot on the Home screen to enter jiggle mode. Tap the dots above the Dock that indicate which Home screen page you’re on. In the Edit Pages screen, you can now tap the – button next to a hidden page to delete it ➊. If you want to delete a visible page, first hide it by tapping its checkmark underneath ➋. Or, to rearrange Home screen pages, drag a thumbnail to a new location ➌. Tap Done or press the Home button when you’re finished.

(Featured image by Adam Engst)

Where to Check macOS, iOS/iPadOS, and iCloud Storage Status

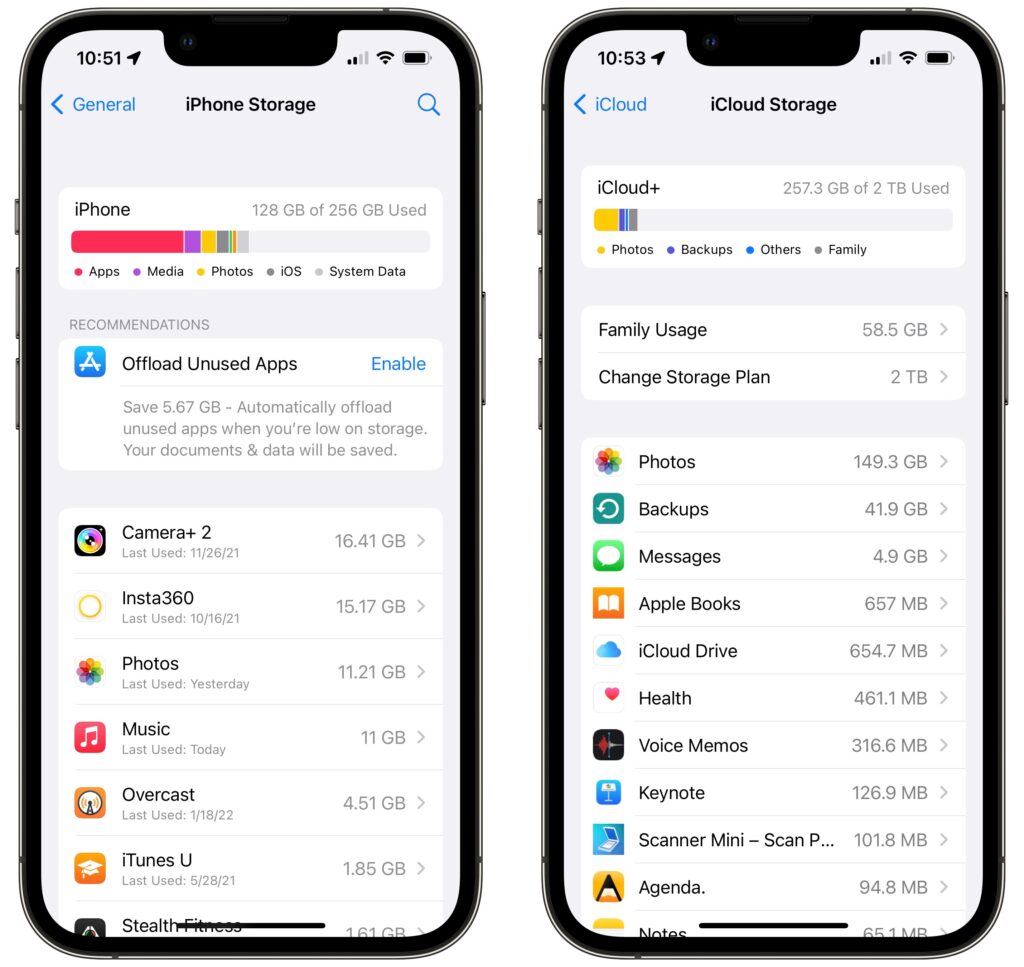
There’s little more frustrating than running out of space, which always seems to happen at just the wrong time. Luckily, Apple makes it easy to check any time, before it becomes a problem. On the Mac, choose About This Mac from the Apple menu and click Storage. On an iPhone or iPad, navigate to Settings > General > iPhone/iPad Storage. For iCloud, you can look in either System Preferences > Apple ID on the Mac or in Settings > Your Name > iCloud > Manage Storage on an iPhone or iPad. Once you know how much space is consumed by what, you can more easily clear unnecessary data.

(Featured image by iStock.com/alphaspirit)

In iOS 15, You Can Now Open an App from the Lock Screen

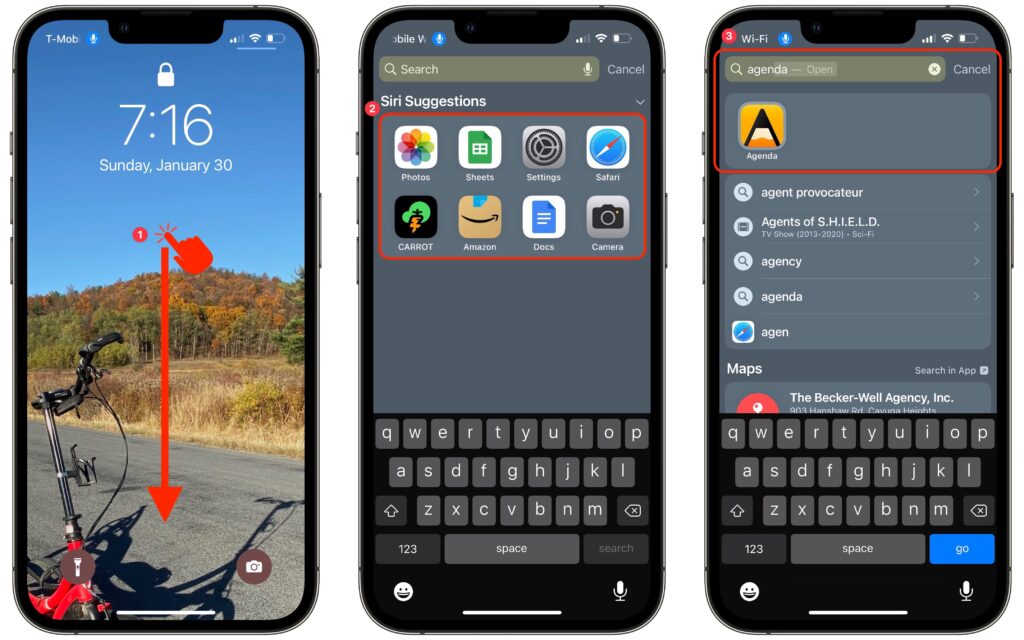
Most of the time, when you unlock your iPhone or iPad, you want to launch an app. In iOS 15 and iPadOS 15, you no longer have to unlock the device, find the app on a Home screen page, and tap it. Instead, you can open an app directly from the Lock screen, assuming Settings > Face/Touch ID & Passcode > Today View and Search is turned on. Just swipe down from the middle of the Lock screen ➊ to access the Search screen, which lists apps from Siri Suggestions ➋. You can tap one of those to open it, or you can use the Search field to find an app by name and tap the search result ➌.

(Featured image by iStock.com/ipopba)

Does Your Magic Mouse Need More Juice? Here’s How to Check

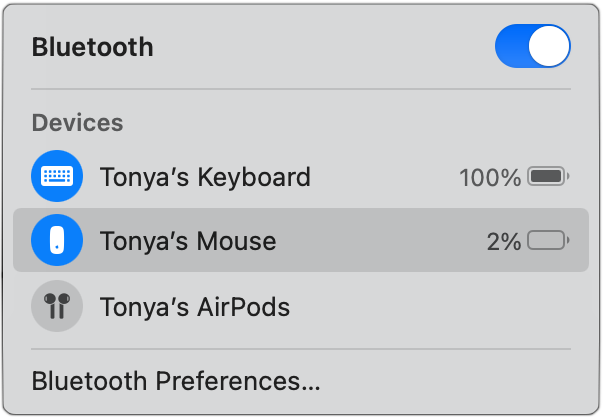
It’s unfortunate that the most recent iteration of the Magic Mouse has its Lightning charging port on the bottom, making it impossible to use while charging, unlike the Magic Keyboard and Magic Trackpad, which work fine when plugged in. To check if your Magic Mouse needs charging before it starts to nag (and starts acting a little funky), look in one of these spots. If your menu bar is displaying the Bluetooth icon, click it, and the charge level should show up. Or click the Control Center icon on the menu bar and click Bluetooth. You can also look in System Preferences, in either the Bluetooth preference pane or the Mouse preference pane. In our experience, the Bluetooth menu is the easiest, but Control Center and the Mouse preference pane are the most reliable—sometimes the charge level doesn’t appear in the menu.

(Featured image by iStock.com/Alex Sholom)

Change Your Pointer Color in macOS 12 Monterey

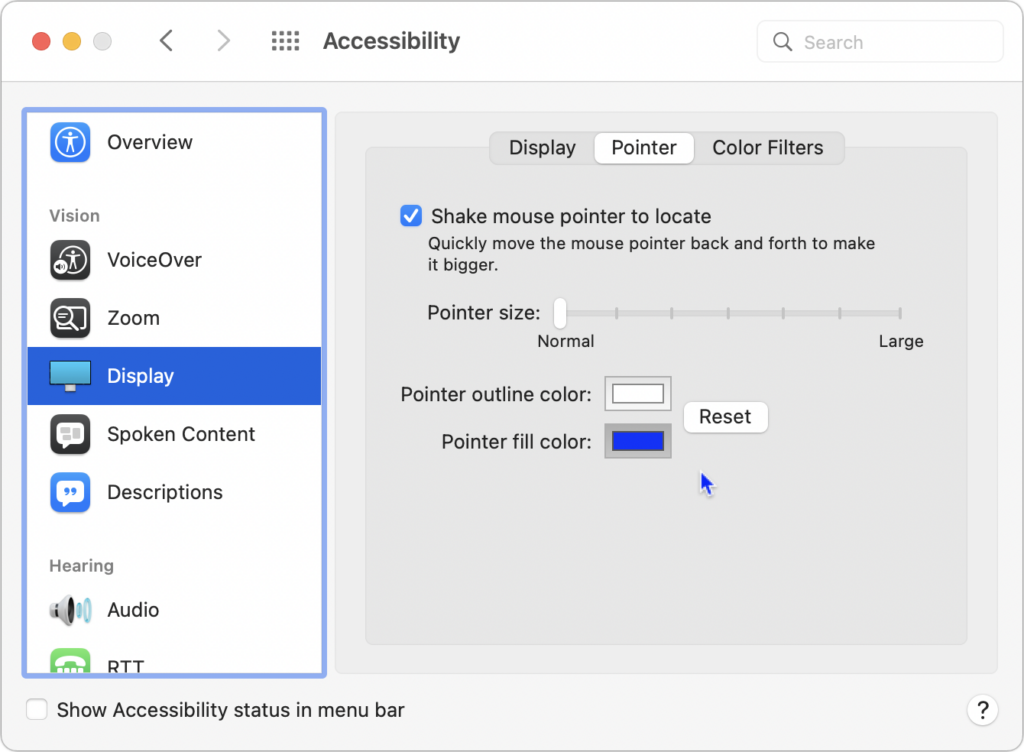
Some people find it hard to find the mouse pointer at times, particularly on a large screen or when working in Dark Mode or in apps with dark interfaces. You’ve long been able to increase the size of the pointer generally and also zoom it temporarily by shaking it, but in macOS 12 Monterey, Apple now lets you change the color of the pointer. That could be a boon to those who have trouble seeing it otherwise. Go to System Preferences > Accessibility > Display > Pointer, click the Pointer Fill Color box, and choose a different color in the color picker. You can also choose a different Pointer Outline Color if that’s helpful. After customizing it, if you decide you prefer the old black-and-white version, click the Reset button.

(Featured image by iStock.com/tahir_duran)

Set Custom Text Sizes on a Per-App Basis in iOS 15

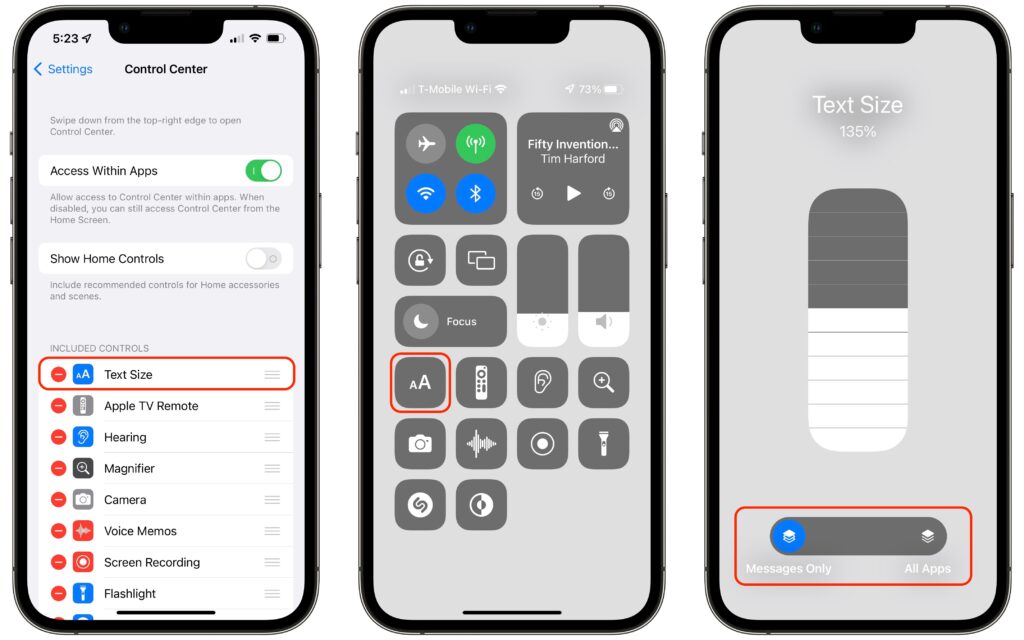
In previous versions of iOS, you could change the systemwide text size to make all apps—at least those that support Dynamic Type—display text at larger or smaller sizes. (Most people who use this feature want the text larger so it’s easier to read with aging eyes.) In iOS 15 and iPadOS 15, however, Apple lets you adjust the text size on a per-app basis, so you can increase it only for those apps where it really makes a difference for you. First, make sure Text Size is showing in Control Center by going to Settings > Control Center, and if it’s not in Included Controls, tap the green + button for it under More Controls. Then, while in an app where you want bigger text, invoke Control Center, tap the Text Size button, move the vertical slider to the desired setting, and then tap the App Only button so the setting affects only that app, not all apps.

(Featured image by iStock.com/SandraMatic)