Posts

Update AirPort Express Base Stations to Add AirPlay 2

Apple may have discontinued its AirPort Wi-Fi base stations, but in a surprise parting gift, the company has released a firmware update to the AirPort Express that gives it AirPlay 2 capabilities like multi-room audio. If you have an AirPort Express connected to speakers through its audio jack, first use AirPort Utility on the Mac or iPhone to update its firmware to version 7.8. Once you do that, you’ll be able to play audio simultaneously through the AirPort Express and to other AirPlay 2–enabled devices, such as the HomePod and Apple TV.

A Hidden Trick that Lets You Navigate Your iPhone with One Hand

Unless you can palm a basketball, you may not be able to use an iPhone single-handed. But sometimes one hand is all you can spare. If you find yourself in such a situation, give Reachability a try. On a Touch ID–based iPhone, tap (don’t press) the Home button twice to slide the iPhone’s interface halfway down the physical screen, bringing everything into reach of your thumb. On the Face ID–equipped iPhone X, put your thumb in the bottom of the screen—about at the top edge of the Dock if you were on the Home screen—and swipe down. You can use apps normally for a tap or two, and then they’ll expand back to the full screen to show the full interface. If Reachability is off (or if you want to turn it off), go to Settings > General > Accessibility.

Make More Space for Documents by Putting Your Dock on the Side of Your Mac’s Screen

By default, Apple locates the Dock at the bottom of the Mac’s screen. If that location interferes with you seeing as much of your document windows as you’d like, you can set it to appear only when you move the pointer to the bottom edge of the screen. But there’s a better way: put the Dock on the side of the screen where there’s plenty of horizontal room and it won’t get in the way of most document windows. Open System Preferences > Dock, and select Right or Left from the Position on Screen radio buttons.


The Secret Keyboard Shortcut for Comparing Before/After Edits in Photos on the Mac

Photos on the Mac provides so many editing tools that it’s easy to lose track of how an edited image compares to the original. You can always use the Revert to Original command and then undo it, but that’s fussy. Instead, Photos provides a Show Original  button in the upper-left corner, between the window controls and the Revert to Original button. Click and hold it to see your original image; let up to see the edited version again. Even easier, press the M key on your keyboard. The only thing either of those techniques won’t do is show the effect of cropping; to see the uncropped original, press Control-M. And if you just want to see how a particular set of adjustment controls affected the image, click its blue checkmark  to turn it off and back on.

The post The Secret Keyboard Shortcut for Comparing Before/After Edits in Photos on the Mac appeared first on TidBITS Content Network.

Here’s How to Load the Desktop Version of a Web Site on an iPhone or iPad

Some Web sites have separate desktop and mobile versions, each theoretically providing the best browsing experience for its platform. Unfortunately, mobile Web sites sometimes leave out necessary features or hide content. That’s especially annoying if you’re browsing on an iPad, where the desktop site would work fine. If you run across such a site while browsing in Safari on the iPhone or iPad, you can ask for its desktop version. Press and hold the Reload button at the right side of the address bar, and then tap Request Desktop Site. If the site allows such a request, as do Wikipedia and the New York Times, the desktop version loads (to read the small text, you may need to pinch out to zoom the page).

The post Here’s How to Load the Desktop Version of a Web Site on an iPhone or iPad appeared first on TidBITS Content Network.

A Simple Technique for Decluttering Your Reminders List

Productivity experts recommend offloading things you have to remember to a task-management app like Apple’s Reminders, which syncs your to-dos among your Mac, iPhone, iPad, and Apple Watch. That’s particularly helpful for tasks you want to be reminded of in a few months or next year, but then those far-in-the-future tasks—especially repeating ones!—clutter your main Reminders list. The solution? Create a Far Future Reminders list, and move reminders to it that aren’t relevant within the next month or so. Just make sure everything in Far Future Reminders is set to alert you on the appropriate day.

The post A Simple Technique for Decluttering Your Reminders List appeared first on TidBITS Content Network.

Did You Know This Hidden Trick for Opening System Preferences Panes Directly?

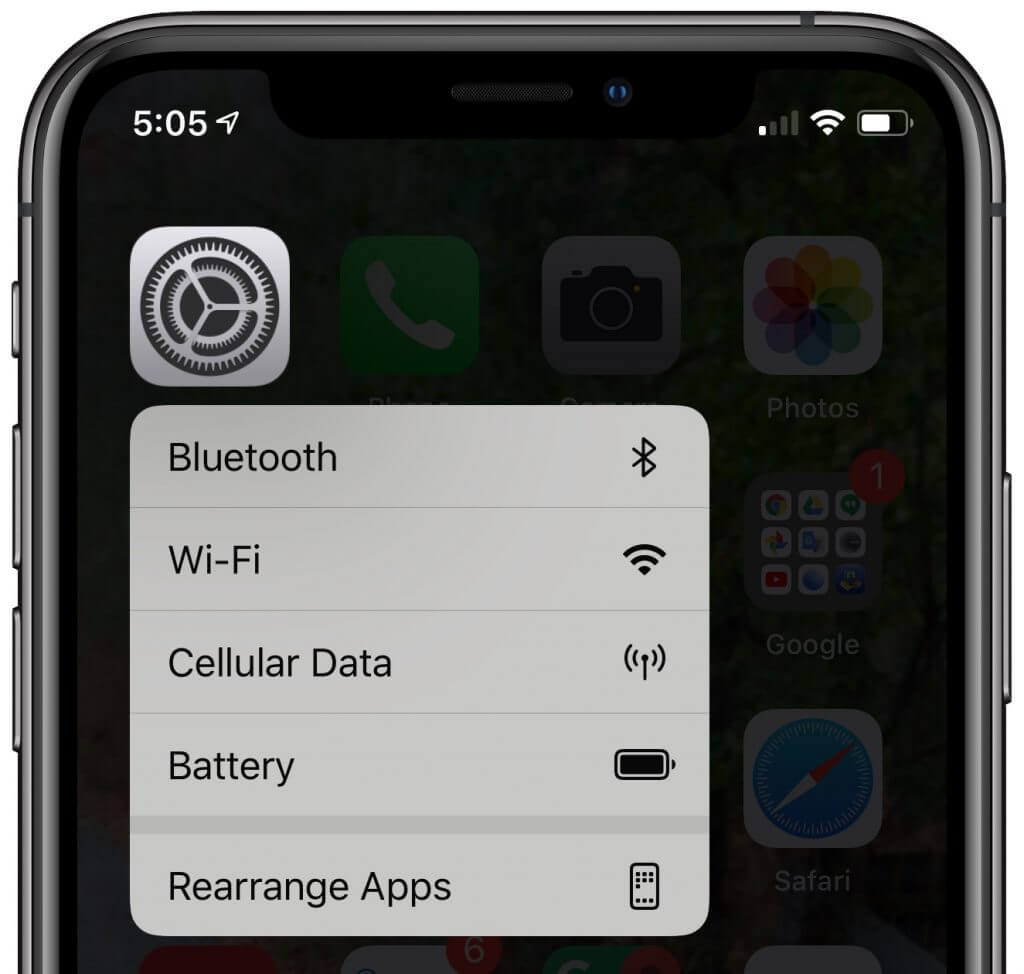
The System Preferences app on the Mac contains about 30 icons, each leading to additional settings panes. Rather than opening System Preferences, scanning the collection of icons, and clicking the one you want, you can jump directly to the desired pane. Just click and hold on the System Preferences icon in the Dock, and choose a pane from the pop-up menu.

The post Did You Know This Hidden Trick for Opening System Preferences Panes Directly? appeared first on TidBITS Content Network.

Tired of Skewed Lines in Your Photos? Use the Camera App’s Hidden Level.

If you’ve ever photographed a sheet of paper or some other rectangular object, the image may have come out skewed because you inadvertently tilted the camera. The iOS 11 Camera app has a level feature to help you avoid this problem, but it’s so subtle that you may not have noticed it. To use it, first go to Settings > Camera and turn on the Grid switch so thin white lines divide the viewfinder image into a grid of nine rectangles. Then, to access the level, hold the iPhone or iPad flat, so the camera points straight down toward the floor (or straight up toward the sky, if you’re photographing a ceiling). Notice that two crosshairs appear in the middle of the viewfinder, a yellow one that marks the position where the camera will be level and a white one that shows the camera’s current angle. Tilt the camera until the crosshairs merge into a single yellow image, and tap the Shutter button.

Did You Know You Can Customize the Columns in a Finder Window’s List View?

When a Mac folder contains a lot of files, the Finder’s List view often works best, since it lets you focus on a single folder and easily sort the contents by clicking the different columns: Name, Date Modified, Size, and Kind. But did you know that you can resize columns, rearrange them, and even add and remove columns? To resize a column, drag the vertical separator line to the right of its name. To move a column, click and hold on its name, and then drag it to the desired position. And to add or remove a column, Control- or right-click any column header and select or deselect the desired column. Choose from Date Modified, Date Created, Date Last Opened, Date Added, Size, Version, Kind, Comments, and Tags.

Remember That You Can Search for Nearly Anything in Your Photos Library

Apple’s Photos app on the Mac can identify thousands of different objects in your photos, so it’s easy to find photos based on their content. You can find objects (cars and trains), scenery (beaches and forests), and even some events (weddings and parades). This is both big fun and useful for those times when you can’t remember when you took a photo, but do remember what’s in it, like a cat, camera, or carousel. To carry out a search like this, type the search term into the Search field on the right side of the Photos toolbar. From the list that appears, choose the Category result. In macOS 10.13 High Sierra’s version of Photos, you can filter your results from the Showing menu at the upper right of the window. The feature isn’t perfect, so you may see some odd results or miss some photos, but it’s way faster than browsing manually!