
10 Reasons to Upgrade to Apple’s Version 27 Operating Systems This Fall
Please visit https://tcn.tidbits.com/10-reasons-to-upgrade-to-apples-version-27-operating-systems-this-fall/ to access this member content.
Please visit https://tcn.tidbits.com/10-reasons-to-upgrade-to-apples-version-27-operating-systems-this-fall/ to access this member content.
We’re taking a brief break from helping you become more productive to recommend a feature that could spark moments of joy for Apple Watch users. In watchOS 11, the new Photos watch face can display a photo from a shuffled set of images each time you raise your wrist (or tap the screen). Like the Lock Screen customization feature on the iPhone and iPad, the Photos face can dynamically select images of your favorite people, nature, and cities from your photo library. (You can also choose photos manually.) The time appears in an appropriate spot and size. Before the Photos face, we often relied on the complication-heavy Modular face, but we now find being surprised by lovely images from our photo library to be delightful. To add the Photos face to your Apple Watch, open the Watch app on your iPhone, tap Face Gallery, and tap the Photos face. Then, choose where the content will come from, select the time size, and add any desired complications. Once it’s on the Apple Watch, you can tweak style settings there too.

(Featured image by Adam Engst)
Social Media: Let’s take a step back from how technology can enhance productivity to appreciate watchOS 11’s new Photos watch face. The way it unearths photos from your photo library on every wrist raise is delightful.
If you have trouble finding particular items across multiple shelves of books, labeled boxes, or anything else that’s clearly identified with a text name, take carefully composed photos that capture all the titles without glare. Later, you can search for any text in those photos to find them—tap the Search button in Photos on the iPhone or iPad, or use the Search field in Photos on the Mac. Photos highlights the search term on the found photo. (If Photos on the Mac doesn’t surface an expected photo, try again on your iPhone, which seems to get more hits on harder-to-read text.) This capability comes courtesy of Apple’s Live Text feature, which uses machine learning to identify text in photos. Think of it as the lazy person’s database!

(Featured image by Adam Engst)
Social Media: You can take advantage of Apple’s Live Text feature in Photos to catalog books, boxes, or any other items with text names. Think of it as a lazy person’s ad hoc database.
Have you ever wanted to extract an object from a photo for use in another context? Starting with iOS 16 on a relatively recent iPhone, you can do that with many photos. In the Photos app, touch and hold the object, and if Photos can extract it, you’ll see a highlight run around its edges. Raise your finger, and a popover lets you copy the object, look up information about it, turn it into a sticker (in iOS 17), or share it. Or you can start dragging the object, switch apps with your other hand, and drop it into another app, like Messages. With Universal Clipboard, you can even lift an object on an iPhone, copy it, switch to Preview on your Mac, and choose File > New from Clipboard. File this one under Arthur C. Clarke’s Third Law, which states, “Any sufficiently advanced technology is indistinguishable from magic.”
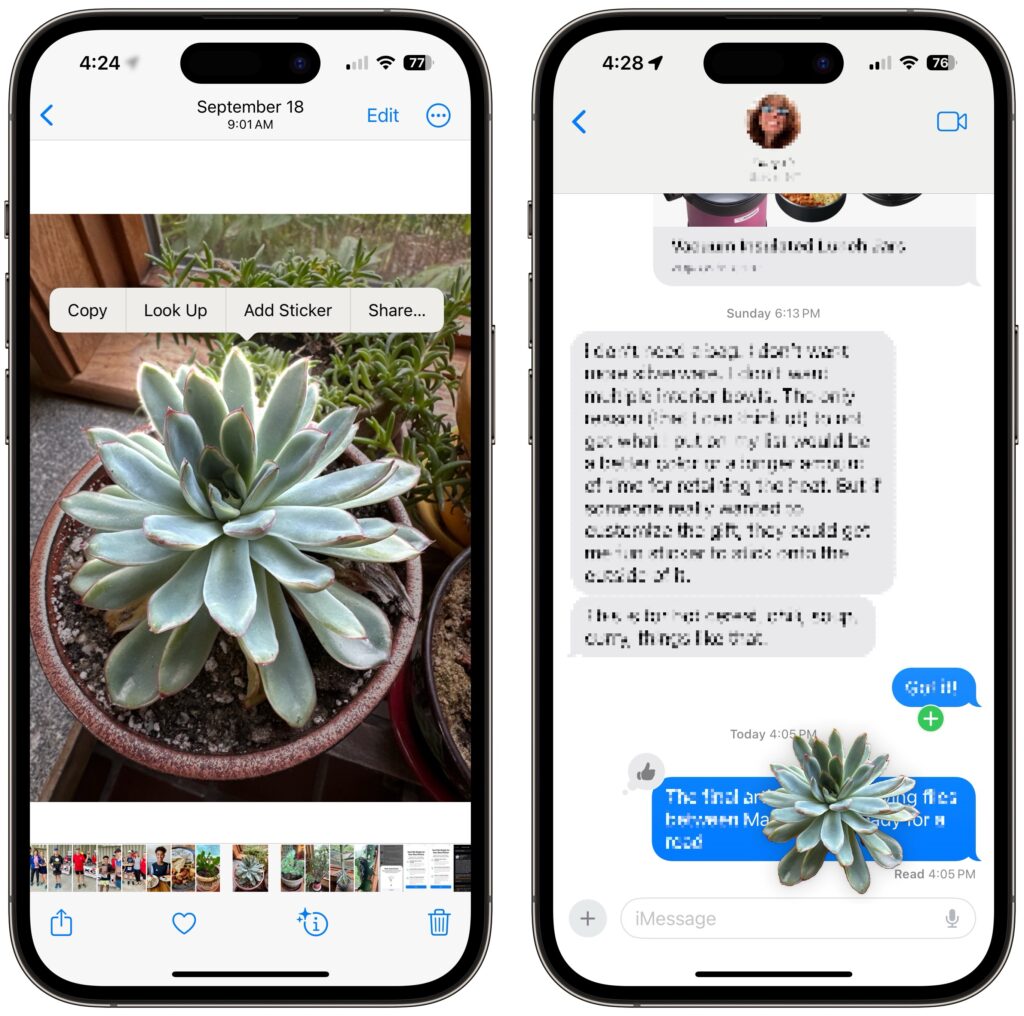
(Featured image by Adam Engst)
Social Media: Starting with iOS 16, Apple made it possible to extract objects from photos. You can drag objects to other apps, copy them, turn them into stickers, and more.
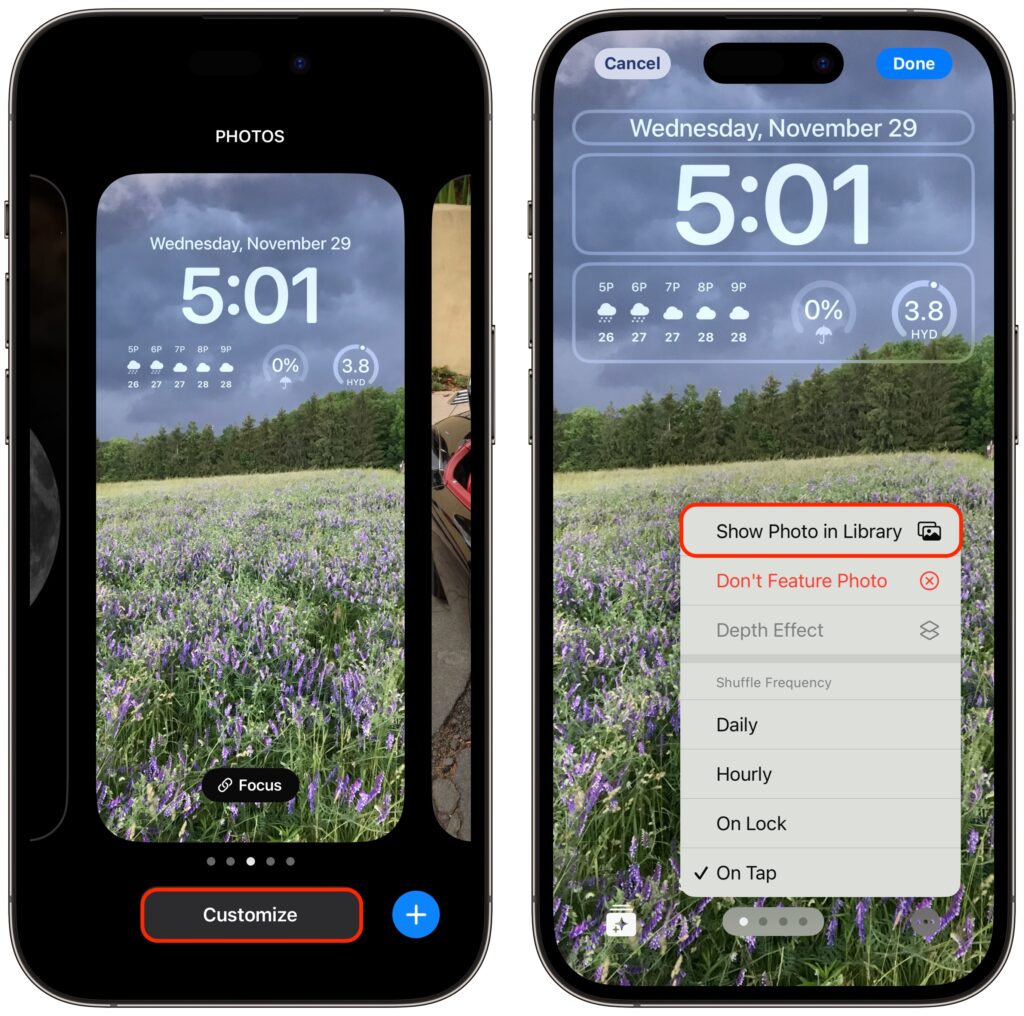
iOS’s Photo Shuffle wallpaper does a great job of identifying attractive photos for your Lock Screen. However, if you’re like us, you’ll sometimes wonder when or where you took a Lock Screen photo. Here’s how to figure that out. Touch and hold the Lock Screen when it’s displaying the photo in question, tap Customize, tap the Lock Screen wallpaper, tap the ••• button in the lower-right corner, and tap Show Photo in Library. Then you can swipe up to reveal more information about the photo, swipe left and right to see the photos on either side, or pinch to see it in the context of your entire photo library.
(Featured image by Apple)
Social Media: Do you sometimes wonder when or where you took a photo that iOS’s Photo Shuffle wallpaper is displaying on your Lock Screen? Us too, and here’s how to find out more.
We’ve recently heard from people who have been embarrassed when they gave their iPhone to someone to swipe through some innocuous photos of a vacation, only to have the person swipe too far and end up at some NSFW (not safe for work) images. Ouch.
Embarrassment might be low on the list of problems such photos could cause. It’s not hard to imagine a male supervisor innocently sharing photos with a female employee but ending up embroiled in a sexual harassment situation if she were to stumble across the kinds of NSFW photos that regularly land politicians in hot water.
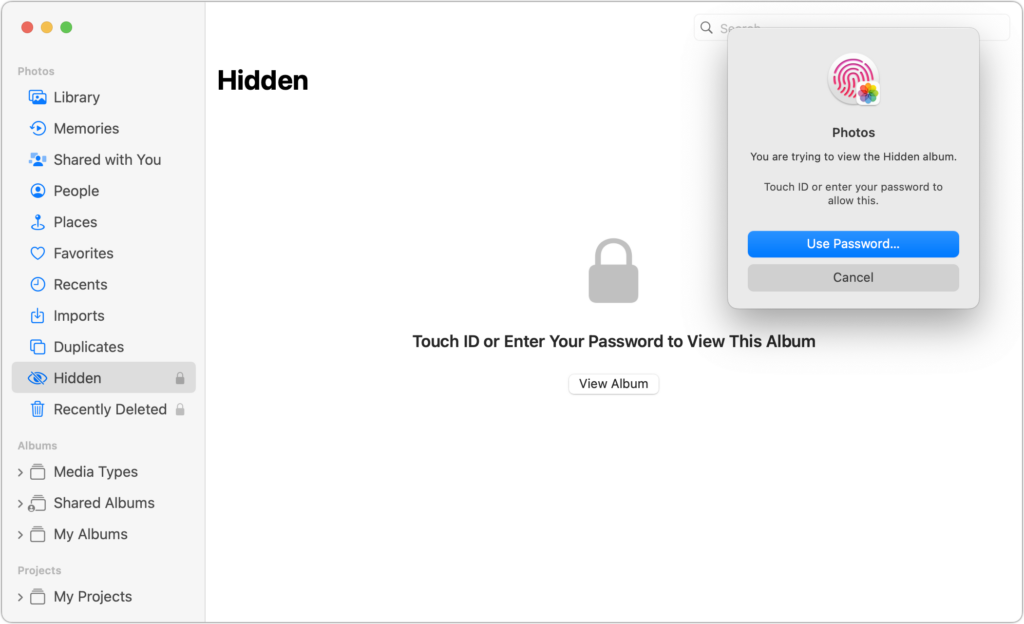
It’s safest to avoid taking NSFW photos to start, especially if the iPhone is a work-managed device. If that’s unrealistic, we recommend deleting any NSFW images from the iPhone as soon as feasible. A third option may be the best solution in the modern world—the Hidden album Apple provides in the Photos app on the iPhone, iPad, and Mac. On the iPhone and iPad, you’ll find it with other albums in the Utilities collection. On the Mac, it appears in the sidebar under Photos. (If you don’t see it, you may have hidden it—we explain how to unhide it below.)
![]()
There are four essential things to know about the Hidden album:
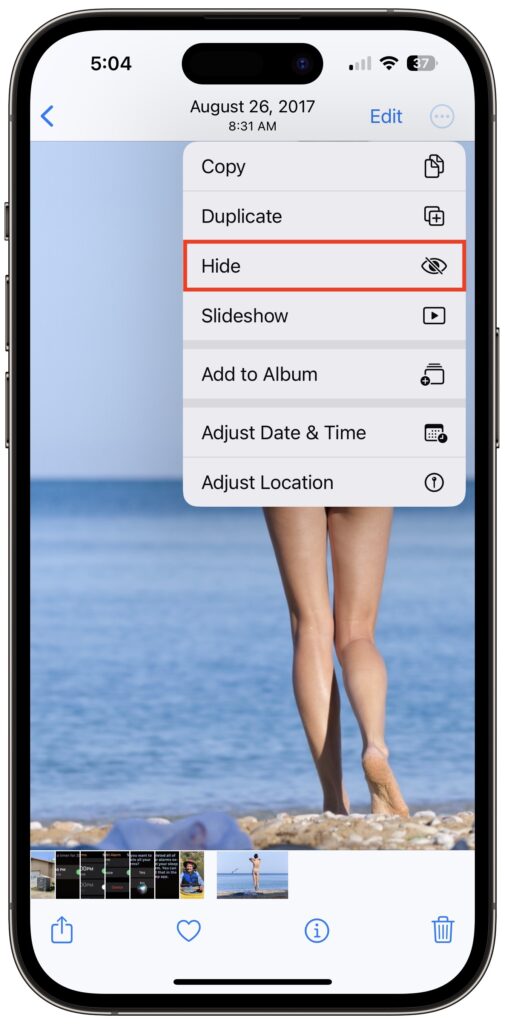
Overall, the Hidden album is a welcome feature, and if you have any photos that could embarrass you if someone were to stumble across them, put them in the Hidden album and turn on the biometric protection.
(Featured image based on an original by iStock.com/AlexZabusik)
Social Media: Although it’s safest to keep all NSFW images off your iPhone entirely, if you have photos that could be embarrassing or legally troublesome if the wrong person were to stumble across them, protect them using the Hidden album in Photos.

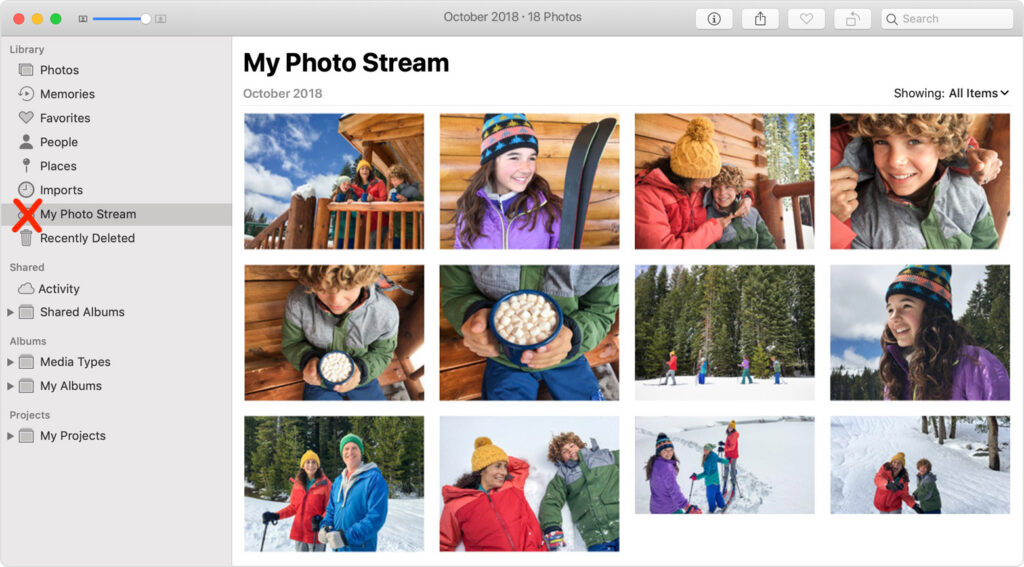
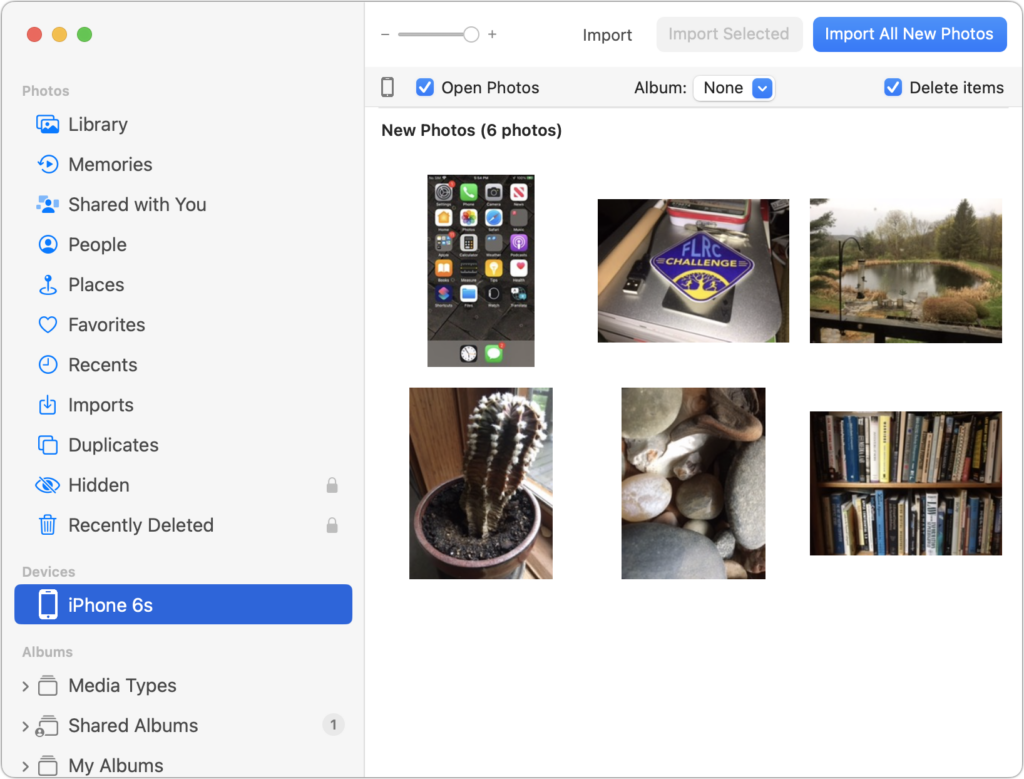
Apple has quietly announced that it is shutting down the My Photo Stream service, the company’s first iCloud-based effort at helping users sync photos between devices. My Photo Stream had numerous limitations but was free and didn’t count against iCloud storage quotas. If you’re still using My Photo Stream, note that photos will stop uploading as of June 26, and all My Photo Stream photos will be removed from iCloud on July 26; they’ll remain on your individual devices. Apple is encouraging all remaining My Photo Stream users to switch to iCloud Photos, which is more capable in every way but might require you to pay for additional iCloud+ storage to hold your photo library. Those who don’t want their photos in the cloud might check out Mylio Photos+. Contact us if you need assistance migrating to iCloud Photos or ensuring all your various photos are backed up securely.
(Featured image by iStock.com/mpiokpee)
Social Media: Still using My Photo Stream to sync photos between your Apple devices? Apple is shutting down the service in late June, and the path of least resistance is to switch to iCloud Photos, though that might require an iCloud+ subscription.

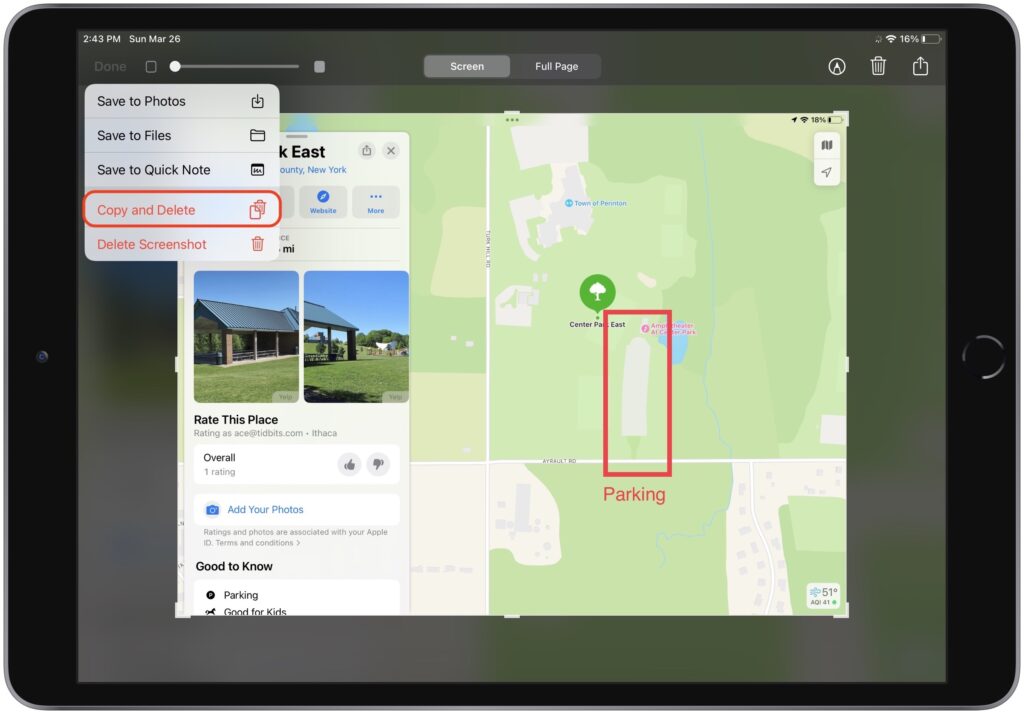
By default, when you take a screenshot (instructions for iPhone and iPad), it saves to Photos. But what if you don’t want something like a quick image of a map for a friend to clutter your Photos library? In iOS 16 and iPadOS 16, Apple has added new options. When you tap the screenshot thumbnail that appears briefly after pressing the capture buttons, you can crop and mark up your image. Or not. The key is that when you’re ready, tap Done to get an option to Copy and Delete, which is great when all you want to do is paste the screenshot into a Messages conversation or Mail message. You can also save to Photos, Files, or Notes, or just trash the screenshot if you’ve changed your mind.
(Featured image by iStock.com/simona flamigni)
Social Media: Do you take temporary screenshots on your iPhone or iPad so you can message what your screen looks like to a friend? If you don’t want these images saved in Photos, read on for a tip about how to move them to the clipboard for pasting instead.

If your iPhone were to be stolen or suffer an unfortunate accident, would you lose all your precious photos? Those using iCloud Photos are probably shaking their heads smugly, thinking that all those baby and vacation photos are backed up securely in iCloud. iCloud Photos does indeed store a copy of all your photos, but you shouldn’t assume that everything in it is completely protected. Although it’s extremely unlikely that Apple’s systems would fail so that you’d lose anything, the contents of your iCloud account aren’t as safe as would be ideal.
Recently, Wall Street Journal reporters Joanna Stern and Nicole Nguyen covered a troubling form of crime aimed at iPhone users in an article (paywalled) and accompanying video. Thieves hang out in bars, looking for users who tap in their passcodes instead of using Face ID or Touch ID. Once they’ve learned someone’s passcode with surreptitious shoulder surfing, they grab the iPhone and run. As soon as they’re clear, they use the passcode to change the user’s Apple ID password and enable or reset a recovery key, which prevents the user from employing Find My to locate and lock the iPhone. Worse, with the passcode, they can make purchases with Apple Pay, access all passwords in iCloud Keychain, and use other information on the iPhone to facilitate identity theft. It’s a disaster.
But it gets worse, as the reporters detail in a new Wall Street Journal article (paywalled) and video. By enabling a recovery key, the thief disables Apple’s normal account recovery process for resetting the Apple ID password. In other words, if this were to happen to you, along with all the financial losses and headaches, you would lose access to your iCloud account, possibly forever, and with it, all your photos in iCloud. With luck, Apple will block this attack soon.
For now, follow this commonsense advice to reduce the chances of being victimized:
As with so many other modern ills, good backups go a long way toward minimizing the pain of problems. They won’t prevent someone from stealing your iPhone or locking you out of your account, but if that were to happen, at least you won’t lose all your photos!
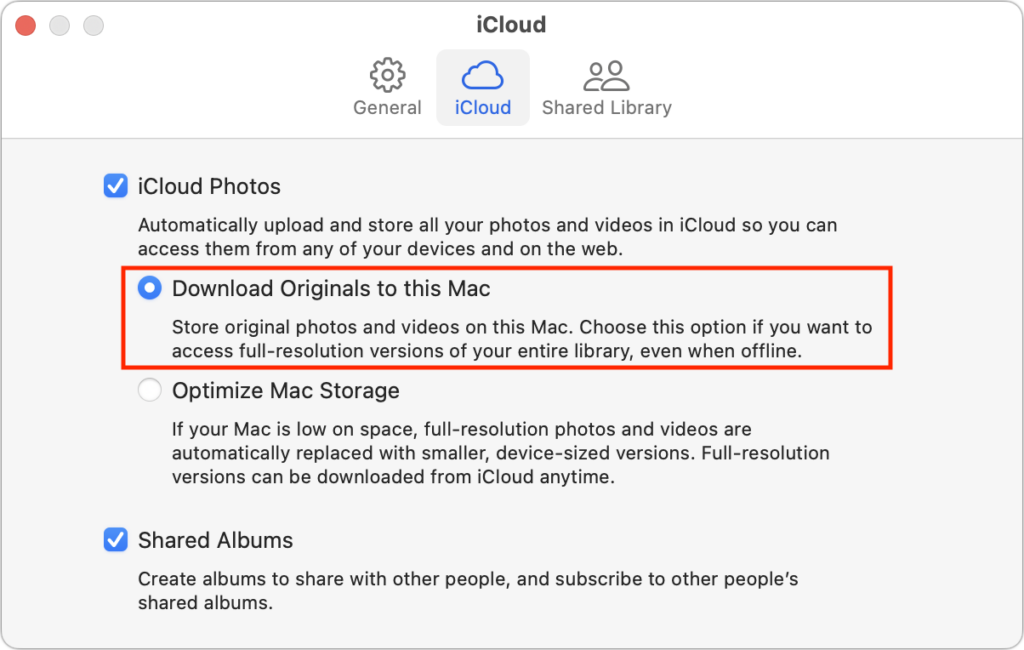
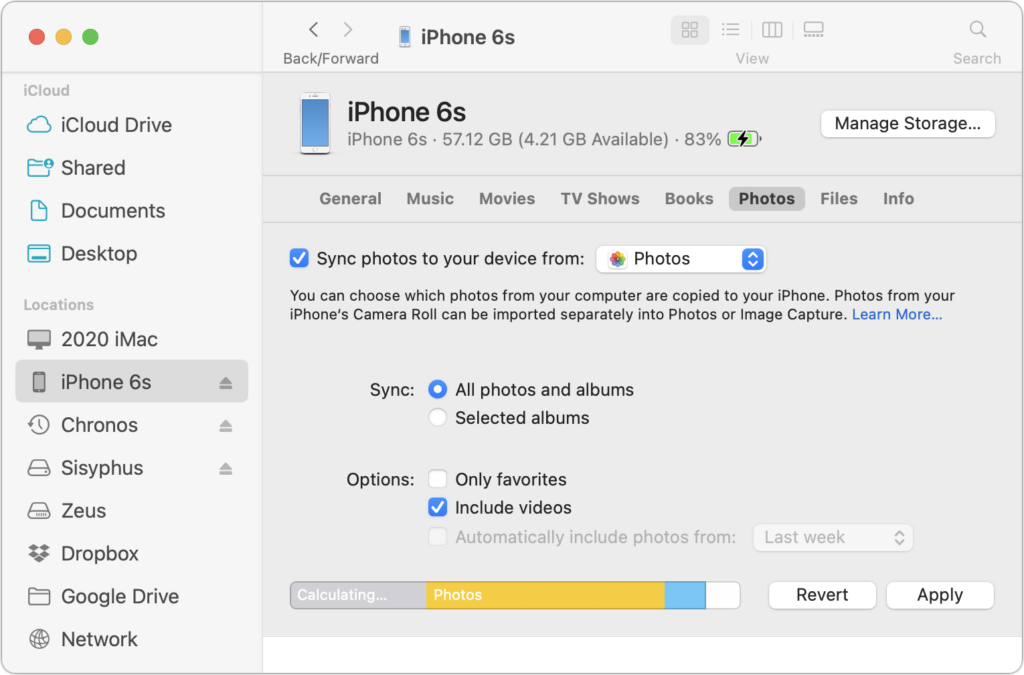
There are two possible backup scenarios. Using iCloud Photos and downloading originals to your Mac is easiest but requires that you pay Apple for more storage if you have more than a handful of photos. If you don’t use iCloud Photos, you can just back up your iPhone to your Mac or, better yet, import images into Photos on the Mac and then sync them back. It’s more work and fussier, but doesn’t cost anything.
Either way, once the photos are on your Mac, you should back up all your data using Time Machine, an Internet service like Backblaze, or a third-party app like Carbon Copy Cloner or SuperDuper. If you’re concerned about the quality of your backups for preserving photos, contact us for advice.
(Featured image by iStock.com/metamorworks)
Social Media: With new reports of iPhone theft victims being locked out of their iCloud accounts, it’s all the more important that you copy your iPhone photos to a Mac and then back up that Mac.

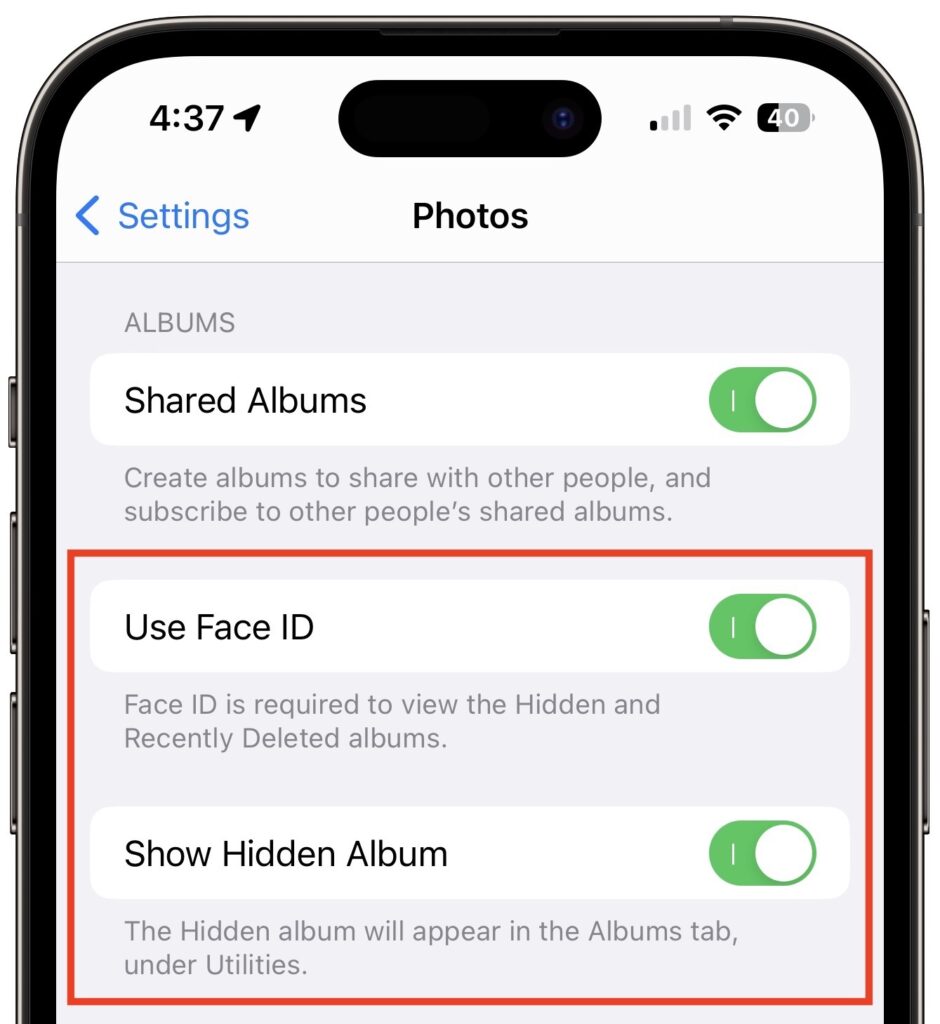
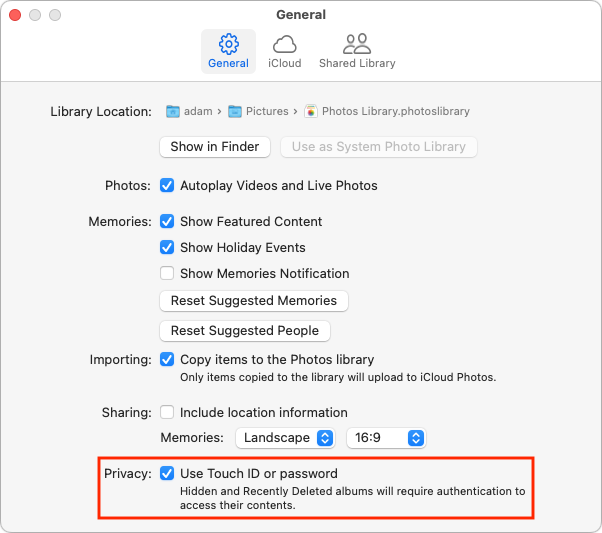
Photos has long provided a hidden album you could use to hold images you wanted to keep a little more private. Until this year, however, it was security through obscurity: anyone who knew to reveal the album in Settings > Photos on an iPhone or iPad or by choosing View > Show Hidden Album on the Mac could see its contents. Now you can protect it—and the Recently Deleted album—with Face ID or Touch ID on an iPhone or iPad, or Touch ID or your password on a Mac. You can enable this feature in iOS 16 or iPadOS 16 using Settings > Photos > Use Face ID/Touch ID; in macOS 13 Ventura, choose Photos > Settings > General and select “Use Touch ID or password.” From then on, opening those albums will require authentication.
(Featured image by iStock.com/Kenishirotie)